
Hello Stampin’ Friends,
I hope you had a chance to get outside and enjoy the beautiful weekend we had!! I actually got to hang my clothes on the line for the first time this year! I just love that smell.
Today I am going to share with you the technique my Technique Clubs did this month – the “Faux Pinwheel” technique.
Normally I don’t share these cards on my blog, as the are “exclusive” to my club members (a benefit of being in my club) but today I’m sharing because I want to invite you to join one of my Stampin’ Technique Clubs when we begin again in fall.
We create a minimum of 1 card and a 6 x 6 technique sheet, but normally we do 2 full cards and our technique sheet. Minimum order depends on the amount of people in the club… no other fee’s required!! So … your class instruction is FREE, and everything is prepared for you… just stamp!
I’ve hosted groups as small a 6, and up to 12! We don’t get any larger than 12 because each club member will receive the hostess benefits of free stamping merchandise at least once!! Gather your friends and let’s stamp!! Leave me a message if you are interested.

My first card was done with the Watercolor Wonder Designer Series paper. The color pallet used is Whisper White, Tangerine Tango and Crisp Cantaloupe. We created some added dimension with the Perfect Polka Dots embossing folder. The cute little flower in the center was created with the Gingham Garden Washi Tape and the Boho Blossom punch.
You’ll Need to cut:
* Two … 2-5/8″ squares (Line between 2-1/2″ & 2-3/4″)
* Eight… 1-1/4″ squares (cut or punch) Can use cardstock or Designer paper / Cut 4 each
Directions:
1) Start with one 2-5/8″ square and put the corners to top/ bottom / sides so it looks like a diamond. Use the lines on your grid paper to align your pieces.
2) Adhere the second 2-5/8″ square over the top, creating a Star of David shape. Keep adhesive to a small square in the center.
3) On the first 1-1/4″ square: Only put adhesive (on the right side) so you can tuck the last square one underneath it.
* Leave a little area showing when adhering your squares so it appears like you’ve added a mat.
4) Alternating designs, you can now adhere the rest of your squares to the main piece.
5) When you get to the last one, you will need to lift up the edge of the first square and tuck the last one under it, then add adhesive to the corner of the first one to secure it.
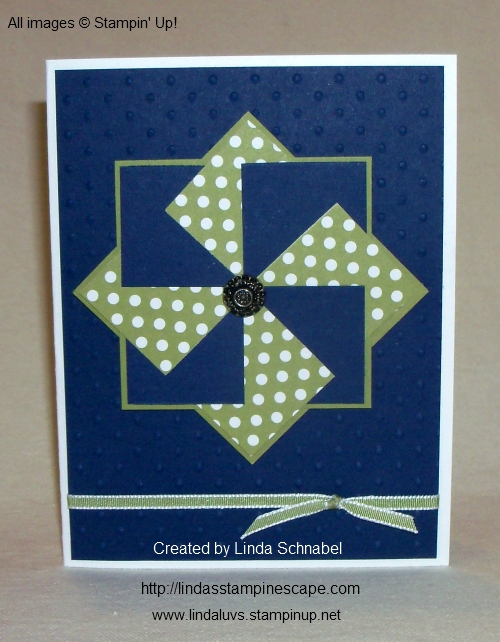
My second card used the Polka Dot Parade Designer paper with a Whisper White, Night of Navy and Old Olive color pallet. The Pinwheel center is one of the beautiful Antique Brads. I finished off the card with the 1/8″ Old Olive Taffeta Ribbon.
Here is a sample of our technique sheets … the are normally done on one sheet, but we also had a sample of our pinwheel, so the instructions needed to go on another sheet.

Besides Technique Clubs, I also host scrapbooking and cardmaking clubs… but the technique club is my most popular. Let me know if you are interested in joining us this fall… it’s going to be a very special year – I’m celebrating 15 years with Stampin’ Up! The entire year will be filled with fun and surprises!!
I have posted the ingredients for you below. Click on any of the images for more information or to being shopping.
Thanks for stopping in!
Have a wonderful week.


