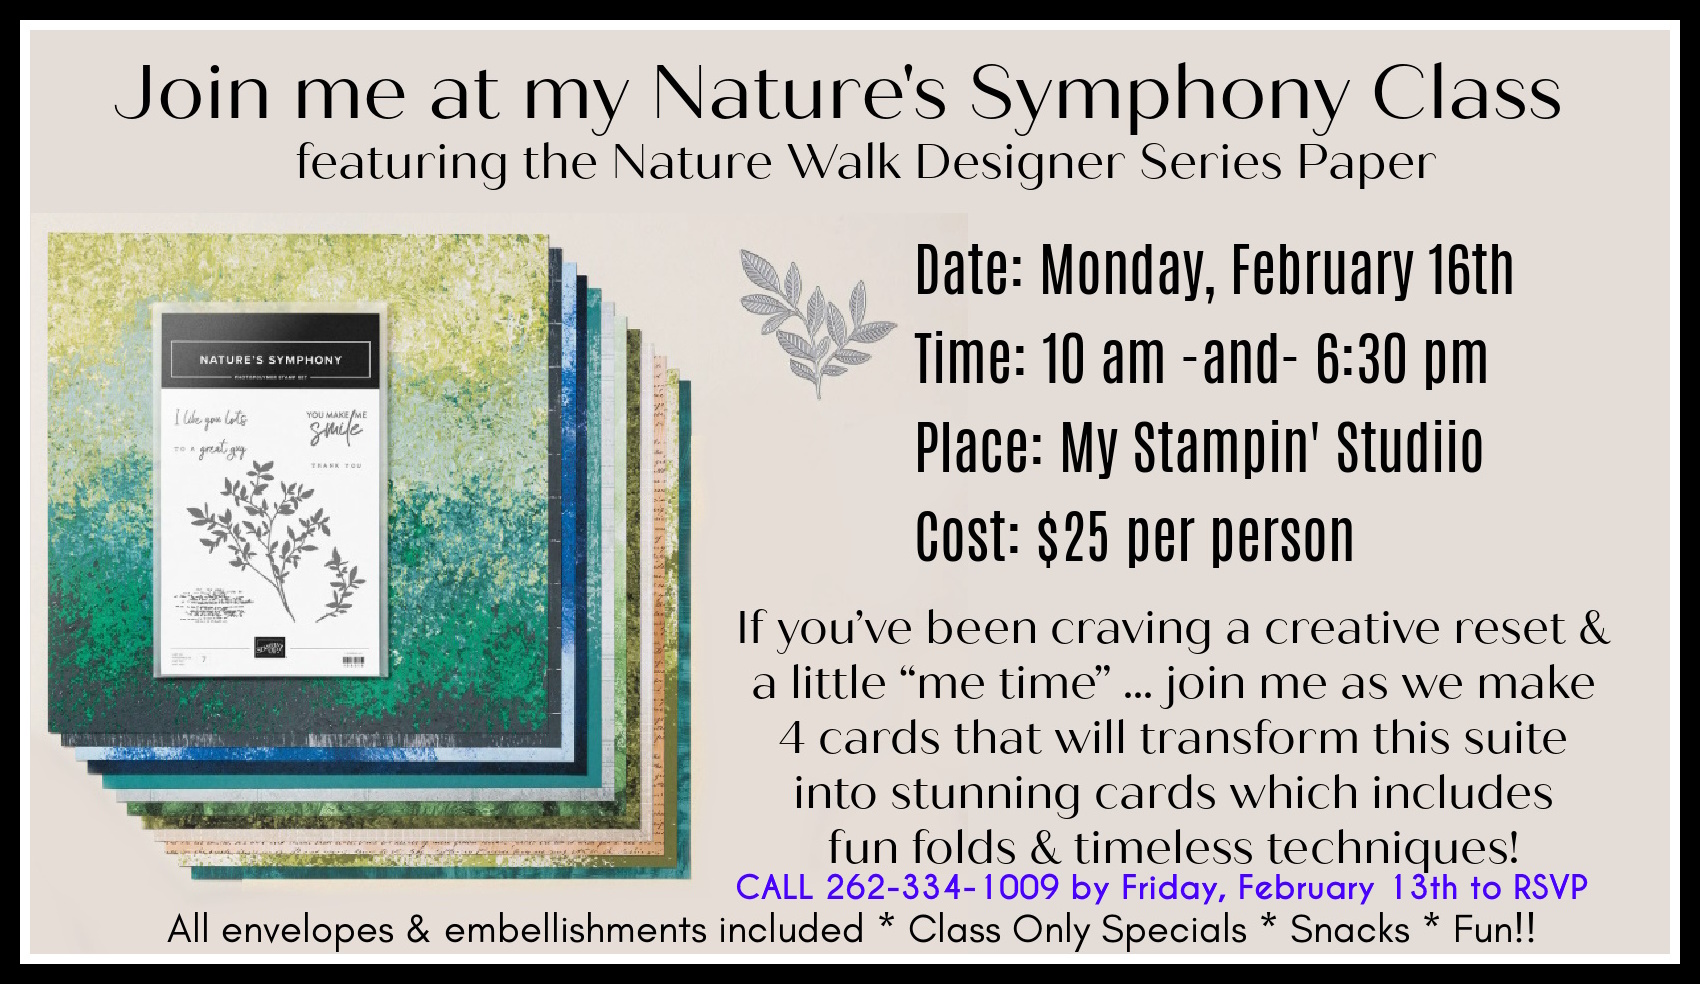
If you’ve been craving a creative reset or a little “me time”… my Nature’s Symphony Class is exactly what you need. We’re taking the gorgeous Nature’s Symphony suite goodies and transforming them into 4 stunning cards!
You’ll be learning how to create impact with smart layouts, elegant details, and techniques you’ll use again and again. The Nature’s Symphony Bundle was designed for year-round crafting, with versatile sentiments and leafy images that feel timeless.
I love helping you get more out of what you already own, I’m designing these projects so you’ll walk away with layouts you can repeat, tweak, and use with other paper packs and stamps in your stash. That’s the real magic—new inspiration + skills you’ll actually keep using.
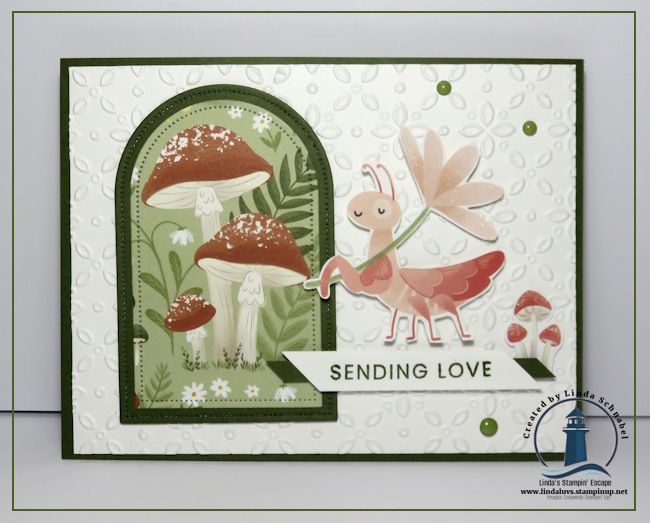
If you stopped by recently, you may remember the sweet mushroom card I shared using the Cute as a Bug Designer Series Paper—and today I’m back with something just as adorable, but with a little extra surprise! This time, we’re giving this cheerful paper a fun fold moment, and I think you’re going to love how playful and interactive it is. The bright colors, happy bugs, and garden-inspired patterns make this paper such a joy to work with, and it truly shines when paired with a fold that adds movement and dimension.
For today’s card, I leaned into the whimsy of the paper and let those darling images do the talking. From the smiling bee and butterfly to the lush leaves and berries, every layer adds to the charm without feeling fussy or overdone. The fun fold design gives this card a little “wow” when it’s opened, yet it’s still simple enough to recreate—perfect for when you want something special without a lot of extra steps.
In this replay of my Facebook LIVE, you’ll see step-by-step both cards—the mushroom card you saw earlier and today’s fun fold—complete with measurements and tips along the way. This video makes it easy to see how quickly these cards come together, and how I used the components of the designer paper sheet.
If these cards made you smile, it might be time to add the Cute as a Bug Designer Series Paper to your craft stash. This paper is a creativity booster—perfect for quick cards, playful folds, and designs that truly let the paper do the work. Pair it with what you already have, or treat yourself to something new, and you’ll be creating cheerful cards in no time.
If you have questions, want help placing an order, or would love to see this paper featured in an upcoming class, just reach out—I’m always happy to help!
I truly appreciate you taking time out of your day to visit, watch the video, and share in a little creative inspiration with me. My stamping friends are the heart of everything I do, and it brings me so much joy to create and share ideas with you.
Until next time, happy stamping—and I hope your craft space is filled with smiles, color, and a few cute little bugs … the paper kind!! lol 💖 Thanks so much for stopping by!
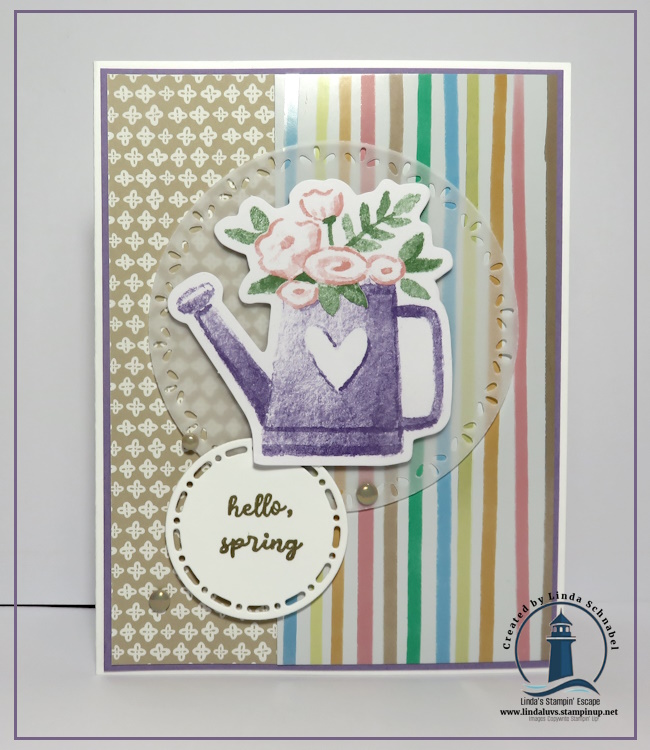
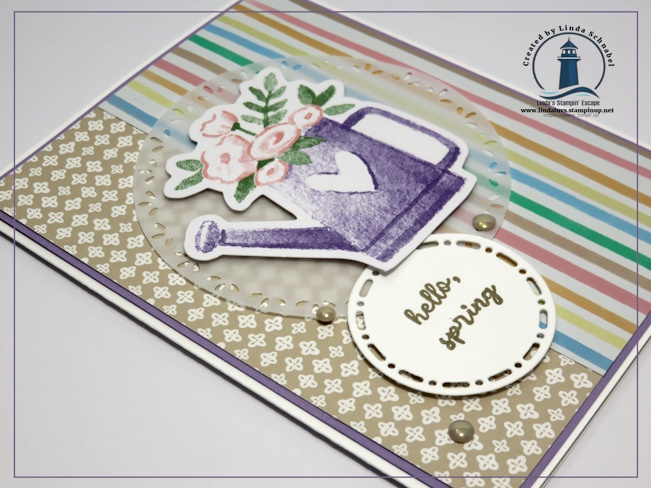
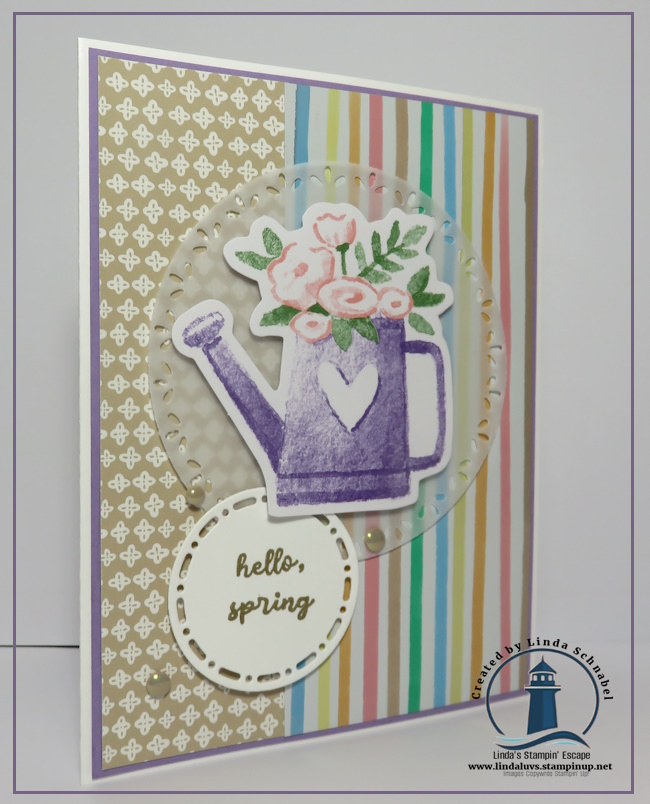
On Sunday, I shared a sweet little bunny card created with the Easter Time Mix & Match Ephemera Pack, and today I’m back with another simple, spring-inspired design—this time featuring the charming watering can. I love how this pack makes it so easy to create beautiful cards without overthinking every detail. The soft pastels, playful spring imagery, and ready-to-use pieces truly let the ephemera do the work for you, which makes crafting feel relaxing and joyful… just the way it should be.
For today’s card, I paired the watering can ephemera with coordinating patterned paper that instantly says spring is here. The vertical stripes add a cheerful pop of color, while the softer patterned panel balances everything out beautifully. The watering can—filled with delicate spring blooms—becomes the perfect focal point, layered over a subtle die-cut circle for a bit of texture and dimension. A simple “hello, spring” greeting finishes the card without taking away from the artwork, making this a lovely design for birthdays, happy mail, or just because.
I’m sharing the replay of my LIVE demonstration / a step-by-step video that walks you through both cards—the bunny card from Sunday and today’s watering can card. In the video, I share all the measurements, layering tips, and simple tricks I use so you can confidently recreate these designs or use them as inspiration for your own spring cards. Whether you’re brand new to cardmaking or just looking for something quick and stress-free, this project is a great reminder that beautiful cards don’t have to be complicated.
I hope you enjoy today’s card as much as I enjoyed creating it. I hope you enjoyed the video … soaking in the inspiration, and most of all—have fun crafting.
Thanks so much for stopping by and spending your time with me. 💕
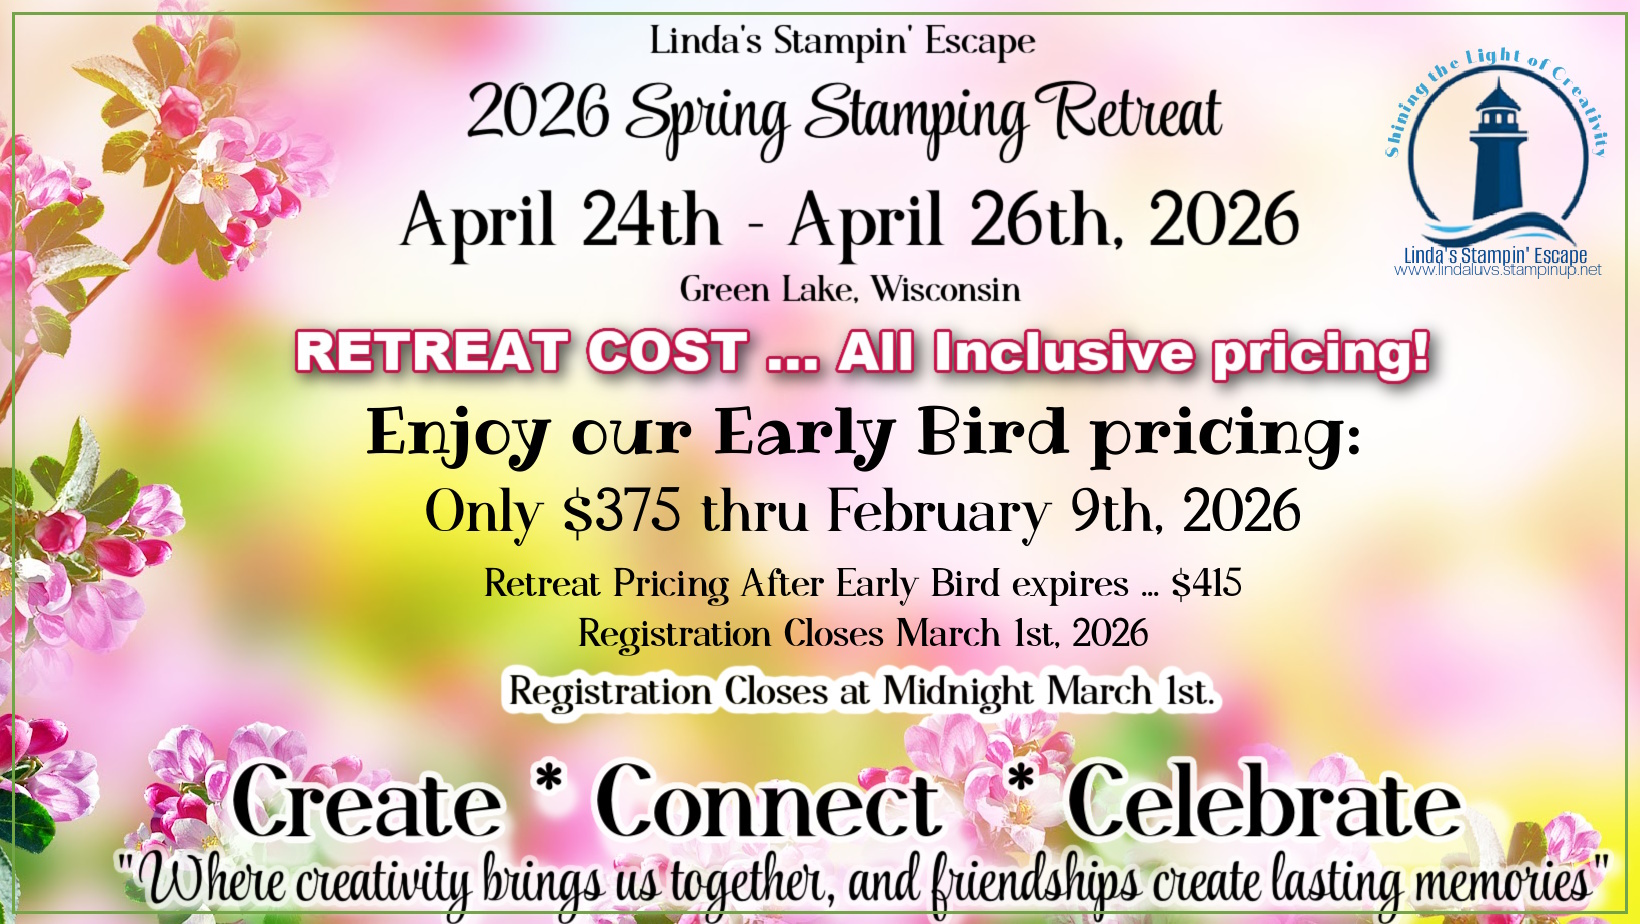
If you’ve been craving time to create, breathe, and truly recharge, my Spring Stamping Retreat was created with you in mind. Yesterday I shared the invitation to this all-inclusive, in-person retreat—a place where creativity flows freely, your sanity gets a much-needed refresh, and you leave feeling relaxed, inspired, and filled with memories you’ll carry long after the weekend ends. Today, I want to show you how that retreat experience comes to life at the stamp table through one of the projects you could expect to create and explore together.
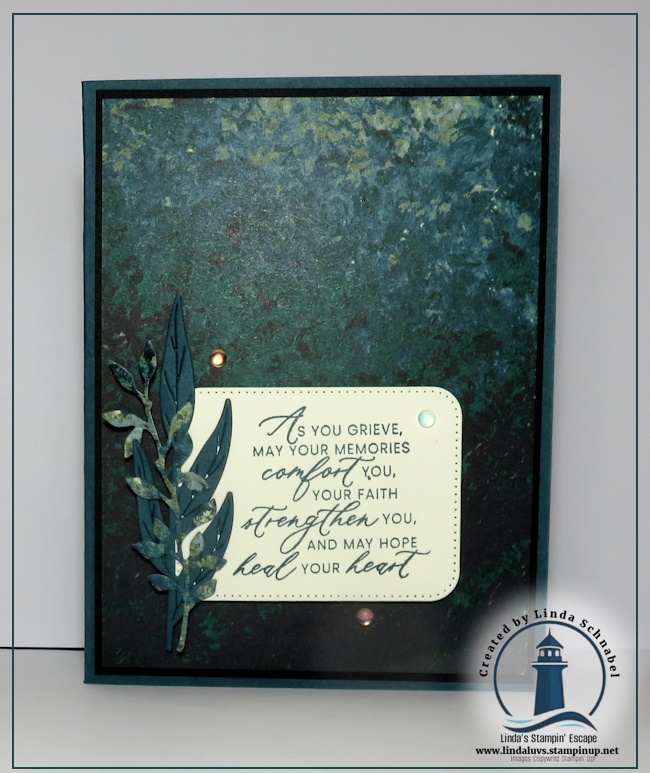
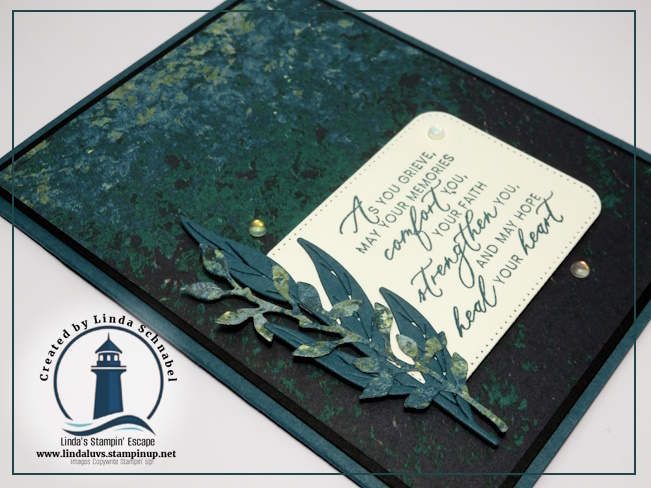
This card, created with the Nature Walk Designer Series Paper, is a perfect example of how inspiration, technique, and thoughtful design come together—something I intentionally build into every retreat experience. We begin with an A2 card base using Pretty Peacock cardstock, cut to 8 1/2″ x 5 1/2″ and scored at 4 1/4″. A layer of Basic Black cardstock, cut to 4″ x 5 1/4″, frames the designer paper and immediately draws the eye inward. The distressed pattern I chose from the Nature Walk collection reminds me of a painted canvas—rich, textured, and quietly powerful. It’s the kind of paper that works beautifully for nature-inspired designs, masculine cards, and sympathy cards like today’s project, making it an incredibly versatile addition to your crafting collection.
At this stage, the greeting naturally becomes the focal point of the card, allowing the sentiment to speak from the heart. I used the Prayers & Promises stamp set, stamping the greeting in Pretty Peacock ink to create harmony across the design. To soften and balance the layout, I added layered leaves cut from both Pretty Peacock cardstock and the Nature Walk Designer Series Paper. This combination adds depth and visual interest while keeping the card elegant and meaningful—exactly the kind of thoughtful design approach we focus on during retreat classes as we explore new fun folds and techniques together.
And let’s talk embellishments for a moment—because sometimes it’s the smallest details that bring everything to life. The Holographic Resin Dots were the perfect finishing touch. I love how they subtly catch the light and reflect the colors of the card, almost like magic. These little accents add just enough sparkle without overpowering the sentiment, a design tip I love sharing during retreat sessions when we talk about balance and intention in cardmaking.
This is what my stamping retreats are really about—you. They’re about creating together, learning together, and giving ourselves permission to pause and enjoy something that fills our hearts. If this card inspires you, imagine an entire weekend built around that feeling. I would love nothing more than to share that experience with you at my Spring Stamping Retreat. Reach out to save your spot, and be sure to take a closer look at the Nature Walk Designer Series Paper and Prayers & Promises stamp set—products chosen with you in mind and perfect for creating cards that matter. 💙
Thank you for being the heart of this stamping community—your creativity, your friendship, and your love for cardmaking continue to inspire me! Till next time ~
I’m excited to invite you to an amazing event … My Spring Stamping Retreat!! It fills more than your craft bag, it’s a creative getaway for your heart, hands and soul.
Take a deep breath… Imagine a weekend where time slows down, your shoulders relax, and creativity flows without interruption. You’ll feel the shift almost immediately, as you step into our beautiful retreat home overlooking the lake … the noise of everyday life begins to fade.
You’ll feel welcomed, seen, and cared for — because this retreat is designed for you, not a crowd. You’ll feel that sense of belonging that comes from being surrounded by people who understand your love of stamping, paper, color, and creativity. And you’ll think to yourself: “This is exactly what I needed.”
There’s something incredibly healing about stepping away from everyday life and spending time doing what you love — surrounded by people who truly get you.
That’s the heart of my Spring Stamping Retreat — a beautiful, in-person getaway where creativity flows, friendships deepen, and you finally have the space to relax, recharge, and feel like yourself again.
Every detail of this retreat is intentionally designed to help you leave feeling refreshed, inspired, and genuinely happy you said yes. And when you return home? That joy follows you — right back to your craft table. 💗 If this sounds like what your heart has been whispering for, I’d love for you to join us.
Early Bird perks are available for a limited time….
Here’s the truth — weekends like this don’t come along often. Our retreat house is intentionally intimate, the experience is thoughtfully curated, and once the spots are filled, there’s no adding more.
If you’ve been waiting for the right time to treat yourself… If your heart has been whispering, “I need this.” If you’re craving creativity, connection, and calm — this is your moment.
✨ Early Bird perks are available now, and they’re my way of saying thank you for saying yes early. But more than that, this is your invitation to put yourself on the calendar.
I would absolutely love to share this retreat with you — to laugh, create, and make memories together in one of the most beautiful settings imaginable.
💗 Don’t wait until the house is full and wish you had joined us. Your spot is waiting!
If you’re craving a little creative time that feels easy, joyful, and totally stress-free, you’re going to love today’s Simply Sunday card. 🌸 This project highlights the Easter Time Mix & Match Ephemera Pack, and it truly is as quick as a bunny’s hop to put together. If your craft table has been calling your name—or if you just need a moment of calm—this is the perfect place to start.
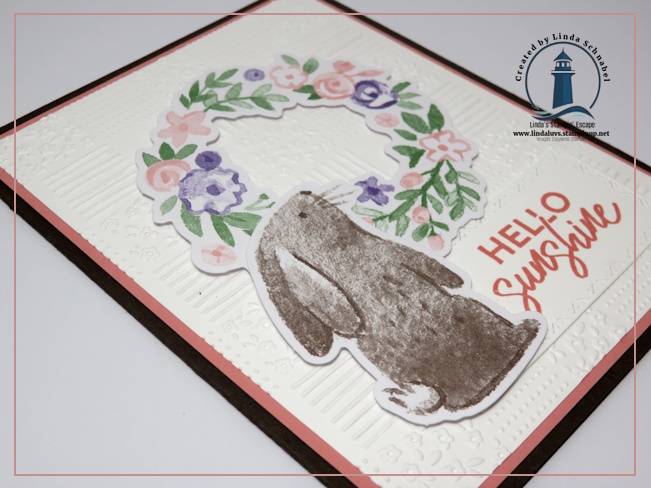
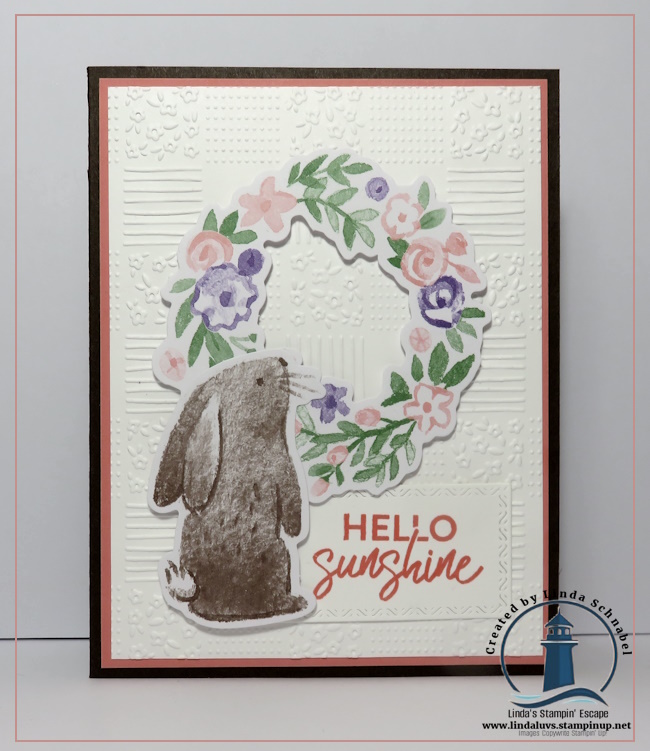
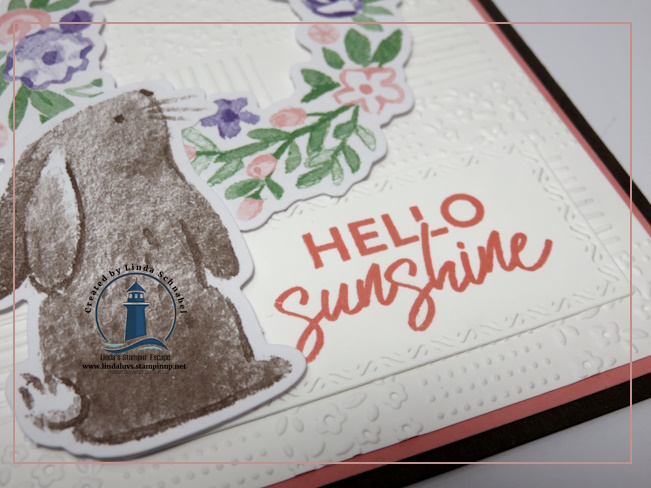
Springtime creativity comes to life with the Easter Time Mix & Match Ephemera Pack, filled with soft pastel colors and charming imagery that instantly makes you smile. Tulips, sweet bunnies, floral wreaths, classic wicker Easter baskets, and blooming water cans make mixing and matching effortless. For today’s card, I chose one of the floral wreath and an adorable bunny, letting the ephemera do all the heavy lifting while still creating a card that feels thoughtful and handcrafted.
To add texture and visual interest, I used the All in a Row Embossing Folder, which is a favorite when I want subtle structure without overwhelming the design. The beautifully embossed grid pattern includes florals, stripes, and dots with deep texture that gives the card such a lovely tactile feel. It’s one of those details that really shines when you see it in person—and makes a simple layout feel extra special. If texture is something you love in your cards, this folder is definitely one to take a closer look at.
The layers for this card are clean and classic, creating the perfect base for our spring focal point. The A2 card base is Early Espresso, measuring 8 1/2″ x 5 1/2″ and scored at 4 1/4″. I added a Flirty Flamingo mat cut to 5 1/4″ x 4″, followed by embossed Basic White at 5 1/8″ x 4 7/8″. These simple layers frame the ephemera beautifully and allow the soft spring colors to really stand out. If you enjoy designs that are easy to recreate but still have that “wow” factor, this layout is one you’ll want to save.
Once the wreath and bunny were in place, all that was left was the greeting. I reached for the Exploring Nature Stamp Set, which is intended as a companion to the scrapbook kit—but I absolutely love using it on cards, too. These sentiment-only stamps are all about embracing adventure, soaking in the sunshine, and celebrating the great outdoors. I framed the greeting using the Textured Notes Die, which adds just the right finishing touch without stealing attention from the main elements.
This sweet little card is wonderfully versatile—it works beautifully for Easter, spring greetings, or even a birthday. That’s one of the things I love most about Mix & Match ephemera: it makes creating fast, fun, and flexible projects so easy. If this card inspired you, I’d love for you to try something similar at your own craft table and see how quickly it comes together.
Thanks so much for stopping by for today’s Simply Sunday inspiration. 💕 Be sure to leave a comment and let me know how you would use this card—and don’t forget to check out the supplies if they’ve found their way onto your wish list.
Until next time, happy stampin’ and enjoy every little moment of spring creativity!
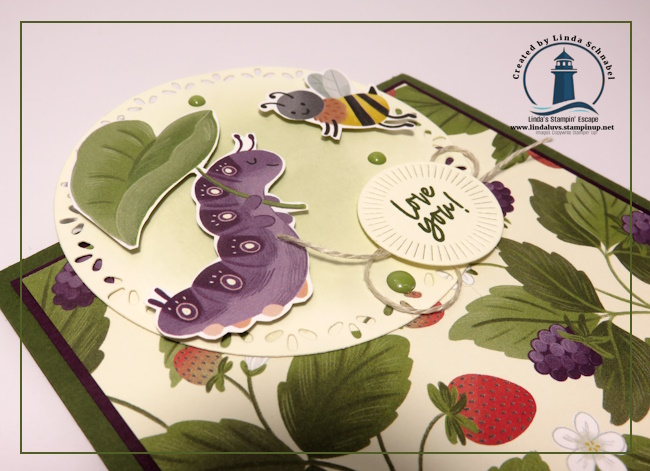
If you love cards that make you smile the moment you see them, today’s project is going to feel like a breath of fresh air. Before you scroll any further, take a moment to imagine sitting at your craft table, surrounded by cheerful colors and playful patterns, creating something that feels lighthearted and happy. That’s exactly the feeling behind today’s card, featuring the absolutely adorable Cute as a Bug Designer Series Paper—and trust me, it truly is buzzing with charm.
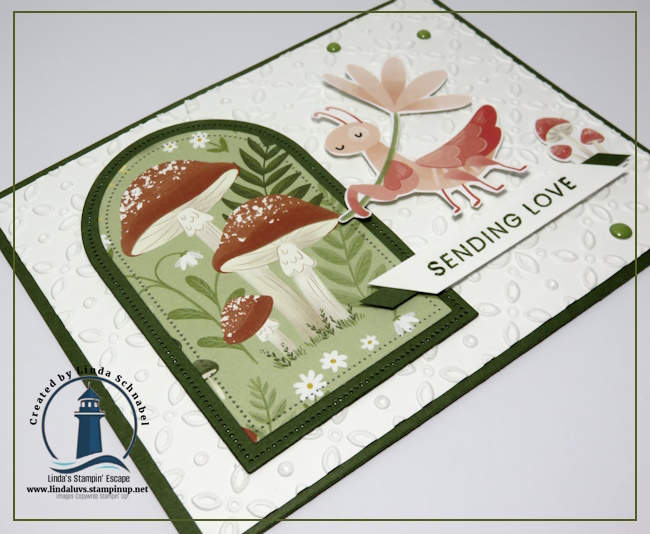
This card brings together two different patterns from the Cute as a Bug paper pack in the sweetest way. The mushroom scene immediately caught my eye, and I knew it would make the perfect focal point. I die cut it using the Everyday Arches Dies, which frames them beautifully and gives it a soft, storybook feel. There’s something about that arched shape paired with the woodland mushrooms that feels both cozy and whimsical, making it a wonderful foundation for the rest of the design.
The card base is a classic A2 size, created with Mossy Meadow cardstock (8 1/2″ x 5 1/2″, scored and folded at 4 1/4″). This rich green color grounds the design and ties in perfectly with the foliage in the designer paper. For the card front, I added a layer of Basic White cardstock, cut to 4″ x 5 1/4″ and embossed with the Eyelet 3-D Embossing Folder. The embossed background adds texture without overpowering the focal images, and the whimsical pattern pairs beautifully with the playful theme of the card.
Now let’s talk about that sweet little bug, because she truly steals the show. She was fussy cut from a second pattern in the Cute as a Bug Designer Series Paper, and I couldn’t resist placing her right beside the mushroom arch. With her daisy held high, I can’t help but wonder—do you think she’s using it as an umbrella? That tiny detail adds so much personality and makes the card feel like it’s telling a story rather than just displaying images.
To tie everything together, I also fussy cut a few small mushroom clusters from the same designer paper and tucked them around the card front and on the inside! These little accents help balance the design and bring the mushroom pattern back into the layout without overwhelming the focal point. It’s a simple detail, but one that really helps the card feel cohesive.
The greeting comes from the Prayers & Promises Stamp Set and was stamped in Mossy Meadow, keeping the sentiment soft and coordinated with the rest of the card. I love how this sentiment complements the gentle, caring feel of the design without distracting from the artwork.
To finish the card, I added a few Moody Palette Glossy Dots for just the right touch of shine. They add subtle interest and draw the eye around the card front, proving once again that a few well-placed embellishments can make all the difference.
This card is such a fun reminder of how playful designer paper can transform a simple layout into something truly special. Mixing patterns, adding texture, and fussy cutting a few charming elements creates a card that feels joyful and full of personality. If this project made you smile, I hope it inspires you to pull out your Cute as a Bug Designer Series Paper and start creating your own buzz-worthy cards. Be sure to let me know what your favorite detail is—and if you think that daisy is an umbrella too!
Thanks so much for stopping by today! I hope this sweet little card brought a smile to your face and sparked a bit of creative inspiration. Until next time, happy stampin’ and enjoy every crafty moment!
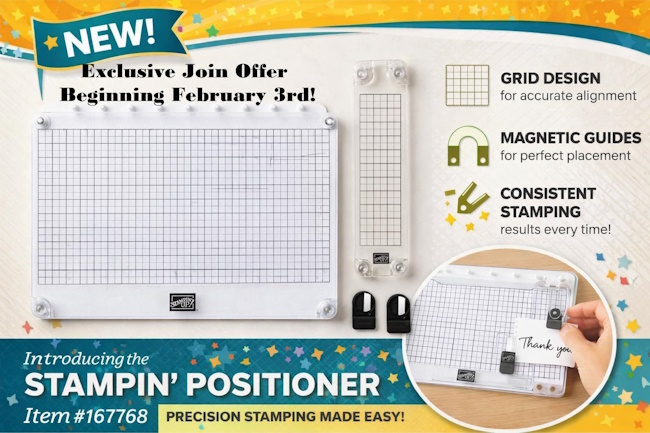
If you were with me for my LIVE on Tuesday, you may remember me teasing a little announcement—and today I’m thrilled to finally share the details!
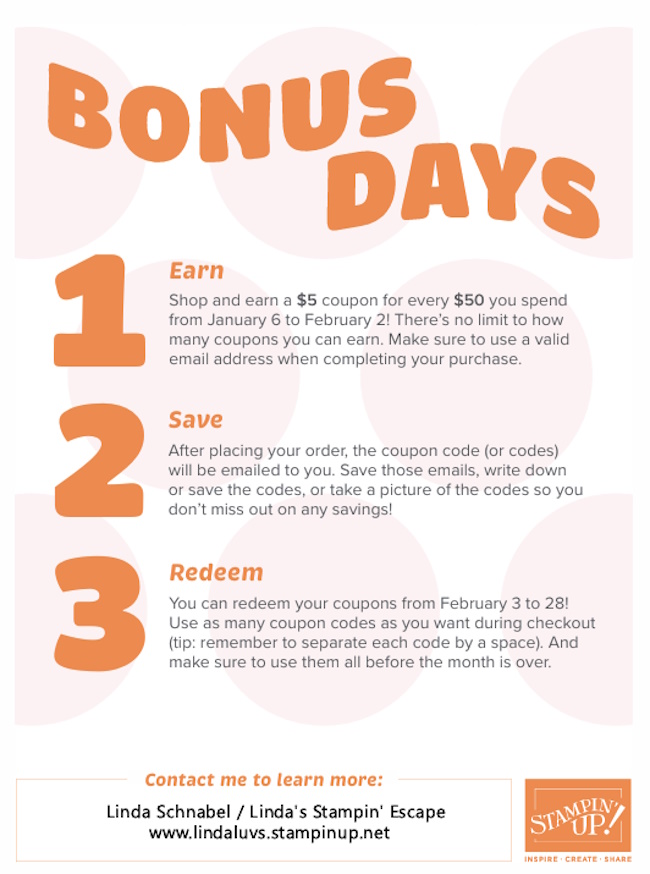
Earlier this week, Stampin’ Up! surprised demonstrators with news of a brand-new stamping tool and a special joining promotion that runs February 3–28. During this time, anyone who joins Stampin’ Up! as a demonstrator will receive a Stampin’ Positioner included FREE in their Starter Kit—before this tool is even available to customers. 🎉
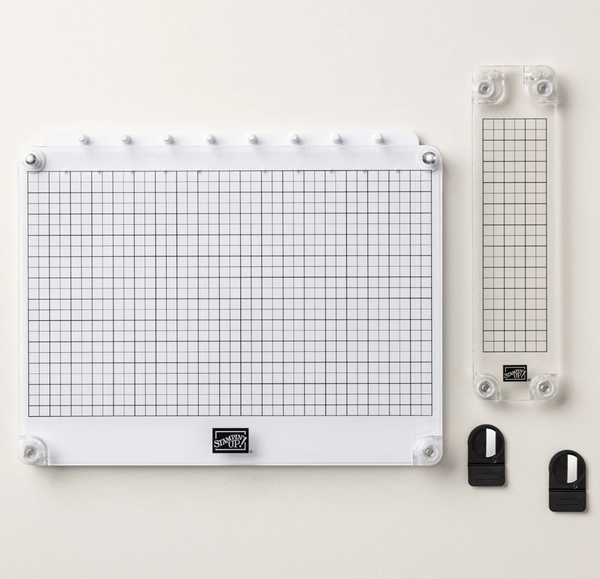
So what makes this Stampin’ Positioner so special?
Stampin’ Up! didn’t just tweak the past design—they started from scratch. The Stampin’ Positioner is a new stamping alignment tool designed to help stampers achieve better accuracy, cleaner images, and more consistent results. It’s ideal for lining up sentiments, Two-Step stamping, repeating patterns, and creating multiples of the same project without frustration.
Whether you’re a card maker, scrapbooker, or someone who loves stamping in batches, this tool is designed to make stamping easier and more enjoyable—and that’s something we can all appreciate.
If joining Stampin’ Up! has ever crossed your mind, this is one of those rare promotions worth paying attention to. For $99, you’ll choose $125 in products, enjoy ongoing demonstrator discounts, and during this promotion, receive the Stampin’ Positioner FREE in your Starter Kit.
I’ll be sharing more details, hands-on projects, and my honest thoughts once I have the tool in hand—so be sure to check back. This is one new product you’re definitely going to want to see in action!
More details are coming soon—including demos and first impressions once my Stampin’ Positioner arrives. This is one release you won’t want to miss! 🎉
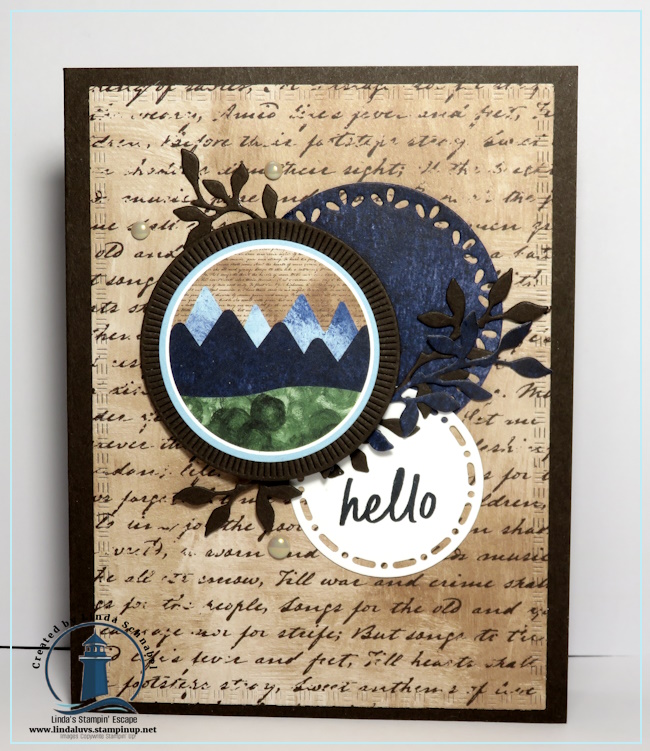
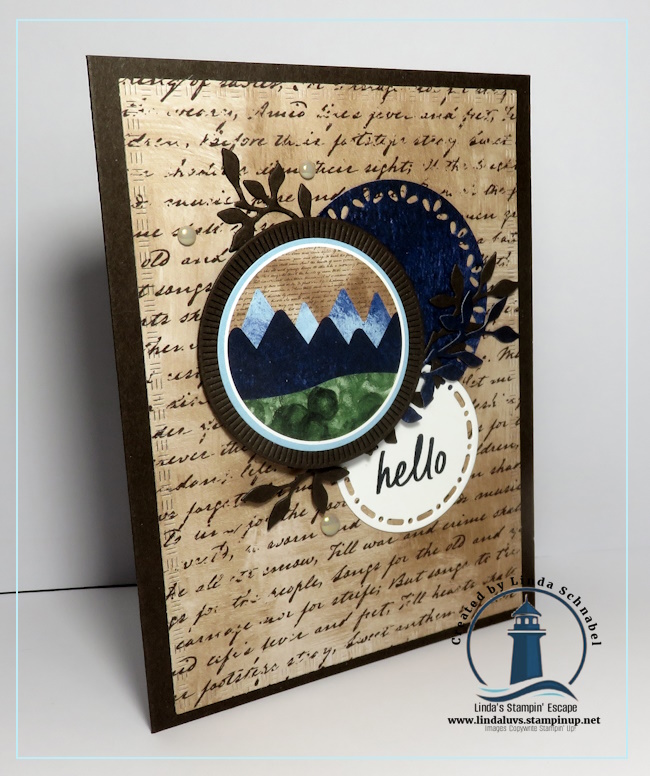
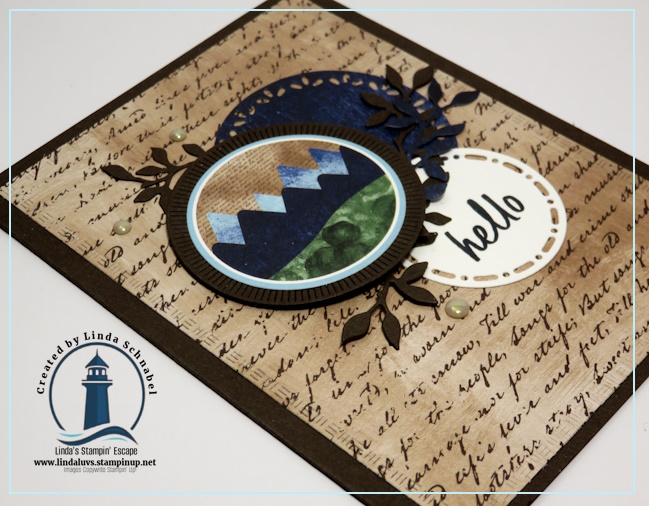
If you’re drawn to projects that feel calm, grounded, and quietly beautiful, today’s card is going to speak to you. The Nature Walk Designer Series Paper with Sticker Sheet brings such a subtle, organic touch to cardmaking, and it’s perfect for creating designs that feel inspired by nature without being busy or overwhelming. This is one of those collections that works effortlessly in the background—letting your focal point shine while still adding depth and interest. If you love cards that feel warm, earthy, and timeless, this is a paper pack you’ll want close at hand.
I started this card with an Early Espresso card base, cut to an A2 size of 8 1/2″ x 5 1/2″, then scored and folded at 4 1/4″. Early Espresso is one of my favorite base colors when working with nature-inspired designs because it adds instant warmth and richness. For the card front, I chose one of the beautiful distressed patterns from the Nature Walk Designer Series Paper—this one quickly became a favorite. It’s cut to 5 1/4″ x 4″, allowing that Early Espresso border to frame the design and give the card a polished, finished look.
The focal point of this card is where the magic really happens. I selected one of the mountain scene stickers from the coordinating sticker sheet. These stickers are such a joy to work with—they give you detailed artwork without extra stamping or coloring. I matted the sticker with Early Espresso cut from the Spotlight on Nature dies. These dies truly connect the entire design… I die cut another circle using a dark blue pattern from the Nature Walk Designer Series Paper, pulling color directly from the mountain scene.
Because I love designing in odd numbers, I added one more circle—this time in Basic White—to create space for the sentiment. The greeting comes from the Simply Said Stamp Set, keeping things clean and uncomplicated so the focal point remains the star. The layout itself is simple and balanced, centered around the mountain scene and supported by those layered circles.
To finish the card, I added just a few Pearls of Beauty. A small amount of embellishment is all this design needs—just enough to add a soft elegance without taking away from the natural, organic feel of the card.
This project is a wonderful reminder that you don’t need complicated layers or techniques to create something meaningful. The Nature Walk Designer Series Paper and Sticker Sheet do so much of the work for you, making it easy to create cards that feel thoughtful, warm, and inspired by the outdoors.
I hope this card inspires you to pull out your supplies and start creating. As always, I’m here to help—whether you need product details, inspiration, or a little creative encouragement.
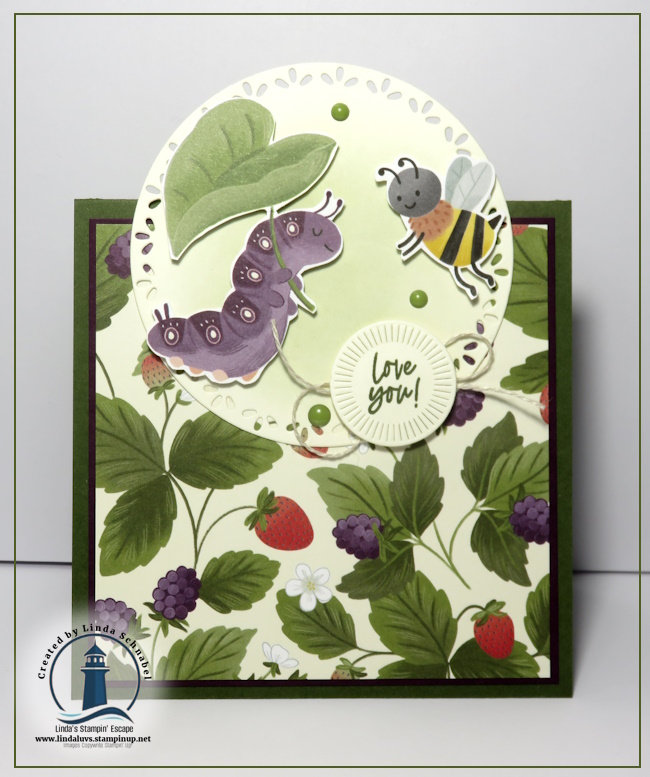
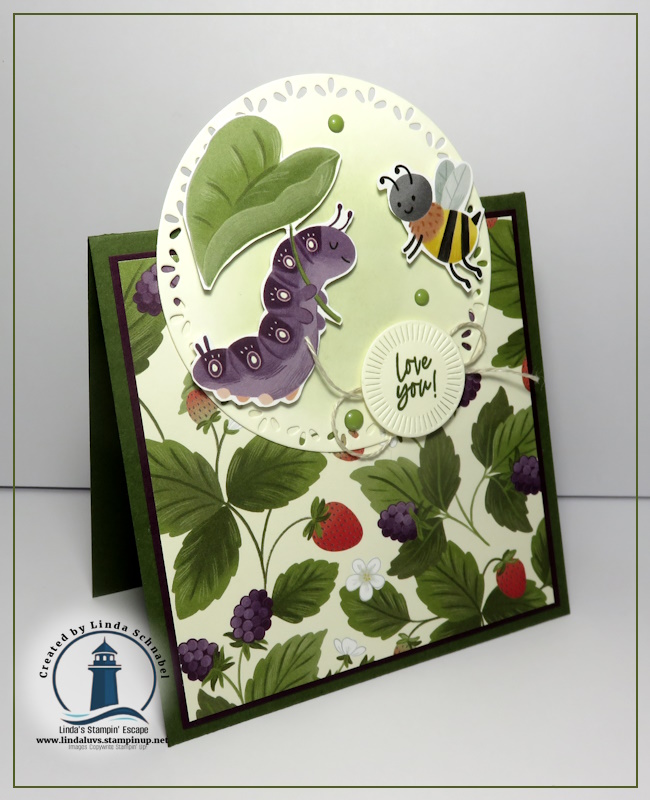
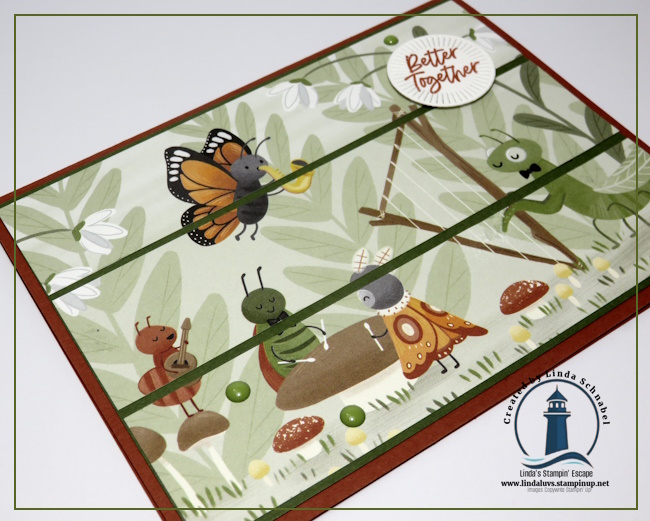
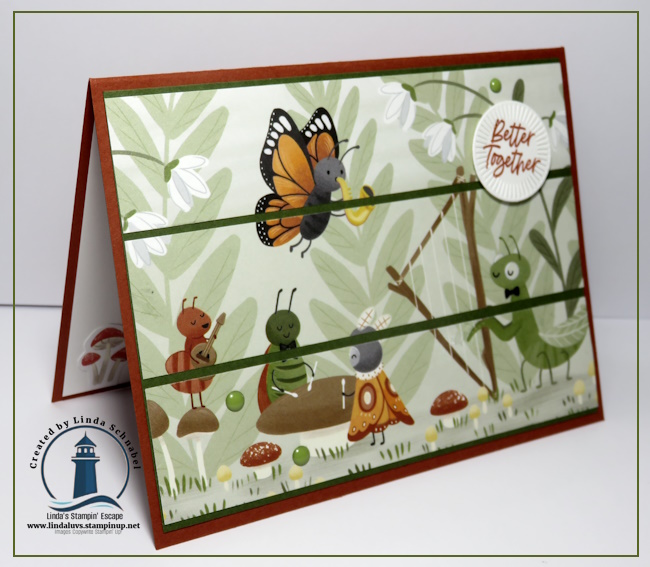
If you liked yesterday’s card … you’ll fall in love with today’s!! When you’re looking for card ideas that are quick, creative, and full of personality, designer paper can truly do the heavy lifting. If you’ve been admiring the Cute as a Bug Designer Series Paper and wondering how to stretch it beyond a single card front, this project may spark a few ideas for your next crafting session.
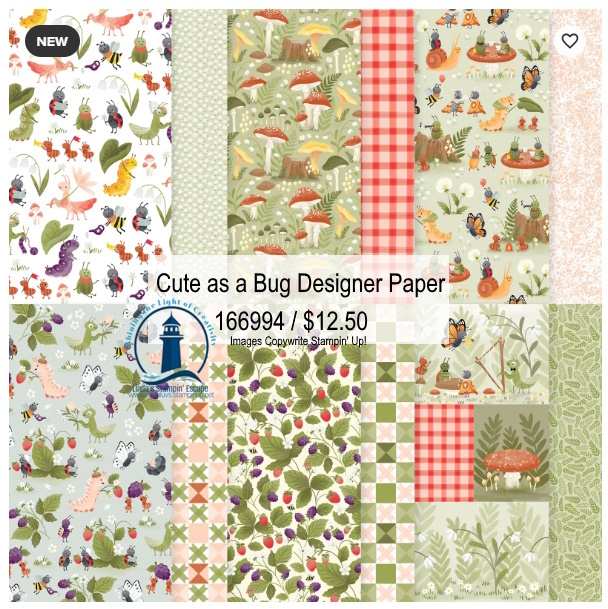
Cute as a Bug is one of those collections that immediately makes you smile. With its charming ladybugs, woodland details, and sweet nature-inspired scenes, it’s playful—but also surprisingly versatile. One of my favorite sheets in the pack features individual scenes, which makes it perfect for cutting apart and using in creative ways. No extra stamping, coloring, or fussing required—just a great starting point for an easy yet eye-catching card.
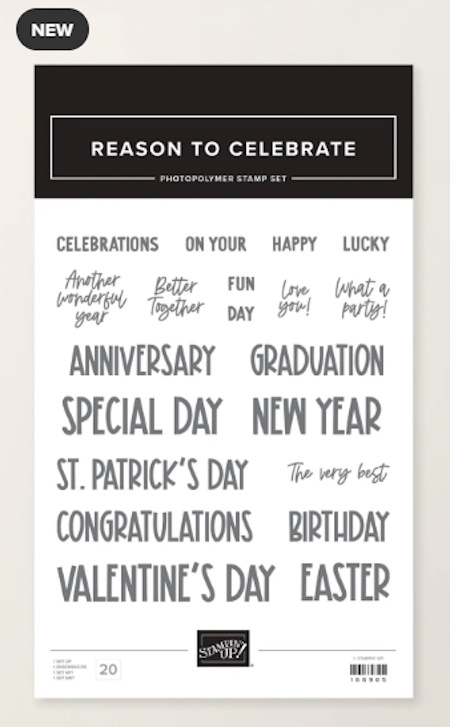
To pair with the paper, I chose the Reason to Celebrate Stamp Set, a wonderfully versatile sentiment set designed to help you celebrate life’s moments—big and small. From birthdays and holidays to everyday encouragement, the playful print-style greetings make this set one you’ll reach for often. It’s also a Two-Step Stampin’ set, allowing you to layer images and greetings to create a look that’s uniquely your own.
My card starts with an A2-size Cajun Craze card base (8½” x 5½”, scored and folded at 4¼”). I added a Mossy Meadow mat cut to 5¼” x 4″, which grounds the design and complements the earthy tones in the designer paper beautifully. From one of the scene sheets in the Cute as a Bug pack, I cut three strips measuring 1¼” x 5¼” to create a split-front design. This layout adds texture, dimension, and a really fun visual element without making the card complicated.
A little tip when working with strips like this: attach the top strip first, then the bottom, and add the middle strip last. This makes it much easier to line everything up evenly and maintain the flow of the pattern. It’s a simple technique, but it makes a big difference in the finished look—and it’s one you can easily repeat with other papers in your collection.
For the sentiment, I stamped “Better Together” from the Reason to Celebrate Stamp Set in Cajun Craze ink and die cut it using one of the smallest dies from the Spotlight on Nature Dies. I loved how this sentiment paired with the scene on the designer paper—it feels warm, happy, and perfectly suited to the card’s woodland charm. Small sentiments like this are wonderful for letting the paper shine while still adding a meaningful message.
Inside the card, I kept things clean and cheerful. The white layer was cut to 5¼” x 4″ and decorated with a few adorable mushrooms that I fussy cut from another sheet of the Cute as a Bug Designer Series Paper. This little detail ties the inside to the front and adds an unexpected smile when the card is opened.
To finish the card, I added Muted Palette Glossy Dots in green. They add just the right amount of shine and texture without overpowering the design—those small finishing touches really bring everything together.
This card layout is a great example of how simple designs can still feel creative and polished. By cutting the designer paper into strips, you add depth and interest while keeping the process approachable and repeatable. If you enjoy projects that look special but don’t require a lot of time or extra supplies, this is a layout—and a paper pack—you’ll want to revisit again and again.
Next time you’re sitting down to create, take a closer look at your designer paper and see what happens when you let it lead the design. With versatile products like Cute as a Bug and Reason to Celebrate, it’s easy to create cards that feel joyful, thoughtful, and ready to celebrate whatever moment comes next. 💚
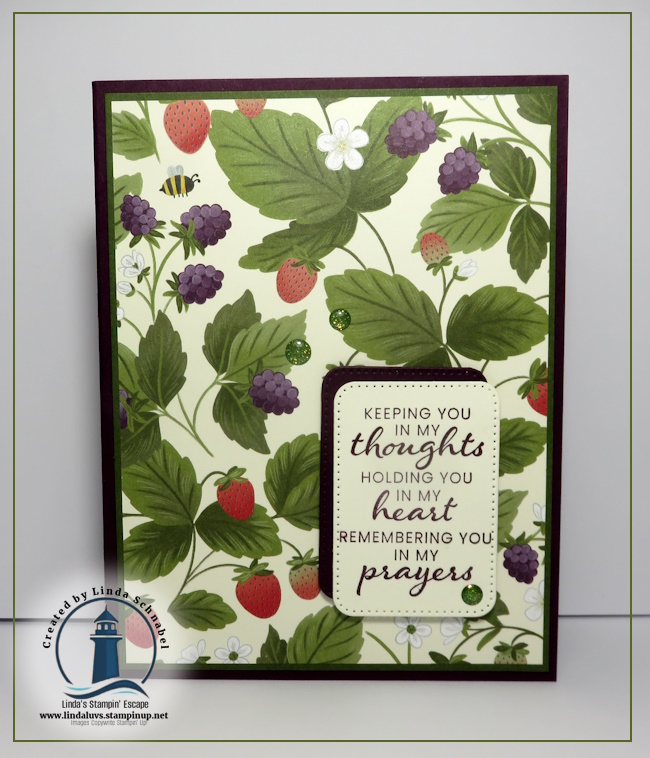
Today we will be turning an unexpected product pairing into a beautiful heartfelt card. Sometimes the most meaningful cards come from unexpected pairings—and this project is a perfect example of that. As you’re browsing your craft room or flipping through the catalog, I want to gently encourage you to look beyond the obvious combinations and think about who you’re creating for. When you design with a specific person in mind, products often come together in ways that feel natural, intentional, and heartfelt.
At first glance, the Cute as a Bug Designer Series Paper and the Prayers and Promises Stamp Set may not seem like a natural match. Cute as a Bug is filled with charming ladybugs, fluttering friends, and picnic-perfect prints that immediately feel playful and lighthearted. But this particular berry pattern stopped me in my tracks. It reminded me of my grandma—warm, comforting, and familiar—and that personal connection made it the perfect choice for a card meant to offer encouragement and care. This paper beautifully demonstrates just how versatile designer paper can be when you let emotion, memory, and purpose guide your choices.
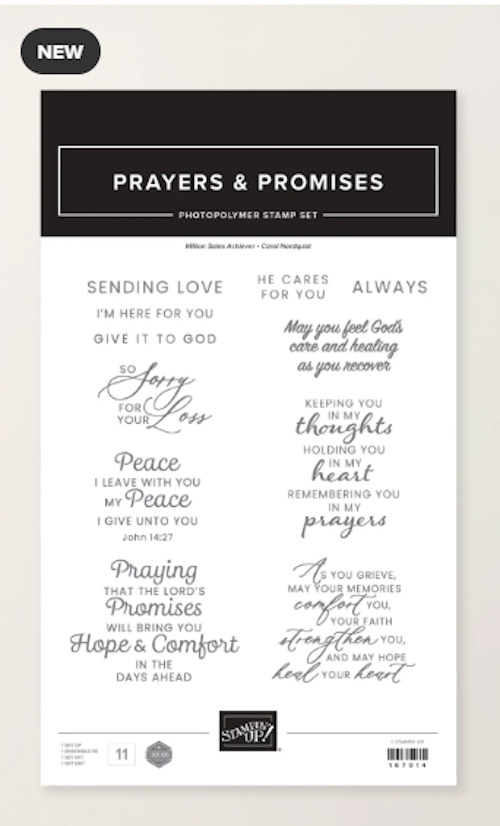
The Prayers and Promises Stamp Set is truly one of those foundational stamp sets that belongs in every stamp room. It shares words of faith, love, sympathy, and encouragement—sentiments we all reach for when someone we care about needs support. Having a go-to set like this allows you to create meaningful cards with confidence, knowing the message will be just right for the moment.
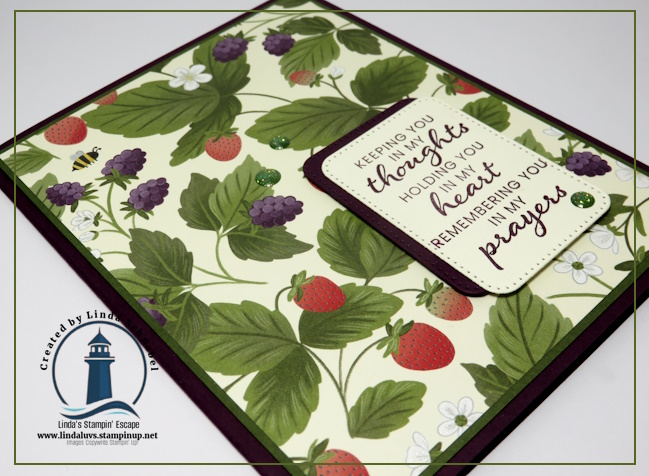
My card begins with an A2 card base in Blackberry Bliss (8½” x 5½”, scored and folded at 4¼”). I cut the Cute as a Bug Designer Series Paper to 5⅛” x 3⅞” and layered it onto a Mossy Meadow mat measuring 5¼” x 4″. The combination of these rich, earthy tones grounds the card and gives it a calm, reassuring feel—perfect for this style of sentiment. This is a color palette you’ll find yourself reaching for again and again.
The greeting was stamped in Blackberry Bliss ink onto Very Vanilla cardstock using a sentiment from Prayers and Promises. I die cut the sentiment with the Nested Essentials Dies, then die cut a second layer in Blackberry Bliss to place behind it. That extra layer adds a subtle pop of color and frames the greeting beautifully. I popped the sentiment up with Stampin’ Dimensionals to add just the right amount of dimension and draw the eye to the message.
To finish the card, I added a few Low Profile Sparkle Dots in green. These small details may seem simple, but they add a gentle touch of shine and tie everything together without taking away from the sentiment.
As you can see, these two seemingly different products blend seamlessly when used with intention. This card is a wonderful reminder that it’s not about following rules—it’s about telling a story, honoring a feeling, and creating something meaningful. If you enjoy designing cards that connect on a deeper level, these are products you’ll want to keep close at hand.
The next time you sit down to create, I invite you to start with a person, a memory, or a feeling—and then let your supplies fall into place. You may be surprised how beautifully unexpected combinations come together when you design from the heart. 💜
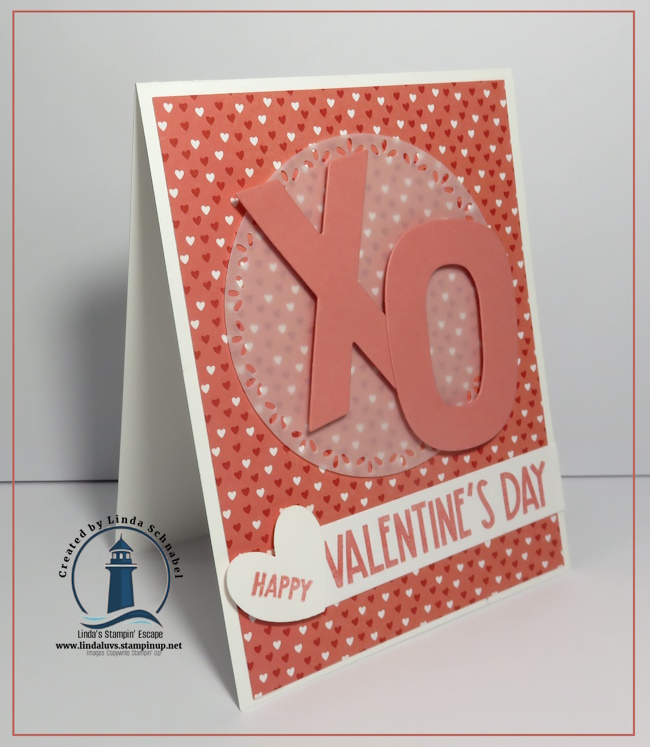
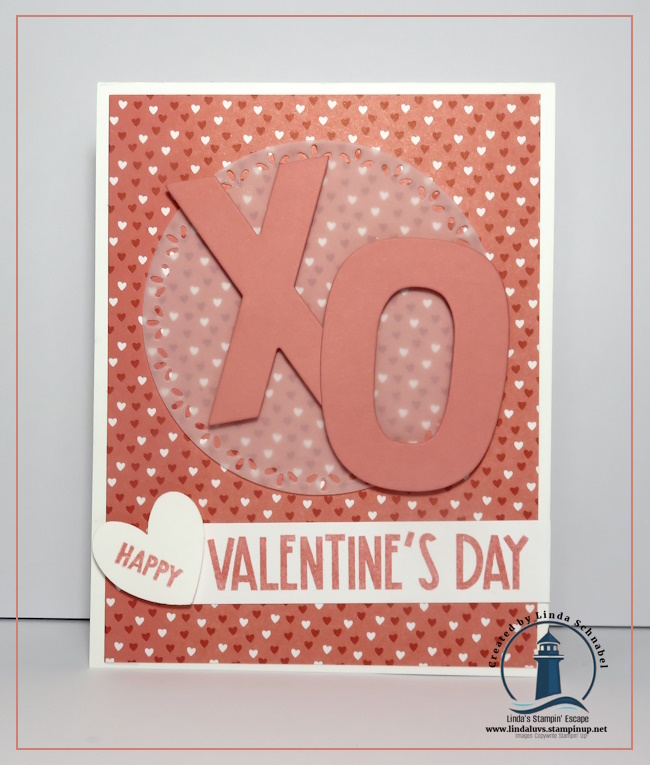
Sometimes it’s fun to take a closer look at those tools in our craft rooms that feel like a bit of an investment—and really explore all the ways they can work for us. Today’s card does exactly that by shining the spotlight on the Party Alphabet Dies in a completely different way. These dies aren’t just for birthdays or big celebrations… they’re perfect for everyday cards, heartfelt messages, and yes—even hugs and kisses!
For this project, I started with a classic A2 tent-fold card base, cut to 11″ x 4 1/4″ and scored at 5 1/2″. This simple fold is always a favorite because it’s easy, sturdy, and gives you plenty of room to let your layers and focal point shine. I selected a different pattern from the Made with Love Designer Series Paper and cut it to 4″ x 5 1/4″, mounting it directly to the card front. The delicate pattern instantly sets the tone and makes the card feel cheerful and fun.
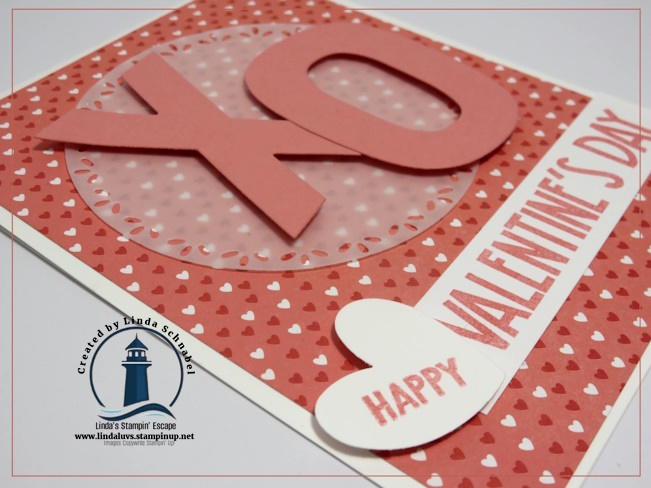
Because the designer paper is such a statement on its own, I wanted the focal point to stand out without competing with the background. A soft vellum circle, cut using the Spotlight on Nature Dies, was the perfect solution. Vellum is one of my favorite tricks for grounding a focal point—it softens the busy background while still letting that gorgeous paper peek through.
Next came the stars of the show: the X and O, die cut from Flirty Flamingo cardstock using the Party Alphabet Dies. Simple, bold, and full of meaning—who doesn’t love sending hugs and kisses? I popped them up with Stampin’ Dimensionals to add depth and draw the eye right to the center of the card. This is a great example of how these alphabet dies can be used beyond words and names to create symbols, sentiments, and playful focal points for any occasion.
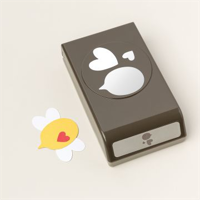
For the greeting, I reached for the sticker sheet that comes with the Made with Love Designer Paper pack. I stamped a sentiment from the Reason to Celebrate stamp set directly onto one of the sticker sections and placed it on the card front. To finish the greeting, I punched a heart using the Bee Builder Punch—how cute is that? It’s such a fun and creative way to use the blank space on the sticker sheet while adding just the right touch of sweetness. Take a peek at the video below …
This card is a perfect reminder that versatile products truly earn their place in your craft room showing up again and again in fresh, unexpected ways. The Party Alphabet Dies are a wonderful example of that kind of versatility—perfect for birthdays, celebrations, Valentine’s Day, everyday greetings, and so much more. And don’t worry… there’s plenty more inspiration coming your way!
If this card made you smile, I hope it inspires you to look at your supplies with fresh eyes and have fun mixing patterns, textures, and simple die cuts to create something special. Sometimes it’s those small, thoughtful details that make a handmade card extra meaningful.
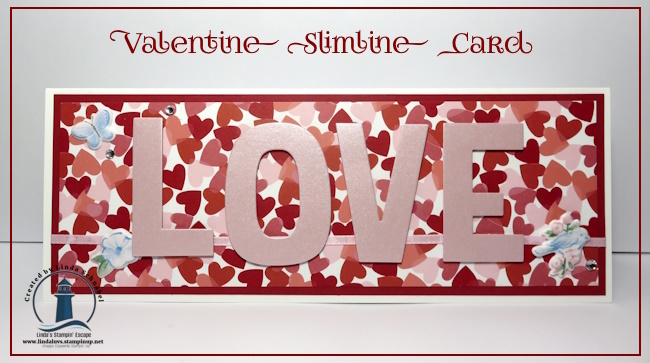
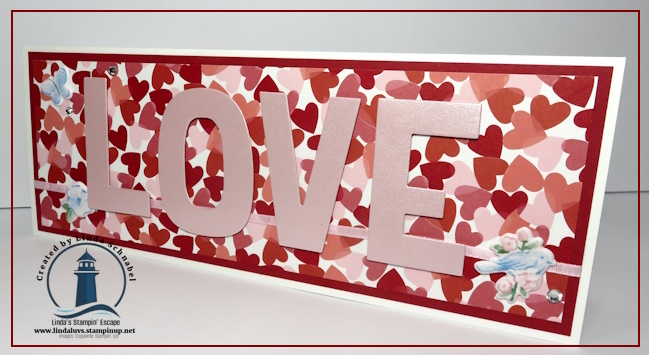
Love is definitely in the air—and this slimline card is the perfect way to celebrate Valentine’s Day in a BIG way! Slimline cards have quickly become a favorite because they offer extra space to showcase gorgeous designer paper and bold greetings, all while still fitting neatly inside a standard #10 envelope (4.125″ x 9.5″). They’re eye-catching, fun to create, and a wonderful option when you want your handmade card to truly stand out from the crowd.
For today’s card, I started with a slimline card base measuring 9 1/4″ x 7 1/2″, scored and folded at 3 3/4″. This size creates a clean, professional look while remaining completely mail-friendly—always a win! To add layers and visual interest, I added a Real Red mat cut to 8 3/4″ x 3 1/2″, followed by the star of the show: the NEW Made to Love Designer Series Paper, trimmed to 8 1/2″ x 3 1/4″. This paper is simply perfect for Valentine projects with its playful patterns and romantic color palette that instantly sets the mood for love.
Before attaching the layers to the card base, I wrapped the NEW Bubble Bath Faux Linen Ribbon across the front. This small step adds softness and texture, and the subtle linen look keeps the design elegant without overpowering the card. It’s one of those details that quietly elevates the finished project.
The greeting is where this card really shines! The word “LOVE” was die cut from the Pastel Shimmer Paper using the Party Alphabet Dies and popped up with Stampin’ Dimensionals for added depth. The Pastel Shimmer Paper adds such a beautiful, soft sparkle—just enough shine to catch the light and make the greeting feel extra special. With delicate pastel shades and a subtle glow, this paper is a lovely addition to cards, scrapbooking, and all kinds of paper crafts. The pack includes 6 sheets (2 each of Bubble Bath, Lemon Lolly, and Pool Party) in a generous 12″ x 12″ size, giving you plenty to play with.
To finish things off, I couldn’t resist adding the Softest Spring Mix & Match Puffy Stickers along with a few Rhinestones. These little embellishments bring in just the right amount of whimsy and sparkle, tying everything together while keeping the overall look light, fun, and full of love.
Slimline cards are a fantastic way to showcase beautiful products, experiment with layers, and create something a little unexpected—yet still practical. This design is perfect for Valentine’s Day, anniversaries, or anytime you want to send a heartfelt message with maximum impact. If you’re looking for products that make creating “wow” cards easy and enjoyable, the pieces used here work together beautifully and are sure to find their way into many future projects. After all, there’s always room for a little more LOVE in our crafting—and in our mailboxes 💕
Thanks for sharing a little crafty time with me today! I hope this slimline Valentine card sparks your creativity and inspires you to give these beautiful products a try. Until next time—happy stamping and keep spreading the love… one card at a time! 💖
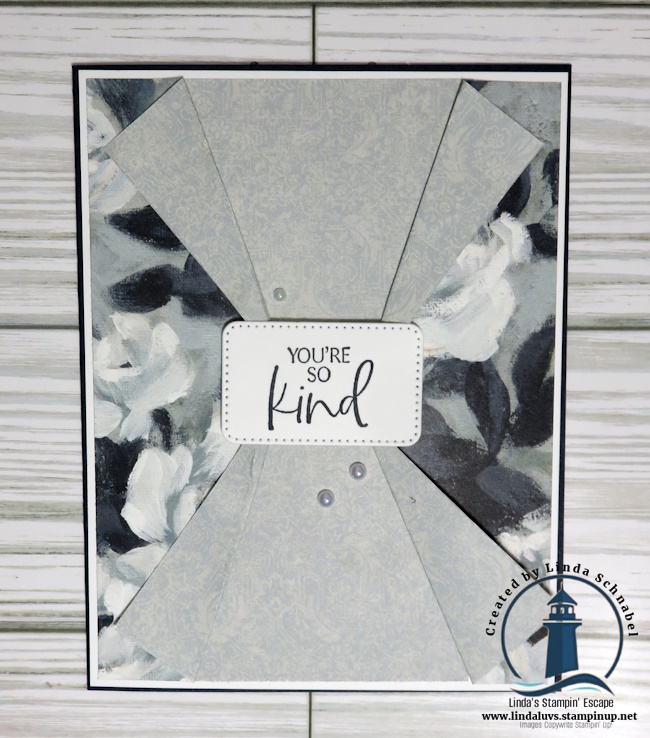
One of my favorite things about card making is how a simple change can completely transform a design—and today’s card is the perfect example of that! This project uses similar measurements and fun fold I shared in my previous post, but with one key twist: instead of using designer paper in the center, I switched it out for cardstock. The result? A totally different look that still delivers that WOW factor while beautifully highlighting the Made with Love Designer Series Paper.
Using cardstock in the center panel creates a wonderful focal point and gives the eye a place to rest, while still letting that gorgeous designer paper shine. It’s an easy way to stretch your supplies, change up the feel of the card, and get even more mileage out of a fold you already know and love. This version feels a little more classic and polished, as I embossed it with the 3-D Eyelet Embossing Folder!
Measurements • Card Base 8 ½” x 5 ½” score at 4 ¼” • Mat / Contrasting Cardstock: 4 ⅛” x 5 ⅜.” • Designer paper 2 @ 1 ¾” x 5 1/4″. The only thing I really changed is the embossing the mat and eliminating the center designer paper!!
If you’re using the Made with Love Designer Series Paper, this layout is a fantastic way to let those patterns do the heavy lifting. Pairing it with cardstock in the center allows the paper to frame the design and truly stand out, making each card feel intentional and thoughtfully designed.
If you missed the original version of this fun fold, be sure to go back and check it out—and stay tuned, because I have even more ideas coming your way using this same amazing designer paper. Great layouts, big impact, and lots of creative fun—that’s what crafting is all about!
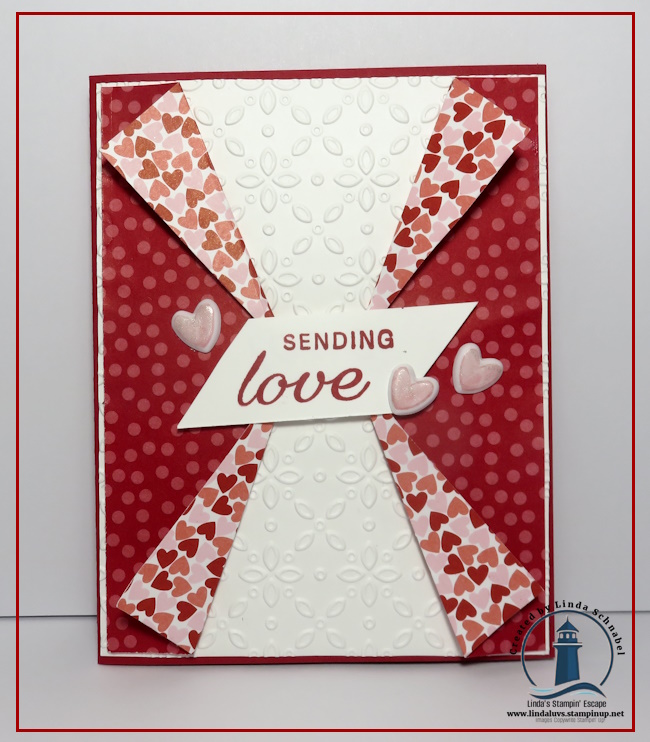
Have you ever fallen in love with a piece of designer paper and thought, I don’t want to waste a single inch of this!? If that sounds like you, you’re going to LOVE today’s project. I’m sharing a fun, eye-catching designer paper fun fold that not only maximizes your paper but also delivers a big WOW factor with very little effort. This is one of those cards that looks fancy and impressive, yet comes together easily—perfect for using up your favorite papers while making something truly special.
One of my favorite things about this fun fold is how efficient it is. With just a few strategic cuts and folds, you’ll be amazed at how much impact you get with little to no waste. It’s a fantastic way to stretch your designer paper, especially those patterns you’ve been hoarding because they’re “too pretty to cut.” Trust me—this design lets the paper shine while keeping the process simple and enjoyable.
In today’s Facebook LIVE REPLAY / YouTube video, I walk you through the entire process step by step. You’ll see exactly how the folds come together, how the layers create that WOW moment when the card is opened, and how easy it is to adapt this design using different designer papers, colors, and themes. Whether you’re crafting for birthdays, thank-you cards, or just for fun, this fold is one you’ll come back to again and again.
🎥 Watch the video below to see this designer paper fun fold in action and learn how to maximize your paper while creating something truly impressive. Grab your supplies, craft along with me, and don’t forget to leave a comment—I’d love to hear which designer paper you’re excited to try with this fold!
If you loved this fun fold and the idea of getting more WOW from your designer paper, be sure to check out the supplies I used—you can easily recreate this design or make it your own with papers you already have on hand. This fold is incredibly versatile and looks amazing with just about any designer series paper. And if you’re hungry for more creative ideas, fun folds, and stamping inspiration, make sure you’re subscribed to my YouTube channel and following along here on the blog so you never miss a project. Crafting should be fun, relaxing, and inspiring—and I’m so happy to share that creative escape with you.
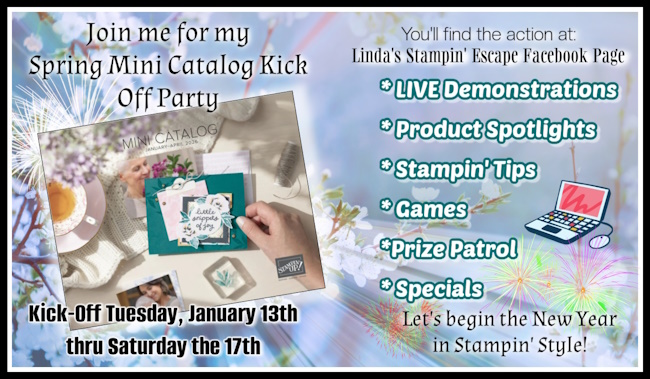
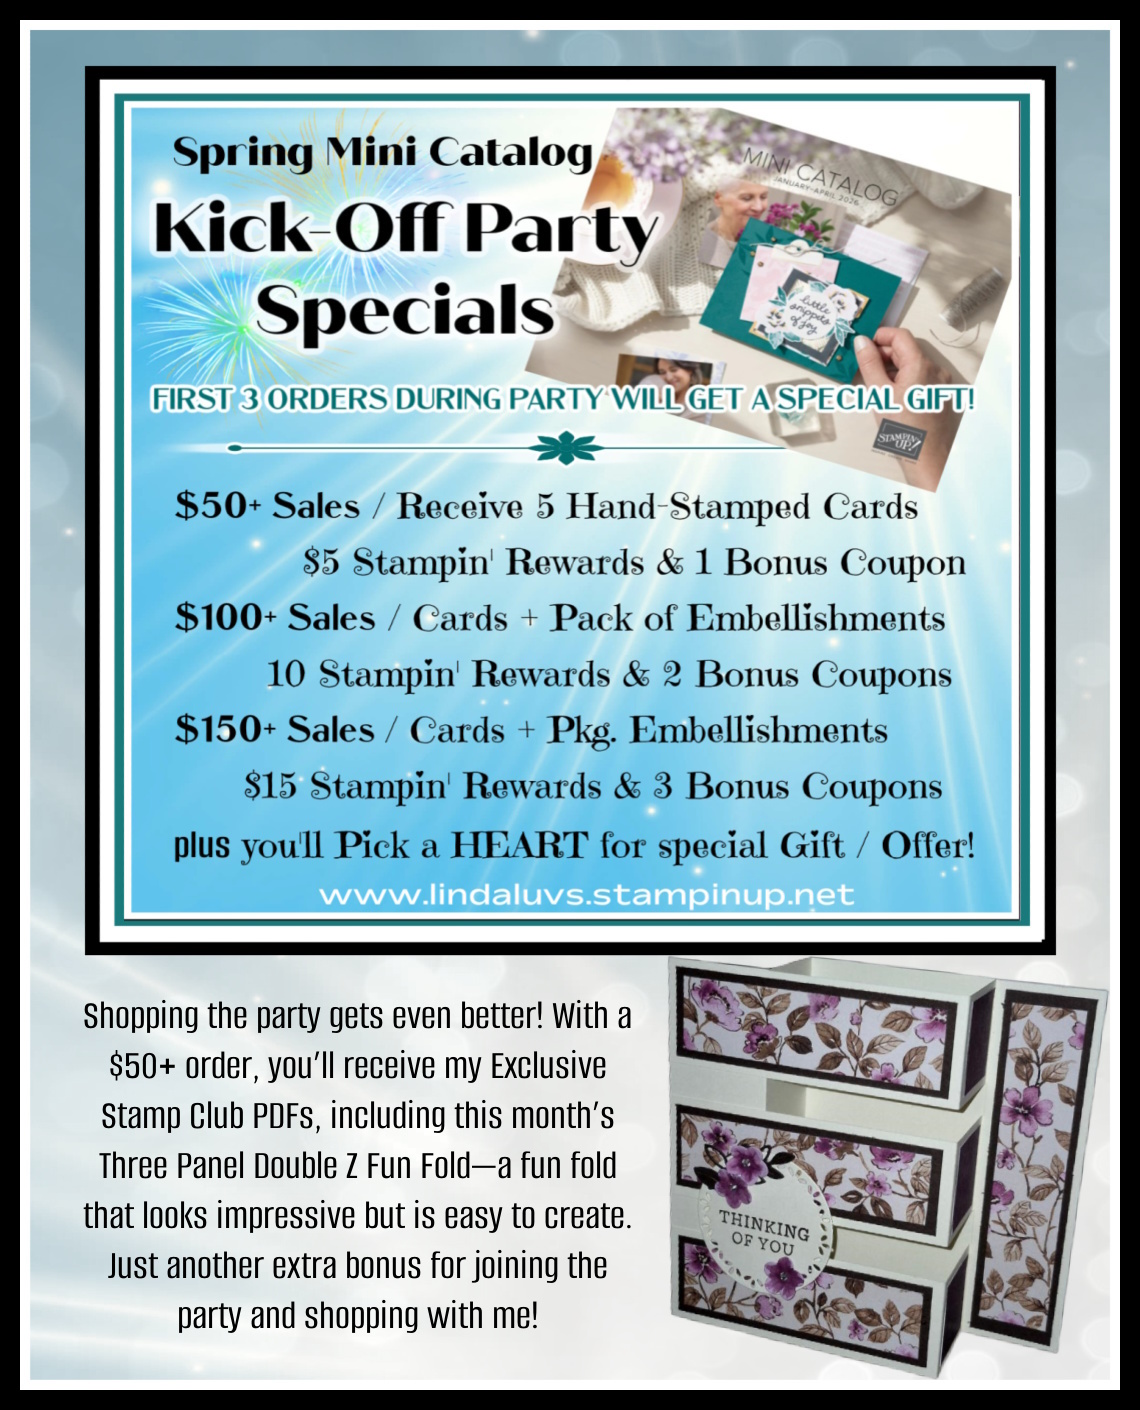
🎉 Join me next Tuesday at 6:30 pm on my Linda’s Stampin’ Escape Facebook page LIVE as I launch my Mini Catalog Kick-Off Party—stamping, inspiration, specials and crafty fun await!