Hello Stampin’ Friends,
Let me take you into a sparkling world where you’ll dazzle your friends with our Gold Celebrations Card! This is a step up from your basic stamping, but with your Stampin’ Emboss & Die cut machine, you’ll be able to crank out 6 of these cards in just minutes!
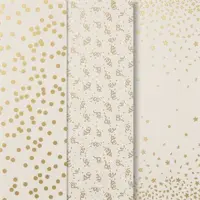
Let’s begin with our supplies: You will need Very Vanilla Cardstock, the Gold Celebrations 12 x 12 Specialty Designer Paper, and the Gold Foil … Yep, that’s it!! Oh, and your Multipurpose Liquid Glue and Stampin’ Dimensionals!

Your dimensions for the card include:
- Vanilla Cardstock: 8-1/2” x 5-1/2” scored and folded at 4-1/4” plus one piece 5” x 3-3/4”
- Gold Celebrations paper: 5” x 3-3/4” (You will get 6 pieces from one sheet)
- Gold Foil Sheet: 5-1/4” x 4” (You will get 6 pieces from one sheet)
Now that you have your basics cut, it will be easy to recreate this card. Let’s do our die cutting next. Using the Gold Foil sheet for your card, use the bold / bottom part of your Celebration greeting … this comes from the “Wanted to Say” Dies … and the stars that are included as well. ***Be sure to use a bottom cutting plate that is not too scuffed up, as those may come through on your foil. I always keep one plate for foils (until it looks like my other “very” loved plates!)
Cut the detailed “celebrate” with the left-over 1/4 sheet of the vanilla cardstock. Using your glue, adhere them together.

Now it’s time to put the card together …. flip your Gold Celebration acetate sheet upside down and place a dot of glue behind many of the stars and graffiti, this will hold your Gold Celebrations onto the small piece of vanilla. You will notice in the cutting dimensions that these are cut to the same size. Attach the “celebration” and the stars (I cut some apart) onto your sheet using dimensionals … you’ll have to trim them down. I use the edges for this part.
Now you can layer this piece over the gold foil sheet … no one will see that you’ve cut out your greeting, and you didn’t waste any gold foil!! Clever. Now, you may glue your card front onto the base or you can attach it with more of your Stampin’ Dimensionals … the choice is yours.

Who wouldn’t love this fun, sleek and sexy card … and it’s so easy to make! It looks like you’re already throwing the party. It’s perfect for a 50th Wedding Anniversary, someones “Golden” Birthday, or maybe a Retirement card, because just retiring from my job just months ago … It’s a CELEBRATION!! lol
Thank you for taking time out of your Sunday to stop over and visit. Hope this inspires you to celebrate someone, or yourself … you deserve it too! I have listed the product links to the bottom of this post if you are interested in making the card I shared today.
Thanks again & enjoy this beautiful day ~