Hello Stampin’ Friends ~
I’m excited to share the Starburst Cards that we made last night on my Facebook LIVE … what a nice turnout, and so much fun!! Three cards and a video … that’s what I have to share with you today. Yesterday I share the Sunburst with the Pansy Petals, today I’m using the “Brights” Designer Series Paper collection. So I decided to begin our LIVE demonstration with the same “Centered” layout as yesterday’s card ….

Then I thought it would be nice to show you another layout for this technique- a side burst Starburst Card using the same “Brights” Designer paper but instead of Daffodil Delight and Mango Medley, I used Melon Mambo, Granny Apple Green, Pacific Point and Gorgeous Grape …
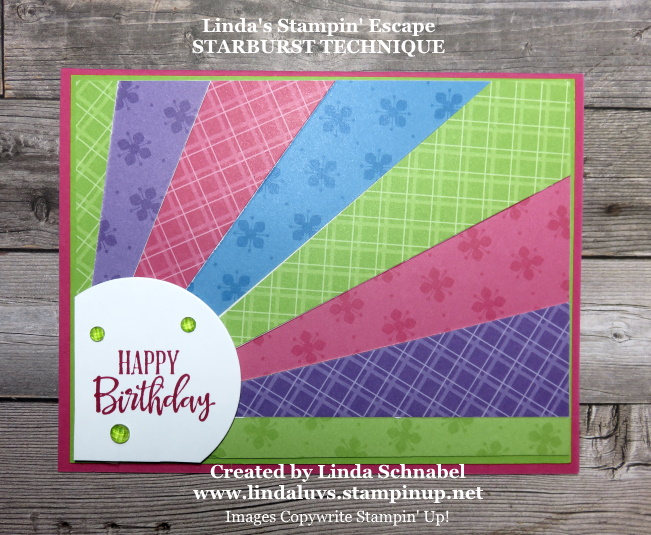
I die cut my circle and stamped the Happy Birthday from the Peaceful Moments Stamp Set in Melon Mambo. I added some Elegant Faceted Gems that I colored in Granny Apple Green using the Stampin’ Blends.
Now join me and watch the video as I show you how easy it is to put these together! Then I have the instructions for you as well!!
Last but not least … a bonus card done in the same colors as our first card, but in the pattern of our second card …
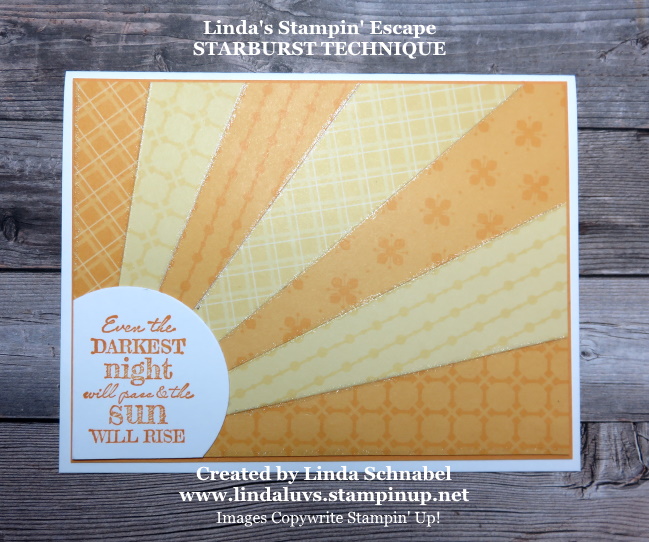
The sentiment on this card from the After the Storm stamp set really drove me to do this technique … I think they were made for each other. This is the perfect card to brighten someone’s day. I even added Wink of Stella to the “rays” to make this card even “happier”.
Now … in case “written” instructions are easier for you (I think they are a nice reminder) Here the are …
STARBURST CARD DIRECTIONS:
1. Card base – 8 1/2″ x 5 1/2″ folded in half – 4 1/4″ x 5 1/2″.
2. Rectangle pieces – 1 1/2″ x 4″ – Cut 4 of these – using a different patterned paper for each one. (You can cut the length to 4″ when making the centered starburst.
3. Take your rectangle pieces and cut them at an angle on your cutter. Opposite corner to opposite corner – you will then have 8 triangles – 2 of each design.
4. This is where you “burst base” comes in …. cut to 5 1/8″ x 3-7/8″. I like to add a 5-1/2″ x 4″ mat behind my staburst. Mark your base where your greeting will be (mine is 5-1/4″ x 1″) It’s your guide to arranging your triangles. I put tape all over on this scrap piece of paper. To me it was easier than putting tape on each triangle. (You could use “Adhesive Sheets to secure your triangles).
5. Now working from the center… place your first triangle down, then adhere your next triangle to the right and then to the left of the previous triangle. Repeat until base is covered. Your triangle pieces will go over the edges on your card and that’s OK. It’s also OK if you are not perfectly precise in lining up the pieces. Some pieces may show a little more of each other than others.
6. Once you have all your triangle secured to the base, turn the card over and trim off the excess of those triangles. This is where I attach my mat … a little pop of color behind the burst.
7. Once that is all prepped … stamp your greeting onto the 1″ piece and attach it to the bottom of the card and secure to the front. Now you can put your completed front onto your card base. Embellish if you wish … I love to!

I want to thank you for joining me today, and if you stopped by last night to watch me LIVE. I will continue to share cards focusing on designer paper.
Have a bright and sunny day, and take good care ~

TODAY’S STAMPIN’ SUPPLY LIST … If you liked the products used in todays projects, I have links for you below. Just click on the item you would like more information on, or to begin your shopping. It will take you directly to my website. Thank you ♥