Hello Stampin’ Friends ~
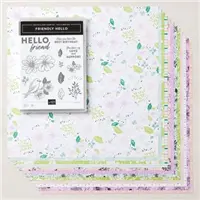
Today I’m going to share the second card from my LIVE on Tuesday …. I’m highlighting the Friendly Hello Stamp Set and Designer Paper that is in the Sale-a-bration Catalog.
Yesterday I shared the “Side Fold” version of this Fun Fold ….

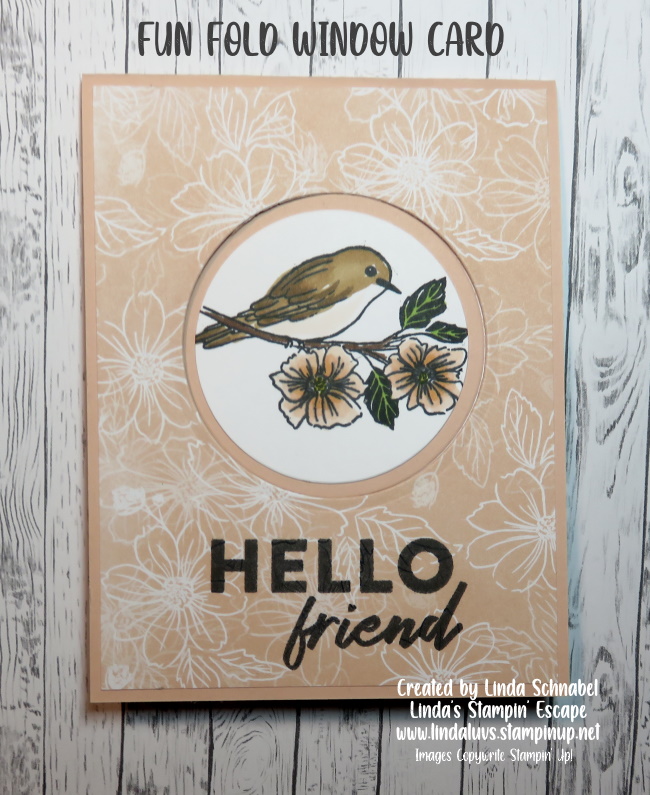
Today I’m going to show you the “Top Fold” version … the inside is exactly the same! It’s just the outside card base that is either folds down from the top, or over from the side. Isn’t that cool 🙂
Measurements:
- Petal Pink Cardbase: 11″ x 4-1/4″ … Score & Fold at 5-1/2″
- Friendly Hello Designer Paper for Front: 5-1/4″ x 4″
- Use Circle Dies to Die Cut the “Window” in Front of your card (Save Designer Paper Circle)
- Basic White Inside Cardstock: 5-1/4″ x8″ … Score at 4″ and 6″ / A scrap piece to die cut smaller circle for your stamped image.
We begin with the Petal Pink Cardbase cut to 11″ x 4-1/4″ and then score & fold at 5-1/2″. If you want to stamp directly onto your designer paper, now is the time. Using your favorite adhesive (around the edges only and NOT in the center) secure your designer paper to the front. The next step is to die cut the circle …. save both the cardstock and designer paper circles. The next step is to secure the “fun fold” into your cardbase …. the scored side will go to the right side of your card.
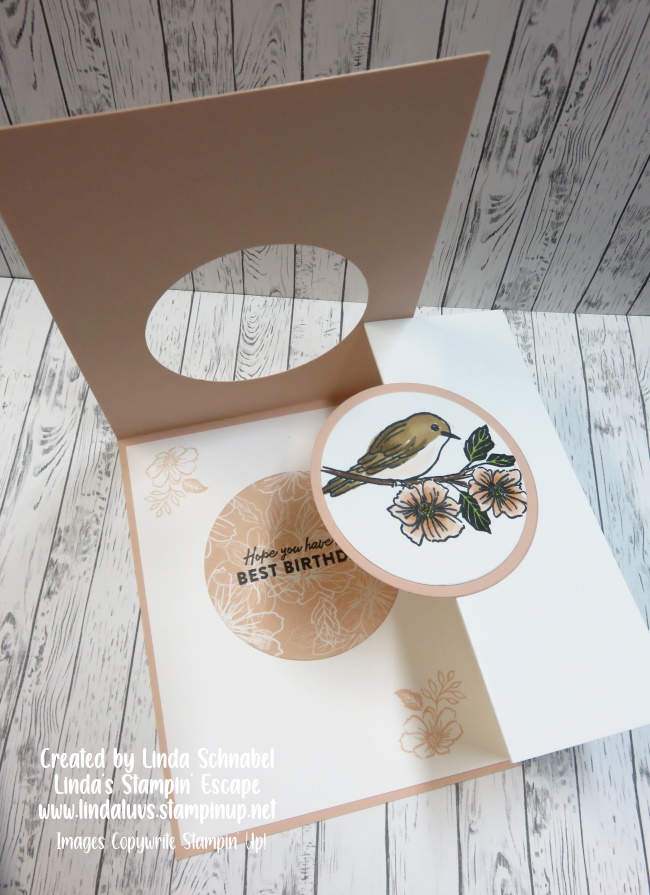
Put adhesive onto the back of the 5-1/4″ x 4″ section of the white folded piece and secure it inside the card. The first score (at the edge) is folded to the right and the second score if folded back upon itself…. burnish with your bone folder and close the card.
The Basic White cardstock fold is now exposed so it’s time to secure the Petal Pink circle to the fun fold …. this will be done while the top flap is down. Apply adhesive on the one section of the flap … that is why I close my card, it makes it so easy to remember exactly where to put the adhesive to attach your circle. Once you have stamped your image onto the white circle and color it, you can attach it to the pink.
If you want to add the die cut designer paper into the inside of your card like I did …. flip up the top, open the fold and then drop the top back down and one you have adhesive on your designer paper circle, fit it directly into the opening and then everything will line up perfect!

I think you are going to have so much fun making these cards… fun and easy is the way.
Thank you for hanging out with me today, have a great one!

TODAY’S STAMPIN’ SUPPLY LIST … If you liked the products used in today’s projects, I have links for you below. Just click on the item you would like more information on, or to begin your shopping. It will take you directly to my website. Thank you ❤