Delighting friends with the Joy to You stamps

Hello Stampin’ Friends,

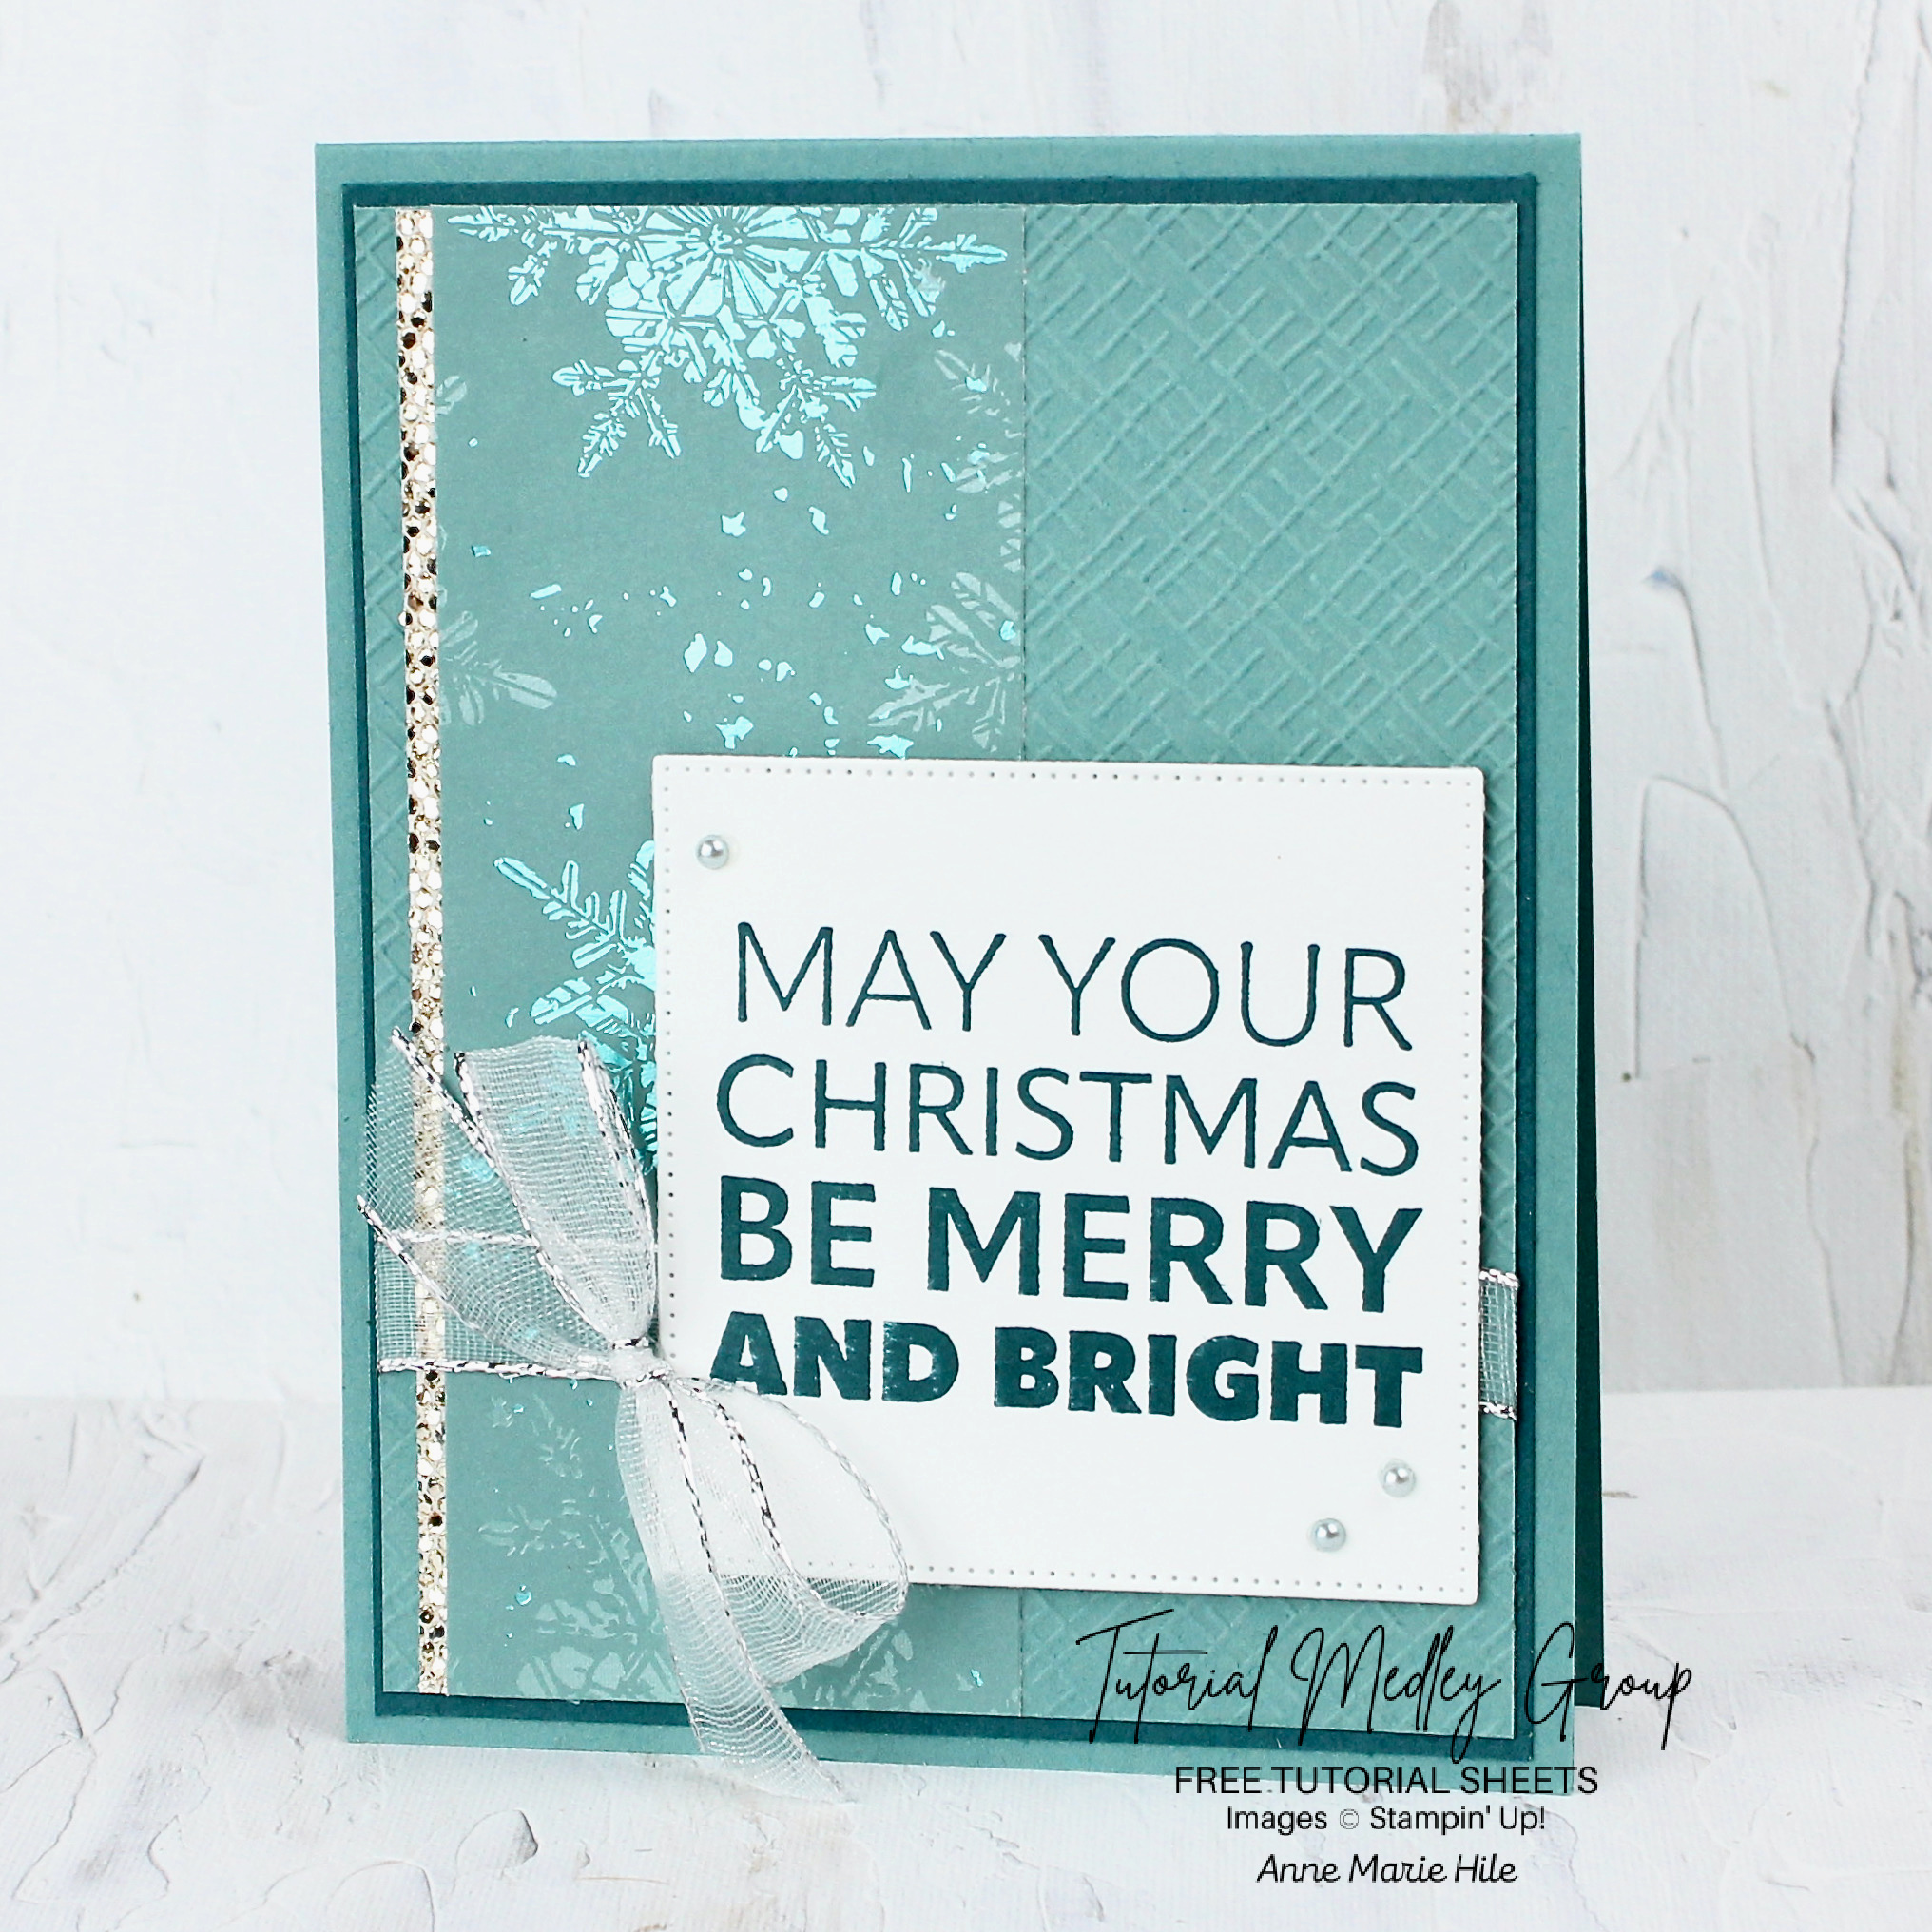
Today I’m introducing the delightful “Joy to You” stamp set from Stampin’ Up!’s Mini Catalog, a delightful collection of holiday-themed stamps designed to spread joy and warmth. Paired with the exquisite “Snowflake Magic Specialty” paper, today’s card creation is nothing short of magical.

The “Joy to You” stamp set offers a versatile array of seasonal sentiments, perfect for sending your heartfelt holiday greetings. Meanwhile, the “Snowflake Magic Specialty” paper, with its intricate snowflake designs and shimmering accents, adds an extra layer of elegance and sophistication to your projects.

Measurements: 

  • Card Base: Lost Lagoon 4-1/4” x 11”, scored at 5-1/2”
  • Cardstock #1: Pretty Peacock 4” x 5-1/4”     
  • Cardstock #2: Lost Lagoon 3-7/8” x 5-1/8”
  • DSP: Snowflake Magic Specialty 2” x 5-1/8”
  • DSP: More Dazzle Specialty 1/2” x 5-1/8”
  • Cardstock #3: Basic White 3” x 3” for die-cut sentiment

Instructions:

  • Fold the Lost Lagoon card base in half at the score line and burnish the fold.
  • Emboss Lost Lagoon layer with Basics 3D Embossing Folder.
  • Adhere strip of More Dazzle Specialty Paper to left side of Embossed Lost Lagoon layer with Stampin’ SEAL.
  • Adhere Snowflake Magic Specialty Designer Paper to the Lost Lagoon layer with Stampin’ SEAL, slightly overlapping More Dazzle layer . Leave approximately a 1/8” border of More Dazzle paper visible.
  • Wrap a piece of Silver & White Sheer ribbon around embossed Lost Lagoon layer (approx 1-1/8” from bottom) and secure ends of ribbon on back with Stampin’ SEAL, or tape.
  • Adhere Lost Lagoon layer to Pretty Peacock layer with Stampin’ SEAL, then adhere to card base with Stampin’ SEAL.
  • Stamp sentiment on Basic White Cardstock in Pretty Peacock ink.
  • Die-cut sentiment with largest square in Stylish Shapes Dies.
  • Adhere the sentiment layer to card Stampin’ Dimensionals.
  • Tie a bow with Silver & White Sheer Ribbon and adhere to left side of die-cut square with a Mini Glue Dot.
  • Add (3) Festive Pearls to the card front, as shown.

Together, the “Joy to You” stamp set and “Snowflake Magic Specialty” paper create a harmonious blend of festivity and beauty, making your cards and crafts truly stand out this holiday season. Whether you’re sending wishes to friends and family or creating stunning holiday decor, the “Joy to You” stamp set and “Snowflake Magic Specialty” paper will undoubtedly make your creations sparkle with joy and charm.

Thank you for joining me today ~

Crafting Holiday Magic: A Merriest Trees Christmas Card

Hello Stampin’ Friends,

The holiday season will soon be upon us, and what better way to spread some festive cheer than by sending heartfelt Christmas cards to your loved ones? Today, we’re going to create a stunning Christmas card using the Merriest Trees Dies and the Snowflake Magic 12 x 12 Specialty Designer Paper. This card not only captures the spirit of the season but also showcases some must-have products for your holiday crafting collection.

Let’s begin with a piece of Basic White Cardstock for your card base 8-1/2″ x 5-1/2″ that will be scored at folded at 4-1/4″ . You will also need a card front (white) 5-1/4″ x 4″ and your blending brush with Balmy Blue Classic Ink. Apply a small amount of ink to the brush in a circular motion apply the ink to the card front, this will create a soft glow for behind your tree.

Now, it’s time to bring out the star of the show: the Merriest Trees Dies. Choose a beautiful design from the Snowflake Magic Designer Paper, and die-cut your tree. This paper is ideal for creating intricate and elegant holiday-themed die-cuts.

Carefully place your die-cut tree onto the Balmy Blue background you created earlier. The soft blue glow behind the tree will give it a magical appearance, as if it’s nestled in a snowy forest.

For the finishing touch, let’s add a heartfelt message. The Beary Cute Stamp Set comes to the rescue! I used the “Merry Christmas” to convey my holiday wishes, and stamped onto a scrap piece of cardstock and adhered it near the bottom of the card.

Time to decorate the tree to add your personal touch to the card. Die cut the garland in Balmy Blue that’s included in the Merriest Trees stamp set and add a little sparkle with your Wink of Stella. Lastly you’ll tuck a little Balmy Blue Sparkly ribbon behind the greeting.

Your Merriest Trees Christmas card is now complete and ready to spread holiday joy to your friends and family. Whether you’re sending it in the mail or delivering it in person, your handmade card will surely bring smiles and warmth to those who receive it.

This Merriest Trees Christmas card combines the beauty of Snowflake Magic Designer Paper, the elegance of the Merriest Trees Dies, and the heartfelt sentiment from the Beary Cute Stamp Set. With a touch of Balmy Blue ink, you’ve created a masterpiece that captures the enchantment of the holiday season.

As you embark on your holiday crafting journey, remember that the magic of Christmas lies not only in the materials you use but in the love and thoughtfulness you put into your creations. Happy crafting, and may your holiday season be filled with warmth, joy, and creativity!

Thanks for hangin’ with me today ~