No Tricks, All Treats! A Fun Fold Card That Pops! šŸŽƒāœØ

Hello Stampin’ Friends ~

Today, we’re creating a No Tricks, All Treats Fun Fold “Easel” Card that’s playful, interactive, and—best of all—super easy to make because the Spooky Sweet Designer Paper is practically doing all the work for you! This card is perfect for Halloween, but it’s so whimsical and fun that it’s hard not to smile while making it.

We’ll start with our Petunia Pop card base, cut to 11″ x 4 1/4″ and scored at 5 1/2″ and 8 1/4″. Burnish those score lines! Since this card is a portrait/vertical layout, the 5 1/2″ score forms the top fold, and the 8 1/4″ score lands about halfway down the front of the card base. This simple fold gives us our ā€œfun foldā€ mechanism that will let the card pop up and stand for display.

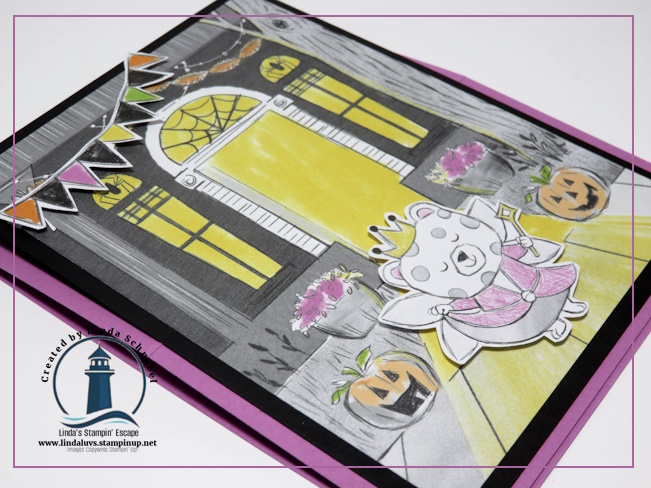
Next, cut two pieces of Basic Black cardstock to 4″ x 5 1/4″ (front & inside mats) and a piece of Basic White at 3 3/4″ x 5″. Grab the Spooky Sweet designer paper and cut your favorite scene—like the cute house and sidewalk—to 3 3/4″ x 5″. Then, let’s bring in our stars: fussy cut the beary sweet little fairy and the banner from the paper. I added a little sparkle using Wink of Stella on her crown, wings, and scepter—because every fairy deserves a touch of shimmer! Both the fairy and banner are popped up with Stampin’ Dimensionals for extra dimension and then attached to the designer paper… then attach to your black mat.

Here’s an important trick: when attaching the front of the card to the base, apply adhesive only from the second score line to the bottom edge of the card base. Leave the area above that top score line free of adhesive, or your fun fold won’t open properly.

Now for the inside—where the magic really happens! I stamped sparkles in Petunia Pop ink onto the white panel, then stamped my greeting on a scrap of white and die-cut it using the Textured Notes Dies. I dressed it up with some Petunia Pop shimmery ribbon and a piece of black cardstock behind it, then popped it up with Stampin’ Dimensionals in the middle of the inside panel. This creates the Easel mechanism, so your card stands perfectly. Finally, I added some fussy cut candy corn for a sweet little embellishment.

The best part? This card lays flat for mailing but pops up to display your cute creation at home—so it’s both practical and whimsical. The combination of fun folds, interactive easel design, and playful designer paper makes it a joy to create.

I encourage you to get creative with embellishments, die cuts, and colors—make this card your own! You’ll find links to all the supplies used today below for your convenience.

Thanks for flying by and spending part of your day with me …

A Spooktacular Halloween Fun Fold Card! šŸŽƒāœØ

Hello Stampin’ Friends ~

Halloween crafting just got even sweeter on Day 3 of Halloween Week with the Halloween Sweet Suite! This collection is packed with playful images, charming characters, and patterned papers that make it a breeze to create cards and treat holders that will delight kids and grown-ups alike. For today’s project, I couldn’t resist diving right into the designer paper—the star of the show! Not only does it feature adorable characters like hippos, bears, and crows dressed for Halloween, but it also makes creating a polished project so quick and easy. Today, I’m sharing a Happy Halloween Fun Fold Card that is as fun to make as it is to give.

Let’s start with our card base: a piece of Smoky Slate cardstock cut 7 1/4″ x 5 1/2″ and scored at 3″. This simple fold is what makes our card interactive and exciting! For the front, I chose a piece of designer paper cut to 5 1/8″ x 4″—but here’s the trick: I cut it at 2 5/8″ so one piece fits on the front flap and the other slips inside. This way, the design continues seamlessly across the card, creating the look of one solid picture. How cool is that? To make the front pop, I matted the designer paper with Pumpkin Pie cardstock (5 1/4″ x 2 3/4″), stamped Happy Halloween in bold Memento Black ink, and fussy cut the cutest little hippo from the paper to give her a starring role on the front. Of course, she had to be popped up for a little extra dimension!

Now for the inside—because every fun fold should have a surprise! I started with a layer of Pumpkin Pie cardstock (5 1/4″ x 4″), then added the second piece of that cut designer paper, perfectly lined up to continue the image. To the left, I placed a strip of Basic White cardstock (5 1/8″ x 2 3/8″) so there’s space to write a special Halloween message. But the real magic? The little Vampire Bear, fussy cut and ready to stroll right out from the front flap! I tucked him so he overlaps both the designer paper and the white panel, and gave him a little crow buddy for company. To finish it off, I scattered white foam stars across the night sky and added Petunia Pop stars near the greeting for a playful sparkle.

Isn’t this card just the cutest? The Halloween Sweet Suite makes creating this fun fold so easy because the designer paper practically does all the work for you. With whimsical images, bold colors, and festive patterns, it’s the perfect collection for quick cards, treat bags, and more.

Give this fun fold a try—you’ll be amazed at how fast it comes together and how much joy it brings when that little vampire bear comes strolling out to say Happy Halloween! šŸ§›ā€ā™‚ļøšŸ¦‡

Thanks for strolling in for a visit today!