Simply Sunday: Fun Fold Daisy Card

Hello Stampin’ Friends ~

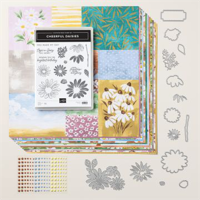
Happy Sunday! Today I have a fun fold for you with our “Cheerful Daisy” … perfect day for it today, it’s beautiful here in Wisconsin!!

I am repurposing some “cut” cardstock from my retreat (I always take a few extra … just in case) so I was on a mission to start using these up. This was one of our Fun Folds that we made, the “Book Binder” technique/fun fold. They are so simple to make and add a little fun to your card.

We begin with the card base; Starry Sky measuring 11″ x 4 1/4″ and then on the 11″ length; score at 4 – 1/4″ and 5 – 1/2″. Now you’ll fold your card in half on the 5 – 1/2″ score line, then fold the front flap “back over” … like you are opening the card but on the 4 – 1/4″ score line.

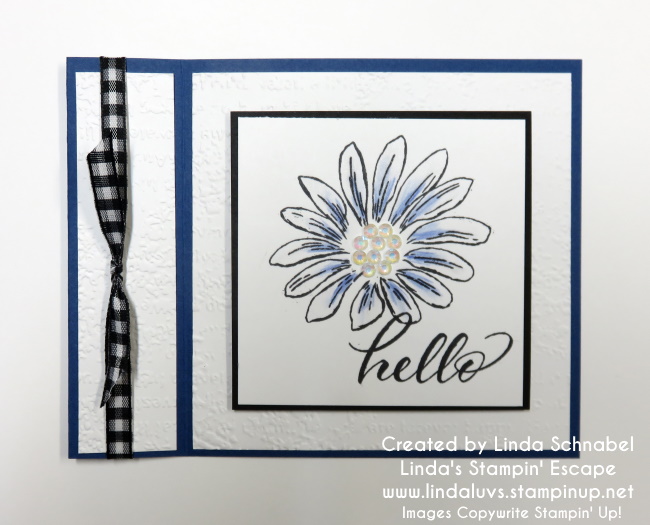
Now we are ready to add some cardstock and create the Binder effect …. You’ll need Basic White measuring 1″ x 4″ and 4″ x 4″ embossed with the Timeworn Type 3-D embossing folder. Once you’ve attached your textured pieces, you can add your bow. I’m using the Black & White Gingham ribbon using 2 pieces. Cut one piece at 6″ … add your adhesive to the “inside / back of that piece and secure your ribbon edges down.

Now, put adhesive on that area “between” the two score lines and secure it … this creates your “Book Binder” fold. Now you can slide the second piece of ribbon under your secure piece on front and tie. This creates a bow that will not fall off or slide around.

OK … We are ready for the focal point of our card ….

Our Basic White square measures 3″ x 3″ and we begin by stamping our “hello” first. I am using the beautiful Layering Leaves stamp set. I then stamped my large daisy … both are stamped with our Tuxedo Black Memento Ink.

Using the Night of Navy in the Assortment 2 Watercolor Pencils, I added a touch of color and then softened it by blending it with the Blender Pen. I finished it off by filling the center with the Iridescent Rhinestones (they are so versatile)!

That’s it! It really is so simple to make and the Book Binder fun fold adds a great touch to your card. Hope this inspired YOU to try out this Fun Fold. Until next time … Have a great day.

Thanks for stopping by today ~

Here is the list of supplies that I used to create today’s card. Just click on the image for more details and to add it to your stampin’ collection.

Transforming the “Fresh as a Daisy” Designer Paper into beautiful cards in Minutes!

Hello Stampin’ Friends ~

Quick post today sharing the replay video of my Facebook LIVE last night. I will share the individual cards later today (they will be added to this post).

Grab a cup of coffee and check out the video or give it a re-watch if you joined me last night. So many pretty cards to see ….

Cheerful Daisies Bundle Step-by-Step

Hello Stampin’ Friends,

I am back with more daisies, brought to you by Stampin’ Up! and their team of artists!! If you’re one of those paper crafters who adores kraft paper, you’re going to love this month’s step-ups. What’s so great about kraft? Its special appeal may be due to its ability to impart instant, shabby chic sophistication to anything you’re creating—which is interesting!

Kraft’s humble beginnings would not have led anyone to guess that it would one day be valued for its natural, organic beauty. In fact, its toughness and coarse texture historically made it a perfect choice for grocery wrapping paper and all-around, heavy-duty packaging.

Today we’re showing off our Kraft Note Cards & Envelopes with our new Cheerful Daisies Bundle, but feel free to match up these beautiful cards with anything you love in the catalog! It’s hard to go wrong with this amazing, versatile paper.

To create the casual card (far left), stamp the flower tops in White Craft ink, the flower centers in Early Espresso, and the stems in Old Olive ink. Stamp the sentiment with White Craft ink on a small piece of Early Espresso Cardstock, sprinkle it with white embossing powder, and heat set. Position a Linen Thread bow behind the sentiment banner before adhering it to the card with Stampin’ Dimensionals.

For the middle card, layer Vellum petal die cuts over the stamped daisies. Stamp the leaves on a kraft envelope in Old Olive ink and die cut. Color the Linen Thread with a Dark Olive Blend for added pizzazz. Finish with gold sequins from our new Neutrals Adhesive-Backed Sequins.

For our most stepped-up project (far right), we decorated the lovely Kraft Note Cards & Envelopes box. Use it for storing cards or better yet—over-the-top gift packaging! We added to the pretty floral focal point by die cutting some of the daisies with a circle die cut from the Stylish Shapes Dies, then popping it up with Stampin’ Dimensionals. Stunning!

Thank you for joining me today.

Cheerful Daisy in Lemon Lolly & Pebble Path

Hello Stampin’ Friends ~

So excited to share the NEW Cheerful Daisy card with you that we made at my Spring Stamping Retreat. I’m also sharing the video replay of last nights Facebook LIVE and then the ingredients and dimensions so you can recreate this quick -n- cute card ….

Wasn’t that easy to make!! Here is a close up of my card

DIMENSIONS:

  • Card Base: Pebble Path / 8-1/2″ x 5-1/2″ Scored and folded at 4-1/4″.
  • Lemon Lolly / 2 pieces 5-1/4″ x 4″ … mat for designer paper (front) and white (inside) & small piece of scrap to add a pop of color behind the greeting
  • Designer Paper: 5″ x 3-3/4″
  • Basic White: 5″ x 3-3/4″ (Inside) + 4″ x 3-1/2″ (cut daisy) + 3″ x 1-1/2″ (stamp greeting) + small scrap to stamp the flowers center in Lemon Lolly

I learned something new today ….

What is the Centre of a daisy called?

A single stem arises carrying the flower head – this is not just one flower, but a composite of a number of tiny flowers which make up the yellow disc in the middle (‘disc florets‘) and the surrounding white ‘ray florets’ (which look just like petals).

Thank you for joining me today.