You are the Happy to my Day!

Hello Stampin’ Friends ~

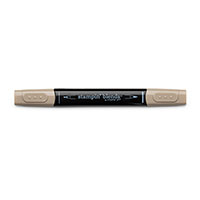
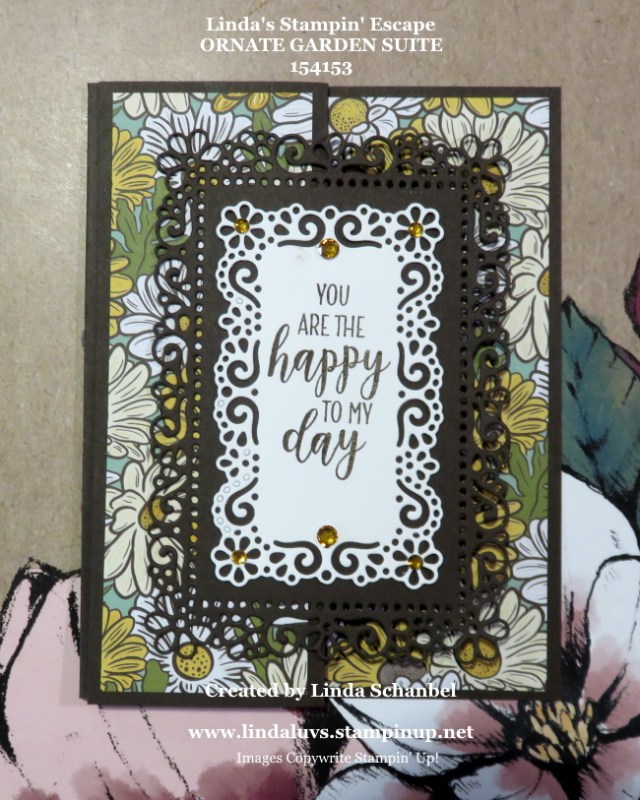
Day 4 of my Ornate Garden Suite parade of cards and today we layer. These delicate dies are created for layering and they are the focal point of today’s card.

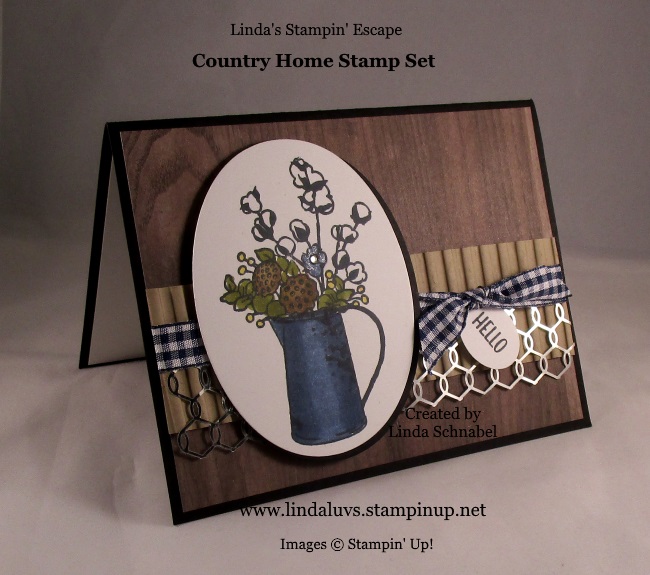
My card base is Early Espresso and is paired with another pattern of the Ornate Garden Specialty designer paper. It is actually cut in half as today’s card is a “Z FOLD” ….

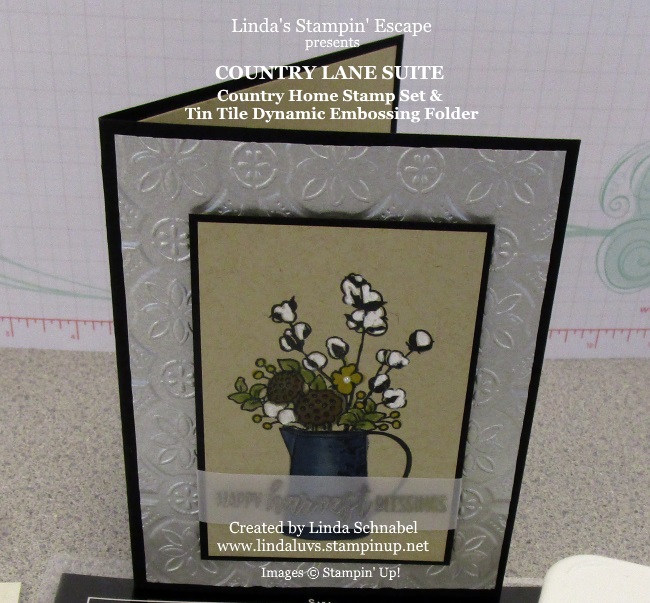
As you open the card, it exposes the layering and how such an intricate “looking” card can be simple to create. Our greeting comes from the “Country Home” stamp set which can be found on page 89 of the Annual Catalog.

The designer paper is only applied to the ends of the card. The layers of die cuts are attached to the left or “Z”.

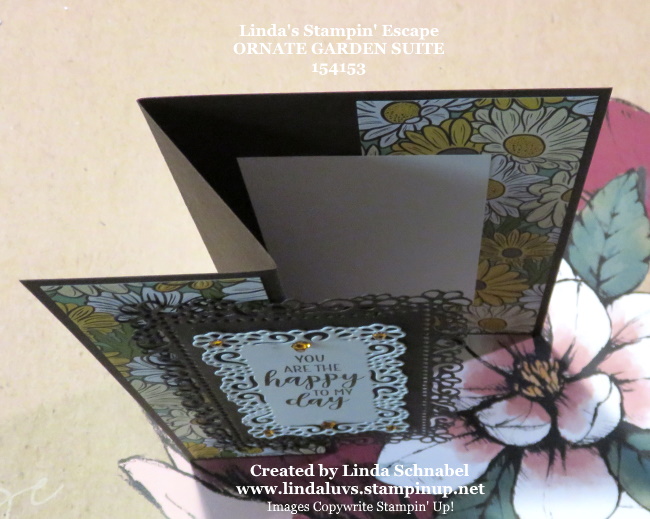
I’ve added some white cardstock so you can add a note to your card, it is hidden by the layers. You could use a full quarter sheet of designer paper inside and then the white for your sentiments but I like the contrast .

A simple “Z Fold” just adds a little surprise when opening up the card. I like them because the are easy to create and fun to open.

I hope you have enjoyed another way to use the Ornate Garden Suite … remember that I will send you a PDF file of all the Instructions (step by step) with photos how to make all the cards shown this week, and 2 BONUS Cards!! You will also get the “Bonus Cards” sent to you as a “Thank You”…

How do you take advantage of this great offer? Just purchase $50 or more of the Ornate Garden suite from me (either from my on-line store or I can help you place your order). And I will send them to you! Oh yes, you will also qualify for my Virtual Rewards points.

Thank you for stopping by today. I will share my final card in this parade of cards tomorrow 🙂 The offer will last all month long.

Throwback Thursday … Country Home

Hello Stampin’ Friends ~

Today is Thursday … a throwback Thursday but I’d like to think it’s a “thankful” Thursday. I’d like to share some of my favorite cards from the Country Home stamp set. This is a beautiful set for the time of year however I believe that you can find a friend that would fall in love with this at any time of year.

I made this card for a friend who was brought up on a farm so that milk can brings back memories for both of us … for her, her parents house, for me … visiting my grandpa and grandma on their farm.  The stunning Tin Tile Embossing folder in combination with the Country Home stamp set really warms your heart.

This warm little hello is another one of my favorites of the Country Home Stamp set.  I used to work in a Flower Shop so I was immediately smitten with the dried flower arrangement that I could tuck so neatly into this pitcher … kind of reminds me of my grandma, she had one just like it ♥ 

Sometimes it’s just nice to sit back and reflect on days gone by … especially when you can enjoy that moment with a friend or family.  I hope you enjoy your day today.

Thank you for joining me today …

TODAY’S STAMPING SUPPLY LIST …


Country Home Hello

Hello Stampin’ Friends ~

Hope you had a good weekend and I hope you enjoyed my card yesterday from our Country Lane Product Suite. If you haven’t had enough … then I have another card to share with you that features the Country Home stamp set.

Many moons ago before I had my children I used to work in a flower shop, and this card takes me back to the late 70’s when dried flower arrangements were popular and so was arranging them in pitchers & coffee pots … a little bit country!  What’s interesting is that I have one of those mini blue tin coffee pots on my stove right now!!

I wanted this card to be a bit more rustic since yesterday we had the galvanized background, so I started with the Wood Textures Designer Series paper stack (I love browns and blues together).  I wanted to add some texture so I used a 1-3/4″ x 5-1/4″ piece of Crumb Cake and ran it through the Corrugated Dynamic embossing folder.

Next I added a strip of the Chicken Wire Elements and added the beautiful new Night of Navy Gingham Ribbon… this ties the two elements together without leaving a harsh edge.  Then I tucked my sweet little “hello” onto the card.

I used the Stamparatus again to stamp my images…. one of the reasons was because I had precut the ovals and then placed them in a template, this is a true paper saver.

Just like yesterday, I used the Stampin’ Blends – the alcohol markers.  I colored the sides of my coffee tin with the Night of Navy first, then filled in the entire pot. I used the Color Lifter to lighten the center and create my “light source” … where the light would hit your object.

I did the same with all my colors, started with the dark and colored over with the lighter shade.  The berries were colored yellow (Yellow and Blue are for our Brewers!!)  And Marge … if you are reading this, please give me a call.

I colored the center flower in Night of Navy and again used the Color Lifter, after which I added a touch of the Wink of Stella to the flower and the light area of my coffee tin.

This stamp set and the cards I have created brought back many memories, whether they were of grandpa’s farm of working in the flower shop … it was a nice stroll down memory lane.

Thanks so much for coming with me … Let’s kick off this week with a warm hello.

Enjoy your day ~

TODAY’S STAMPING SUPPLY LIST … if you like what you saw, you may purchase any of the items used to create this card by clicking on them. Thank you.


Simply Sunday: Simply Country

Hello Stampin’ Friends ~

How are you on this fine Sunday? Hope you are enjoying your weekend. With the chill in the air … I’ve been doing some stamping and preparing for my upcoming retreat. Yesterday morning I hosted my Saturday Stamp Club and I would like to share one of the cards that we made.

This month my clubs focused on the Country Land product suite on pages 42 and 43 of the Holiday Catalog. Today’s card features the Country Home stamp set, Galvanized Metallic paper, the Tin Tile Dynamic Embossing Folder and the Stampin’ Blends to create a simply beautiful card.

We first embossed the Galvanized paper with the Tin Tile embossing folder … these two combined are simply stunning. Gives you that old Farmhouse ceiling look! In keeping with the farmhouse look, I chose the Milk Can again and demonstrated how to attach the stamps onto the plates of the Stamparatus for perfect alignment.

Once we stamped our images…  we punched two of the corners with the Detailed Trio punch. You can find that on page 211 of the Annual Catalog.  We also punched the corners on the inside piece of our card.  We added the new Metallic Pearls to both the punched corners and our greeting!

Before assembling the card we colored … that is always such a relaxing thing to do, and with the Stampin’ Blends its also easy. We started with the milk can using the Smoky Slate / Dark and brought it down both sides of the can twice. Once that was done, we took the Smoky Slate / Light and colored in the entire can, then went over the area between the light and the dark to blend them. It’s almost like magic!! Here is my color pallet …

So not only did they get to learn the basics on the Stamparatus but got to see the amazing ease at which color-blending with the Stampin’ Blends can be. And who didn’t fall in love with the Tin Tile and Galvanized paper combo!

I hope you enjoyed todays card and please feel free to check out my schedule HERE for the date and time of my clubs and think about joining us … I usually have a couple spots for guests.

Thank you for joining me on this beautiful Sunday…

and I hope you have a wonderful day.

TODAY’S STAMPIN’ SUPPLY LIST …


Country Home …

Hello Stampin’ Friends ~

Let me paint you a picture: A beautiful fall in the countryside. Dried flowers, rustic jugs—just the setting to sit still for a moment and be grateful. Doesn’t that sound beautiful?

This month my clubs are creating cards using the Country Home Stamp Set. This beautiful product suite is perfect for this time of year (anytime really) but I fell in love because Fall is my favorite time of year. Besides the milk can reminds me of my grandpa’s farm.

It’s those beautiful memories that make creating beautiful cards so easy with this stamp set. There are so many ways in which you can use this set. One of my favorites is teaming it up with the Tin Tile Dynamic Embossing Folder and the new Galvanized Metallic paper … the results are stunning.

Another fun product to add to your cards and projects is the Chicken Wire Elements (currently unavailable, but expected arrival October 29th).  Just look at all the beautiful cards you can make … and don’t forget the wall décor!

There is one more tool that we have been using in creating our projects and that is the Stamparatus!!  The members were amazed at how easy it was to use, and that each of their stamped images turned out perfect. Too light … just re-ink and stamp again – NO double image!!  Just check out this video!

Love, Love, LOVE this tool … I am in the process of creating for my Holiday Stamping Retreat, and let me tell you how handy this has become.  I will show you “after” my retreat how it helped me out so much.

If you have any questions on the Stamparatus or the Country Home product suite … please feel free to contact me at anytime.

I thank you for stopping by to visit today.

Have a beautiful day ~

COUNTRY HOME PRODUCT SUITE: 

Happy Harvest Blessings

Hello Stampin’ Friends,

And a Happy September 1st to you!  With fall just around the corner, it seems this is the time many people get reflective and have gratitude for all they have in their life, so my card today reflects the same sentiment.

I am using the Country Home stamp set from the Country Lane Suite of products found on pages 42 and 43 of your Holiday Catalog.  This stamp set reminds me of a simpler time … the pitcher from grandma’s kitchen and when I used to work in a flower shop! I loved designing dried flower arrangements … you don’t see that much anymore.

I will also be highlighting the Galvanized Metallic paper and the Tin Tile Dynamic Embossing Folder ….

The base of our card is Basic Black and the inside and the piece we stamp our images are Crumb Cake cardstock. Our background is the Galvanized Metallic paper embossed with the Tile Dynamic Embossing Folder.  This is such a dramatic piece and looks great embossed with any paper medium.

Next we stamp our two images … the pitcher and the floral piece (there are two) Using the Photopolymer stamps makes it easy to align the pitcher and floral images.  When you’re done, you can begin to color.  I used the Stampin’ Blends Markers because they are so quick and easy to use and can create so much dimension on the image.

For the pitcher … I just followed the sides of the pitcher with my marker twice, giving me nice dark color along the sides and leaving the center untouched.  Then I simply colored the pitcher going side to side with the marker to fill in the blank spaces leaving an area that looks like the light is bouncing off of it (highlighting it).

Again, I used the Stampin’ Blends to do the floral piece except for the cotton … that was done with the White Stampin’ Chalk Marker.  Don’t you just love the way the chalk marker brings the cotton to life!!

Our greeting “Happy Harvest Blessings” was stamped with VersaMark® onto the Vellum Cardstock and then heat embossed with Silver Embossing Powder… this ties all of our elements on the card together, so nothing looks out of place, just a nice flow in the design.

Thanks much for stopping by today, I have the list of ingredients below. Click on any image to see more details about the product of to begin shopping.  HOWEVER, the Country Lane product suite is not available to purchase until the 5th of September … so just a few short days and the Holiday Catalog will come alive!!

Have a great Saturday, September 1st … and I’ll see you back here tomorrow for my Simply Sunday post.

TODAY’S STAMPIN’ SUPPLY LIST …


Simply Sunday: Happy Blessings

Hello Stampin’ Friends ~

Hope you are enjoying your weekend. I promised to share a sneak peek into the Holiday Catalog so I chose the Country Home stamp set to share with you today.

Just like the name says, this stamp set takes you home to the country. For me, it is the “milk can” that takes me back. Back to my grandpa’s farm and running in the fields on those warm summer days, the smell of grandma’s kitchen as she always had something baking in the oven, and the pretty flowers in the garden … all take me back.

I teamed up the images from the Country Home stamp set with the Festive Farmhouse Designer Series paper. It may be located in the Christmas section of the catalog but I thought it was perfect for my card.  It reminds me of Shiplap!! A little Farmhouse Chic 🙂 What do you think … Will I get a thumbs up from Chip and Joanna Gaines?

I stamped the milk can with VersaMark and embossed it with Silver onto the Galvanized Metallic paper. Next I used the Garden Green Watercolor Pencil and the Aqua Painter to “tarnish” my milk can. The flowers were colored with the Stampin’ Blends, I used the Light & Dark Old Olive, Light & Dark Crumb Cake, Light and Dark Pink Pirouette and Light Crushed Curry. The Stampin’ Blends make coloring so easy and it looks sooo good.

You can see the “tarnish” a little better from this angle … You can also see that I popped up both stamped images (these are two separate stamps). I find coloring very relaxing, and while I was relaxed I didn’t mind cutting out these images and adhering them together. It really does remind me of Farmhouse Chic. The greeting completes the card.

I hope you enjoyed todays card share, and I thank you for sharing a part of your day with me.

Happy Blessings and Have a beautiful day ~