I could not get my Facebook LIVE video from last night to upload so while I work on that I’d like to share my Facebook Live video and card that I created using the Stampartus and highlighting the Mirror Image Technique. You will discover the “secret” or simple trick to creating the Mirror Image.
Sit back, grab your coffee and enjoy the short video …
The video explains the steps that I took to come up with the size and layout of the stamped area… and also explains the background I’ve used. It is actually one of the backgrounds I demonstrated the Embossing Paste with last week!
Let’s get a closer look at the card …
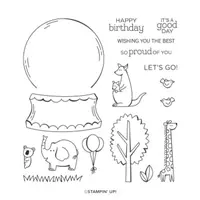
Our cute giraffes come from the Zoo Globe stamp set, and our verbiage come from the Well Said stamp sets.
The background was created with the Shimmery White Embossing paste and the masks … you can watch the video HERE.
Now before we go … lets take a look at the layering and see how amazing a few Stampin’ Dimensionals can change up a card! Besides the beautiful texture you get from the Embossing paste, you ‘ll get great dimension and height.
I hope you enjoyed today’s card and are inspired to try this fun technique. Please don’t forget that all of the items used in today’s card are available in the Online Extravaganza (with the exception of the Memento Ink) …
Thank you for hanging out with me today. I hope your day is a good one.
TODAY’S STAMPIN’ SUPPLY LIST … If you liked the products used in today’s projects, I have links for you below. Just click on the item you would like more information on, or to begin your shopping. It will take you directly to my website. Thank you ♥ PLEASE NOTE: SOME ITEMS MAY NO LONGER BE AVAILABLE or AT THE PRICE LISTED.
Yippee … it’s the weekend and I have a sweet -n- simple card to share with you today using the cutest little snail to mail! And our sweet little snail teamed up with the Many Messages Bundle to send you wishes from a grateful heart …
You know what they say “Teamwork Makes the Dream Work” … these two bundles pair so nicely together (actually the Many Messages stamp set pairs perfectly with any of our stamp sets!) Even the little stars and hearts came from the Many Messages stamp set.
Let’s begin with the soft warm glow behind our friendly little snail … I used the blending brush with Bermuda Bay ink to create an area to highlight our snail. Our snail was created using the dies and cutting from the designer paper… you also have the option of stamping your snail and coloring this little cutie any way you want!!
I have mentioned that the sentiments come from the Many Messages stamp set … a large grouping of sentiments that are stamped all at once, and can also be die cut all at one!! How easy is that …
I like to use my Stamparatus and then stamp multiple colors and create a large collection of sentiments that I can just select at a moments notice. I love to create dimension and texture on my cards so I popped up the sentiments, the snail and the stars and hearts.
These little snails are sure to bring the fun to the party or to let you know how grateful you are for having them in your life… both will bring a smile to your face.
Thank you for stopping by and checking out my blog, I appreciate the company.
Today I’d like to share my Facebook Live video and card that I created using the Stampartus and highlighting the Mirror Image Technique. You will discover the “secret” or simple trick to creating the Mirror Image.
I’m also very excited to share with you that Stampin’ Up! has extended the Online Extravaganza until Midnight (MT) tomorrow!
Sit back, grab your coffee and enjoy the short video …
The video explains the steps that I took to come up with the size and layout of the stamped area… and also explains the background I’ve used. It is actually one of the backgrounds I demonstrated the Embossing Paste with last week!
Let’s get a closer look at the card …
Our cute giraffes come from the Zoo Globe stamp set, and our verbiage come from the Well Said stamp sets.
The background was created with the Shimmery White Embossing paste and the masks … you can watch the video HERE.
Now before we go … lets take a look at the layering and see how amazing a few Stampin’ Dimensionals can change up a card! Besides the beautiful texture you get from the Embossing paste, you ‘ll get great dimension and height.
I hope you enjoyed today’s card and are inspired to try this fun technique. Please don’t forget that all of the items used in today’s card are available in the Online Extravaganza (with the exception of the Memento Ink) …
With hundreds of items On Sale … I’d be happy to help you with your Holiday Shopping List.
Thank you for hanging out with me today. I hope your day is a good one.
TODAY’S STAMPIN’ SUPPLY LIST … If you liked the products used in today’s projects, I have links for you below. Just click on the item you would like more information on, or to begin your shopping. It will take you directly to my website. Thank you ♥
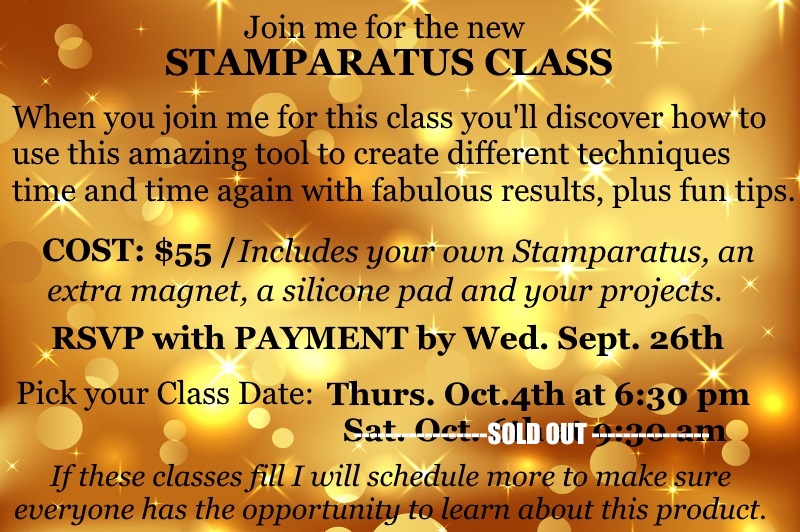
And Happy Saturday to you! I am excited to share an upcoming class with you today. The Stamparatus Class has been much requested by you so I sat down and created 3 super cute cards with our newest and most popular Stamp sets!
DID YOU KNOW … The Stamaratus works with both Red Rubber and Photopolymer Stamps? I’ll show you how. You’ll learn great tips and fun techniques!
The Stamparatus is the perfect tool to have in your stamping arsenal … It’s a “positioning” tool and so much more! It stamps perfectly with your two-step stamping, it’s solves the problem of always getting a good image, and works wonders when stamping multiple projects (You will be learning how these problems are solved by the Stamparatusand some fun techniques as well)
SATURDAY, August 22nd @ 9:30 am
… or …
WEDNESDAY, August 26th @ 6:30 pmThis class has filled already!! I will schedule another evening class soon!
Classes will be limited to 4 attendee’s per class / COST: $15.00 … If these classes fill up, I will offer additional classes.Please RSVP by Wed.Aug. 19th … Let me know which class you will be attending
CALL 262-334-1009 or Email: lindaluvs2stamp@aol.com
Join me for a great learning experience and a couple of hours of stamping fun! You’ll go home with 3 great cards, knowledge on how to utilize your Stamparatus for best performance, and great specials & more for attendees!!
Thanks for stopping by today, and if you would like to join me for this class, please RSVP by Wednesday the 19th, 2020. Let me know which class you would like to attend.
I’m so excited to announce that, on April 1, Stampin’ Up! is launching a new product line called Storage by Stampin’ Up! Whether you have an entire room or a small corner in your home for stamping, our new lineup of modular storage solutions lets you organize—and customize—your space your way!
Storage by Stampin’ Up! is designed to store and showcase your Stampin’ Pads, Stampin’ Ink Refills, Stampin’ Blends, Stampin’ Write Markers, Watercolor Pencils, and other accessories. Here are some other features and benefits of Storage by Stampin’ Up!:
Keeps products organized, tidy, visible, and trackable at all times.
Ensures that your Stampin’ Pads, Stampin’ Write Markers, and Stampin’ Blends are all stored horizontally, as recommended.
Designed to be stylish, durable, compact, stackable, and modular.
Blends in naturally with most home decor with its white neutral color.
Stacks vertically and can be arranged to fit practically any flat workspace.
Easily assembled and disassembled for rearrangement and/or cleaning.
Watch this quick video and see how easy you can assemble and arrange your new storage …
Also … I just want to remind you that we only have a few more days before Sale-a-bration ends. If you were looking at making a purchase, now’s the time to get additional FREE product. Here’s my suggestion and my favorite tool, the Stamparatus!
Message me with any of your questions, plus I’d love to hear what you think of the new Storage by Stampin’ Up! I’m so excited … I’m doing a little rearranging of my craft room so now I can have all my inks and markers and more right at my fingertips!! I’ll be sure to share the before and after photos … of course I have to wait till April 1st, just like you.
Thanks so much for spending a part of your day with me.
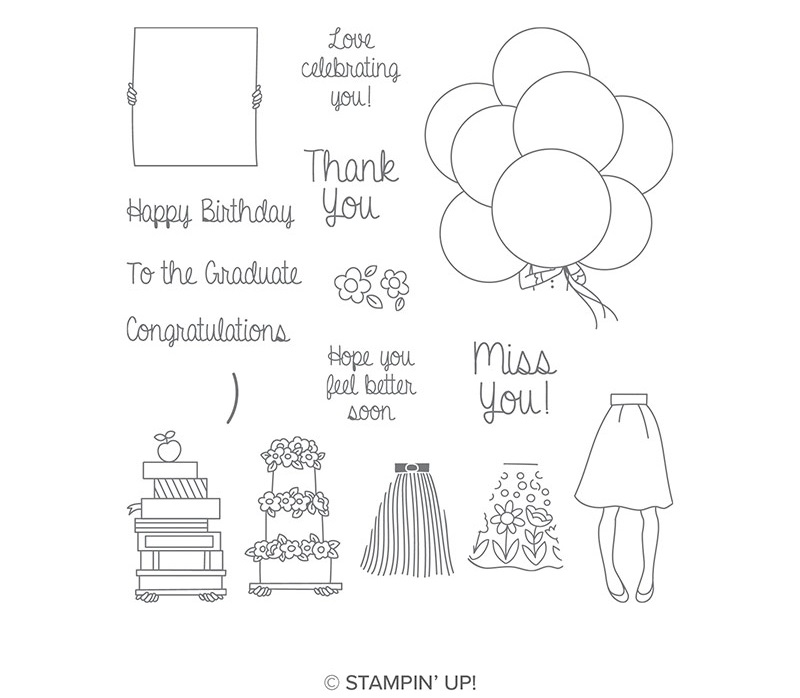
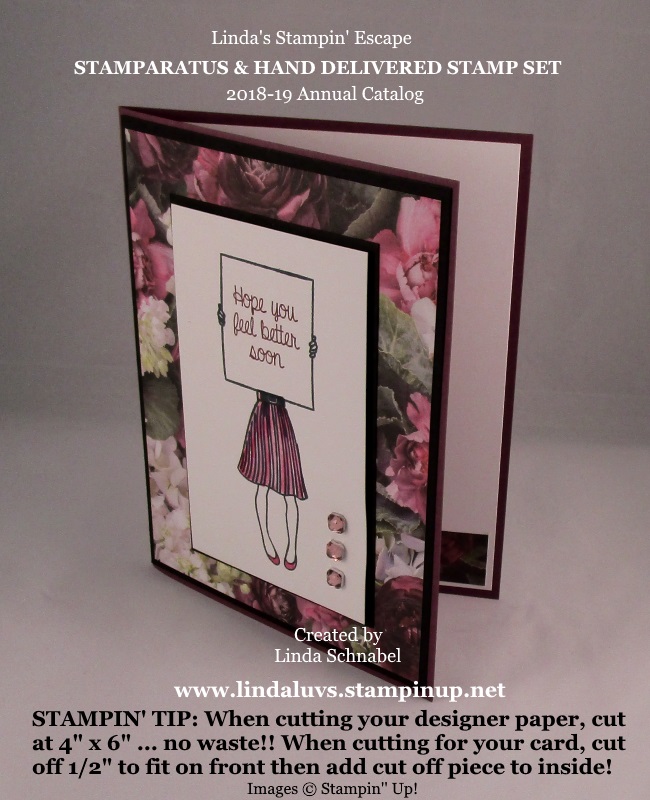
Today I’d like to share yet another card that I created with the help of the Stamparatus and the Oh so cute “Hand Delivered” Hostess stamp set! Yes, this is one of our exclusive stamp sets for those who host a stampin’ party or purchase enough to qualify as a hostess. You can also have a book party too … just pass the catalog and let your friends & family pick out what they need … Remember, it’s Sale-A-Bration so each $50 (before S&H) purchase qualifys for a FREE Sale-A-Bration item.
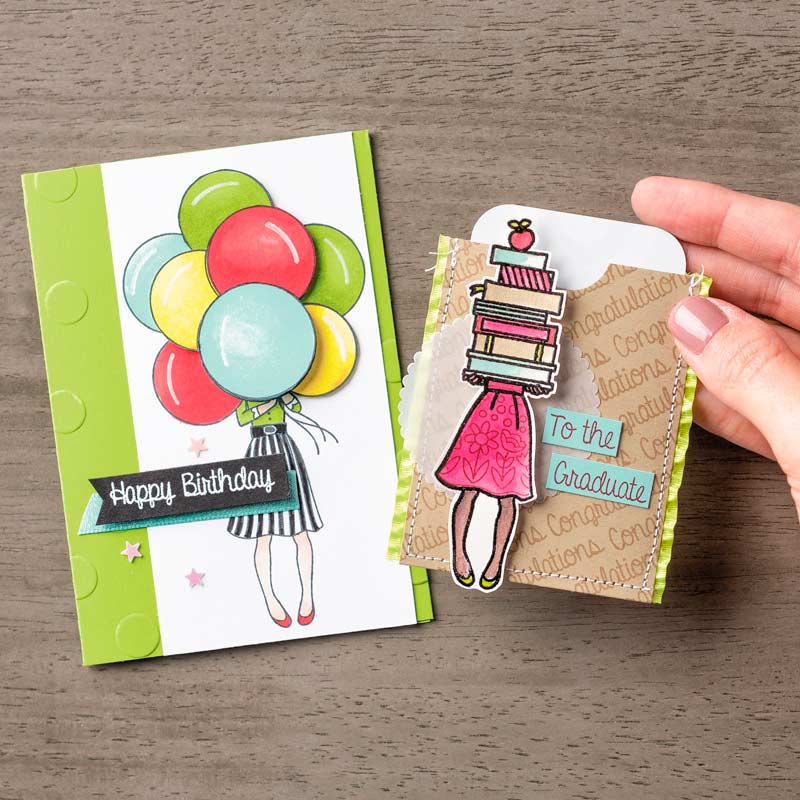
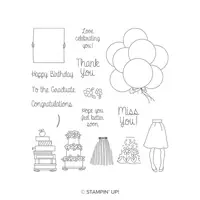
This is such a cute stamp set and contains 7 different greetings! Besides the poster you can put the greetings on, there is also a cake, balloons and books. Take a look at the stamp set …
Get Well cards are requested all the times, and this stamp set is so sweet. When deciding how I was going to create my card, I decided to “send” flowers with it, in the form of our designer paper … the stunning Petal Promenade Designer Paper. The pattern I used had a lot of the Blackberry Bliss in it. I did the “Happy Dance” when Stampin’ Up! brought this back!
When I cut my designer paper, I cut it in 4″ x 6″ pieces and use it for card fronts … I just cut off 3/4″ off the 6″ edge so I end up with a 4″ x 5-1/4″ … think I printed that wrong on my photo!! But you can see I tucked it in the inside to decorate that too.
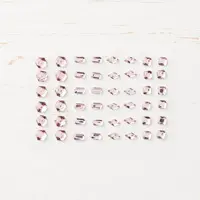
The coloring and the greeting were all done in Blackberry Bliss and I couldn’t resist using the new Petal Pink Rhinestone Gems … the compliment the Blackberry Bliss so beautifully.
Don’t forget that when you are working with a Photopolymer stamp set on the Stamparatus, you will need to use the foam mat this is included with the Stamparatus. I always have my Silicone mat underneath … just always have it there!
Here are a few more samples that were created with the Hand Delivered stamp set ….
The Hand Delivered stamp set just stole my heart, and I hope that you enjoyed the samples shared today. This maybe an exclusive Hostess stamp set but just by passing the catalog around, hosting a stamping party of purchasing enough to qualify as a hostess, it can be yours too.
Thanks for hanging out until I got my blog posted today … I appreciate your loyalty and patience.
My, my, my … it’s about 70° warmer today than it was 3 days ago!! Even 20° felt warm yesterday!! lol Speaking of yesterday, I hope you enjoyed my Mirror Image card. It was fun and easy to make with the Stamparatus!
Today I’d like to share more cards that were created using the Stamparatus!! You can use your Stamparatus to create “ANY” card … it’s especially useful you are making repetitive cards such as Birthday invitations, Save the Date cards or your Christmas cards.
It also creates the fun techniques like the Mirror Image above or the “Hinge Technique” below …
The Hinge Technique is unique to our stamp positioning tool (the Stamparatus) because of the removeable plates! The hinges allow you space your stamping equally each time. So pretty!
I think this is perfect for our craftin’ sisters (or brothers) who are NEW to Stamping. It helps in the placement of the stamped images and if it doesn’t stamp the best the first time … just re-ink and stamp! Walla … perfection! Next is a simple card that is a great example of stamp placement ….
If you’re new to stamping I will show you how easy it is to place your stamps on the Stamparatus to ensure repeatable perfection. If you’re ready to try your hand at the magic of the Stamparatus, let me sweeten the deal for you ….
First, we are in our Sale-A-Bration celebration so with a $50 purchase you can choose a FREE Sale-A-Bration item … You will also get a Virtual Rewards Point from me AND I will send you a tutorial for “each” of the three techniques shown here today. You will receive a PDF file showing you how to do the Basic Set up, the Mirror Image and the Hinge Technique during the month of February. This offer will end on February 28th, 2019.
You can click on the images to learn more about the products … you will need the Silicone Craft sheet to do the Mirror Image technique, however, I use it all the time … it just gives the “pad” that’s included a little lift for stamping images close to the hinges.
Please let me know if you have any questions. One More Thing … I will be sending you a Special Gift and Hand Stamped Card when you purchase my Stamparatus “Sweetheart of a Deal” Bundle.
Yesterday I shared a video with some great tips while using the Stamparatus, today I’ve got a cute card for you that features a fun technique by using the Stamparatus!! I’m going to show you how easy the “Mirror Image” technique is … and with the precision stamping of the Stamparatus, it makes it super simple!!
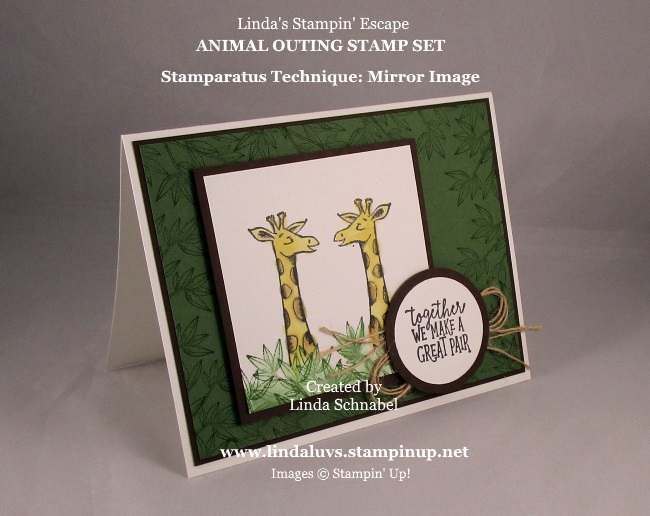
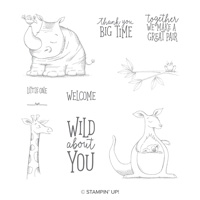
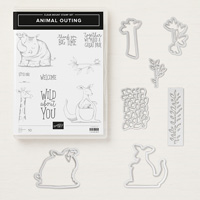
This is the card that I used to teach the Mirror Image Technique during my Stamparatus Class. The stamp set is the Animal Outing set found in our Annual Catalog. I will give you Step by Step instructions along with photos …
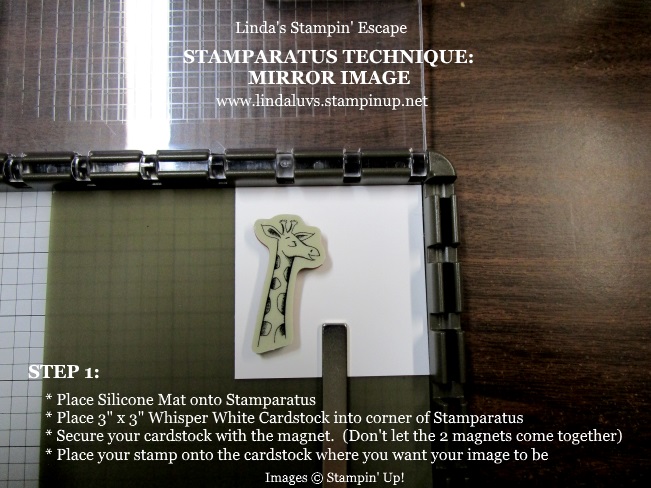
The first thing you want to do is set up your placement of the stamp. You will place your stamp on your piece of cardstock “where” you want the stamped image. Once it’s placed properly, bring your plate (you can see it above our stamp) over the stamp and press firmly to pick it up. You do this just as you would on your blocks.
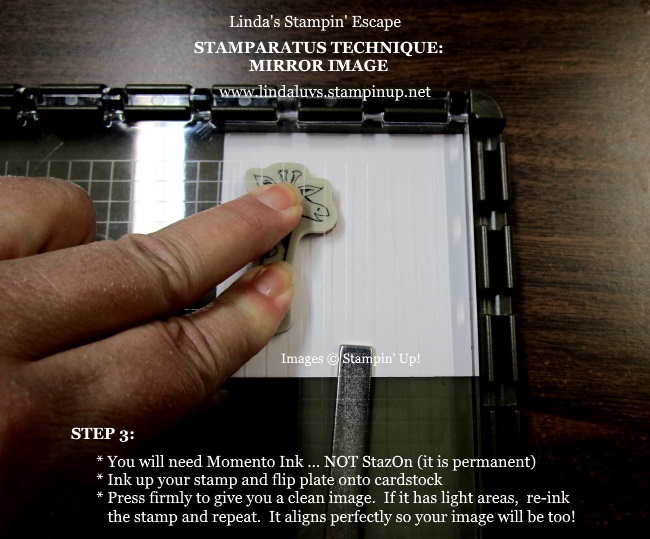
Here you can see that I brought the plate down over the stamp and with my finger I put a little pressure on the plate to pick up the stamp. Once you have picked up the stamp … you will flip the plate back up and ink up the stamp with Momento ink. Do not use StazOn … it’s permanent ink and will remain on your silicone pad.
I always give my stamp a firm little push to make sure the paper is picking up the ink. You can always re-ink and re-stamp … because the Stamparatus is a stamp positioner, it will stamp directly in the same spot (as long as you are not moving your cardstock).
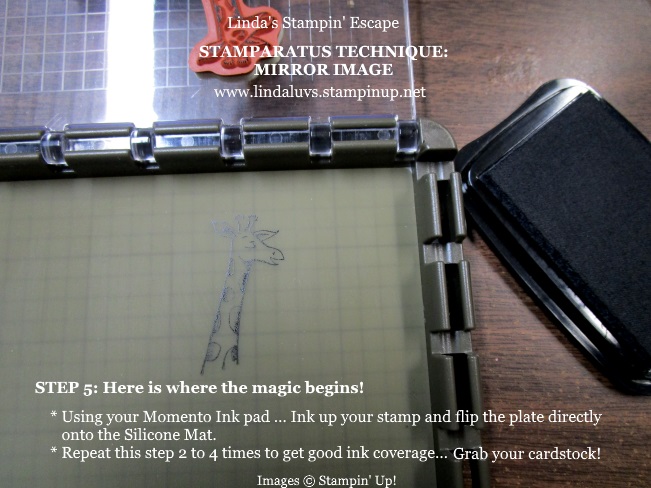
Once you’ve stamped your image to your liking … It’s time to remove your cardstock. Get your Momento ink and ink up your stamp again and stamp directly onto your Silicone mat.
You will want to ink up the stamp and stamp the Silicone pad several times so you have “good” ink coverage. When you have a nice layer of ink on your Silicone pad … get your cardstock again.
FLIP OVER THE CARDSTOCK so the image is placed against the silicone pad … you should not see any stamping on your cardstock. Tuck the cardstock back into the corner of your Stamparatus, then bring the plate over your cardstock and apply pressure to the stamp so you pick up the ink on the silicone pad. The picture would look exactly like STEP 3.
Now it’s time to pick up your cardstock and see the magic …
If you look closely you can see a very light image left on the silicone pad … most of the ink is now on your cardstock and you have created a mirror image! Wasn’t that easy!!
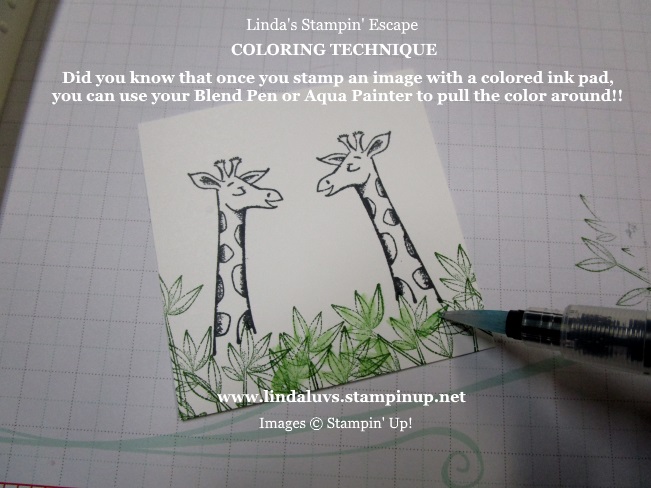
I have a few more tips to show you how I finished the card. We stamped our own background on our Garden Green cardstock using Garden Green ink …
Because there is a little froggie sitting at the end of our branch, we simply inked only the leaves. These were stamped on the Garden Green to create the background, and then again as foliage around our giraffes.
After we stamped the leaves around our giraffe, we used the Aqua Painters to pull the color from the stamped image to color itself … isn’t that cool!!
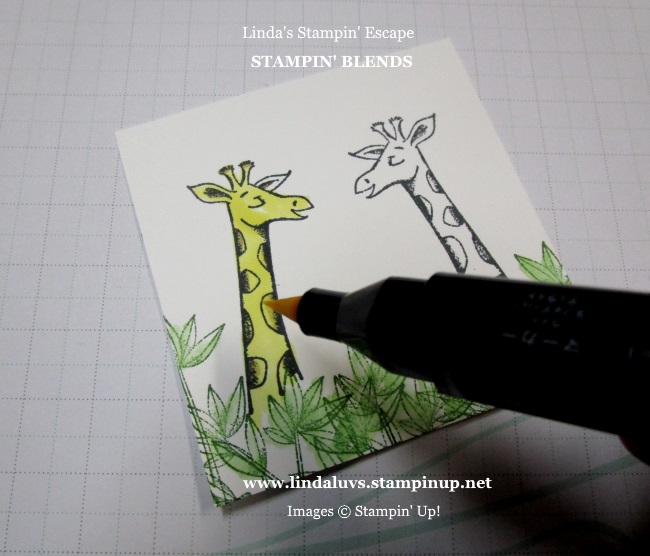
We used the Stampin’ Blends to color our giraffe … the Light Daffodil Delight and the Light Crumb Cake for the spots. You’ll see this better on the finished card.
Here you can see the Crumb Cake on the spots and the leaves stamped to create the background. I did that technique a lot before Stampin’ Up! gave us so many amazing designer papers.
The greeting also comes from the stamp set and was punched out with our circle punches. All of our stamped cardstock was backed with Early Espresso cardstock. I finished off the card with strings pulled from the Burlap ribbon.
I just adore this card, and we had a great time making it … because it was so easy to do. The ladies were pleasantly surprised and oh so happy that they could create this card with ease. Hope you enjoyed it as much as we did.
Thank you for joining me today. Please message me if you have any questions about the Stamparatus or the Mirror Image Technique.
If you like the card you saw today, I have the items listed below. You can click on any item to learn more about the product or to begin your shopping. Remember, for each $50 you spend, you may choose a FREE Sale-A-Bration item and get a Virtual Rewards point from me!!
Yesterday I shared a step by step guide on how use the Stamparatus and the masking technique to add my lighthouse “behind” the house from the By the Bay stamp set. I explained a few things about the Stamparatus that I think would bring you more clarity by watching this video …
I think by seeing the Stamparatus in action, it will actually bring my words to life and help you better understand my step by step tutorial. For example, not getting it stamped fully on the first try, it’s easily fixed by re-inking the stamp and stamping it again … perfection!
Hope you enjoyed this video on our Stamparatus, it is a great addition to your stamping tools. Stop back tomorrow as I will be sharing another cute card and amazing technique using your stamparatus.
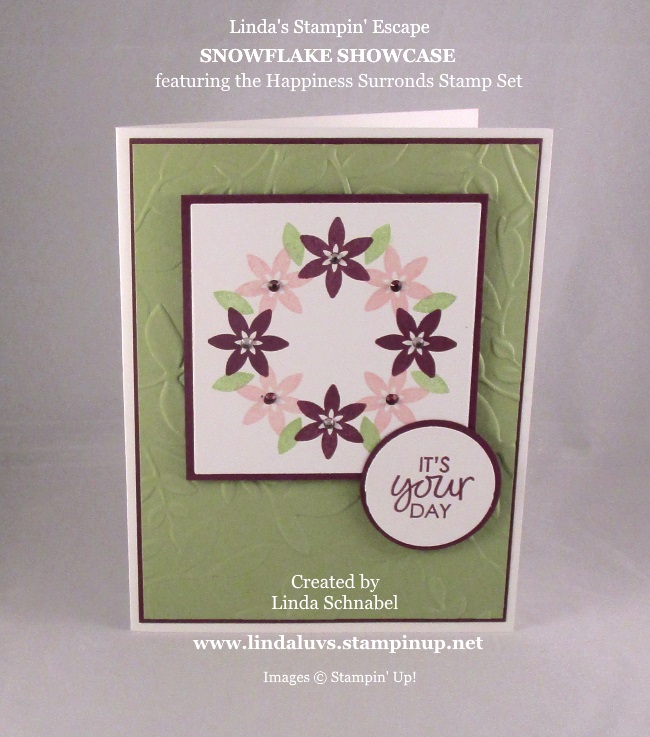
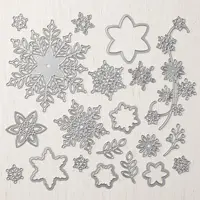
Today I have a special card that I created using the second of the two stamp sets offered in the Snowflake Showcase
The stamp set is the Happiness Surrounds Photopolymer Stamp Set. This set also coordinates with the Snowfall Thinlits Dies.
For my card today I’m using a technique called the “Wreath” or “In the Round” technique. I’m not really showcasing that today … I am working on a video to show how this is done, and it is done using the Stamparatus. This is the card we made at my Advanced Stamparatus Class …
The background was embossed with the “Layered Leaves” Dynamic embossing folder. This is one of my favorites because it goes with so many different stampin’ styles.
The floral wreath was done in Pink Pirouette and Rich Razzleberry with a touch of Pear Pizzazz … these colors were also used in my cardstock layers. We used a template created to make our wreath and with the Stamparatus the flowers are inked and stamped in perfect placement.
Each of the flowers has a Rhinestone but to jazz it up we colored the rhinestones to match the colors we used, but put the opposite colors on the flower … so light on dark and dark on light.
Greeting is also included in the stamp set and was simply stamped in Rich Razzleberry on Whisper White and was punched with our circle punches.
With the use of the Stamparatus … this card is super simple to make. I’m hoping to have a video for your soon. Thanks for hanging out with me today.
Enjoy your day today ~
TODAY’S STAMPIN’ SUPPLY LIST … Last 2 days to purchase the Snowflake Showcase products.
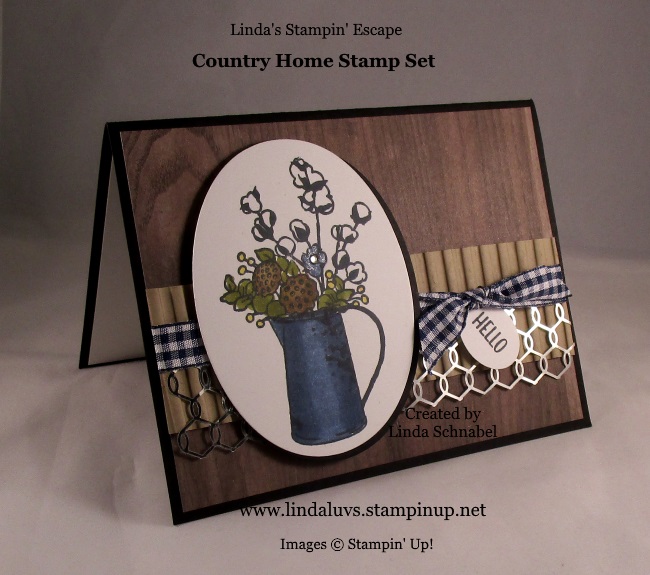
Hope you had a good weekend and I hope you enjoyed my card yesterday from our Country Lane Product Suite. If you haven’t had enough … then I have another card to share with you that features the Country Home stamp set.
Many moons ago before I had my children I used to work in a flower shop, and this card takes me back to the late 70’s when dried flower arrangements were popular and so was arranging them in pitchers & coffee pots … a little bit country! What’s interesting is that I have one of those mini blue tin coffee pots on my stove right now!!
I wanted this card to be a bit more rustic since yesterday we had the galvanized background, so I started with the Wood Textures Designer Series paper stack (I love browns and blues together). I wanted to add some texture so I used a 1-3/4″ x 5-1/4″ piece of Crumb Cake and ran it through the Corrugated Dynamic embossing folder.
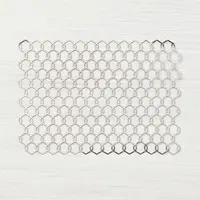
Next I added a strip of the Chicken Wire Elements and added the beautiful new Night of Navy Gingham Ribbon… this ties the two elements together without leaving a harsh edge. Then I tucked my sweet little “hello” onto the card.
I used the Stamparatus again to stamp my images…. one of the reasons was because I had precut the ovals and then placed them in a template, this is a true paper saver.
Just like yesterday, I used the Stampin’ Blends – the alcohol markers. I colored the sides of my coffee tin with the Night of Navy first, then filled in the entire pot. I used the Color Lifter to lighten the center and create my “light source” … where the light would hit your object.
I did the same with all my colors, started with the dark and colored over with the lighter shade. The berries were colored yellow (Yellow and Blue are for our Brewers!!) And Marge … if you are reading this, please give me a call.
I colored the center flower in Night of Navy and again used the Color Lifter, after which I added a touch of the Wink of Stella to the flower and the light area of my coffee tin.
This stamp set and the cards I have created brought back many memories, whether they were of grandpa’s farm of working in the flower shop … it was a nice stroll down memory lane.
Thanks so much for coming with me … Let’s kick off this week with a warm hello.
Enjoy your day ~
TODAY’S STAMPING SUPPLY LIST … if you like what you saw, you may purchase any of the items used to create this card by clicking on them. Thank you.
It’s good to be back!! My workload got a little more hectic than I had planned (happens to us all) but who plans on the drama … right!! But I’m thrilled to be here today to share with you one of the cards that we created in my “Stamperatus 1” Class yesterday.
In class we learned about the parts of the stamparatus, how they interact, how to clean it and to store it. We talked about the it’s core function of “stamp placement” and the wonderful ability to create repeatable stamping. In fact, this little gem is great just for those two features alone, but it does so much more!
Here is a quick video to quickly share the basics and introduce you to the new products that came out to accessorize the Stamparatus…
Todays card features the “Hinge Technique” … we are able to do this fun technique because the hinges are not only removeable but can be moved in equal increments. It’s so easy and so amazing.
We used Cherry Cobbler for our greeting. The stamp is aligned onto my cardstock and then “picked up” with to plate so you can begin your stamping. Once your stamp is inked, stamp directly onto your cardstock. You will then take the plate out of by the hinge, move it down one notch and replace it back into the hinge and stamp again (without re-inking) This will give you a slightly lighter image. You will do that one more time creating the final and lightest of the 3 images.
The large leave stamp is stamped onto your cardstock and with the stamparatus you can add the solid stamp in perfect alignment every time. You see, I showed them how and where each of the stamps were placed and then everyone used the same plates to stamp their projects … what does that mean. You have the ability to create a multitude of cards that all look the same.
The little leaves also used the “Hinge Technique” for their placement. This really is a slick little tool to help you with your card creations. Easy, fast and precise.
I am thrill to share that Stampin’ Up! has announced the release of Stamparatus accessories! You will be able to order beginning October 1st, 2018.
We know that owning a Stamparatus means it was love at first sight and we wanted to give you even more to love about this versatile tool by introducing Stamparatus accessories! The new accessories are: Small Grid Paper, Stamparatus Plates, and Stamparatus Foam Mats. They will continue to offer Stamparatus magnets.
The small grid paper fits perfectly in the Stamparatus.
It will be nice to have a replacement mat, when yours starts to wear (everything does).
The extra plates can be used for quicker stamping of multiple set ups without having to switch stamps out often.
A little birdie told us that there will also be a “carrying case” for our Stamparatus coming in the near future … I will keep you posted!
Today is the last day to register (and PAY) for my Stamperatus Class …
Payment is required for this class as I will be ordering your Stamparatus and supplies. ONLY Payment confirms your registration for this class.
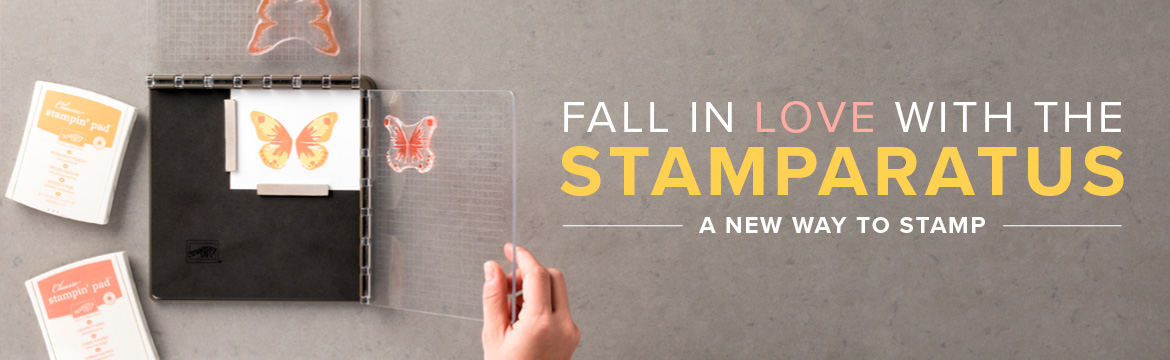
I am excited to announce my Stamparatus Classes!! The Stamparatus is an indispensable positioning tool that allows you perfect placement EVERY time –with a sleek and sturdy design and some WOW new features that rock this tool!
Multi-step stamping? Bring it on! You’ll never waste cardstock trying to line things up again. Multiples of the same card? No problem! Set it up once and stamp as many as you want. Partially-stamp an image? Never fear! You can stamp again in precisely the same spot.
Here’s just a few features of this awesome new workhorse… it’s going to change everything you know about stamping!
Compatible with both red rubber cling-mount and clear photopolymer stamps
Built-in rulers and gridlines for quick measuring and placement
Two (2) open sides so you can stamp on larger paper, but not take up tons of space
Two (2) clear grid reversible hinged plates: a total of 4 surfaces to work with without having to change stamps!
Two (2) strong bar magnets to hold the paper in place
Magnet storage areas built into the bottom of the worksurface–never lose them!
Foam mat to use with photopolymer stamps included, for best impressions
Easily wipes clean with a clean cloth or our shammy
Ready to see more? Watch this short video that covers the basics of what the Stamparatus does, why it has multiple plates, how to use it for regular stamping and making multiples, and storage and cleaning tips. Five Things You Need to Know About the Stamparatus …
I can’t wait to share in this fun, one-of-a-kind class with you. Here is how to sign up and pick your date …
PRE-PAY $55 CLASS: Includes the Stamparatus, a silicone pad, an extra magnet and your projects. (An $75+ value) RSVP and payment are due by Wednesday, September 26th
PICK YOUR CLASS TIME: Thursday, October 4th at 6:30 pm / Saturday, October 6th at 9:30 am / Limit 6 per class If these two dates fill … I will add class times so you can get in on this amazing product and class special.
The Stamparatus is going to be a HUGE game changer in your craft room and on your stamping projects! When you join me for this special Stamparatus Class, you’ll discover how to use this amazing tool to create several different techniques time and time again, so that you can do, and share what you love and get your cards in the mailbox quicker!
I’ve also learned some great tips that I can’t wait to share with you, after this class you will be ready to begin stamping and will have the Stamparatus and all the knowledge you need to begin creating successfully.
Contact me at: lindaluvs2stamp@aol.com or call (262) 334-1009 … Leave me a message as I also work outside of this business. I look forward to seeing you soon.
Today I want to share a fantastic announcement and video that will introduce an amazing new product …
What the video to see the fascinating things that the “Stamparatus” can do for you …
Here is a Q & A … Should answer any questions you may have. If not, contact me!
Customer Stamparatus Launch Q & A
Q: How do I reserve my Stamparatus?
A: Normally you order Stampin’ Up! products through the online store; in this case, you will click the
RESERVE link on the Stamparatus page which will take you to the reservation page. For step-by-step
instructions, please see the How to Reserve Your Stamparatus Tutorial for Customers.
Q: What if I do not have a Stampin’ Up! customer account?
A: To reserve a Stamparatus, you must have a customer account. To create one, click Create Account on the online store.
Q: Why does it take so long for the Stamparatus to ship?
A: We will place an order with the manufacturer based on how many reservations are made during any
given reservation window. Shipping dates depend on how long it takes the order to arrive in our
warehouse after the tools have been manufactured.
Q: Will the available-to-ship dates be the same for all markets?
A: Yes.
Q: Am I billed at the time I reserve my Stamparatus?
A: No. However, a credit card is required to reserve the product.
Q: When will I be charged for the Stamparatus?
A: When inventory arrives in the warehouse, we will add your reservation to a shopping cart. We will
then send you an email notifying you that your Stamparatus order is ready. Once you finalize payment
and close your order, the system will charge your credit card.
Q: Will I be able to add other products to my Stamparatus reservation?
A: No. However, once your reservation is transferred to your shopping cart, you will then be able to add other items to your order. Important note: Please do not delete the Stamparatus from your order. We
will not be able to add it back and you will lose your reservation.
Q: Will I be able to update my address and credit card information when I open my shopping bag to
complete my order?
A: Yes.
Q: What if I change my mind and want to cancel my reservation?
A: You can cancel your reservation at any time. To cancel, please see the How to Reserve Your Stamparatus Tutorial for Customers PDF.
Q: Will the tool be available in the 2018–2019 annual catalog?
A: Yes. Once the annual catalog ordering period begins, you will be able to order the Stamparatus as you
would any other product. Reservations will no longer be required, and there will be no limit on the
number of tools you can order.
Q: Once the Stamparatus has been added to my shopping cart, how long will it stay there?
A: Indefinitely. As with all products, it will be subject to temporary interruptions in availability
depending on demand.
Q: When I close my order, can I take advantage of current Stampin’ Up! promotions?
A: Yes.
Q: Can I participate in all three reservation periods?
A: Yes.
Q: How many stamp placement tools can I reserve per reservation window?
A: For customers, there is a limit of 1 per reservation window.
Q: How did we come up with the name Stamparatus?
A: We landed on an innovative name by combining two words that speak to the end use of the tool as well as Stampin’ Up! branding.
Stampē: To impress a pattern or mark (especially an official one) on
a surface, object, or document using an engraved or inked
block or die or other instrument
Apparatus: The technical equipment or machinery needed for a
particular activity or purpose
Stamp + Apparatus = Stamparatus