Reverse Masking Technique with Winter Woods

Hello Stampin’ Friends ~

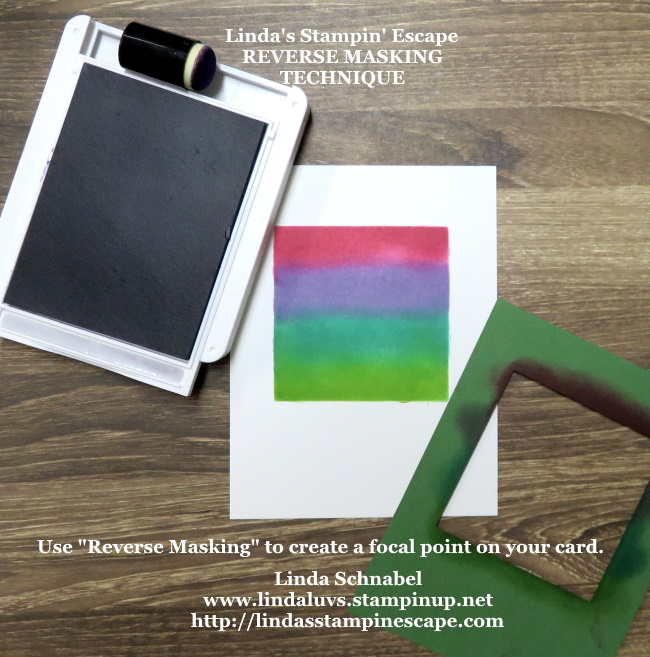
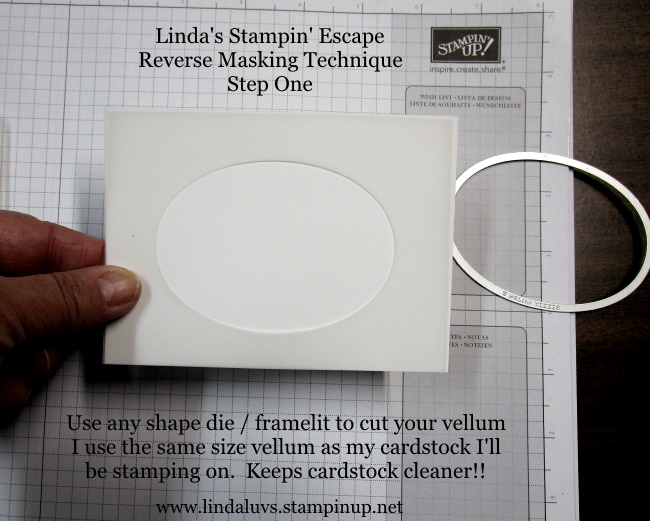
I have my video to share with you today … I am demonstrating the “Reverse Masking” technique and highlighting two different mediums you can use to create your reverse mask! I also have some additional stamping tips to share with you. Sit back and enjoy the video …

What a fun and easy technique this is …. It’s an oldie but a goodie!! I love how this technique creates depth to your card without all the layers and hazzle! Which one of the mediums to do this technique do you prefer? The sponge daubers or the brush? The Blending Brushes will be available in the upcoming Jan – June Mini catalog!

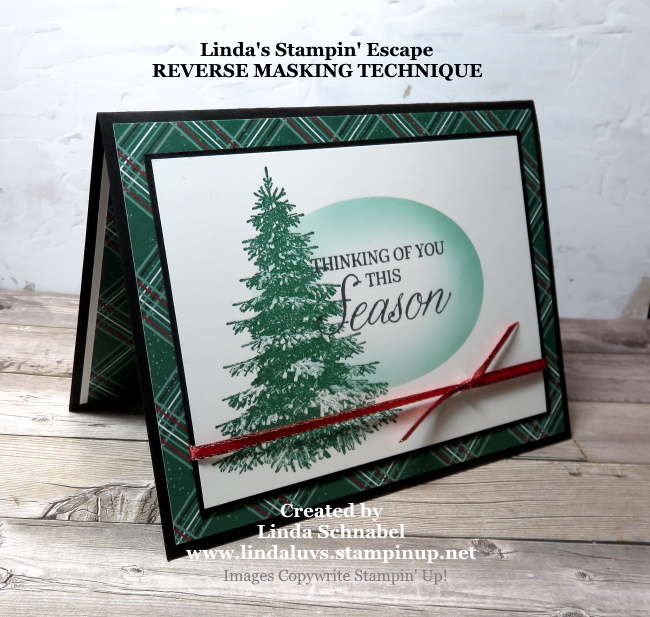
I used Shaded Spruce for my sponging and for the tree and of course it is the main color of our designer paper which comes from the Wonder of the Season and is called the “Tis the Season” 6 x 6, and is layered onto the Basic Black card base.

The Tree and Greeting both come from the Winter Woods stamp set … it was Hot, Hot, Hot last year but I think it’s the perfect year round stamp set!

A little piece of the extra designer paper was adhered inside to coordinate our entire card. The pretty gold edged Real Read ribbon is from the All the Trimmings Ribbon Combo pack.

Thank you for stopping by my blog and checking it out.

Have a beautiful day ~

TODAY’S STAMPIN’ SUPPLY LIST … If you liked the products used in today’s projects, I have links for you below. Just click on the item you would like more information on, or to begin your shopping. It will take you directly to my website. Thank you ♥ 

Technique Tuesday: Reverse Masking with a Twist!

Hello Stampin’ Friends ~

Today I have a cute card that highlights the Reverse Masking technique. Usually we use masking to cover an image so we can stamp over it to create depth on our cards … today, we will use “reverse masking” to create a focal point on our card.

I used the Layered Square dies to cut out a “mask” to begin my card. The mask is secured onto my card front and prepared to sponge color in the “space” ….

Once the mask is removed, you have a colorful focal point on your card front. You can do many things at this point and I’ll be showing some of those yet this week, but today ….

Our twist is to run it through your embossing machine. I used the Hammered Metal 3-D embossing folder … love the texture it adds to this card!

Now … with the crack of a handle we’re going to run the Well Written dies through the die cut machine to create our “friend” greeting and our hearts! Simple … Sweet … mount, Complete!

So with a simple reverse image, a little embossing and a die cut greeting, we have a cute card that was easy to make but will produce a big impact!

Thanks for hanging out with me today, stop back tomorrow and I’ll share another way you can decorate a this simple reverse image technique.

Have a great day ~

Here is a list of the ingredients used for today’s card … Click on any item for more information or to begin shopping. Thank you!

Stampin’ Technique: Reverse Masking

Hello Stampin’ Friends ~

I hope you all have a wonderful weekend! I heard it rained here on Sunday morning … hmmm, I never heard a thing! lol Yesterday I posted two cards that were created by my Retreat Attendee’s for our Swap, and Janet’s card used a technique called Mask Resist. I was asked “how” that is done, so I tried to explain it in my reply but thought I should show you, so I will 🙂

Today the card that I created is using the “Got To Have it All” Bundle …

Directions:

Use any framelit or die to cut out a circle, oval or other shape using Vellum Paper. I cut my vellum piece the same size as the cardstock I will be stamping on (No Mess!)

Adhere the Vellum Paper “reverse mask” to a piece of cardstock with a very small spot of removable adhesive (I use the retired Stampin’ Up! Dotto).

Without moving the mask, ink your Stampin’ Sponge and sponge within the masked area with a light color, leaving a bit lighter area in the center

Remove the vellum mask (remove any Dotto residue with the Adhesive Eraser) and Stamp a focal point stamp INSIDE masked area onto cardstock… today I used the bonus stamp from the “Got to Have It All” Bundle.

Stamp additional images that overlap the focal area and the white space for added dimension … and a little “Wink of Stella” always adds a sweet little touch of sparkle to your card.

Thank you for hanging out with me today.

Have a wonderful day!


TODAY’S STAMPIN’ SUPPLY LIST …


Simply Thankful …

Hello Stampin’ Friends ~

Hard to believe we are mid-week already! But that means we are closer to the weekend. It is so beautiful this time of year … the leaves are just starting to turn. I hope nature takes it’s time this fall so we can all enjoy the splendor.

Today’s card is a refection of this time of year … the beautiful fall colors, and a time to give thanks for all we have in our lives.

000_2613

I did the “Reverse Masking” technique for this card. I cut out my leaf image using the “Leaflets Framelits” Dies to create my mask and placed it onto my Very Vanilla cardstock.

I then sponged Crushed Curry, Pumpkin Pie and Cajun Craze into the leaf image. When I got the color consistency I wanted … I simply lifted off the mask and revealed the beautiful leaf! I love the dimension that this technique gives.

With our new HOSTESS stamp set “Six Sayings” …. I stamped the Thankful greeting onto my card in Cajun Craze (I think I need to re-ink my pad!) However, I loved the way it turned out. What a beautiful font!! You can find this Hostess stamp set in the back of the Holiday Catalog.

Grab a few friends and do a book or on-line show so you can get this set for yourself (Contact me at lindaluvs2stamp@aol.com) for more details.

I matted my card front with Cajun Craze and then popped it up onto more Very Vanilla.

000_2610

I took a left over piece of bakers twine from my September Paper Pumpkin kit and added the cute little bow to the leaf. I gave it added a bit more texture to the card.

A simple but stunning card. I’ve always loved this technique! Hope you enjoyed the card share today.

I am “Thankful” you stopped by to visit with me …

Have a beautiful day ~

blog-closing-small

TODAY’S STAMPIN’ SUPPLY LIST …