“Little Notes, Big Smiles: Handmade Messages That Matter!”

Hello Stampin’ Friends ~

Create quick, heartfelt notes for every season—from first-day jitters to everyday encouragement with the Just a Note Bundle!

Back-to-school season is here, and what better way to send your favorite students off with a smile than with a handmade note? The Just a Note Bundle is perfect for creating those little surprises that tuck easily into a backpack or lunch bag. Whether you want to brighten their first day back or add a sweet touch to their school routine, this bundle makes it simple and oh-so-cute. And if school days aren’t on your calendar, these notes are just as perfect for encouragement, support, or a “thinking of you” message any time of year.

For my first card, I paired the Just a Note Bundle with the Timeless Plaid Designer Paper as the backdrop, then added a pop of fun with the On the Go Designer Paper and a fussy-cut backpack. I stamped the notebook lines, die-cut the ripped paper edge, and added those oh-so-realistic clips and little arrows pointing straight to the backpack—so playful and perfectly on theme!

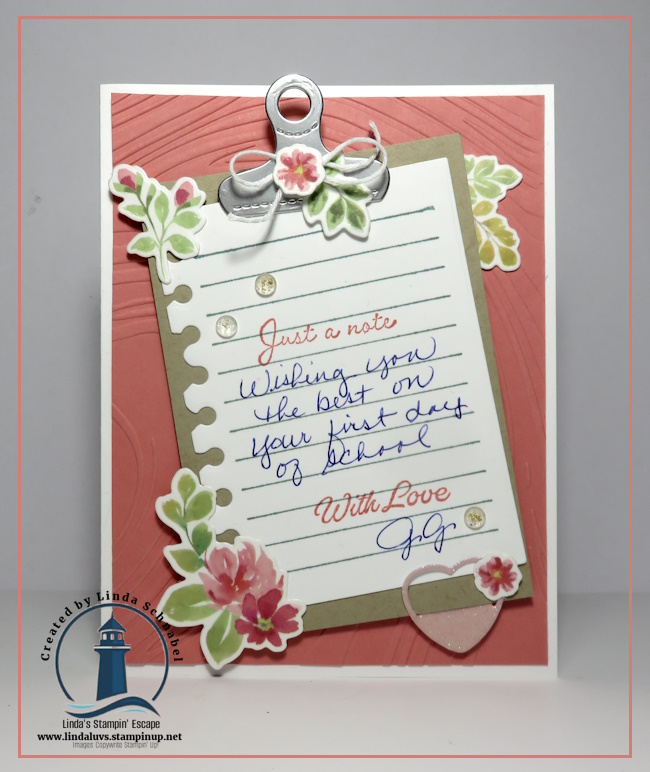
My second card takes a softer, more feminine approach with the help of Extraordinary Washi Tape and coordinating dies. I couldn’t resist using that adorable stamped paper and die again (it’s just too cute!) and this time I created a mini clipboard. All of the dies to create all the stationary stuff is in the bundle. I stamped “Just a Note” at the top and left space to handwrite a personal message—because a heartfelt note never goes out of style!

Whether you’re crafting for the first day of school, a midweek pick-me-up, or a just-because moment, the Just a Note Bundle will help you deliver smiles in the sweetest way. Add them to scrapbooking pages to capture those once-a-year moments. Not back-to-school time? These little notes make wonderful gestures of encouragement and support all year long.

Which card inspired you to try first—the playful backpack or the cute clipboard? Grab your bundle, pick your papers, and start sending those little notes that make a big difference!

Thank you for hopping on the bus with me today, and heading back to school.

Spooky, Sweet & Oh-So-Fun! Fun Fold Tutorial

Hello Stampin’ Friends ~

Halloween is creeping closer, and I’ve got a real treat for you today! A Fun Fold Card 🎃 We’re diving into the Spooky Sweet Suite Collection—a must-have for creating Halloween magic that’s more sweet than scary. From adorable costumed critters to a charming haunted house die, this suite has everything you need to whip up cards, tags, scrapbook pages, and treat bags that will delight ghosts and goblins of all ages!

Inside this suite, you’ll find:

  • Stamps featuring a costumed dog and cat (seriously, how cute are they?)
  • Dies that make creating your haunted house a breeze
  • Patterned paper with whimsical, not-too-spooky designs
  • Treat bags, ribbon, and shiny stickers—because it’s all in the details!

And today… we’re taking it up a notch with a spook-tacular Fun Fold card! Fun Folds always bring that extra “wow” factor, and when paired with the Spooky Sweet Suite, you’ll have a card that stands out in any Halloween lineup.

Let’s begin with the base: Cut to 10-1/2″ x 3-1/2″ and score at 3-1/2″ and 7″. Next you’ll cut 3 arches in the same color cardstock as your base. The size depends on what type of effect you want, and how much of the base you want to leave exposed.

Next, you’ll cut 3 pieces of the patterned paper … use the die that is one size smaller than the background. I used the house fronts to draw attention and then the candy background because that panel will be the core of the card.

Before you put those Arches dies away …. cut out three (one of each size) in the colors of candy corn. I’ll be using this as the focal point and highlight our little die cut flamingo. The flamingo was fussy cut from one of the patterned designer paper sheets. Then all you need is to stamp the greetings in Petunia Pop ink and cut and attach them to your card. I added some of those cute little purple glitter stars that come in this suite.

This card may look like a challenge but it is really simple to create!! Don’t wait too long to grab your supplies—especially the Everyday Arches Dies. They are the perfect match for this project and are currently on the Last Chance List (translation: once they’re gone, they’re gone!).

Whether you’re crafting cards to send a boo-tiful hello, making tags for treat bags, or decorating your scrapbook with a little Halloween charm, this suite is packed with possibilities. So grab your suite, pick your favorite patterned paper, and let’s get spooky!

Thanks for joining me for a spooky sweet card you’ll enjoy making and your recipients will be enchanted by!

STAMPIN’ TIP: When attaching your arches to the base, make sure you stay within a 5-1/2″ length so it fits in your envelope. I use a piece of colored cardstock that measures 5-1/2″ x 4-1/4″ as my guide! Easy.

Peaceful Garden Suite – Creating Timeless Charm

Hello Stampin’ Friends ~

There’s something truly magical about the holiday season—cozy moments, heartfelt giving, and the joy of creating something special with your own hands. The Peaceful Garden Suite captures all of that and more with its elegant designs and timeless charm. Whether you’re crafting Christmas cards, heartfelt tags, or scrapbook pages filled with memories, this suite offers everything you need: graceful sentiments, versatile tools, and beautiful coordinating paper that you’ll reach for long after the holidays have passed.

During a recent LIVE, I showcased two cards created with the same layout but each with a completely different look. One featured the Peaceful Greenery 3D Embossing Folder, which creates a stunning embossed frame with delicate filigree and greenery surrounding a large open space—perfect for your stamped images or sentiments. The other card highlighted the Peaceful Garden 12″ x 12″ Designer Series Paper, which has beautiful dove and greenery images on one side and soft tone-on-tone washes on the other. The paper is perfect for holiday crafting, but its gentle designs make it just as lovely for all-occasion projects.

The Peaceful Greenery 3D Embossing Folder

The embossing folder creates a stunning embossed frame with delicate filigree and greenery surrounding a large open space, which I used the dies and stamp set to add the greeting, and are backed with the beautiful glimmer paper. The die cut doves are recognized as symbols of peace and goodwill, and brought all together makes a beautiful Christmas card with dimension and texture.

Peaceful Garden 12″ x 12″ Designer Series

As you can see, the layout of the two cards is the same, right down to the greeting (I only changes the color of the glimmer paper). The patterned paper I used gives a soft background and is perfect for Christmas, or switch out the greeting to either Sympathy or the Heartfelt Prayer stamps and change the entire feeling of this card, showing the versatility of this suite.

Both cards came together quickly, yet each offered its own personality: the embossed version was rich with texture and a little more luxurious, while the designer paper version had a softer, layered elegance that’s wonderful for creating multiples with ease. That’s what I love about this suite—it’s so easy to mix and match, whether you prefer the tactile beauty of embossing or the graceful flow of patterned paper.

If you’re looking to create projects that are both elegant and versatile, the Peaceful Garden Suite Collection is a wonderful addition to your crafting lineup. The coordinating products take the guesswork out of designing, allowing you to focus on what matters most—sharing a little handmade joy.

If you haven’t added the Peaceful Garden Suite to your collection yet, this is the perfect time to do so. It’s one of those suites that will serve you beautifully for the holidays and long after the season is over.

Thank you for stopping by my blog today. I hope these two cards inspired you.

Cosmic Colors & Creative Magic: Lights of Aurora Inspiration Inside

Hello Stampin’ Friends ~

Have you ever sat beneath a starry sky, watching the Northern Lights dance across the horizon? That same sense of wonder comes alive with the Lights of Aurora Suite. This stunning collection was designed to capture the magic of the aurora borealis and bring it right to your craft table. Today, I want to share not only the beauty of this suite, but also a few different ways you can create with it, so you can see just how versatile and inspiring it can be.

Inside this suite, you’ll find designer paper that swirls with cosmic color, dies that create breathtaking natural landscapes, and all-occasion sentiment stamps that make your handmade cards shine for any moment worth celebrating. Add in the frosted iridescent gems and a touch of sheer blue ribbon, and suddenly your creations feel as if they’re glowing beneath a winter sky.

The first of my cards is a simple combination of the stunning paper, a die and a hand stamped greeting in Berry Burst …. Don’t you love the look of stamping your greeting sideways? Different & fun!!

The palette is rich and dreamy—Azure Afternoon, Balmy Blue, Basic Black, Berry Burst, Blackberry Bliss, Gorgeous Grape, Highland Heather, Lost Lagoon, Petunia Pop, Pool Party, and Very Vanilla—perfect for creating depth, drama, and soft blends that mirror the night sky. With just a little ink, some cardstock, and your favorite adhesive, you can make truly magical projects.

The second card again used the pretty patterned paper and a unique die (I can’t wait to play with this more) and a combination of stamps to create our greeting.

Join me in today’s video, where I’ll share how I used this suite to craft cards that feel like they’re kissed by the lights themselves. Let’s explore the possibilities together and bring that celestial beauty into your hands and onto your paper!

CLICK HERE TO VIEW ON YOUTUBE

The Lights of Aurora Suite isn’t just about making cards—it’s about capturing a moment of wonder and sharing it with someone else. Each swirl of color, each delicate gem, and every shimmering ribbon can turn an ordinary card into a keepsake that feels like a little piece of the night sky.

If you’ve ever dreamed of creating something truly magical, this is your invitation to start. With its rich palette and versatile designs, this suite will take your crafting to new heights—whether you’re making a card for a special occasion or simply letting your creativity dance across the paper like the aurora itself.

The last card I’m sharing is a twist to the usual “black” die cut that represents a silhouette, I chose “white” to give you another option … to me it’s like a snowy scene. So fresh and pretty!

I hope this inspired you to see all the different ways you can bring that magical glow into your own crafting. Whether you create a simple card or a stunning layered masterpiece, this suite is ready to help your projects shine.

If it’s calling your name, now is the perfect time to add it to your collection—because every card you make with it will feel like a little piece of the night sky, ready to share.

Thank you so much for stopping by and sharing a moment under the “northern lights” with me today.