High Tide by the Bay

Hello Stampin’ Friends ~

Oh yes, I took a sick day yesterday … had this bug hanging on for about a month and Thursday after work, it took me down!!  I hope you are feeling well and that bug by passed you.  Hard to believe it can hang on in these frigid temps … we got a whoppin’ -14°  Brrrrrrr!!

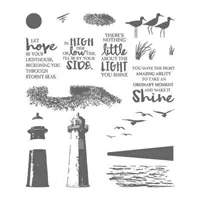
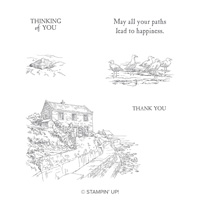
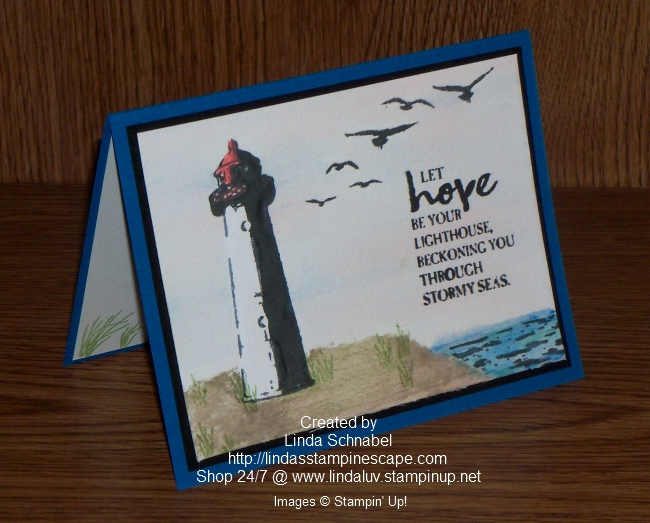
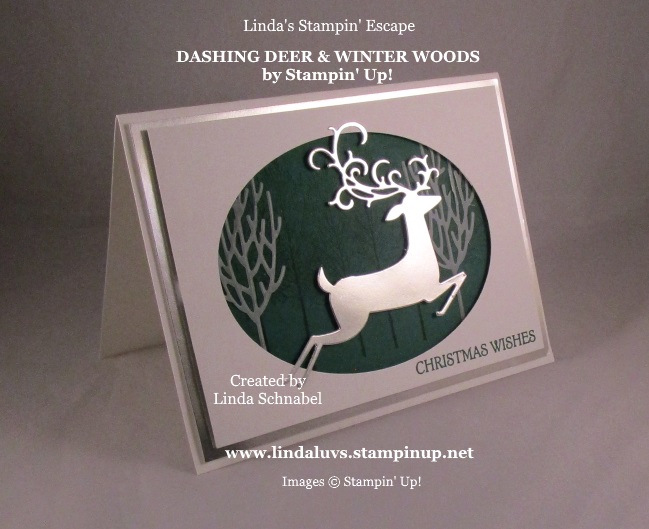
Let’s get to our card share today.  My last two posts I shared the new Sale-a-bration stamp set; By the Bay and Thursday I shared my lighthouse card from High Tide … Today I’m going to combine the two.

Being a demonstrator surely has it’s benefits, and one of my favorites is we not only get to see the catalogs first, we can order from them too! And the cherry on top before Sale-a-bration is that we as demonstrators can earn the Sale-a-bration items during our pre-order!!  So the minute I saw the “By The Bay” stamp set … I knew I had to have it.

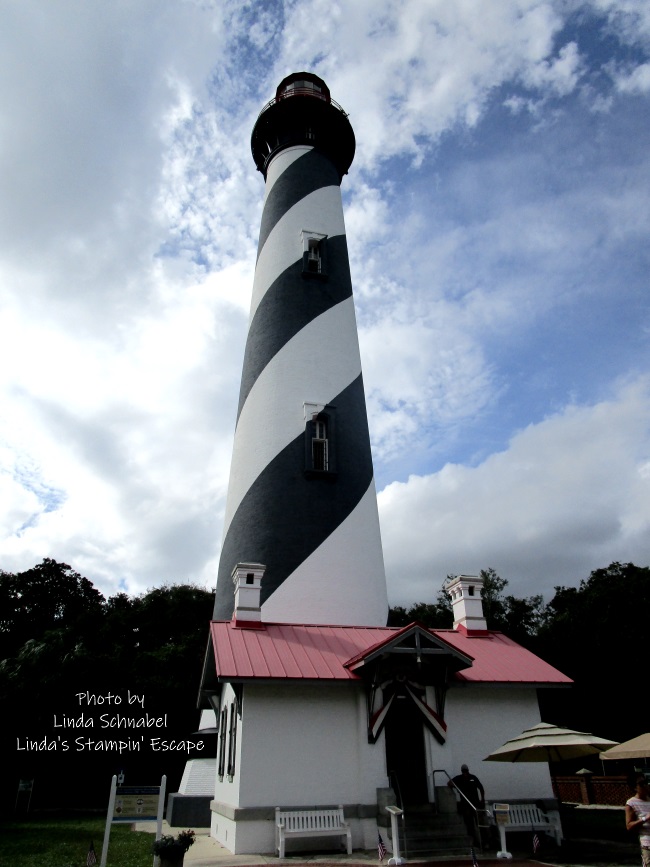
I’ve always pictured that house, with a lighthouse sitting next to it …

I stamped my lighthouse first onto a scrap piece of computer paper, then stamped it onto my cardstock.  I cut out the lighthouse on the computer paper so I could use it to mask (cover) the one on my cardstock.  Once I had the lighthouse covered with the mask, I stamped the house by the water image.  I may play with the placement some more, this is my first try … but I did like the way it looked.

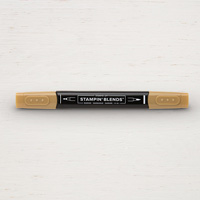
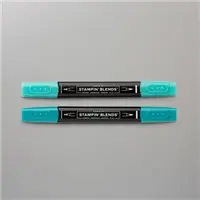
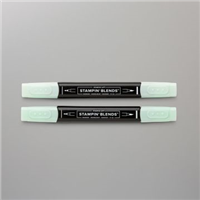
I used the Smoky Slate, Old Olive, Crumb Cake, Pool Party, Bermuda Bay and Cherry Cobbler Stampin’ Blends to color my images.  I love the way these layer and blend so nicely… You’d be surprised that the house was done in Crumb Cake (Light & Dark) and Smoky Slate.  I just keep playing until I like the way it looks!! lol

Thank you so much for stopping back in to visit today.  I just have to say, I’m so intrigued by lighthouses and the families that maintained them and guided others safely to shore.  You are sure to see more variations of this … both stamp sets are so cool!!

Oh yes … the greeting comes from the By The Bay stamp set and are punched out with the Tailored Tag punch.

I hope you have a great Saturday & stay warm if your in this artic freeze,

TODAY’S STAMPIN’ SUPPLY LIST …


Throwback Thursday: High Tide

Hello Stampin’ Friends ~

Today I’m sharing a card made a while back using the stamp set “High Tide”.  I love going back into my stampin’ stash and using stamp sets I already have.  Better yet, I like to combine them with some of the new sets in the Occasions catalog. You’ll see what I mean tomorrow.

In the past couple years I have been on a few “lighthouse” hunts where I travel the coastline and stop for any lighthouses I can find … then explore them and if possible, take many pictures, so this card was inspired by those trips …

000_3983

I began by stamping my lighthouse on the Watercolor paper and then stamped the land around the lighthouse in Sahara Sand, then the water… at that point I started coloring with the Watercolor Pencils.

I was on a bad part of the table and when I stamped the land around the lighthouse, I had a big void.  With the use of the Watercolor Pencils and the Aqua painter I filled everything in and now you can’t even tell!  Now I could have used my Stamparatus!

I then colored the water using the two blues; Bermuda Bay and Pacific Point.  The Pacific Point is the cardstock I used for my base.  Then with a light hand I applied the Melon Mambo and Pacific point (birds were already stamped) and blended the colors to create a subtle evening sky.

I finished off the card with the Real Red Watercolor Pencil to the lighthouse and stamped the grassy images around it with Old Olive ink.

000_3985

Do you hear the beach calling your name? It sounds a lot like what you hear when these stamps are calling to you. Answer all the calls!  This is a Two-Step Stampin’ set… You can combine individual stamps to create the final image you want in the colors you want.

There are a total of 16 photopolymer stamps and the suggested clear blocks (sold separately): a, b, c, h

I’m glad you checked out my blog today, and I appreciate you taking time out of your day to do that. I hope it inspires you to get out and stamp or check out some lighthouses! They are a part of our history. Here is the last one I explored: St. Augustine, Florida 

I believe this is one of the biggest ones I have seen so far! It was huge, I could not even climb to the top … what a magnificent sight!  I find lighthouses so inspiring.  

Stop back tomorrow as I combine the High Tide stamp set with one of our new stamp sets from the Occasions Catalog.  Can you guess which one it is?

Have a wonderful day ~

blog-closing-small   

STAMPIN’ SUPPLY LIST …


Triple My Tuesday Stampin’ Fun!!

Hello Stampin’ Friends ~

Woo Hooo … I had fun creating these projects last night, if fact, I have 3 to share with you today.  Yesterday I shared the January Paper Pumpkin video, so today I wanted to share with you my alternative projects.

Lets begin with the Paper Pumpkin itself … this cute little pillow box was fun to make and fun to stuff with candy!!

Didn’t really change anything on this little project except that I stamped the hearts on the circle background.  The hearts come in the stamp set (there are a lot of cute stamps in this set!).

My next project is an Alternative to the kit … LOL, it’s actually a mistake!!  I was watching TV and not reading the instructions a glued two of the pillow boxes together. So as I tell my stampin’ friends … “there are not mistakes in stamping, just opportunities to embellish”. So here is what I came up with ….

I remembered those circle fold cards, so I scored my boxes above the “pre-scored” line, then cut them down to sides so I could fold the flaps in … it worked beautifully.  I had to decorate my box with those cute little Chameleons.  The heart in the background and the pretty heart embellishments all come with the kit, as does my greeting.

I finished off this sweet little package of treats with the Dotted Swiss Ribbon … I just love the way this little boo-boo turned out!!  That brings me to the card that I made.  My blog followers may recognized this layout …

I told you that I loved those little chameleons, I just had to use them again … mainly because I wanted to use the greeting “You’re One-In-A Chameleon” … lol.  Again, the heart embellishments are from the kit but the large heart (although there is one in the kit) I used the “All My Love” Designer Series paper and the “Be Mine” Stitched Framelit to cut it out.

The “I” comes from the “Large Numbers” framelits and the “YOU” is from the “Celebrate You” Thinlets which were FREE during Sale-a-bration last year!  This year I’m using the Organdy Ribbon Combo Pack.

Hope you enjoyed todays card and projects.  When you subscribe to Paper Pumpkin, don’t be afraid to use it with other stamp set and accessories you already have.  This one coordinates with the “Animal Outing” stamp set.

Thank you for dropping in on me today.  Have a great day … and I hope it’s triple the fun!!

TODAY’S STAMPIN’ SUPPLY LIST …


Simply Sunday: Butterfly Gala

Hello Stampin’ Friends ~

I have a beautiful card to share with you today that is simple to recreate. I’ve been in a bit in a funk lately, and my creativity was just not there, so I took a few days off, when I realized that it has been a year since we lost our Mom.

While sleeping last night, this card came to me, so it is dedicated to my Mom … who “LOVED” Butterflies!!

I started with the Gingham Gala for my background and the Botanical Butterfly (SAB) Designer Series papers, along with the butterfly punch from the bundle. I used the Balmy Blue from the Gingham Gala Cardstock pack to mat my Balmy Blue Gingham paper … Blue was my Mom’s favorite color. Her bathrooms was actually this color blue with butterflies!

When punching out the butterflies from the Botanical Butterfly Designer paper (FREE with a $50 purchase during SAB / Sale-a-bration!) I cut out the large butterfly and attached it to a piece of vellum cardstock … this made it easier to slide the butterfly into the punch and I actually kept it on my butterfly for a 3-D effect.

The little butterflies are punched out from another pattern from the Botanical Butterfly Designer paper.  All of my butterflies are highlighting my greeting which comes from the Wonderful Romance stamp set and is punched out with the 2″ Circle punch.  My butterflies and greeting are popped up with the Stampin’ Dimensionals.

My card was completed with a pretty bow from the Organdy Ribbon Combo pack that coordinates with the Gingham Gala product suite and can be yours free with a $50 purchase during our Sale-a-bration period.

I think my Mom would love this card, and I thank you for spending some of your time with me as I honor my Mom.

if you enjoy my blog, please share it with your friends.

Have a blessed day ~

TODAY’S STAMPIN’ SUPPLY LIST …


I “Heart” You …

Hello Stampin’ Friends ~

I have that cute card I promised you!!  I ❤ my Stampin’ Up! job and I ❤ this bundle.  I just had to share a least one more card with you from the Meant to Be bundle.

Did you know that the Be Mine Stitched Framelits Dies actually coordinate with the All My Love Designer Series paper … and the pretty flower hearts (2 sizes) can be cut with the dies.

Today’s card features the die cut heart … 

Oh my, my … isn’t this cute!! I love the floral heart with the Highland Heather Gingham Gala 6″ X 6″ Designer Series Paper.  I ❤ you! The “I” was die cut from the Large Letters Framelits Dies and “YOU” comes from the Celebrate You Thinlit Dies which were from our Sale-a-Bration catalog last year!

This year you can get the pretty Organdy Ribbon for Free… 5 bolts of ribbon: Highland Heather, Balmy Blue, Daffodil Delight, Grapefruit Grove and Lemon Lime and its on todays card. Isn’t it amazing what a little ribbon can do to a card?

I hope you enjoyed todays card, and I thank you for stopping back today.

Have a great day ~

TODAY’S STAMPING SUPPLY LIST …

Hearts a Plenty …

Hello Stampin’ Friends ~

For the past week, I’ve been sharing samples from our Meant to Be Bundle in preparation for Valentines Day. However, don’t let hearts just be for one day of the year … we should share our hearts and kindness everyday. We need a kinder world.

Today I am going to review the many cards, and you’ll also notice the sprinkling of Sale-a-bration items included on the cards.  I think you will be “amazed” at all of the different styles of cards and projects you can create with this wonderful bundle … and with this bundle, you qualify for a FREE Sale-a-Bration item!!

I start with the very basic of cards … Stamp, Paper and Ink!  Super simple, great for our new stampers.

Simply stamped in Lovely Lipstick ink on Whisper White cardstock.  My next card is also simple but very pretty …

This cards adds a little more dimension when we simply add layers.  Our greeting is backed with the Lovely Lipstick Foil paper which is found in the Sale-a-Bration catalog and can be yours with this bundle or a $50 purchase.

The next card introduces the BigShot and the coordinating dies in the Meant to Be Bundle …

This card is also very easy to make … just add the beautiful All My Love Designer Series paper.  The cute little white hearts are cut from the dies included in the bundle.  Many of the dies in this set include the stitched look and the scallops edges.

The next card uses the same little white hearts … and they are stamped in Flirty Flamingo.  Works well with our flirty background, which is another pattern from the All My Love Designer paper.

The cute scalloped edge on the bottom is yet another die from the coordinating die set in this bundle.  I did introduce the new Stitched Rectangle dies … these are located in the new Occasions Catalog.  You could easily change the greeting on this card to Welcome a Baby, a Sweet Sixteen or a birthday card … possibilities are endless.

If you’re looking for treat boxes for your children’s upcoming Valentines party or a cute little gift for a neighbor or co-worker, here are some great ideas (You’ll see these in the Occasions Catalog) …

My next card features more of the dies, the one I’m using here actually cuts 2 hearts with one roll of the BigShot…

Again I am using the All My Love Designer paper and the Sale-a-Bration Lovely Lipstick Foil paper.  I also embossed my heart with the Tufted Embossing Folder … how cute is that!!

And my card from yesterday, the Grapefruit Grove foil paper is highlighted and actually comes in the same package as the Lovely Lipstick … both of these beautiful papers for FREE.

This card uses the largest of the heart dies and the beautiful little flower die that is also included in the die set.  The ribbon is also available in the Sale-a-bration catalog and comes in a package of 5 colors!!  The background is actually vellum designer paper that comes from the Floral Romance Special paper … in the Occasions Catalog.

So many different styles … and from simple beginnings for our newest stampers to lots of beautiful layers and the BigShot.  Don’t forget all the amazing projects and treat boxes you can also make.

I thank you for joining me today … I have another for you tomorrow, so stop back and check it out.

Till then, have yourself an amazing Monday!!

BASIC SUPPLY LIST FOR THESE CARDS …


Simply Sunday: Just for You

Hello Stampin’ Friends ~

Hope you are enjoying your weekend.  On my last post I promised to share a card that featured the Grapefruit Grove Foil paper that is in the Sale-A-Bration catalog… well, today is the day, and you will not be disappointed. It also features the Meant to Be Bundle and I’m introducing the beautiful Floral Romance Specialty Designer paper.

The beautiful background is the Floral Romance Designer paper … but this pattern is actually “vellum” and oh so pretty! This lacy background works perfectly with our hearts.  Today I’m using the largest of the heart, and like yesterdays die … this one also cuts 2 heart – the plain heart, and the thin outer heart with the scalloped edge.

To get this layering, I actually ran the die through with Whisper White (creating two hearts) and then the Grapefruit Grove Foil sheets.  You can actually create another heart layout with the White lace edge around the graperfruit heart. However … today the white is the center so we could stamp our greeting.  The greeting is stamped in Petal Pink, which coordinates with the Floral Romance paper.

The Grapefruit Grove Foil sheet has an amazing prism of color that runs through it, so it complimented the Petal Pink that I used.  I also used the sweet floral die in the set as an added touch to my card, and I thought it works beautifully with our vellum Floral Romance Designer Specialty paper.

The Grapefruit Grove Ribbon can also be found in our Sale-A-Bration catalog and you can get it, or the foil paper for FREE when you purchase this bundle or any purchase of $50 before shipping & handling.

However you hold that card and the light reflects on the Grapefruit Grove Foil paper … you will fall in love with it, just like I did!!  I guess it was “meant to be”.

Thank you so much for sharing a part of your day with me, it is appreciated.

Have a fabulous day ~

TODAY’S STAMPIN’ SUPPLY LIST …


To My Valentine …

Hello Stampin’ Friends ~

Today I’d like to share a Valentine card that was inspired by a “Heart Box” that we have at the Candy store I work at. It also highlights the fabulous Lovely Lipstick Foil sheets from our Sale-A-Bration catalog … there is also a very spectacular Grapefruit Grove Foil sheets included in the package!!  I will share a card using that tomorrow!

I’m starting with the “MEANT TO BE” bundle from our Occasions Catalog … I have shared several projects using this bundle already. You can create die-cut hearts in all shapes and sizes in record time with Framelits dies and the Big Shot. The dies have stitching and scalloped details… and with the one I’m using today, one cut gets you two hearts!

The embossed heart reminds me of the decorations I was using when setting up the candy store yesterday … I cut the heart our first. It cuts a scalloped heart and then the inner heart so you actually have two.  I used the “Tufted” Embossing folder for the fun texture on this heart.  I used stampin’ dimensionals to keep the two pieces together.

I also cut out the Basic Black heart out with this die but only used the inside heart.  My more “masculine” heart, goes well with my Lovely Lipstick Foil tufted heart ❤  All die cuts and the “Happy Valentine’s Day” which was punched with the Pretty Label Punch, were all popped up with the Stampin’ Dimensionals.

The pretty paper comes from the “All My Love” Designer Series paper, and is the flip side to my “Thinking of You” card I posted earlier this month.

We had a little chuckle at my club this week as I passed around a few cards that I have created … each person opened the card to see what was inside (I laughed and said … don’t look in there!)  So, I’m going to make it a point to stamp on the insides as well …

I actually like the little border of Lovely Lipstick and Basic Black hearts … and it ties in with the front of our card.  All the stamps used on today’s card are from the Meant to Be stamp set that is included in this bundle.

The Meant to Be bundle not only qualifies you for a FREE Sale-A-Bration item but if you purchase from me, you will also receive a Virtual Rewards Point from me (Every $50 qualifies you… and you don’t have to worry – I do all the work, your card gets stamped with your purchase) When you have 10 … I send you a card so you can claim a FREE Stamp Set of Your Choice… YES, Your Choice!!

If you are located in the United States and looking for a creative coach/demonstrator … I’d be happy to help you.

Thank you so much for the visit today, and if you liked my card … please hit click on the LIKE button on the bottom of the page, or leave a comment, I’d love to hear your thoughts.

Have a sweet day ~

TODAY’S STAMPIN’ SUPPLY LIST …


Home to Roost

Hello Stampin’ Friends ~

Today I’m going to share another of our fun Sale-a-bration stamps sets Home to Roost.  For those of you who are new to my blog and Stampin’ Up! … Sale-a-bration is an exciting sales event. For “each” $50 you spend, you can chose an item out of our Sale-a-bration catalog!!  It’s just a fun way to build your stamp collection.

Our Sale-a-bration product of the week is the Home to Roost stamp set, Warm thoughts come home to roost when you create projects with this set.

Home to Roost is a wonderful stamp set for all-year use with versatile sentiments and line-art images perfect for lots of coloring techniques. You’ll love the high-quality, color pencils. Perfect for watercoloring stamped images. Use with Aqua Painters, Blender Pens, or alone.

Purchase the products to make these projects and you’ll immediately qualify for the following FREE Sale-A-Bration item used to make the project: Home to Roost Cling Stamp Set. I have them listed below.

More ways to earn … Hostesses will get an extra $25 in FREE Merchandise above the regular rewards with party sales of $250 or more.  Gather your friends for a fun evening of stamping and everyone can earn free goodies!

Or … if you want it all, you can purchase the ultimate starter kit and join my stampin’ family ❤ . We’d love to have you on our team.  CLICK HERE

Let me know if you have any questions regarding Sale-a-bration, or the starter kit.

Wishing you a wonderful day ~

TODAY’S STAMPING SUPPLY LIST …

Sweet Treats for a Celebration …

Hello Stampin’ Friends ~

Today we kick off our annual Sale-A-Bration event and the new Occasions Catalogs!!  Let’s start this party with some sweet treats any kid would love to get.  Our “Hey Love” stamp set is perfect for creating these cute treat toppers.  They are so quick -n- easy to create, it’s the perfect project to do with your kids … and they’ll be stars at the Valentines party!

Kids long gone? Well … don’t stop there, I have the perfect treat boxes for your friends and co-workers as well.

These little gems were created with the Kraft Pillow Boxes which you will find in our Annual Catalog and are dressed in the beautiful “All My Love” Designer Series paper and coordinating stamp set.  Behind the designer paper is the amazing “Lovely Lipstick” Foil paper … that is FREE from our Sale-A-Bration Catalog!!

I am just flippin’ over these new catalogs, and I would love to show you and your friends more ideas, and get you stamping!! So get your friends together … I’ll bring the stamping supplies … and let’s party.

One more thing … If Valentines isn’t your thing, I have another cute little Pillow Box for you …

Happy Birthday to all my January stampers out there, and a great day to you all.

You will also find these and more projects on my website … Hop over and check it out!  CLICK HERE.

Thanks for stopping back today!


Here Today … Gone Tomorrow! Let the Sale-A-Bration begin …

Hello Stampin’ Friends ~

Today is that day … transition day, when you can’t wait for the new Occasions Catalog to go live but there are still items in the holiday catalog you like!!  I feel your anxiety!! lol

Not to worry … Two of the most popular stamps; Winter Woods and Dashing Deer will carry over, however, they will no longer be “bundled” so if you want the 10% savings … today is your last day.

Tomorrow kicks off our new Occasions Catalog and our Sale-A-Bration celebration!!  With each $50 purchased (before Ship/Tax) you can choose any of the Level 1 items in the Sale-A-Bration Catalog for FREE.  And so on … I’d be happy to answer any questions you may have about Sale-A-Bration.

Not only can you earn FREE products when you purchase … but you can earn more when you host a Stampin’ Party too!  Invite your friends over (or use my place) Let’s gather and I’ll show you some fun and exciting product, we’ll make cards, and you’ll earn more FREE stuff ..

If you want it all … then the starter kit is your best deal!!  And during Sale-A-Bration there are two options!!  Both have an additional $50 in FREE product, beyond the $25 your normally get (that is $75 in FREE product). Amazing!

I just have to show you what the Exclusive Craft & Carry Tote looks like … It’s beautiful (and it fits the paper cutter!)

It’s not only beautiful … it’s sturdy and perfect for your stamping on the go!!  Punches in the front, cardstock, paper cutter and stamps in the inside pockets, it’s perfect.

Let me know if you have any questions about purchasing, hosting or joining … I am here to help you.

Thank you for stopping by today.  I will be back with another great card to kick off this celebration of our two new catalogs.

Have yourself an awesome day!

Want to be the first to HOST a Stampin’ Party?  Click the HOST Link!

Going Wild …

Hello Stampin’ Friends ~

Need a simple solution for fitting creativity into your busy life? Paper Pumpkin is here to help! We designed our awesome subscription service to put subscribers on a fast track to creativity with our easy-to-make kits.

Paper Pumpkin’s January kit has paired up with the Animal Expedition suite in the annual catalog (p. 26-27) to help you expand your crafting possibilities—just in time for wild Valentine’s Day fun. Become a Paper Pumpkin subscriber by January 10 (and shop the Animal Expedition suite today) so you can enjoy the full experience.

Paper Pumpkin is your One-Stop Box™ for creativity, providing the perfect solution to help you fit creativity into your busy life. Paper Pumpkin can also help you explore more creative possibilities with Stampin’ Up!.

You can sign up here: https://www.paperpumpkin.com/en-us/sign-up/?demoid=26646

Please let me know if you have any questions …

Then stop back tomorrow to see what I did with the Animal Expedition!! It’s just tooooooooooo cute!!

Have an awesome day!!


Christmas Season in Red

Hello Stampin’ Friends ~

Still looking for Christmas Card ideas? Today I’m seeing red … Christmas Red. I have teamed up the Dashing Deer and Winter Woods bundles to create a monochromatic card that is simple and beautiful.

This was one of the cards we did in our Stamp Club this month…

Our base is Whisper White (8-1/2″ x 5-1/2″) and our stamped piece is 5″ x 3-3/4″ … We used Real Red to stamp the Filigreed Deer from the Dashing Deer Stamp Set.  You will need to let that dry or heat set it because our next step was to emboss it with the Gently Falling Impressions Folder.  We used a piece of Real Red 5-1/4″ x 4″ to mat our stamped piece.

Our next step was to cut out the Christmas Tree from the Winter Woods bundle.  This tree can be used as 2 pieces for a beautiful layered effect, plus you can “fluff” up your branches for even more texture.  Our next step was to decorate our tree which we did with the Red Rhinestones Basic Jewels.

The inside has our greeting which came from the Winter Woods stamp set.  The pretty design stamped on the inside and on the envelope came from the Dashing Deer stamp set.  These two bundles really pair up wonderfully.

Hope you enjoyed today’s card share of the Winter Woods and Dashing Deer Bundles. I appreciate the visit!!

Have a wonderful Friday ~

TODAY’S STAMPIN’ SUPPLY LIST: Click on any item for more information. If you need help placing your order you can contact me at: lindaluvs2stamp@aol.com  


A Walk through the Winter Woods …

Hello Stampin’ Friends ~

Sometimes we look for holiday cards that are a little on the simple side, earthy, more masculine … well, today is the day for you. I have a wonderful card to share with you that I created using the Winter Woods stamp set.

I started this card using Very Vanilla cardstock … base is 8-1/2″ x 5-1/2″ with a 4″ x 5-1/4″ background that I embossed with the Woodland Textured Impressions Embossing Folder. It adds such a nice texture to the card.

I stamped the birch in Soft Suede on a piece of 2-3/4″ by 3-3/4″ Very Vanilla and then I tied a bow around it … to keep the natural look of the card I used the Burlap Ribbon and pulled it apart!! Love the way it adds so much texture to your card.

I chose to mat the tree with the beautiful Joyous Noel Glimmer paper (Merry Merlot) and measures 3″ x 4″, just to add a little holiday color -n- sparkle.

The greeting comes from the Winter Woods stamp set so no need to look any further, and is stamped in Merry Merlot to coordinate with the glimmer paper. To finish it off, I cut it out using the Stitched Shapes Framelits Dies.

A nice simple layout with touches of texture and dimension to bring our nature scene alive… and a touch of holiday bling!!

Thank you for taking a stroll in the woods with me today, hope you enjoyed the view!  I’ll be back tomorrow with my Simply Sunday series.

Have a wonderful weekend.

TODAY’S STAMPING SUPPLY LIST …


Simply Sunday: Guest Stamper Anne T.

Hello Stampin’ Friends ~

Today I have a beautiful card to share with you that was made by one of my Holiday Retreat attendees for our annual Attendee Swap!!   This magical card was made by Anne Tonsor … We begin with the background which was created using the Woodland Textured Impressions Embossing Folder.

The Christmas was cut from the beautiful Gold Shimmer paper and comes from the Merry Christmas To All Photopolymer Bundle as does the stamped “wishes”.  Bundle and save! Buy these two coordinating products and save 10%.

Thanks for stopping by today.

Hope your Sunday is a good one.

Today’s Stampin’ Supply List …