Simply Sunday: Butterfly Kisses

Hello Stampin’ Friends ~

I hope you’ve had time to enjoy this beautiful weekend! I’ve been busy stamping, planning classes and visiting with my great grandbabies! Life is good!!

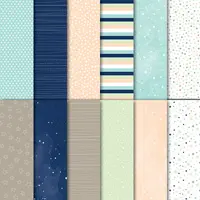
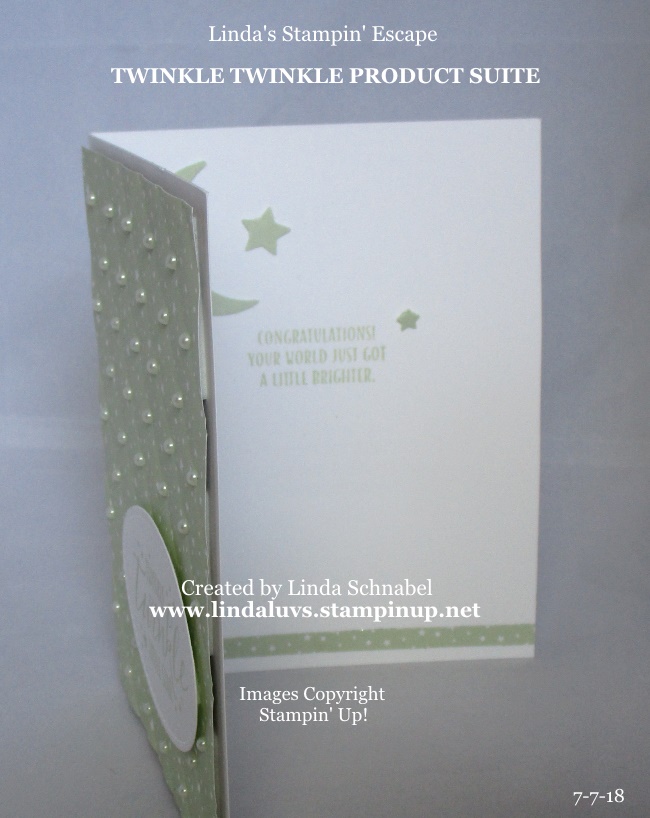
Today’s card features the Twinkle Twinkle Designer Paper … in fact, because of the sale, the last few days have featured our designer papers!! This quick card just takes a few runs through the BigShot and you’re pretty much done.

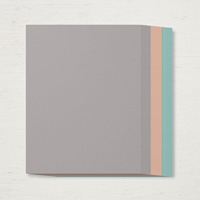
The “dots” on my designer paper inspired me to continue the circles in my design, so I cut out a Whisper White and a Soft Sea Foam with the Stitched Shapes Framelits. The double cut “hollow” circle is done in the new Gray Granite color, which is also the base of our card.

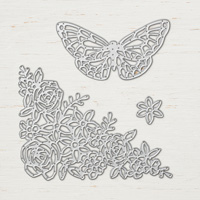
I did tuck a little Soft Sea Foam behind the designer paper to tie in our major circle which highlights the butterfly.  Our butterfly comes from the Springtime Impressions Framelits and is cut from the Petal Pink.

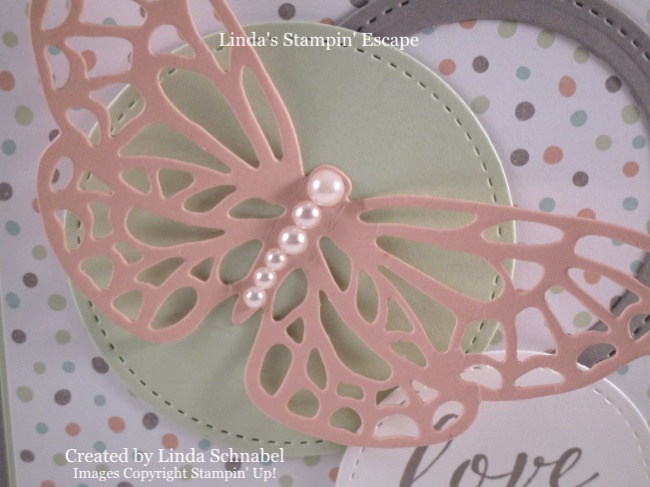
To make this beautiful butterfly “pop” even more … I added the Basic Pearls, another item I always keep handy in my stampin’ stash!! You can see that my color pallet came from the Twinkle Twinkle designer paper … takes all the stress out of coordinating your projects.

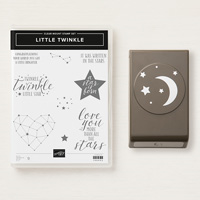
My greeting comes from the Twinkle Twinkle stamp set, I just omitted everything but the “love you” by covering the stamp with Washi Tape!! Once the stamp is inked … just peel off the washi tape 🙂

This designer paper may have the intention of “baby” but let your imagination go wild and use your designer papers for any application!!” You may find that it’s just the touch you need.

I appreciate you spending a part of your Sunday with me and checking out my blog.

Have an awesome Sunday ~

Thank you,

TODAY’S STAMPIN’ SUPPLY LIST … Just click on any item to view and see full details of the product.


Welcome Sweet Baby

Hello Stampin’ Friends ~

Today I have a sweet baby card for you featuring the new Twinkle Twinkle bundle on pages 82 and 83 of the 2018-19 Annual Catalog.

This sweet stamp set caught my eye the first time I looked at it, it’s perfect for welcoming a new baby into the family and I think it will work for many other occasions as well (I’ll be sharing some of those with you!)

Now … I have always loved the “quilted” look that you can do with your Simply Score, however, now we have the new “Tufted” embossing folder and it makes this look super simple!!  Just check this out …

I used the beautiful star pattern in (one of my favorite new colors) Soft Seafoam … it is so pretty and delicate and perfect for a new baby ❤ I added the pearls in each of the exposed “tufts” to make this card a “keepsake” card. Will you be using a lot of your pearls … well, 39 to be exact but I don’t forsee anyone making too many of these! 😉

My greeting is from the coordinating stamp set and is cut out with the Stitched Shapes Framelits.  These are my “go to” dies … I use them all the time!!

Inside you will see …

I incorporated the coordinating “Twinkle Builder” punch that is included in the bundle to dress up the inside of my card and a strip of the Twinkle Twinkle Designer Series paper.

You can also see from this angle that I “popped up” my entire front of the designer paper and the greeting… it adds so much dimension yet does not compete with the pretty pearls on the front.

I hope you enjoyed today’s card and I would love it if you could leave a message in the comment section or just click the like button … I appreciate that. It helps my blog become more available in search engines … so others can fine me 🙂

Enjoy this beautiful day … I’ll be back tomorrow to show you another way you can use this great bundle.

Thank you ~

TODAY’S STAMPIN’ SUPPLY LIST … Just click on any item for full details and to view the product. You can also begin shopping from clicking on any item.  Thank you.


New Class Announcement!

Hello Stampin’ Friends ~


Today I’d like to share an upcoming class with you.  As you know our Stampin’ Up! has an amazing promotion with our Designer Series paper!!  So I would like to gather my stampin’ friends and show you some creative ways to use your designer papers!!

I hope you plan on joining me … it will be a fun filled evening of stamping, snacks and making new friends! Plus you will go home with some amazing cards and great ideas to use on your cards!

I will also have a “Class Special” for those attending and purchasing the Designer Papers!

Thanks for stopping in today, I hope you have a marvelous Monday!


Simply Sunday: Happy Birthday

Hello Stampin’ Friends ~

I hope you are staying cool … even my stamp room got a little warm & muggy! Usually I don’t need an air conditioner, so I gave it to my daughter (they need it more).

OK … Let’s talk stamping! Today I have a cute birthday card that I created for my granddaughter who is turning 14! I also incorporated “designer paper” because it’s on sale this month; Buy 3 get 1 Free!

Today’s fun and simple layout was inspired by a card on Pinterest (they did not have their name on the card) I would love to give them credit!

I used the Twinkle Twinkle Designer Series paper (because she’s our track star!) and the Number dies … however, they are no longer in the catalog but you could use the same technique with their name because the Large Letter framelit dies are still available to purchase!

I love how the designer paper “peeks” through to highlight the designer paper.  The greeting comes from the “Happy Birthday Gorgeous” stamp set.

I’m keeping my post short and sweet today so you can get back to your holiday celebrations. We’ve got storms coming so I’m staying in and stamping!

Take good care & thanks for stopping in today.


TODAY’S STAMPIN’ SUPPLY LIST …


Dandelion Wishes: Dream

Hello Stampin’ Friends ~

Today I’m sharing with you one of the cards that we made last night at my Dandelion Wishes stamp set.  It’s beautiful and sophisticated … the attendee’s words last night! I thank them for joining me, sharing their time with me and making it a wonderful evening.

Bringing back a classic technique, heat embossing … and done in black and gold!!

The background was embossed with the Gently Falling embossing folder to give the card extra texture. Once the dandelion image was embossed, it was cut out using the Stitched Framelit die and the gold mat from the Circle Framelits … they pair well together. That was popped up on the background.

My greeting comes from the Chase your Dreams Thinlits dies (also comes as a bundle). We used the stampin’ blends to color our Rhinestones to give them a hint of gold!  It looks so cohesive … and I loved the way it turned out.

Thank you for joining me today!

Have a good day ~

TODAY’S STAMPIN’ SUPPLY LIST …

Price: $110.00


Technique Tuesday: Distinktive Stamps

Hello Stampin’ Friends ~

Stampin’ Up! knows there is always room for innovation, which is why we’ve trademarked a new style of red rubber stamp. Named Distinktive (see what we did there?), these stamps start with a photograph, which our amazing Stampin’ Up! manufacturing team in Kanab, Utah then turns into a photorealistic red rubber stamp!

Watch Stampin’ Up! Demonstrator Development Manager, Tanner Smedley, show you the innovative Distinktive Stamps. Watch how these stamps give a realistic stamped image that will wow anyone who see it.

This innovative stamp style allows you to create images with depth by simply inking and stamping once!

Here is the “Healing Hugs” stamp set that Tanner showed us in the video … a card sample will follow!

Another beautiful Distinktive Stamp Set is the “All The Good Things” stamp set with the lovely koi fish. Did you know that koi are symbols of love and friendship in Japan?

This Distinktive stamp set is perfect for creating eye-catching projects like these pretty cards …

I hope you enjoyed learning more about this awesome new stamp design.  They really create a beautiful image … you just choose they ones that reflect your style.

Thanks for sharing a part of your day with me …

Hope yours is a good one.

Dandelion Dreams & Wishes …

Hello Stampin’ Friends ~

I hope you enjoyed the beautiful weekend! Yesterday was absolutely a lovely day and perfect for my great-nieces graduation party… and it’s always great to see family.

Today I have two cards for you, both using the Dandelion Wishes stamp set … just a different orientation. Our first card is has a similar layout as the card you saw yesterday. I also used the Garden Impressions Designer Paper again … but a totally different pattern!!

Do you agree with me … this designer paper is stunning!! I embossed my image directly onto the designer paper. This paper color coordinates with the new 2018-20 In-Color Blueberry Bushel – what a beautiful color.

The background was created by the simple technique of stamping “color on color” … in other words, Blueberry Bushel ink on Blueberry Bushel cardstock. I did the same on the cardstock that I embossed my greeting onto as well.

The greeting comes from the “Follow Your Dreams” stamp set.  This also comes in a bundle for a 10% Savings! It was heat embossed like the dandelion image and cut with the Layering Ovals Framelits.

Now ~ using the same designer paper, techniques and stamp set, we’ll change the orientation to a vertical card and you get this beautiful card …

So we switched the stamp from the dandelion set and used the greeting from the set as well but the Garden Impressions designer paper and embossing and stamping technique are all the same, but the card still looks different.

I did a little more layering of cardstock on this card and my base was Whisper White instead of the Blueberry Bushel like our first card.  My stampin’ tip for you today is to “Heat Set” your stamped cardstock before you emboss on it… you don’t want your embossing powder to stick onto the cardstock.

So … what do you think of this amazing combination of the beautiful blue Garden Impressions paper and the “Color on Color” stamping technique, then embossed in white? I’m lovin’ it!!

Thank you for stopping back today to check out yet another card with the Dandelion Wishes stamp set.

Hope you have a beautiful Monday!!

TODAY’S STAMPIN’ SUPPLY LIST …


Simply Sunday: I Made a Wish

Hello Stampin’ Friends ~

I am so excited to share another card I created using the Dandelion Wishes stamp set! Not only am I sharing the card but a great stampin’ tip that I used in creating this card. Again, today’s card is not included in the card class, so if you are coming … you’ll have additional ideas!

As of last night, there are only 3 spots left. If you would like to join us … give me a call at the number listed above.  If there is more interest, I will open another date!

Today’s layout is simple to recreate, fun and colorful.  My color pallet consists of the new Soft Sea Foam and Shaded Spruce teamed up with the Pacific Point.  Not sure I would have put these colors together by myself, but when you put them all together … it looks nice.  And it is the basis of the designer paper.

The designer paper I used is the 6 x 6 Garden Impressions Designer Paper stack … there are so many cute designs in this stack. It’s fun and colorful!!  Today’s pattern seemed to match with the Dandelion Wishes.

The greeting and images were both stamped in the Shaded spruce, in fact … they were both put on the same clear block!!

Putting multiple stamps on one block makes stamping easy! If you are doing several cards … you may want to consider purchasing the Stamparatus (Click Here to View)

The Soft Sea Foam is so “soft” and pretty and really seams to works well with this stamp set and the patterned paper I found in the Garden Impressions pack. All the layering on this quick -n- easy card takes it a step up.

Hope you enjoyed today’s Simply Sunday share.  I appreciate you taking the time out of your weekend to check in with me.

Thank you, and I’ll see you tomorrow with another Dandelion Wishes card!!

Have a great day ~


TODAY’S STAMPIN’ SUPPLY LIST …


Dandelion Wishes Card Class …

Hello Stampin’ Friends ~

I am excited to let you know that I am hosting a stamp class featuring the Dandelion Wishes stamp set.  I fell in love with this set the moment I saw it and if you love it too … you’ll want to attend this class!!

We will be combining this beautiful stamp set with some great stamping techniques that will truly highlight it’s beauty.

I will be holding this class in my stamping studio (in my home). I can give you directions when you RSVP.

Date: Wednesday, June 27th

Time: 6:00 pm

We’ll be making a minimum of 4 cards with coordinating envelopes!

COST: $15.00

Club Members: $10.50

Star Members: $8.00

RSVP Required by Monday, June 25th

Call me to reserve your spot at [262-334-1009]

If you think this is cute … wait till you see what we’re making in the class … Don’t miss it! Contact me by Monday the 25th to reserve your spot!

See you there ~

HOORAY … It’s Your Day!!

Hi Stampers ~

So what did you think of yesterday’s project … cute right! OMGosh today’s project had me tickled pink! Or should I say Lovely Lipstick!!

Yesterday was an interesting day … I’ve been training new employees for the past two weeks so setting up for the weeks events (at work) have been challenging to say the least, however the events started at home! I spilled the coffee grounds, the sugar … oh my, but I wasn’t going to let this start dampen my day! Life is short and is meant to be celebrated so I brushed off those bad vibes and let out a big HOORAY!!

Like I said … this card has me tickled pink!

Again, everything on this card is included in this months kit and I did not add anything outside the kit!! The base kicks off the party and then I added the block of Lovely Lipstick to the center (I’ve loved red and black since the ’80’s!!)

I love the little accent that looks like a marquee so that will be my focal point and will broadcast the HOORAY to announce the celebration!! Too cute!! But I was not done yet!  I added the little green pieces on the sides of the center square to act like moving blinkers calling you to pay attention!! lol  Can you visualize these moving??

Those little green pieces are actually the left over piece from the banners in the kit!! Again, waste not, want not (or so they say) I just thought they looked cool 🙂

I added the two balloons to keep the party going and to create some fun coordination of color! And the sequins added a touch of bling and would highlight/coordinate with the greeting. Overall, I love it!!

I thank you for joining me today, and I hope you enjoyed this card … if so, please leave me a note below.

Have yourself an awesome day ~ HOORAY!!

Today’s Stampin’ Supply List …


Broadway Star!!

Hi Stampers ~

I am really excited to share an alternative project to this months Paper Pumpkin kit! This kit is so cute and it coordinates with a stamp set in the new catalog!!

June’s Broadway Star kit is stealing the show this summer! Check out the unboxing video and get started creating these show-stopping birthday cards today! And stay tuned after the unboxing to learn about the coordinating Broadway Bound product suite, full of products that coordinate with your Broadway Star Paper Pumpkin kit!

Oh wow … I think that coordinating the Paper Pumpkin and a product suite is the catalog is genius!!  I have just ordered the Broadway Birthday suite and can’t wait till it arrives … love the colors and the specialty paper is like a party itself … so much fun!!

I created my alternative card with only the ingredients from the June / Broadway Star kit! The two strips of Lovely Lipstick came from the left over areas of the banner!! Don’t want anything to go to waste … besides, the width was perfect, I only needed to trim off the ends after attaching it to the white banner.  Many of the die cuts already have adhesive on it … easy breezy!!

You can see by this angle the shine from the die cut greeting in gold foil … now that’s one way to get someones attention! lol

If you think this card is cute, then stop back tomorrow because I have another alternative project that will knock your socks off … it will really catch their attention.

Thank you for stopping by today and I hope to see you tomorrow.

Have a happy day ~

Today’s Stampin’ Supply List …


Technique Tuesday: Glitter Designer Paper

Hello Stampin’ Friends ~

If you are a glitter addict then I have the perfect technique for you… Glitter Designer Paper!  I have been doing this for years … the only thing that has changed is the adhesive that I used.  Today I’m using the fabulous Multipurpose adhesive sheets! Quick * Clean * Glitter perfect!!  Pictures do not do it justice!

I’m using the beautiful Petal Promenade Designer Paper. If you love fresh flowers, you will love this paper, the patterns are so pretty and look like they are ready to be picked with the photographic floral designs ❤

I begin with the choice of designer papers … that will set you up for a perfect color pallet (the colors are already listed on the designer paper packaged – Thanks Stampin’ Up!). I chose the returning Mossy Meadow and new Petal Pink, and Whisper White for my greeting.

Using the Multipurpose Adhesive Sheets makes this technique so easy. I cut the adhesive sheet slightly larger than my designer paper, then I trim off the extra.  This ensures I have full coverage of adhesive on my designer paper … don’t want any spots that don’t have glitter!!

Once I have the covering removed … I put the sheet into my glitter tub and sprinkle it with the Dazzling Diamonds glitter.  I made sure to cover it fully and then tap off the excess glitter.  Then I use a scrap piece of paper and cover the glittered paper. My next step is to firmly press the glitter into the adhesive – I use one of my clear blocks.  Remove scrap paper and tap off any excess glitter. WOW! Just beautiful!!

I matted the glitter paper onto the Mossy Meadow cardstock and then onto the card base in Petal Pink.  I used the Label Me Pretty stamp set and stamped the lined decor in Petal Pink and the greeting in Mossy Meadow… then it was punched with Pretty Label punch.  I punched out another label in Mossy Meadow, cut it in half and then attached it to the back … this allows you to mat the label 🙂

I added a touch of Wink of Stella to the filigree lines on the label and the rhinestones to add a touch of bling to my blinged out card!! I used the Stampin’ Dimensionals to pop up the greeting which added a little dimension to the card. Again, the camera does not capture the full beauty of this card.

I thank you for spending a part of your day with me. I encourage you to try this beautiful and fun technique. It really is quite easy as well.  I have listed the supplies I used on today’s card below.

You’re the Best! Have a beautiful day ~

TODAY’S STAMPING SUPPLY LIST … Click on any image for more information on the product or to begin your shopping experience. The link will take you to my On-Line Store.  Thank You for your purchase.


Dandelion Wishes

Hello Stampin’ Friends ~

I hope you had a wonderful weekend!! I am happy to say I got some stamping done this weekend, it was so fun to play with all the new items so I chose the Dandelion Wishes.  I love this stamp set (there are so many great new sets in this catalog!!)

I began with the background using a waterwash watercolor technique. In a small dish I put a drop of the new Balmy Blue ink, a little water and I squeezed a couple drops of the Wink of Stella in the mix!  Using the Aqua Painter … I brushed a little water onto my cardstock and then I picked up some “color” from my mixture and brushed it onto the cardstock.

Not a project I could do in a class because it was pretty wet and took a while to drive however I also could have used the Watercolor paper!! lol  I do however love the shimmer from the Wink of Stella.  Once dry I simply stamped the images onto the cardstock using my StazOn.

I finished off my card with the new Faceted Dot by placing them in the center of my dandelions – so nice to have all the new embellishments!  It is a simple layout but I love these stamps and the font on the greetings … so pretty!!

So many possibilities with this stamp set! Hope you enjoyed this one.

Thank you for checking out my blog post today …

Have yourself a great Monday.

Today’s Stampin’ Supply List …


Simply Sunday: Simple Petals

Hello Stampin’ Friends ~

Whew … it’s a bit hot -n- sticky outside!!  Great time to hide out in my stampin’ studio and play with my new stamps and stuff.

Today I decided to play with the new designer papers, my choice for the day is Petal Promenade!

The photographs in our Petal Promenade Designer Series Paper is more than just a look—real flowers were used! See how our talented Product Designer and Specialist, Kaitlyn Zumbach, used floral arrangements with technology to design this paper. You’ll be blown away be the entire process!

The flower patterns are so pretty … Here is the card I made using one patterns and the “Thank You” thinlets.  Talk about an easy card to make, this is one of them 🙂

My base is Smoky Slate cardstock and the mat and greeting are cut from the new Highland Heather cardstock … oooo – so pretty! I think it highlights nice against the pink contrast of the flowers.

I adhered the greeting with the Stampin’ Dots… it just lifted then enough to give it some dimension.

These pretty petals will compliment any occasion and today we made it simple by adding the Thank You Thinlit die.

Hope you enjoyed today’s card, and I thank you for joining me this Sunday.

Have a wonderful day ~

TODAY’S STAMPING SUPPLY LIST …


Alphabet Edgelits?

Hello Stampin’ Friends ~

I hope you got a chance to see the cute card I shared yesterday!! I love how simple it was to make … and the color scheme, however you can use any color combination you like.

Today I want to share the video …

Have you seen the Layering Alphabet Edgelits? Watch as Tanner demonstrates the use of the Edgelits.

Aren’t these amazing? I think you could really have fun and get totally creative with this bundle.

Thanks for checking out this video, I hope you have a great day!