No Leftovers Here …

Hello Stampin’ Friends ~

Hope you enjoyed yesterday’s fall card and the fun “Reverse Masking” technique used to create it.

I had someone ask me … “What do you do with the left over items when you make a card?”  Well, she was speaking of the piece of paper that I used as a mask to create the leaf on yesterdays card.

Well … Let me show you!!

000_2621

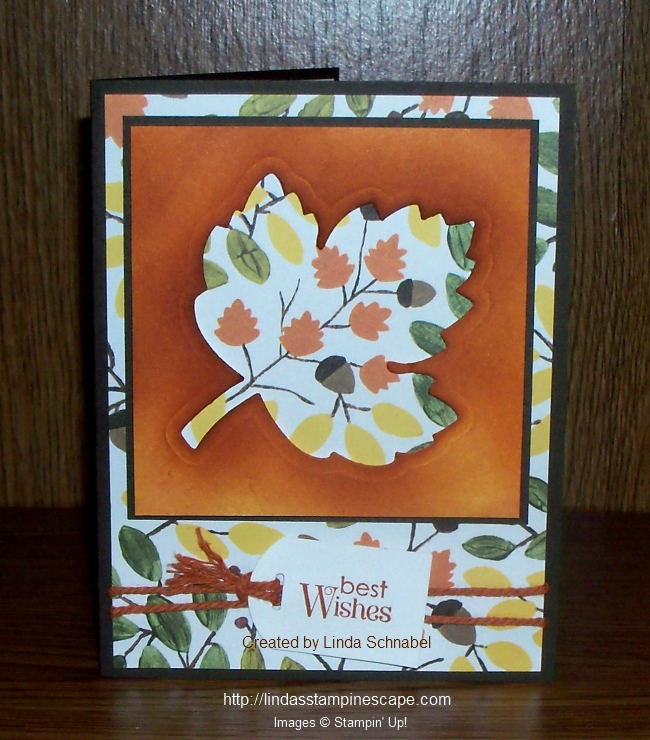
I that the mask looked pretty after I got done sponging, so I added a bit more sponging and trimmed it down and came up with the 3-1/2″ x 3-1/2″ square. I used dimensionals to raise the leaf above the “Into the Woods” designer paper.

I trimmed off the designer paper and matted the front (leaf) piece to create more impact for my focal point. Without the Early Espresso mat behind the leaf, it just blended in to much. Now the designer on the card front works well with our focal (leaf) point.

The card front sits upon a Early Espresso base and is tied together with a bit of that left-over bakers twine from my September Paper Pumpkin.  I created a little tag with the Note Tag and Curvy Corner Trio Punches (I’ll show you step by step soon).

000_2617

The greeting on the tag comes from the stamp set “Teeny Tiny Wishes … still a staple in my stamp collection.

So … now you know what I do with some of my left-over paper, I use it!

Thank you so much for stopping by today ~

Hope your day is a good one!

blog-closing-small

TODAY’S STAMPIN’ SUPPLY LIST …


Simply Sunday: Grateful for cool tools!

Hello Stampin’ Friends,

I’m back with a pretty card that showcases some of my favorite tools for cardmaking. Have you ever thought … what did I do before the BigShot? Me too!! I love using my BigShot and all the tools for cutting and embossing.

Maybe someday I’ll show you some of my first cards … I think we all giggle when we look back. But we had to start somewhere right! That was 15 years ago.

On to today’s card …

000_2532

I began with the thought of using the “Into the Woods” Designer Series paper. I wanted to highlight the pretty flowers so I punched some out with the 2″ circle punch. Did you know the designs on this set of designer paper was hand painted by our designers? Watch this quick video to learn more (Into the Woods is the 3rd highlighted) …

Once I punched out the flowers I chose my color pallet … Whisper White, Rich Razzleberry and Mossy Meadow. I used the Razzleberry for my base and mat behind the flowers to make the razzleberry flowers pop in the bouquet of flowers. The mat was cut with the Circle Framelit Dies.

It’s so easy to create beautiful backgrounds with our embossing folders, and I wanted to use the new “Woodland” folder, it coordinates so well with the “Woodland” theme of this card.

000_2536

Finally my greeting … a simple choice! I used the “Seasonal Framelit Dies” and chose the grateful die cut and adhered it with the new Fine Tip Glue Pen. If you don’t have this yet, you will really need to get it on your wish list. I works so nice!

000_2532

Thanks so much for joining me today. I hope you enjoyed the fun tools (punches, folders & framelits) that were used to create today’s Simply Sunday card.

Hope  you are having a wonderful weekend.

blog-closing-small

TODAY’S STAMPIN’ SUPPLY LIST …


Dropping in to Say HI …

Hello Stampin’ Friends ~

I hope you had a wonderful weekend! I had the chance to spend time with my granddaughter and her little guy … He’s so cute!

Today I’d like to share with you the last of my “sneak peeks” into the Holiday Catalog because tomorrow it goes live!! Yes, you can finally order from this fabulous catalog.

For those of you who can’t wait … you should consider becoming one of my Star’s! There’s no obligation to sell (unless you want to make some money) you only need to keep yourself active to be able to see the catalogs early and order early … just one of the fun perks. Let me know … we’ll talk.

Here’s my card …

000_2493

I started with the fabulous “Into the Woods” Designer Series paper. Our designers actually hand painted the designs, how pretty, and it coordinates with several of our stamp sets.

I choose the “Acorny Thank You” stamp set because I felt like dropping in on you to say Hi! I think that is so cute. I love all the acorns too! Oh yes … it has a coordinating punch, which you can bundle and save 15% … gotta love that!

I highlighted my punching it out with the “Decorative Label” punch … you will recognize that one. It’s in our main catalog and I use it quite a bit.

I also wanted to add some texture to my card so I created a banner with the Burlap Ribbon. I don’t know, I think burlap looks great on fall cards. What do you think?

000_2496

Hope you enjoyed today’s card … I’d really love to hear what you think. You can comment below on this card or any of the “sneak peek” cards I have shared with you.

I’d also like to THANK all those who participated in my “Free Stamp Special” … I hope you enjoy you stamps. Thanks again!

Hope you all have a wonderful day … I’ll be back tomorrow with some new “Weekly Deals”.

Take care ~

blog-closing-small