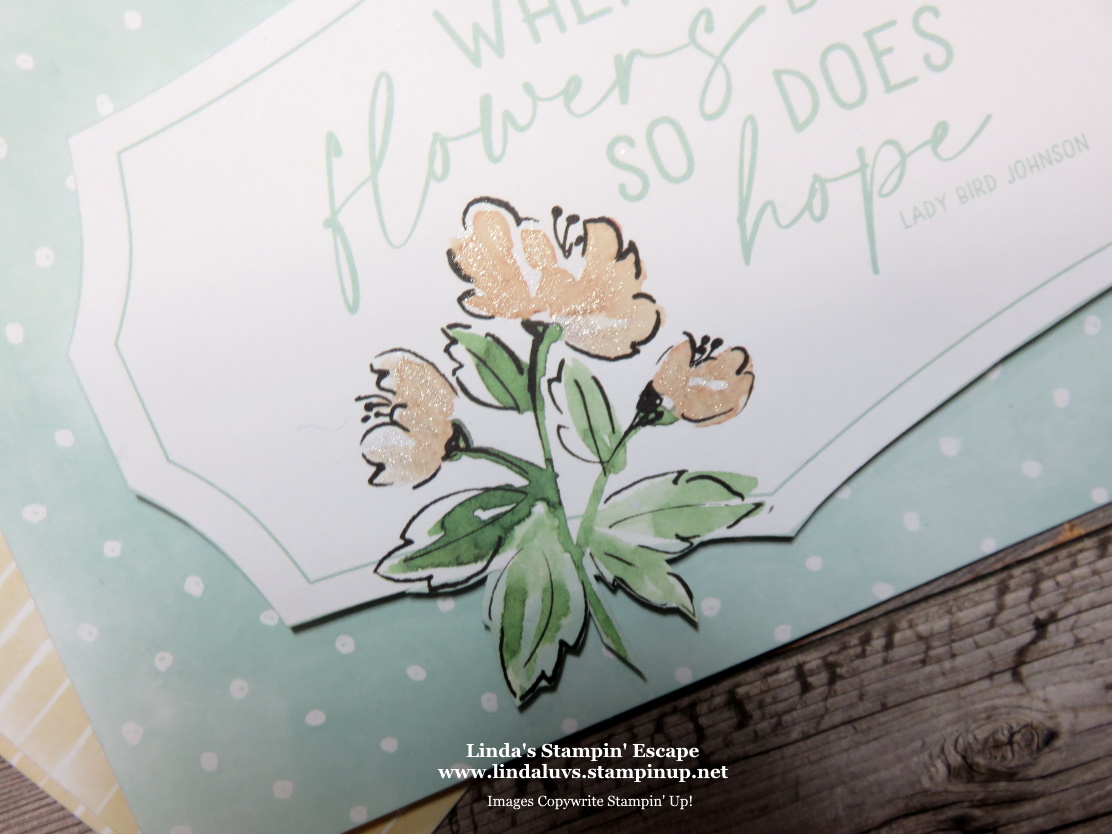
As promised, friends! If you caught my latest video, you know I couldn’t wait to share another stunning card using the Inked Occasions April 2025 Paper Pumpkin Kit — and this one is a real showstopper.
I started with the gorgeous card base that’s beautifully infused with gold detailing (seriously, it’s almost too pretty to cut… almost!). I sliced it in half, then trimmed one side down to 3-7/8″ x 5-1/8″. To give it a dramatic frame, I layered it onto Basic Black cardstock cut to 4″ x 5-1/4″ — the contrast really makes that gold pop! This was then mounted on a Berry Burst card base, bringing in a vibrant touch that plays so well with the florals.
Now for the WOW factor… the gold veins running through the design inspired me to reach for my Beautiful Butterflies Bundle. I die-cut the most intricate butterfly from the Gold Foil Sheets, and friends — it is GORGEOUS. Elegant, eye-catching, and the perfect complement to this design.
To finish it off, I stamped a sentiment from the exclusive Inked Occasions stamp set (another gem in this kit!) and sprinkled on a few Holographic Resin Dot embellishments for a little sparkle. These little beauties will be available when the Annual Catalog goes LIVE May 6th!
💡 PRO TIP: Don’t be afraid to cut up your kit pieces — with a little imagination, the possibilities are endless! When you cut those card bases in half, you double the output of your kits! That means even more gorgeous cards from one monthly box. Talk about getting the most out of your Paper Pumpkin subscription!
Thanks for crafting with me today — let me know in the comments if you’ve tried an alternative project with your Paper Pumpkin kit. I’d love to see what you’re making!
The holiday season is upon us, and there’s no better way to get into the spirit than with handmade crafts that come straight from the heart! Over the next 12 days, I’ll be sharing creative inspiration for your Christmas crafting, so be sure to check back daily. Let’s kick things off with a project that’s equal parts festive, elegant, and oh-so-easy to recreate!
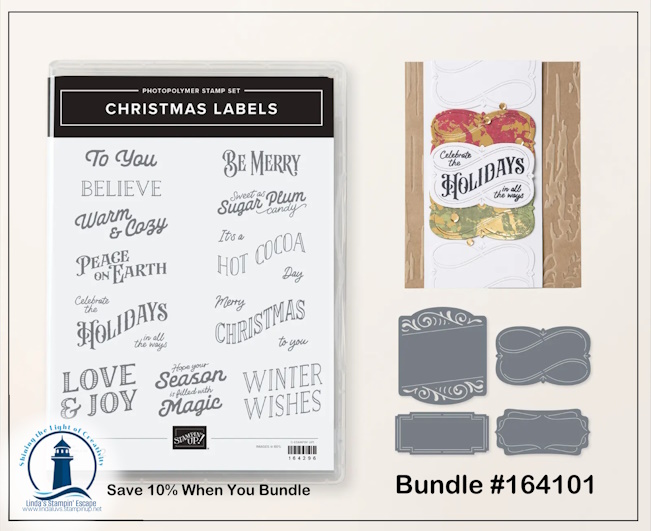
Today, we’re spotlighting two fabulous products that will elevate your holiday projects: the Sentimental Christmas Designer Series Paper and the Christmas Labels Bundle. These items are your new best friends for creating beautiful handmade cards, gift tags, scrapbook pages, and more.
The Sentimental Christmas Designer Series Paper exudes a cozy, vintage charm that captures the essence of the season. Think warm, rich colors, timeless patterns, and designs that instantly set a nostalgic mood.
The Christmas Labels Bundle, which includes stamps and coordinating dies, is a must-have for your holiday toolbox. Save 10% when you buy the bundle instead of purchasing the stamps and dies separately! Not only does it save you money, but it also saves you time by effortlessly cutting out your stamped images.
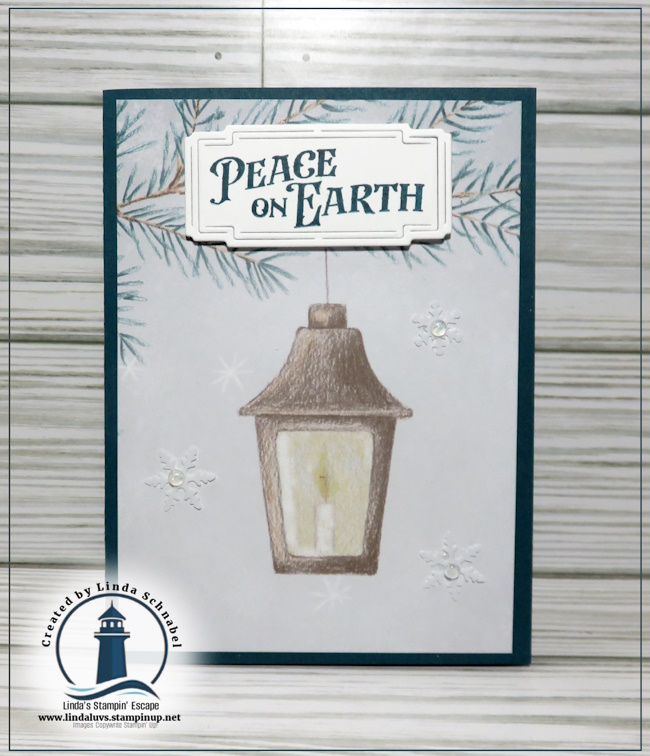
For today’s project, I’ve created a simple yet stunning card featuring the lantern design from the Sentimental Christmas paper. The lantern is so beautifully detailed that it becomes the star of the card. To complete the look, I added a bold “Peace on Earth” greeting using the rectangular die from the Christmas Labels Bundle.
Here’s how easy it is to make: 1️⃣ Cut a piece of the lantern-patterned paper; 4″ x 5 1/4″ to fit your card front. Pretty Peacock Card Base measures 8 1/2″ x 5 1/2″… then scored and folded at 4 1/4″. 2️⃣ Stamp “Peace on Earth” (or your favorite sentiment!) with Pretty Peacock Classic Ink and use the coordinating die to cut it out. The bundle makes it an easy choice! 3️⃣ Attach the greeting to the card with a few dimensionals for a polished look. Embellish!
That’s it! This card is a breeze to assemble and perfect for making multiples—ideal for spreading holiday cheer far and wide.
Join the Fun!
This is just the beginning of my 12 Days of Christmas series! Every day, I’ll showcase a new project to inspire your holiday creativity, featuring tips, techniques, and must-have products. Whether you’re a seasoned crafter or just starting out, there’s something here for everyone.
Be sure to stop by tomorrow for Day 2, where I’ll share another festive idea to spark your imagination. Let’s make this Christmas extra special with handmade touches!
The Beary Christmas suite shines in the joy of simple, delightful crafting! Today, we’re taking a step back from the complexities of life and crafting to embrace the art of simplicity. We’ll be exploring how to create charming Christmas cards and gift tags effortlessly using the Beary Christmas Memories and More Card Pack in combination with the Beary Christmas Memories Cards & Envelopes by Stampin’ Up!
Before we dive into the crafting magic, let’s talk about what’s included in the Beary Christmas Memories and More Card Pack. This pack is a treasure trove for crafters, especially those seeking an easy and enjoyable creative experience. Inside, you’ll find:
Cards: A variety of beautifully designed, double-sided cards that come in different sizes. These cards feature delightful Christmas-themed artwork, perfect for spreading holiday cheer.
Stickers: An assortment of coordinating stickers that match the card designs. These stickers are great for adding extra flair to your projects.
Journaling Cards: Some cards are designed for journaling or adding personalized messages, making them versatile for different crafting projects.
Memories Cards: These cards are designed for scrapbooking but can be repurposed for other creative endeavors, as you’ll see in our project today.
Coordinating Colors: The color palette in this pack is classic Christmas with shades of red, green, and white.
Now, let’s get to the fun part! When you combine the Beary Christmas Memories and More Card Pack with the Beary Christmas Memories Cards & Envelopes, you can create adorable Christmas cards in no time at all. The pre-scored and pre-folded cards and envelopes make crafting a breeze, especially if you’re new to cardmaking.
Creating Christmas Cards:
Select a Card Base: Start by choosing a Beary Christmas Memories Cards & Envelope as your card base. These cards already have a festive design on the front, saving you time and effort.
Embellish with Memories and More: Pick a Memories and More card or stickers from the Beary Christmas Memories and More Card Pack that complements your card base. You can use double-sided tape or glue to attach these elements.
Personalize: Add a heartfelt message or greeting to the inside of the card using the journaling cards or simply write your own message.
Envelope Decoration: Don’t forget to decorate the envelopes with matching stickers or a touch of your creativity.
But that’s not all; these supplies aren’t just for cards. You can also use them to create easy and charming gift tags for your holiday presents. Here’s how:
Die-Cut Tags: Use the tag die from the Merriest Trees Bundle (or any tag die you prefer) to cut out tags from the Memories Cards or other cardstock in the Beary Christmas Memories and More Card Pack.
Add Festive Touches: Decorate the tags with stickers, additional embellishments, or even some ribbon for that extra holiday charm.
Attach to Gifts: Use a hole punch to make a hole at the top of your tag and thread a ribbon or string through it. Then, attach the tag to your beautifully wrapped gifts.
Crafting doesn’t have to be complicated or time-consuming. With the Beary Christmas Memories and More Card Pack in tandem with the Beary Christmas Memories Cards & Envelopes, you can effortlessly create delightful Christmas cards and gift tags that will bring smiles to your loved ones’ faces. It’s the perfect crafting experience for beginners or anyone seeking a simpler, more joyous way to celebrate the holidays through handmade creations.
So, grab your supplies, put on some holiday tunes, and enjoy the magic of simple crafting this Sunday. Happy crafting! 🎄✨
Happy Sunday! Today I’d like to share one of my Stampin’ Tips for creating with designer paper who’s patterns are a bit, well … BOLD!! Some designs we look at and know exactly what we would like to do with them, others leave us with a question mark … lol.
Yesterday I highlighted the pattern with a simple die cut, today it’s all in the pattern of the card. When you have bold patterns you are not sure how to use them … go small! Today I turned a bold pattern into a simple little block that will create our focal point.
I was not sure how I wanted to use those big X’s, and the other pattern… well, it kind of hurt my eyes!! lol But cut into smaller blocks (1-1/2″ x 1-1/2″) we tame them down and create a cute design of blocks. I love the little swans so I added them into my Black & White themed card … it is what gave my my pop of color.
I matted my designer paper blocks with Calypso Coral measuring 1-5/8″ x 1-5/8″. Then I used my Stampin’ Blends to color the White Bakers Twine to Calypso Coral! The blocks were placed onto a 3-1/2″ x 3-1/2″ piece of Basic White…. this fun pattern of blocks create the focal point of our card.
I popped up the entire assembly with the foam adhesive sheets. I stamped my greeting from the Layering Leaves stamp set with Memento Ink and finished it off with the Classic Matte Dots in Black. The front was then layered onto a Basic Black card base.
I love all the texture and dimension of this card, and those crazy patterns make this card fun! If there is ever a pattern in your pack of designer paper that you are not sure what to do with it … tame it! Cut it down into blocks, or maybe use a collection of circles. Just have fun with it, and use it up.
Thank you for taking time out of your Sunday to visit me!
I took the weekend off but I’m back to say HELLO in a fun & whimsical way. I am using the Delightfully Eclectic 12 x 12 Designer Series paper. This paper is so much fun with a total of 48 sheets … you’ll get 4 sheets each of 12 double-sided designs. That is 24 “delightfully eclectic” patterns. I’ve used several already and I’m sharing one of them with you today.
My pattern choice today was the fun floral in Fresh Freesia and Basic Black. I matted my paper with the black and chose the Fresh Freesia cardstock as my base. Once layered I added the Black & White 1/4″ Gingham Ribbon which I tied in a cute little bow.
With such a fun and whimsical pattern, I chose the Alphabest stamp set and coordinating Best Label punch. I first stamped the outer design in Tuxedo Black Memento Ink and then stamped my greeting in the Fresh Freesia ink.
With the Alphabest being photopolymer stamps, it’s a breeze to align the letters inside your stamped outer designs.
I popped up my greeting using the Mini Dimensionals and attached them in a playful way … I find this a “no stress” way to add my individually punched pieces because I don’t have to make sure it’s perfectly straight.
To finish off the card, I added my favorite “Iridescent Ice” Rhinestones … they go on everything!! I love the way the pick up the colors that are one your card. Perfect for a super simple, fun and whimsical card.
Thank you for joining me today. I hope you have a great week ahead.
Today I have one more card from my quick & easy cut patterns I shared yesterday. It comes from the 4″ x 6″ pattern cut down to 5-1/4″ …. using the Dandy Designs as well and mounting it onto a Coastal Cabana cardbase.
The greeting comes from the Charming Sentiments stamp set and stamped with Coastal Cabana ink … I just cut the points off the square to create a look similar to the squares on the designer paper.
I punched 6 daisies out and layered them to create 3 flowers and added Coastal Cabana to the centers. These add so much dimension and texture to your card and they are cute!
Once those daisies are popped up with dimensionals, I added a little Wink of Stella to the centers to add a little sparkle. Not much else to say … this card is that simple, but will bring a smile to who ever receives it.
I think we all like making quick & cute cards ….
Thank you for stopping by today. Have a wonderful week.
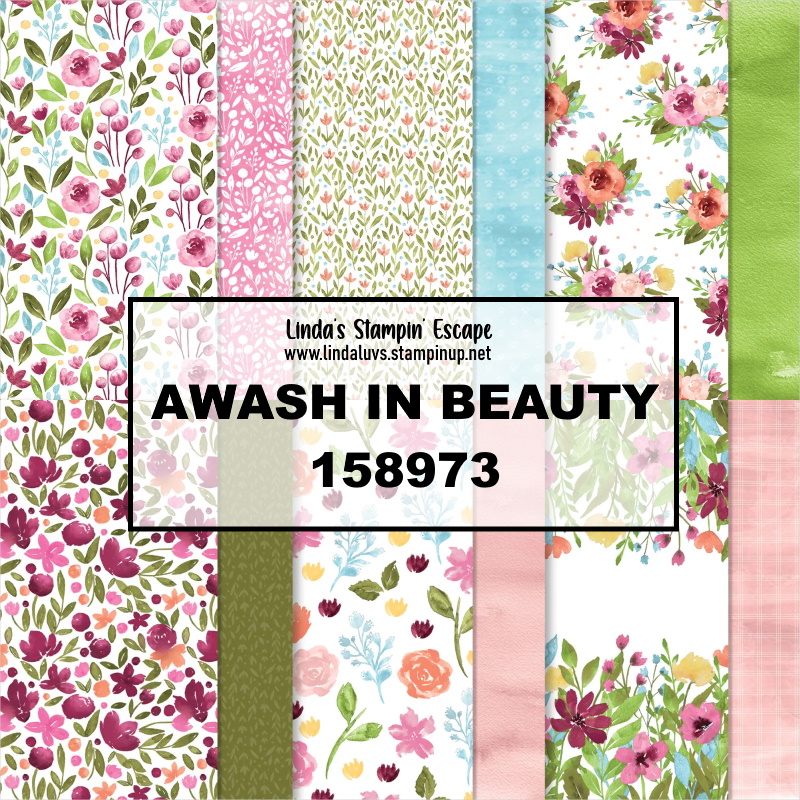
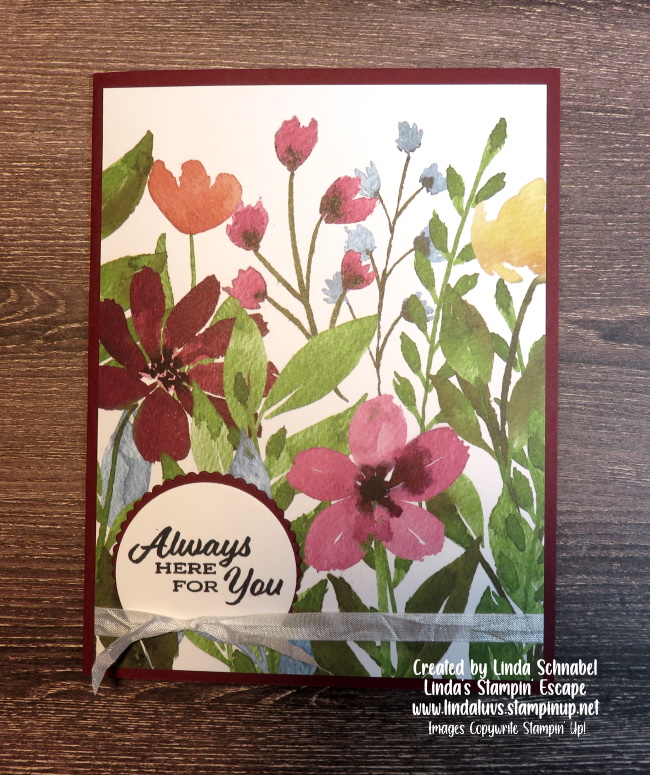
I’m back with more Quick & Easy Cards from that same sheet of paper that I shared with you yesterday … Click Here to View! Don’t forget …. over the next few days I will be sharing “how to” make 8 beautiful “easy to make” cards from one sheet of designer paper … the Awash in Beauty Designer paper.
The layouts for all three cards are similar of coarse but the designer paper gives it a different look. I’ve also chose to use different colored card bases so you can see what a difference that can make on your card as well. Let’s take a look at the Granny Apple Green …
Wow! The Granny Apple Green really makes the greenery in the design POP!! I also decided to use the Double Oval punch for my greeting and the greeting comes from the Lighthouse Point stamp set. I added a bit of the White Frayed Ribbon which I cut the width in half.
My next card highlights the Merry Merlot in the Awash in Beauty Designer paper by using it as my card base ….
The card base is 8-1/2″ x 5-1/2″ then scored & folded at 4-1/4″ on all three of my cards. The Awash in Beauty designer paper and the inside piece of Basic White both measure 4″ x 5-1/4″. I just used scraps for my greetings, and I used the same one as the last card. I die cut the greeting using the Layering Circle dies and added a ribbon to complete the card.
If you look at my three cards together you will see the pattern of the paper ….
I did add the Iridescent Rhinestones to all three cards. Don’t you just love these Quick & Easy Flower Cards. Thanks for joining me today!
Here is a list of the items I used in my Quick & Easy Cards post today … Just click on the item for more details or to begin shopping. Thank you.
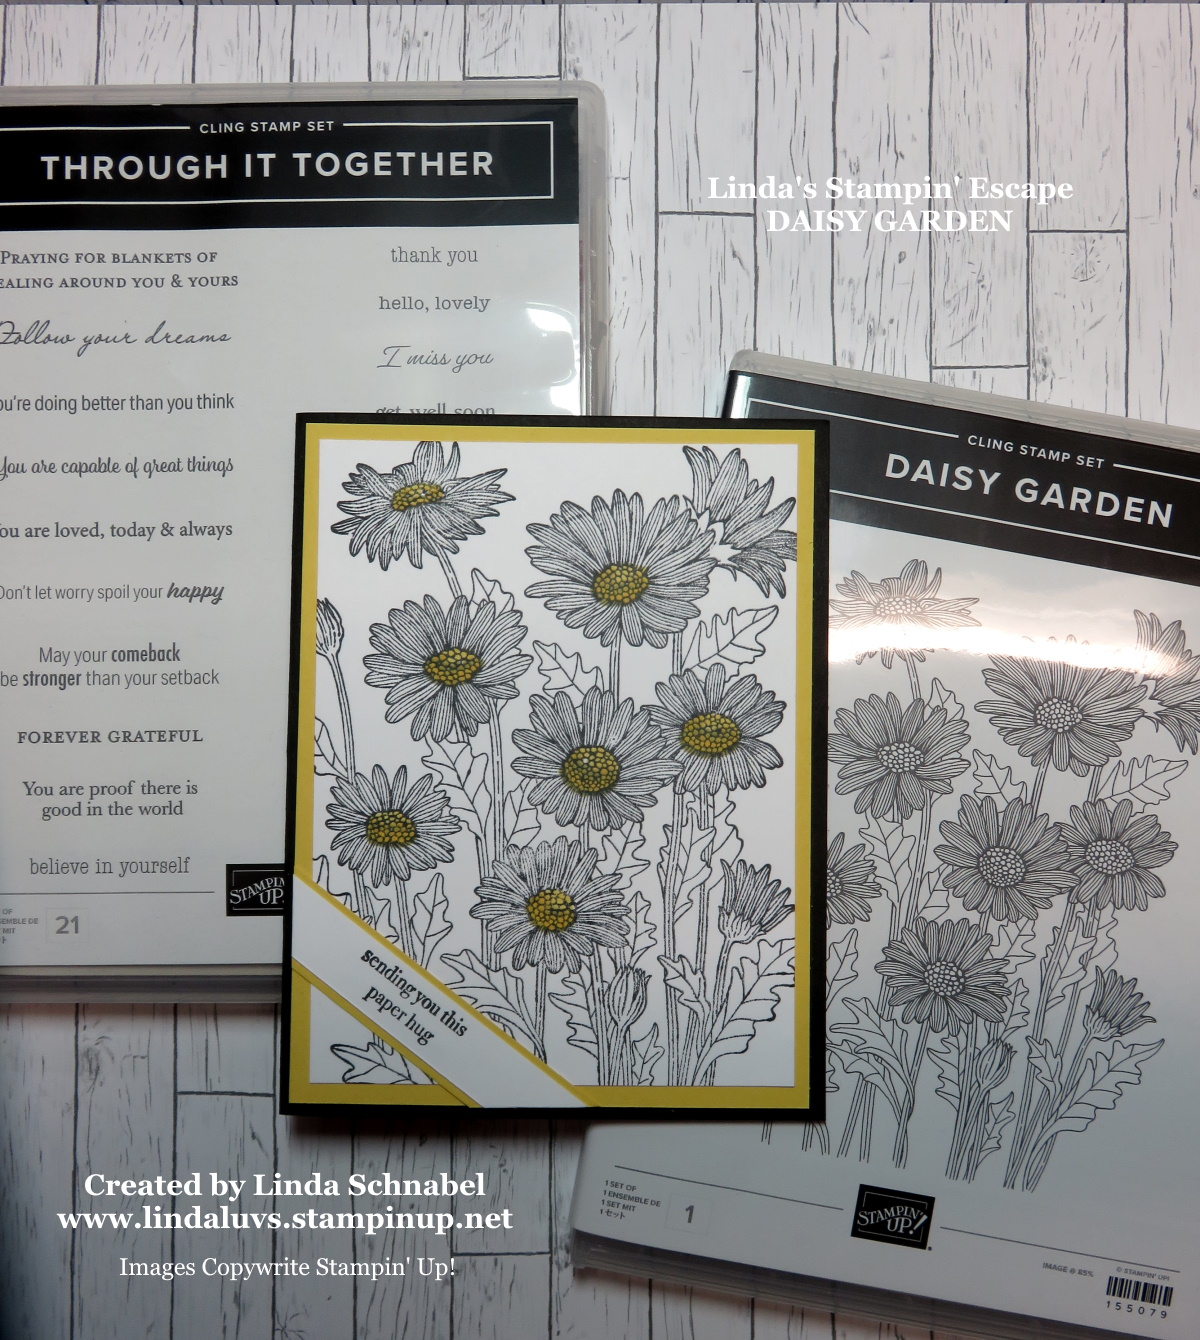
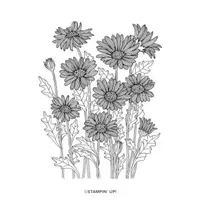
Today I’d like to share a cute stamp that I’ve wanted since the new Annual Catalog came out … and I got it for Christmas!! So the next few days, I will be sharing this with you and introducing you to a few more goodies from the Annual Catalog. Let me introduce you to Daisy Garden …
For the next few days I will be sharing cards from the Daisy Lane and the Through it Together stamp sets. You’ll see some easy layouts that will make this simple stamp set lots of fun and very versatile.
Today’s card is simply stamped in Black and highlighted with yellow centers in the daisies. I used the Tuxedo Black Momento Ink and the Stamparatus so I could get the perfect stamped image …
The minimal coloring actually makes the daisies pop and is great if you need a card in a hurry. I added the greeting at an angle to catch your attention and layered it to add more dimension to the card.
This fun layout can be done in any color but I picked daffodil delight to really attract attention to the card! You can replace it with a soft subtle color such as Fresh Freesia or how about Misty Moonlight… anything would work and look beautiful.
Thank you for joining me today. I hope you had a wonderful Christmas with friends and/or family.
Enjoy this beautiful day ~
TODAY’S STAMPIN’ SUPPLY LIST … If you liked the products used in today’s projects, I have links for you below. Just click on the item you would like more information on, or to begin your shopping. It will take you directly to my website. Thank you ♥
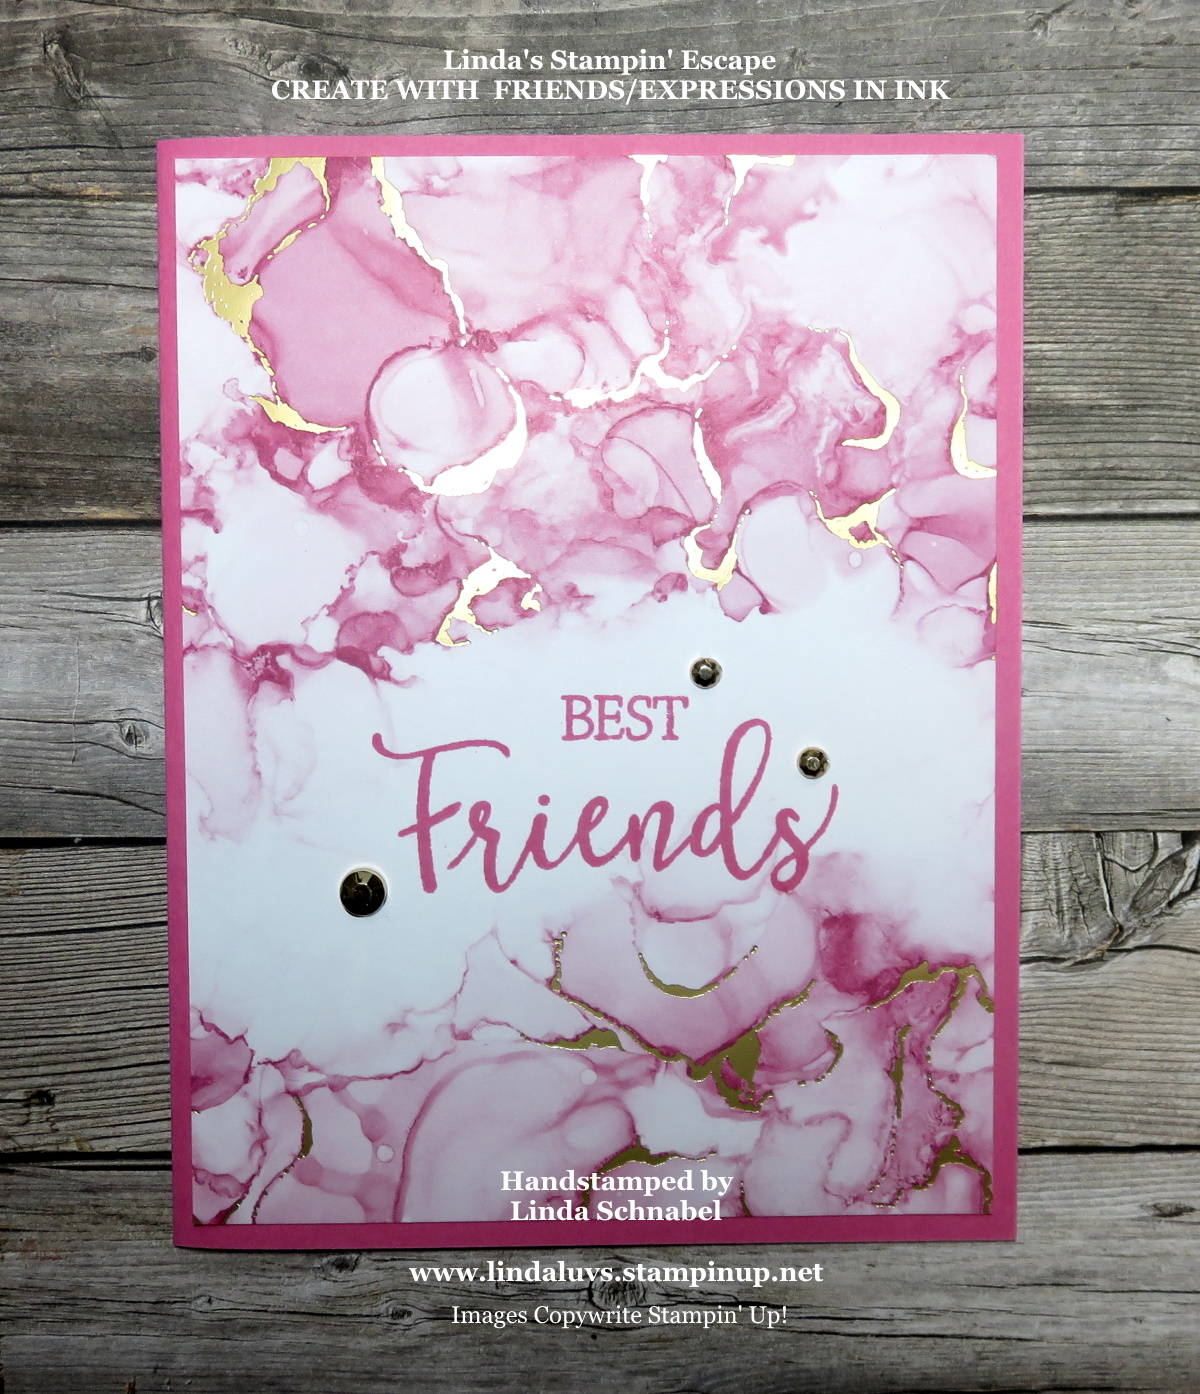
Hello Stampin’ Friends ~ Let me wish any guys out there a “Happy Father’s Day” and a Happy Sunday to all of you. Today I have some great cards for you … If you are looking for some unique, pretty and simple ways to make cards, I have the answer for you today ….
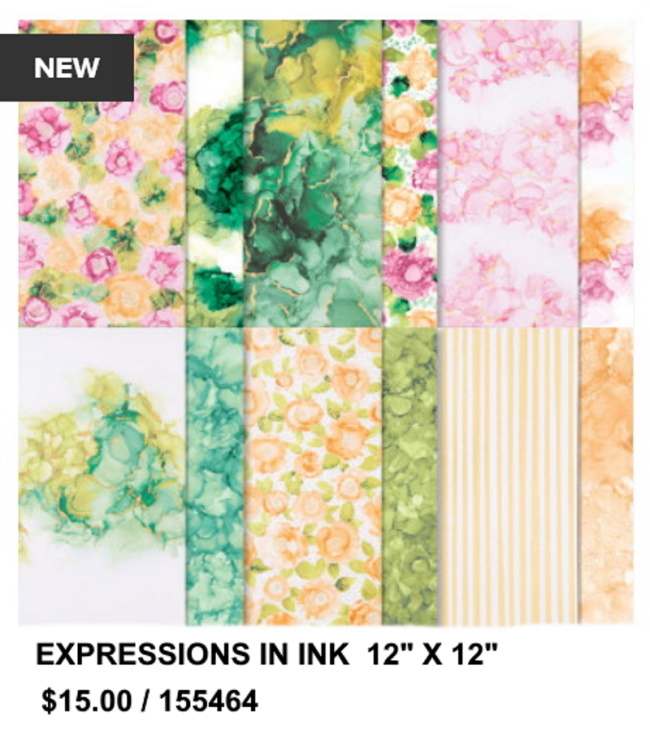
Get yourself the “Create with Friends” stamp set, a package of “Expressions in Ink” Designer Series paper, and a package of “Guilded Gems” and you’ll be ready to create cool, quick cards!
Don’t you just love the pretty patterns of this paper, oooooh … then add gold and it’s irresistible. Now it’s time for the “Create with Friends” stamp set …
Now it’s time to get stampin’ and combine the two together … the hardest part will be deciding which one of the beautiful papers you want and what greeting you’d like on it. Maybe you want to send a card to a special friend, you can combine the stamps to create your own greeting …
I used Polished Pink cardstock and ink to coordinate with my designer paper. The watercolor splits perfectly in the center so you can highlight your greeting. It’s so pretty and so easy! #simplestamping
Let’s continue with another pattern, this time the designer paper was cut so the exposed area is on the side … a perfect place for our greeting.
I thought it would be pretty to emboss my greeting in gold to highlight the gold that is laced through the watercolor design of the paper. I think this card is perfect for birthday’s, a graduation, a new job … anything! On both cards I have decided to use the Gilded Gems, not only to coordinate but to add more depth and texture to the cards. They are way prettier than they appear on the cards.
I’m so happy you stopped by today to take a look. I hope you are having a wonderful day… Thank you.
TODAY’S STAMPIN’ SUPPLY LIST … If you liked the products used in today’s projects, I have links for you below. Just click on the item you would like more information on, or to begin your shopping. It will take you directly to my website. Thank you ♥
Sorry I missed you yesterday but I was head over heals in my Catalog Launch Party. It’s winding down but there will still be some activities today, including a LIVE Demonstration on the Tidings of Christmas Suite (pages 88 & 89) Here is the link: Just request to become a member: CLICK HERE TO JOIN IN
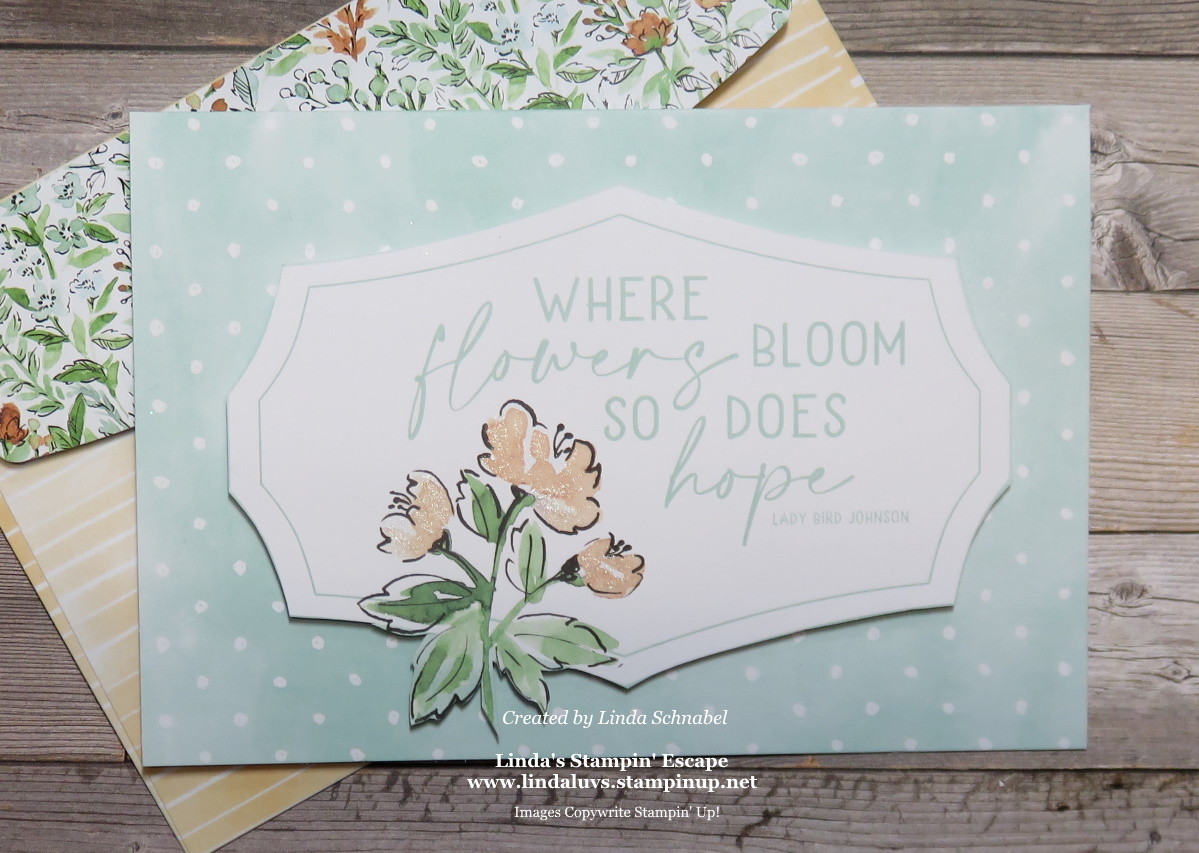
Today I would like to share just one of the cards that I created using the Hand-Penned family of products; the Hand-Penned Memories & More Card Kit and the Hand-Penned Cards & Envelopes … this pair is perfect for making your cards quick & easy! Let’s begin with the Cards & Envelopes …
The Hand-Penned Memories & More Card Kit Isn’t just for scrapbooking, use the cards to create quick & easy cards that are simply beautiful!
You will find beautiful “cards” that can be slipped into the pockets of your Memory Book along with 4 sheets of die cut stickers that embellish your scrapbook or cards so sweetly … I love the soft pastel colors, and the coordinate with the Hand-Penned suite so the possibilities for creating are endless.
I chose one of the larger cards that works great with the cards & envelopes, and then I simply trimmed away the outside to highlight the shape, greeting and flower! All that was already there!! I just trimmed and popped it onto the card front …
The card front is the pre-pattern polka-dots card and is already scored for you… and check out the coordinating envelope! The only other thing I did on this card was give my flowers a touch of the Wink of Stella …
When using these two products combined, you have so many options for creating pretty yet simple cards.
I hope you enjoyed my card share with you today, and that you were inspired to try this sometime.
Thank you for sharing a part of your Sunday with me.
Have a wonderful day ~
TODAY’S STAMPIN’ SUPPLY LIST … If you liked the products used in today’s projects, I have links for you below. Just click on the item you would like more information on, or to begin your shopping. It will take you directly to my website. Thank you ♥
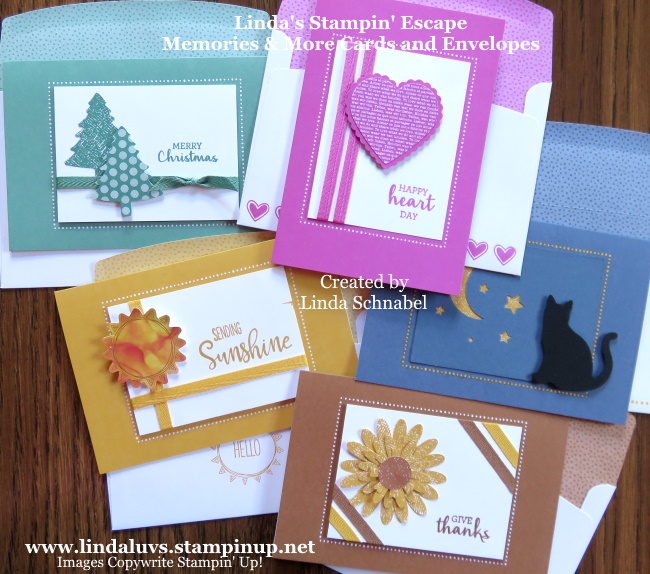
I’m excited to share today’s 5 cards with you … YES, 5 cards! Since I shared the beautiful In Color ribbons yesterday, I thought you would enjoy these ribbons used yet again! I’ve got a great way for you to make sweet -n- simple cards that really showcase the pretty In Colors.
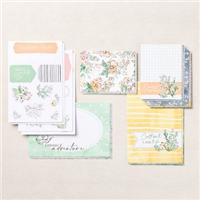
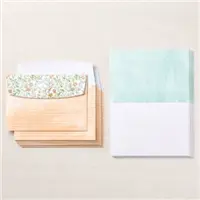
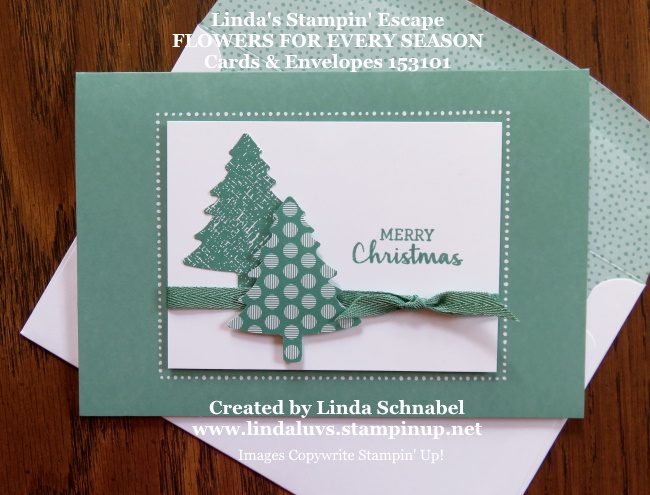
Let’s begin with a card kit … the Flowers for Every Season Memories and More Cards & Envelopes. These cute cards come in our new 2020-2022 In-Colors, and look … the envelopes are already decked out for us!!
I love these card bases for quick and easy cards. There are 2 each of 5 2020–2022 In Colors. 10 printed card bases and 10 printed envelopes. Discover Bumblebee, Cinnamon Cider, Just Jade, Magenta Madness, Misty Moonlight.
I think the Polka dots are cute so I didn’t want to hide them so my first layer … usually Whisper White measures 4″ by 3″ and fits nicely inside my polka dots. To add a touch of color I will add the coordinating In Color 6 x 6 Designer paper pack and the ribbon. For some fun … we’ll use some of the punches we have. Let’s begin ….
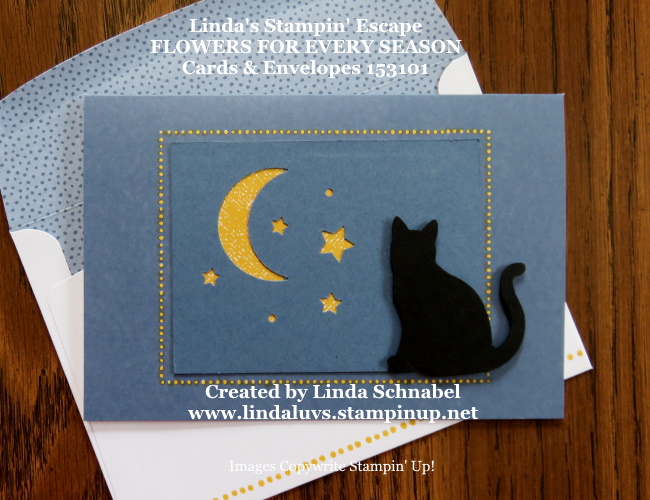
My first card highlights the Misty Moonlight, so what better to start with than the “Cat” punch ….
My apologies for using the “retired” moon & stars … Looks like I need to check my catalog a little closer, but it does look nice with our Cat silhouette. I colored the polka dots with my Stampin’ Blends … one touch and they were “Bumble Bee”. I also used it on the envelope (and a ruler to guide me)
The next card highlights the Just Jade and the “Pine Tree” punch …
I punched the tree from two different patterns, added the ribbon with a bow (it is Christmas) and our greeting comes from the “Arrange a Wreath” stamp set. I used this stamp set for the rest of my cards today.
The third card brings us into Spring and the Magenta Madness …
I used the “Heart Punch Pack” to create this card… the scallop heart is punched in the Magenta Madness cardstock and the other heart is punched from the In Color 6 x 6 Designer paper pack. I also changed the layout from horizontal to vertical … they can be used either way.
I also switched up my ribbon from a simple bow to two lines of ribbon. Ribbon is the perfect way to add texture and color to your projects at a budget friendly price … there is a lot of ribbon on those bolts!!
My fourth card uses the ribbon in a similar fashion, more to dress up the card than to create a bow …
Talk about a simple card … I took the “sun” embellishment out of this months Paper Pumpkin kit! It’s cute and matches perfectly. The Paper Pumpkins are designed to coordinate with other products … and the stamp set, you guessed it – also from this kit! Each month you get an “Exclusive” stamp set that you’ll have around whenever you need it.
The fifth and final card today celebrates both the Bumblebee and the Cinnamon Cider …
I used both Daisy punches to create a sunflower and both the Bumblebee and Cinnamon Cider ribbon to create a pop of color and texture. The greeting is again from the “Arrange a Wreath” stamp set.
So, as you can see with the Flowers for Every Season Memories and More Cards & Envelopes as your base and a little designer paper, ribbon and punches you can create “Simple yet Stunning” cards for all occasions!
Doesn’t that look like a mailbox full of fun! I hope I inspired you to start creating, and use some of those items you have in your collection to make something fresh and new.
Thank you for spending a part of your day with me. Stop back tomorrow I’ll have more goodies for you. If you like what you saw today, feel free to leave me a quick note below or hit the LIKE button.
Here is a list of the supplies I used to create today’s cards. Find out more information about these products by clicking on the image … or you can begin your shopping from here as well. Thank you!
I’m excited to share today’s 5 cards with you … YES, 5 cards! What is more simple than working with a card & envelope set … not sure, because this packet made creating these cards easy. My daughter was amazed that I made them so fast, but I started with a simple idea and I’m going to share that with you today.
Let’s begin with our card kit … the Flowers for Every Season Memories and More Cards & Envelopes. These cute cards come in our new 2020-2022 In-Colors….
I love these card bases for quick and easy cards. There are 2 each of 5 2020–2022 In Colors. 10 printed card bases and 10 printed envelopes. Discover Bumblebee, Cinnamon Cider, Just Jade, Magenta Madness, Misty Moonlight.
I think the Polka dots are cute so I didn’t want to hide them so my first layer … usually Whisper White measures 4″ by 3″ and fits nicely inside my polka dots. To add a touch of color I will add the coordinating In Color 6 x 6 Designer paper pack and the ribbon. For some fun … we’ll use some of the punches we have. Let’s begin ….
My first card highlights the Misty Moonlight, so what better to start with than the “Cat” punch ….
My apologies for using the “retired” moon & stars … Looks like I need to check my catalog a little closer, but it does look nice with our Cat silhouette. I colored the polka dots with my Stampin’ Blends … one touch and they were “Bumble Bee”. I also used it on the envelope (and a ruler to guide me)
The next card highlights the Just Jade and the “Pine Tree” punch …
I punched the tree from two different patterns, added the ribbon with a bow (it is Christmas) and our greeting comes from the “Arrange a Wreath” stamp set. I used this stamp set for the rest of my cards today.
The third card brings us into Spring and the Magenta Madness …
I used the “Heart Punch Pack” to create this card… the scallop heart is punched in the Magenta Madness cardstock and the other heart is punched from the In Color 6 x 6 Designer paper pack. I also changed the layout from horizontal to vertical … they can be used either way.
I also switched up my ribbon from a simple bow to two lines of ribbon. Ribbon is the perfect way to add texture and color to your projects at a budget friendly price … there is a lot of ribbon on those bolts!!
My fourth card uses the ribbon in a similar fashion, more to dress up the card than to create a bow …
Talk about a simple card … I took the “sun” embellishment out of this months Paper Pumpkin kit! It’s cute and matches perfectly. The Paper Pumpkins are designed to coordinate with other products … and the stamp set, you guessed it – also from this kit! Each month you get an “Exclusive” stamp set that you’ll have around whenever you need it.
The fifth and final card today celebrates both the Bumblebee and the Cinnamon Cider …
I used both Daisy punches to create a sunflower and both the Bumblebee and Cinnamon Cider ribbon to create a pop of color and texture. The greeting is again from the “Arrange a Wreath” stamp set.
So, as you can see with the Flowers for Every Season Memories and More Cards & Envelopes as your base and a little designer paper, ribbon and punches you can create “Simple yet Stunning” cards for all occasions!
Doesn’t that look like a mailbox full of fun! I hope I inspired you to start creating, and use some of those items you have in your collection to make something fresh and new.
Thank you for spending a part of your Sunday with me. Stop back tomorrow because I have an amazing “FUN FOLD” card. If you like what you saw today, feel free to leave me a quick note below or hit the LIKE button.
Here is a list of the supplies I used to create today’s cards. Find out more information about these products by clicking on the image … or you can begin your shopping from here as well. Thank you!
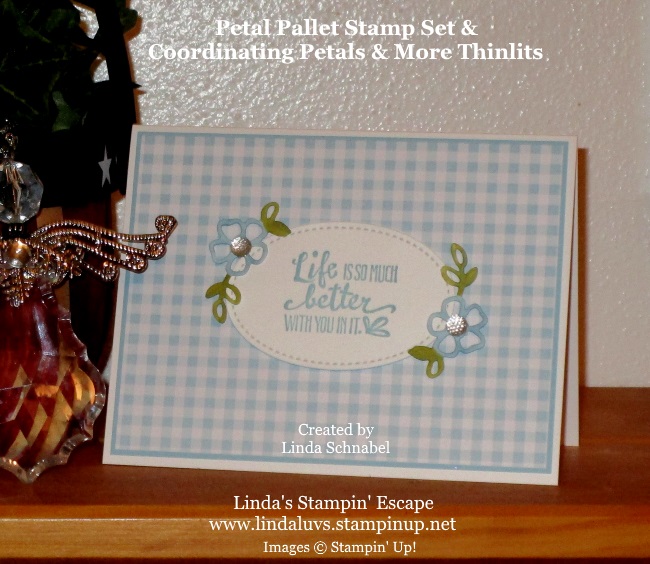
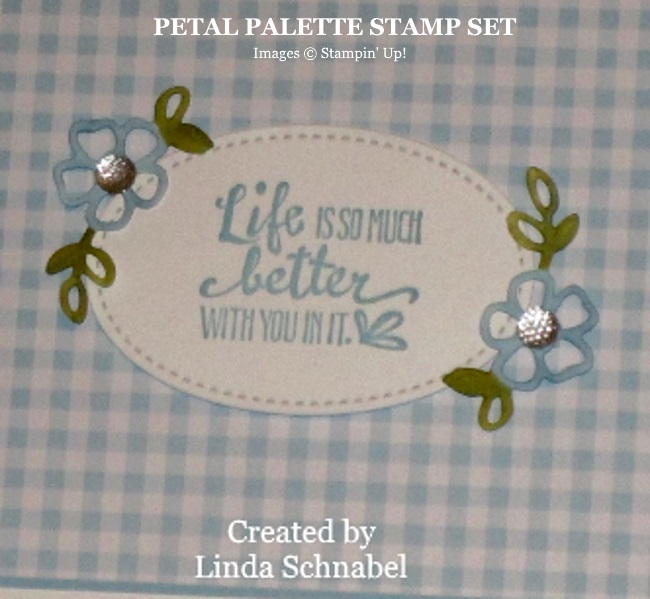
I hope you are enjoying your weekend and I thank you for taking time out of your day to stop and visit my blog. Today I have a sweet -n- simple card for you, that I created using the Petal Palette stamp set (Annual Catalog – page 119) and the coordinating Petals & More Thinlits Dies.
I used the monochromatic style when creating this card which is done in the Balmy Blue …
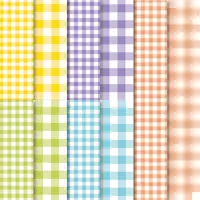
My base is Whisper White as was the oval for my greeting and the flowers that were die cut with the Petals & More Thinlits Dies. I don’t know about you but I feel in love with the Gingham Gala 6″ X 6″ Designer Series Paper … it’s just so “springy”! Reminds me of a warm sunny day. I chose the smaller gingham side (other is wider) and then backed it with Balmy Blue.
The oval was cut from the Stitched Shapes Framelits Die and stamped in Balmy Blue. As I stated earlier … I die cut the flowers with the Petals & More Thinlits Dies and colored them with the Balmy Blue and Mossy Meadow Stampin’ Blends Combo packs. They were then popped up using mini dimensionals and embellished with the clear faceted gems (so pretty).
I think the stitching adds the perfect touch to the gingham and those clear faceted gems really make the little flowers pop! Cute yet quick … that’s just how we have to have it sometimes!!
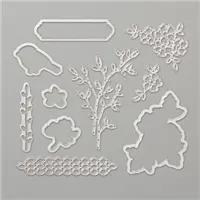
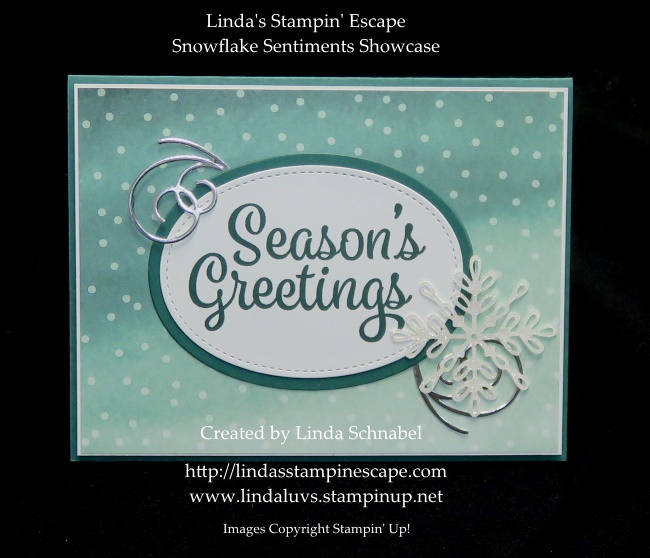
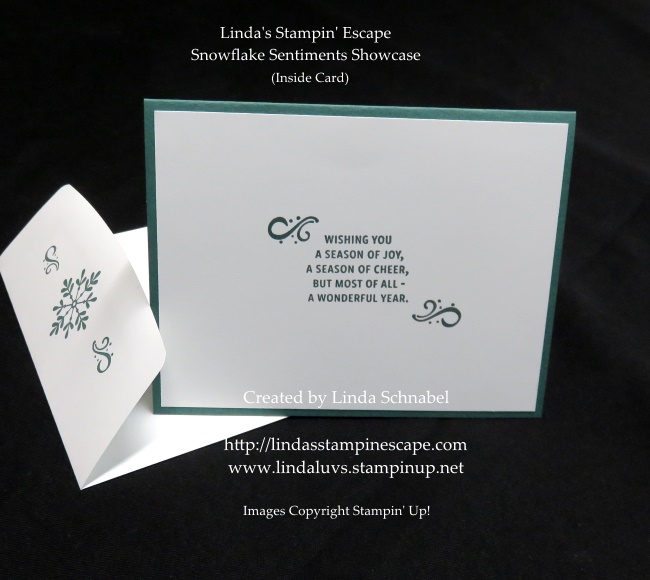
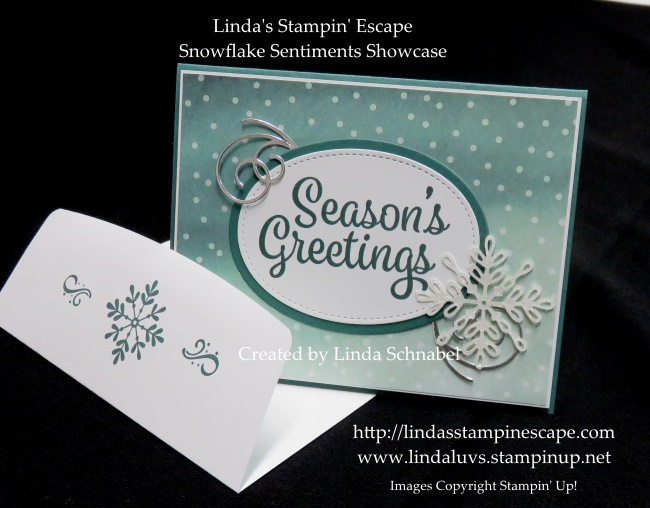
Today I have another card created from the Snowflake Sentiments bundle. I have had many requests to showcase more than one card when doing the popular bundles.
I hope you got to see the “glamorous” Gold and Vanilla cards that I shared yesterday … oh so pretty! Today I’m using one of my favorite new In-Colors “Tranquil Tide” … all stamps and dies used today are again from the Snowflake Sentiments.
With the exception of the Oval Framelits and Stitched Shapes Framelits … these were used for the “Season’s Greetings” which comes in the bundle. I love the little swirls that come in this bundle – I used the Silver Foil for these, and the Dazzling Diamonds Glimmer paper for the snowflake.
Our designer paper comes from the “Delicate Daisy” paper. Hint… Hint … this is one of the designer papers that are currently on sale (Buy 3 / Get 1 Free).
The inside was stamped with this wonderful sentiment and with little swirl that are included in the bundle as well. I also created a matching envelope by using the snowflake stamp and the swirl.
Super Simple to create … just a little stamping and a few runs through the BigShot and you are ready for assembly.
Thank you so much for joining me this Sunday. Stop back tomorrow, I have a cute Christmas card that features 2 more of the dies (you haven’t seen) that are included in the Snowflake Sentiments bundle.
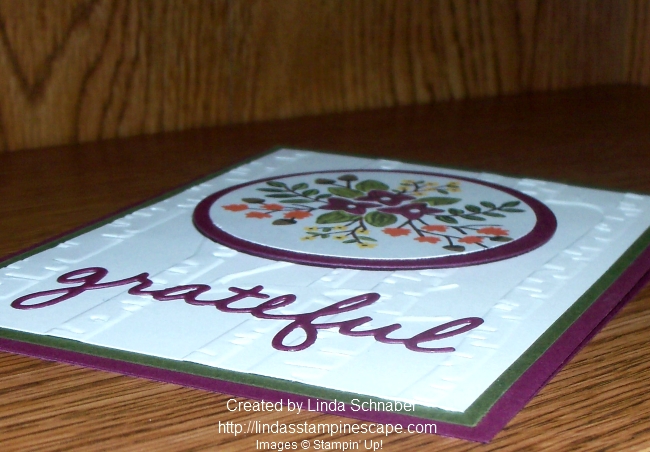
I’m back with a pretty card that showcases some of my favorite tools for cardmaking. Have you ever thought … what did I do before the BigShot? Me too!! I love using my BigShot and all the tools for cutting and embossing.
Maybe someday I’ll show you some of my first cards … I think we all giggle when we look back. But we had to start somewhere right! That was 15 years ago.
On to today’s card …
I began with the thought of using the “Into the Woods” Designer Series paper. I wanted to highlight the pretty flowers so I punched some out with the 2″ circle punch. Did you know the designs on this set of designer paper was hand painted by our designers? Watch this quick video to learn more (Into the Woods is the 3rd highlighted) …
Once I punched out the flowers I chose my color pallet … Whisper White, Rich Razzleberry and Mossy Meadow. I used the Razzleberry for my base and mat behind the flowers to make the razzleberry flowers pop in the bouquet of flowers. The mat was cut with the Circle Framelit Dies.
It’s so easy to create beautiful backgrounds with our embossing folders, and I wanted to use the new “Woodland” folder, it coordinates so well with the “Woodland” theme of this card.
Finally my greeting … a simple choice! I used the “Seasonal Framelit Dies” and chose the grateful die cut and adhered it with the new Fine Tip Glue Pen. If you don’t have this yet, you will really need to get it on your wish list. I works so nice!
Thanks so much for joining me today. I hope you enjoyed the fun tools (punches, folders & framelits) that were used to create today’s Simply Sunday card.