Silent Snowfall Shines in This Eye-Catching Diagonal Card Front

Hello Stampin’ Friends ~

Today I’m excited to share two beautiful winter cards featuring the Silent Snowfall Specialty Paper and the Snowflake Kisses Dies. These cards were part of last week’s Facebook LIVE—if you missed it, no worries! You can catch the full video replay on YouTube by simply clicking the link. Every Tuesday night I go LIVE to share tips, techniques, new products, and plenty of creative inspiration. My goal is always the same: fun, simple cards that are beautiful yet easy to recreate, and these winter cards fit that perfectly.

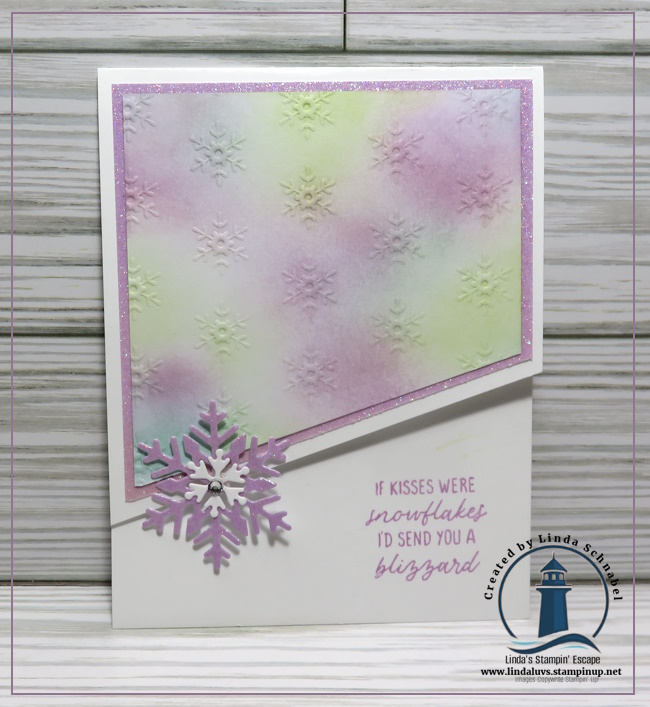
For both designs, I started with an A2 tent-fold style card base—11″ x 4¼”, scored at 5½”. From there, the magic happens! The first card features that stunning diagonal-cut front using the dreamy Silent Snowfall paper backed with sparkling glitter. One angled cut is all it takes to turn a traditional card into a real wow piece. The Snowflake Kisses Dies add the perfect frosty finishing touch. The second card follows the same layout and the same coloring technique using the blending brushes. I stepped it up a bit with more sparkle, showcasing the Peaceful Garden Glimmer paper and some additional layering.

All the dimensions, cutting instructions, and step-by-step details can be found right in the video, so grab a notebook if you want to jot them down. Whether you’re looking to try a new layout or simply love winter crafting, these cards will warm your heart with creativity.

CLICK HERE TO VIEW ON YOUTUBE

Thank you for joining me today …. I hope you enjoy the projects and feel inspired to give this diagonal-cut design a try!

Straight from Santa’s Mailroom: A North Pole Delivery You’ll Adore!

Hello Stampin’ Friends ~

Today it’s double the fun with at the North Pole🎄! I just can’t get enough of the North Pole Delivery Specialty Designer Series Paper! In today’s post, I’m sharing not one, but two adorable cards featuring this festive paper—and you can catch the full creative process in my Facebook LIVE replay (link below)!

This cheerful paper is the backdrop on this first card in garden green. You get two sheets of precut images in this designer paper packet, and this is where our adorable little helper who is busily mailing letters is from, as is the mailbox! Today’s card showcases these delightful images front and center, paired perfectly with the banner from the Stylish Shapes dies. The banner also highlights my greeting from the Words for the Season bundle.

My next card uses the Stylish Shapes Dies to not only highlight my greeting but to create a “gift”. The clean stitched edges of these dies add just the right touch of polish, and they make layering quick and easy. Each card came together in no time—but looks like you spent hours crafting! And the bow on top finishes off the card!

If you’re looking for inspiration to get started with your holiday cards, you’ll definitely want to watch the video below. You’ll see step-by-step how I pulled these designs together and how versatile the North Pole Delivery Specialty Paper really is. It’s perfect not only for cards but also for gift tags, scrapbook layouts, and holiday packaging projects.

Whether you’re making cards, decking out your scrapbook pages, or designing cute packaging for gifts, the North Pole Delivery Specialty Designer Paper is sure to add a touch of merry magic to everything you create. It’s the perfect way to send a little North Pole joy straight from your craft table!

Thank you for joining me today! Ready to bring a little North Pole magic into your craft room? 🎁 Scroll down to find links to all the products I used today—then grab your favorites and start creating your own merry deliveries! And don’t forget to join me for my next Facebook LIVE for more holiday inspiration and creative fun! 🎄✨

Special Delivery from the North Pole! You’ll LOVE What’s Inside!

Hello Stampin’ Friends ~

Yesterday I shared 2 cards created with the Hobby Haven Designer paper, so I thought I’d share the same concept of creating but with a sprinkle of Christmas magic ….

Send joyful tidings this holiday season with the North Pole Delivery Specialty Designer Series Paper! This adorable 12″ x 12″ (30.5 x 30.5 cm) paper pack is bursting with cheer and whimsy—filled with playful dogs, bears, and other festive friends busily delivering holiday letters and packages. With its classic Christmas palette of reds and greens, it’s impossible not to smile when you start creating with it!

One of my favorite features of this paper is the two sheets of precut images—ready-to-use accents that make crafting a breeze! I used a few of these darling images on today’s project, pairing them with the Spotlight on Nature dies. The different-sized circles were perfect for framing my chosen designs and sentiment, giving each element the attention it deserves. For the greetings, I reached for the Words for the Season stamp set—it’s packed with sentiments that fit beautifully with this cheerful paper collection.

To complete the design, I added a touch of texture using the So Swirly embossing folder, which created a fun, blustery background—just like a winter day at the North Pole! And I used the Old Olive Low Profile Sparkle Dots to bring a little magic and coordinating color into our design.

And of course, I couldn’t stop with the front of the card. The inside is decked out too, featuring one of those cute die-cut trucks and a sentiment highlighted with the Stylish Shapes dies.

Whether you’re making cards, decking out your scrapbook pages, or designing cute packaging for gifts, the North Pole Delivery Specialty Designer Paper is sure to add a touch of merry magic to everything you create. It’s the perfect way to send a little North Pole joy straight from your craft table!

Thank you for joining me today, I hope you feel inspired to try out this adorable paper pack, the layout or a combination of both. You’ll find the supplies you need listed below.

A Stunning Alternative Card with Inked Occasions

Hello Stampin’ Friends,

As promised, friends! If you caught my latest video, you know I couldn’t wait to share another stunning card using the Inked Occasions April 2025 Paper Pumpkin Kit — and this one is a real showstopper.

I started with the gorgeous card base that’s beautifully infused with gold detailing (seriously, it’s almost too pretty to cut… almost!). I sliced it in half, then trimmed one side down to 3-7/8″ x 5-1/8″. To give it a dramatic frame, I layered it onto Basic Black cardstock cut to 4″ x 5-1/4″ — the contrast really makes that gold pop! This was then mounted on a Berry Burst card base, bringing in a vibrant touch that plays so well with the florals.

Now for the WOW factor… the gold veins running through the design inspired me to reach for my Beautiful Butterflies Bundle. I die-cut the most intricate butterfly from the Gold Foil Sheets, and friends — it is GORGEOUS. Elegant, eye-catching, and the perfect complement to this design.

To finish it off, I stamped a sentiment from the exclusive Inked Occasions stamp set (another gem in this kit!) and sprinkled on a few Holographic Resin Dot embellishments for a little sparkle. These little beauties will be available when the Annual Catalog goes LIVE May 6th!

💡 PRO TIP: Don’t be afraid to cut up your kit pieces — with a little imagination, the possibilities are endless! When you cut those card bases in half, you double the output of your kits! That means even more gorgeous cards from one monthly box. Talk about getting the most out of your Paper Pumpkin subscription!

Thanks for crafting with me today — let me know in the comments if you’ve tried an alternative project with your Paper Pumpkin kit. I’d love to see what you’re making!

Happy Stamping,
Linda 💕