Butterfly Brilliance Birthday Card Tutorial

Hello Stampin’ Friends ~

Hope you enjoyed your weekend … I know, I was AWOL … Missing in Action … I was taking a break and spending some time with my Great Grandsons. I haven’t seen them in almost 2 years so it was a very special time, and the weather here was great!

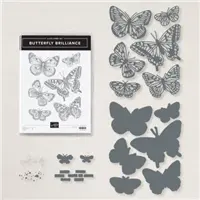
Today I have a sweet birthday card to share with you that features the Butterfly Brilliance stamp set … I am ready to see my yard filled with butterflies! This card was created by fellow demonstrator Charlet Brooks Mallett. I hope you are enjoyed the “Tutorial Week” … this will be the last (since I missed Saturday) … but I’ll be back with my own creations and some sneak peeks for you this week!

Let’s check out Charlet’s Butterfly Brilliance card ….

Measurements: 

  • Card Base: Basic White 4.25 x 11” folded to 4.25” x 5.5”
  • Layer #2: Fluid 100 Watercolor paper 3.25” x 4.5”

Instructions:

  • Cut and score card base. Fold in half.
  • Emboss front half of card base using Brick & Mortar 3D Embossing folder.
  • Wet a 3.25” x 4.5” piece of Fluid 100 Watercolor paper.
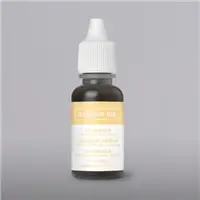
  • Using a water brush lay in So Saffron ink on top half of Fluid 100 paper.
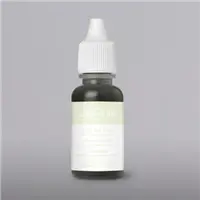
  • Using a water brush lay in Soft Sea Foam ink on bottom half of Fluid 100 paper. Let two ink bleed/blend together. Let dry.
  • Stamp the butterfly background onto the dry watercolor paper using Soft Sea Foam ink.
  • Center and mount to card front using Stampin’ Dimensionals.
  • Stamp butterfly image in Tuxedo Black ink onto Basic White Cardstock. Die cut butterflies using die. Pull aside medium butterfly image. See card to see exact butterfly.
  • Color medium butterfly using So Saffron Stampin’ Blends.
  • Add Wink of Stella to So Saffron butterfly wings.
  • Take a 4” piece of gold elegant trim. Fold in half, unravel ends of trim and adhere to back of butterfly. See card for detail view.
  • Adhere assembled butterfly to card front using Stampin’ Dimensionals. Align on top of stamped butterfly that is on watercolor paper.
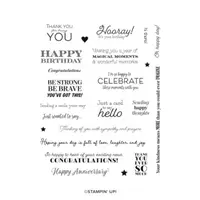
  • Stamp Happy Birthday on ½” x 2.5” piece of Basic White Cardstock in Tuxedo Black ink.
  • Tuck greeting under right butterfly wing and adhere to cardfront using Stampin’ Dimensionals.
  • Add three gold sequins to card front. See card for placement.

Thank you so much for coming back to join me today.

Have a wonderful day ~

TODAY’S STAMPIN’ SUPPLY LIST … If you liked the products used in today’s projects, I have links for you below. Just click on the item you would like more information on, or to begin your shopping. It will take you directly to my website. Thank you

Just Wanted to Say Card …

Hello Stampin’ Friends ~

Yippee … it’s the weekend and I have a sweet -n- simple card to share with you today using the cutest little snail to mail! And our sweet little snail teamed up with the Many Messages Bundle to send you wishes from a grateful heart …

You know what they say “Teamwork Makes the Dream Work” … these two bundles pair so nicely together (actually the Many Messages stamp set pairs perfectly with any of our stamp sets!) Even the little stars and hearts came from the Many Messages stamp set.

Let’s begin with the soft warm glow behind our friendly little snail … I used the blending brush with Bermuda Bay ink to create an area to highlight our snail. Our snail was created using the dies and cutting from the designer paper… you also have the option of stamping your snail and coloring this little cutie any way you want!!

I have mentioned that the sentiments come from the Many Messages stamp set … a large grouping of sentiments that are stamped all at once, and can also be die cut all at one!! How easy is that …

I like to use my Stamparatus and then stamp multiple colors and create a large collection of sentiments that I can just select at a moments notice. I love to create dimension and texture on my cards so I popped up the sentiments, the snail and the stars and hearts.

These little snails are sure to bring the fun to the party or to let you know how grateful you are for having them in your life… both will bring a smile to your face.

Thank you for stopping by and checking out my blog, I appreciate the company.

Enjoy this beautiful day ~

Birthday Messages …

Hello Stampin’ Friends ~

Happy Tuesday to you! Yesterday I shared a card that I created using the Many Messages bundle from the Jan. – June Mini Catalog. This is such a fun way to stamp sentiments … one stamp, one die cut and “many messages”!!

Today’s card was stamped with VersaMark and heat embossed in White…. then I used the Blending Brushes to apply Granny Apple Green, Gorgeous Grape and Marvelous Magenta. Wipe off the excess ink and see the white emerge beautifully. I tried a damp sponge technique on this card … not sure if I like it or not; What Do YOU Think?? Do you like to “dry brush effect”?

Next up is applying the sentiments … earlier I put the stamp on the Stamparatus and stamped out several different colors, then die cut them and tucked them into a stamp case for safe keeping until I need a sentiment … on this card I used several different colors to make the card even more fun! I layered the cardfront onto a Basic White mat and a Gorgeous Grape card base.

What I do love is the fun colorful background … so many happy thoughts in white, and then our Birthday sentiments highlighted bold and bright. And a butterfly from the Floating & Fluttering Bundle to bring a little added joy.

I thank you for stopping by to visit today, I hope your Tuesday is a good one.

TODAY’S STAMPIN’ SUPPLY LIST … If you liked the products used in today’s projects, I have links for you below. Just click on the item you would like more information on, or to begin your shopping. It will take you directly to my website. Thank you ♥ 

Be Strong, Be Brave … Many Messages

Hello Stampin’ Friends ~

Today we enter a brand new week … a new month … and I’m sharing a NEW Stamp Set!! I’m really excited to share this fun bundle with you, it’s the Many Messages bundle and it is created to answer your “sentiment” needs!! It has something for every occasion …

This amazing bundle not only has all of these sentiments, but it has a die to cut them all out for you!! You can do what I did … I put the stamp onto my Stamparatus and stamped them in different colors, cut them out, and saved them to use on any card at any time!

For today’s card, I stamped the card front with the full stamp and embossed it in white. I then choose a couple of sentiments from my stash and spotlighted those on the cardfront….

By embossing the cardfront this way, it adds a nice texture and subtle look to the front. The images were stamped in the coordinating ink to match the mat which really pops the sentiments … highlighting them.

A simple card with a big statement … you can create anything you’d like. I also brought in the Floating & Fluttering bundle to add some warmth to the card, just because we all love butterflies! They are pretty and they hold a special meaning in many of our lives.

A little Wink of Stella to the wings and your card is complete…. just mail it out and let someone know that you support them, or wish them a happy birthday or anniversary … so many to choose from.

I hope you enjoyed a glimpse into this bundle, I will be back to share more fun things you can do with it.

Thank you so much for joining me today.

I hope your week is a good one ~

TODAY’S STAMPIN’ SUPPLY LIST … If you liked the products used in today’s projects, I have links for you below. Just click on the item you would like more information on, or to begin your shopping. It will take you directly to my website. Thank you ♥