Easy Peasy Celebrations!

Hello Stampin’ Friends ~

Well … we made it through Monday, almost … before this “NASTY” storm came blowing through. Holy cow … wind & snow and up to 3 – 5 inches. NOOOOOOOOOOOOOO!!  Time to go back to the stamp room!!

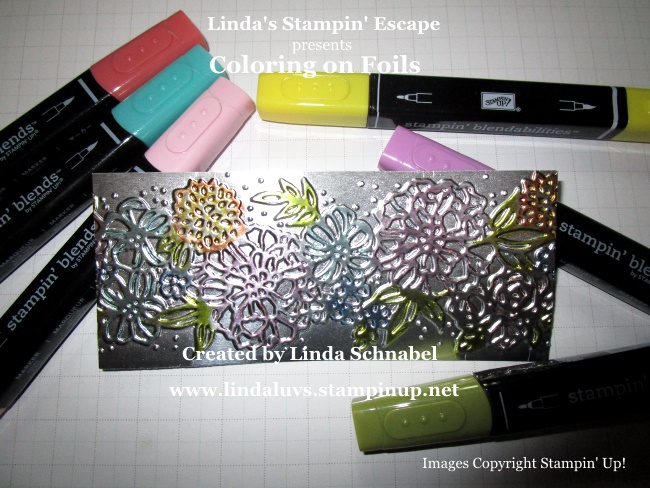
So … what did you think about yesterday’s “Coloring on Foils”? Cool, right! It’s so pretty, it was sitting on the shelf and when I walked past it I thought, oh … that would make a cute Easter card!!

Today, I have an easy peasy card for you …

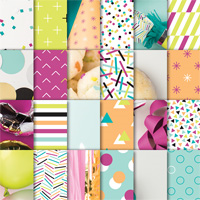
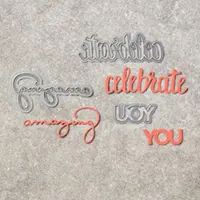
Oh yes, another card with the Picture Perfect Designer Series paper and the Celebrate You (Sale-a-bration item). This time I used the pattern with the cute bows! I love the Lemon Lime Twist and the fact that it has a coordinating ribbon that I can make into a banner just makes me happy!! It’s the little things you know 🙂

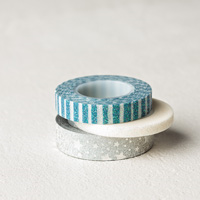
You will also notice another little favorite of mine, the Myths and Magic Washi Tape! I also made that a banner and both coordinate with the bows on the paper. Give that card a little twist so the light hits it and ….

the washi tape comes alive!! The stars shine and it really makes the “celebrate” sparkle. I just love this look, are you with me?? So simple, and easy to make but you know this card will put a sparkle in their eyes.  Win – Win!

So glad you came to visit my blog today. Hope you’re not in this storms pass, if so … it’s a great time to make some quick cards.

Have an awesome day ~

TODAY’S STAMPIN’ SUPPLY LIST …


Coloring on Foils

Hello Stampin’ Friends ~

Hope you are having a good day … it is Monday but if I think Friday is only 4 days away – everything seems brighter!! Then I step outside and it’s overcast, dreary and the wind is blowing that cold right through you, so I went back inside, put on one of my favorite CD’s and started to stamp … ahhhhh, much better!!

Yesterday I shared my Silver Foil card with you …

Pretty … Yes! But wait, we’re going to grab our Stampin’ Blend and ink pad and add some color!! What do you think …

OK … I’ll put it onto a card.  I used several different colors of my Stampin’ Blends to color the different flowers on the Petal Pair Textured Impressions Embossing Folder found on page 23 of the Occasions Catalog… and I’m pairing it with the Sale-a-bration item; Springtime Foils Specialty Designer paper (Free with a $50 purchase during our Sale-a-bration).

I took the Lemon Lime Twist ink and sponged it onto my Springtime Foils Specialty Designer paper. It takes the color so nicely and really compliments the Silver foil paper we have embossed and colored.

I’ll be honest … I don’t like blunt edges so you’ll always see me adding a strip of cardstock or a ribbon to join my two edges and give it a softer look. Here I used the beautiful Powder Pink Ribbon that coordinates with the card base and the mat to our greeting.

The greeting is again from the “A Mother’s Flair” on page 46 in the Occasions Catalog. This set is so pretty but it’s going to be hard for me to make a Mother’s Day card this year, but it would be a nice way to honor my Mom (it’s just a little raw yet).

The greeting was cut out with our Stitched Shape and Circle Framelits Dies. I mounted it over my ribbon and then finished off the card with the Glitter Enamel Dots … if you haven’t noticed, I’m really crushin’ on these!! They go with everything!!

I hope you enjoyed today’s card, it is a lot quicker to make than what it looks like it would be. So try your hand at coloring on the foils … it is so pretty!

Thank you so much for stopping by today.

Have a wonderful Monday ~

TODAY’S STAMPIN’ SUPPLY LIST ….


Simply Sunday: Hello Sweet Friend

Hello Stampin’ Friends ~

I’m so sorry … didn’t realize that I had a computer issue and that my blog did not post my card!!

I’ve been busy creating a new stamping space …. a place where I can create and “leave my mess”!! I won’t have to put away my creations or mess (lol) when I’m hosting a club or a class in my stamping studio.  I show you picks soon 🙂

Now … let’s get to that card I was telling you about on Friday!! I said I was going to combine Paper Pumpkin with a Sale-a-bration item!! I don’t know about you ~ but I love this card!!

Can you find the Pumpkin? It is our greeting! And you will see some sweet little flowers stamped on the inside that surprisingly look like the beautiful  embossing folder; Petal Pair Textured Impressions Embossing Folder.

What ties the two halves together is the … you guessed it, the Myth’s and Magic Washi Tape!!

The lower half of our card is our Sale-a-bration item; FREE with a $50 purchase. It’s the stunning Springtime Foil Designer Series Paper. I love the way the light reflects upon the foils ….

You can see how the embossed flowers look so much like the flowers stamped from the Paper Pumpkin stamp set … who would have thought!

Amazing right!! I know Stampin’ Up! has coordinating products but this totally takes it to the next level.  And … the verbiage comes from the “A Mother’s Flair” stamp set!

If your not a subscriber, try it now. Sign up before March 10th and get in on the Fun and the FREE Gift!! Oh yes, and if you purchase a subscription below from me (3mo. / 6mo. / or a 1 year subscription) I have a Gift for YOU as well!!

Thank you for hanging out and waiting for my post to show up on my blog. There will be plenty more to come this week!!

Stampin’ Supply & Paper Pumpkin  … Click for more information or to begin your purchase.  Thank you ❤


Fun and easy … all in one box!

Hello Stampin’ Friends ~

Wooo Hooo … it’s Friday!  I’m always happy to see the weekend on it’s way (kind of like the Ice Cream truck on a hot summer day)!! Things just seem to get a little easier, less stress …

Another thing I look forward to is getting my Paper Pumpkin kit in the mail each month. Cute projects with all the work done for you … just put it together, or have some fun and change it up a bit!!

Plus… we’re celebrating an Anniversary!

You’ve seen a few samples from this past months Paper Pumpkin (just scroll back some to revisit) and then take a look at some of these past kits!

Autumn is my favorite time of year so I could not resist the beautiful kit they put together for September: “Layered Leaves” …

and my favorite card of them all …

Since Easter is just around the corner, I thought I’d share the irresistible “Bunny Buddies” from March2017! I added note cards and tucked them in the bag, and a full size card on this one ….

I’m so excited to see what will be in the March 2018 …. plus, because of our anniversary, there will be a FREE Gift included!! Make sure you order by the 10th of March.

Her was another cute one …. June 2017 “One in a Melon” … that was so fun to make into cards, and the kids just loved the bags!!


Can’t keep going without another favorite ….July 2017 and the “Positively Picturesque” …


I could go on and on but I have to stop somewhere so I’ll stop here, however I’m inviting you to stop back tomorrow and see what I’ve created using the February 2018 Paper Pumpkin and one of our Sale-a-Bration stamp sets!!

Don’t forget with the Pre-Paid subscriptions you qualify for FREE Sale-A-Bration items (see catalog to the right). Click the links below to view or subscribe!

Let me know if you have any questions.

Thank you for hangin’ with me today.

Hope your day is a good one ~

CLICK TO FOR MORE INFOMATION OR TO PURCHASE …

Supply List

 One Year Pre-Paid Subscription:
4 FREE Level 1 Items or
2 FREE Level 2 Items or
2 FREE Level 1 and 2 FREE Level 2 Items

6-Month Pre-Paid Subscription:

1 FREE Level 2 Item or
2 FREE Level 1 Items

3-Month Pre-Paid Subscription:

1 FREE Level 1 Item


The Gift of Stamping

Hello Stampin’ Friends ~

Today I have a special project to share with you … a Gift Card Enclosure (or envelope!)  I love to create special enclosures when someone wants to give the gift of stamping by purchasing a Gift Certificate from me.

Yesterday it was one of my stampin’ friends’ birthday, and her husband (a very smart man) wanted to get her a gift certificate, so here is what I came up with for Dawn …

The front flap was created by coloring the Springtime Foil Specialty paper with the Stampin’ Blends. The greeting was cut with the Oval Thinlits dies and the Enamel Glitter dots were added for dimension and a touch of sparkle. The pretty pink ribbon just slides on and off to keep the cover closed.

The envelope was created with a piece of 8-1/2″ x 11″ Early Espresso and a couple of score lines!  The inner piece was cut to add a greeting and room for a signature.  Gently tucked inside is the Gift Certificate.

I can create a special card enclosure for your stampin’ friend, wife, Mom, daughter … sister, you name it! And for any occasion!! I do not charge for the card envelope …. just the cost of the Gift Certificate.

I’d be happy to help you with sharing the gift of stamping with the creative person in your life.

A Happy Birthday to Dawn … and I thank you all for stopping by today.

Enjoy your day ~


Simply Sunday: Go for the Gold… Rose Gold!!

Hello Stampin’ Friends ~

Well, the Olympics are coming to an end tonight but striving for Gold will not stop there for some of the athletes … they will start working all over again.  I don’t know if it’s the Olympic year or what, but foils – Gold, Silver, & Bronze are Hot, Hot, Hot right now!

We’ve got you covered in the Annual catalog in Gold, Silver and Bronze …. but did you see the NEW Sale-a-bration Springtime Foils Specialty Designer Series Paper? WOW … it is stunning! And … there’s the new Rose Gold!!

I am so excited about this beautiful paper that it is just one of the Gifts that my Hostesses’ are receiving for hosting a stampin’ party!! I also have a couple of cute surprises that are tucked into our new Silver Mini Gabel Boxes (pg.13 / Occasions Catalog) that is decorated with one of the patterns from the Sale-a-bration Springtime Foils Specialty Designer Series Paper.

I still have 2 more sets of Hostess Gifts if you would like to host a Stampin’ Party! Have a girls night out (they are so needed!!) and have some fun stampin’ with your friends. They can get FREE Sale-a-bration items and you will receive additional Hostess Benefits with a qualifying party.

Here is just one of the Make -n- Takes we made at Kathie’s party. Playing with the new Sale-a-bration Springtime Foils Specialty Designer Series Paper was a must, and they loved it …

This pattern has silver and gold foils so we made those “pop” by matting it on a black card base and a black focal point cut with the Stitched Shapes Framelit dies.

The greeting comes from the “Flourishing Phrases” stamp set and a banner created using the Triple Banner Punch. A touch of gold (leaf die cut) was added to draw your eye in and tie in the gold from the designer paper.

Oh yes … this shot shows the beauty of the foils. This card is simply classy and oh so timeless! Plus, it can be used for any occasion. I love it, and it was a big hit at Kathie’s party.

I will design a special one just for your group as well. My stampin’ parties are tailored to my hostesses and what they like 🙂

I thank you for checking out my blog today, and I hope you think about having a stampin’ party! It’s a great night (or afternoon) out.

Have a simply awesome Sunday!

Stamping Supply List ….


Thank You Friend … Brayer Card

Hello Stampin’ Friends ~

I am back today to share another alternative project. from this months Paper Pumpkin kit. This one is so cute and just resonates SPRING! I’m going to start by sharing “HOW” I did the brayering on this card …

First, let’s begin with the Silicone Craft Sheet. Because the Die Cut Greetings already have adhesive, we want to make sure we’re not “sticking to everything” … so our Silicone mat solves that problem!!

I pulled the greeting from the die cut sheet and placed it onto my Silicone Craft Sheet (127853) Don’t forget to add the small pieces from your “a” and “o” to complete your word.

Now we are ready to prepare our sponge brayer. Roll it over the ink pad several times and then do a practice brayer on the side.  You will see that you DO NOT have to have your brayer covered with so much ink that you don’t see any white!  You’d be surprised how much ink is actually on the brayer 🙂

You are now ready to begin brayering your die cut greeting! I began using the brayer at full width to get the words fully covered with ink. I also brought it back & forth from top to bottom to get some color across the majority of the greeting.

Now you can see by the photo that I am brayering on the edge of the brayer. This gives me a more defined area to brayer … I want my center with a deep rich color so my cardstock underneath just POPS!! Then just let it dry before you begin assembly of your card!


My next step was to arrange my flowers onto my greeting … I put dimensionals on the back of the greeting so it did not stick to the card front … I’m just placing it on the front so we can stamp onto the card.

I lifted the lower flower arrangement off and “popped” it up to add dimension to the card. The greeting is also popped up as is the entire card front!! There is a lot of dimension going on here! lol

This picture shows all the different layers of this card … so pretty.  I also wanted to bring in a little something for the “empty” spaces on my card … not that every inch has to be backed full but adding the Glitter Enamel Dots just allows your eye to flow around the card and brings in the touch of pink to tie this card all together.  Besides … I love them ❤ lol

Thank you for stopping back and sharing part of your day with me!

I wish you a beautiful day. It’s a balmy 40 degree’s here in Wisconsin … and we will take that in February 🙂

Don’t forget that next months Paper Pumpkin kit includes a FREE Gift as Stampin’ Up! celebrates the 5 year Anniversary with Paper Pumpkin!!

Choose a subscription today …. Earn FREE Sale-a-bration items too for each $50 purchase!!


Celebrate Your Awesomeness!

Hello Stampin’ Friends ~

I am excited to share not one but two really cute cards!! Since I missed you yesterday I thought I should share two cards with you 🙂

I hope you had a chance to view the Paper Pumpkin video that I posted … it’s a good kit! Did you know that if you purchase Paper Pumpkin by March 10th, you’ll get the kit that includes a FREE Gift, and will be invited to a Paper Pumpkin celebration at my home!!

If that’s not all … Once you’re a subscriber, you can purchase any past kits that are available … Like this months kit!  So let’s get to the cards!

I love to share alternative projects …

I used ONLY items found in the kit for this card 🙂 The celebrate comes from the negative that is used for the original card. I sponged it (Ombre style: Darker on top to Lighter on the bottom) to give my card a bolder visual impact.  (They are all ready sticky, so no worries on how to adhere them!)

I added the flowers next (also sticky) and then I stamped my secondary greeting from the Ink Spot and Stamp Set that is included in the kit! The entire greeting was popped up. This picture will show the layering better …

What a cute card to send to a special friend … Celebrate your awesomeness! It could be used simply for a birthday or to celebrate a new job or an achievement in their life ❤

My next card was created using the “Basket Weave” embossing folder that is part of a special Sale-A-Bration bundle that you can earn for FREE with a qualifying purchase. I love this folder and it goes so well with this kit!!

I love to rich color of the Early Espresso teamed with the colors from the Paper Pumpkin kit this month. The “friend” piece is actually the negative (open) and I placed a piece of cardstock behind it.

Once I embossed the card front with the “Basket Weave” embossing folder, I wrapped it in the Linen Thread (that was included in the kit).

Then … I stamped the greeting “hello sweet” above the friend, added the cute “sticky die cut flowers” and then popped it up onto the card front and added a cute little bow. Even the little pearls come with this kit!

This angle shows the basket weave a little better! I love the simplicity of this card, yet the texture and dimension really brings it to the next level.  It’s so cute!!

Thanks for joining me today ~

I hope you keep stopping back as I have so much more to share with you!! Not just the Paper Pumpkin but the Occasions and Sale-A-Bration catalogs as well.

Have an awesome day! It’s Friday 🙂

Don’t forget that next months Paper Pumpkin kit includes a FREE Gift as Stampin’ Up! celebrates the 5 year Anniversary with Paper Pumpkin!!

Choose a subscription today …. Earn FREE Sale-a-bration items too for each $50 purchase!!


Blooming Basket Bundle …

Hello Stampin’ Friends ~

Today I have the video from the awesome “Blooming Basket Bunde” … You’ve seen some of the projects I created from this bundle the past few days.

Sit back and enjoy the video as Shannon shares some amazing tips for this wonderful bundle….

What can Sale-A-Bration do for you?

The biggest sale of the year! You can earn free, exclusive products with every qualifying order. There are 3 ways to enjoy Sale-a-bration benfits …


#1.  Shop

 For every $50 you spend, you’ll receive a free Sale-A-Bration product. For anyone who has enjoyed Sale-A-Bration in the past, we have an exciting new announcement for this year: We now have a new reward level, giving your customers more flexibility and options for their free items.

Let’s break it down:

  • If you spend $50, you get one free level 1 product.
  • If you spend $100, you get one free level 2 product, OR, you can choose two level 1 items.
  • If you spend $150, you have the option to choose three level 1 items or one level 1 item and one level 2 item.

This new option allows everyone to create a personalized Sale-A-Bration experience! 

#2. Host a Party


When Sale-A-Bration goes live on January 3, consider the exciting hosting opportunity …. When you host a qualifying party with at least $250 in sales during Sale-A-Bration, you’ll earn $25 MORE in Stampin’ Rewards! Plus … you’ll enjoy an evening with your friends making some cute hand stamped cards … I’ll show you how fun and easy it is!!

12.01.17_HOSTCHART_SAB_PRE-EARN_US

These rewards can even be applied towards a Starter Kit, allowing you to also join and become one of my Stars / and the Stampin’ Up! family. 

#3.  Join!

 In addition to hosting, you’ll also want know about the fantastic benefits of joining as a Stampin’ Up! demonstrator during Sale-A-Bration. This opportunity begins January 3, as well. Joining at this time gives you the starter kit at $99, PLUS the choice of TWO additional stamp sets for your kit—any stamp set, any price. (Excludes bundles and Sale-A-Bration sets.)
Plus, the kit ships for free!
It’s a great time to try out and experience the benefits of joining the Stampin’ Up! family and my Star’s group!! I’ve got 17+ years of experience and many tips for you to get the maximum benefits and fun!!
Let’s chat (262) 334-1009 … Linda


Thank you for stopping by today, I hope yours is a good one!

Sweet as You …

Hello Stampin’ Friends ~

As promised … I have a cute card for you today using the Basket Weave Embossing folder that comes in the Blooming Basket Bundle. The use for this project is so unexpected & cute and is the brain child of a fellow demonstrator, so I took it one step further and made a pie in the tin!!

What other type of pie can a girl from Wisconsin make who frequently visits beautiful Door County but Cherry Pie!! The pie was made with the Layering Oval Framelits, once cut you can emboss the oval to create the crust “weave” pattern. The scallop adds the “pinched” area of the crust …. all was sponged with Crumb Cake to give it that “baked” look.

I free handed the pie tin from Smokey Slate … I wanted to use the Silver Foil but I was out! Guess I’ll be putting in an order in soon! lol

The Door County Cherries were created using the “May Flowers” Framelits and the 1/2″ Circle Punch using the Red Glimmer Paper. Door County Cherries are magic 🙂

The greeting comes from the “Cool Treats” stamp set … I think it fits perfectly on this card, and makes a fun Birthday Card!!

Hope you enjoyed seeing another way you can use this fun embossing folder, and I thank our community of Stampin’ Up! demonstrators for sharing so freely 🙂

Thanks for checking out my blog today  …

Have a wonderful Monday!

Today’s Stampin’ Supply List: Just click on any item for a picture and more information, or begin shopping.


Simply Sunday: Springtime Foil Specialty Paper

Hello Stampin’ Friends ~

Happy Sunday all … How did you like yesterday’s card with the Blooming Basket Bundle?  Today I’m sharing my card created with the Springtime Foil Specialty Designer Series Paper …

The designer paper includes 12 sheets; 3 each of 4 single sided designs. The foils are Gold, Silver, and the beautiful Rose Gold!!

I chose the beautiful floral pattern with the Rose Gold foil and colored it using the Stampin’ Blends; Pink Pirouette and Old Olive Combo packs. These are the same colors I used on yesterday’s card.

The Stampin’ Blends on this glossy, foiled paper creates a beautiful watercolor look.  The bold pattern makes it easy and fun to color.

I used the same greeting as the other day from the Beautiful Bouquet stamp set … that also comes in a bundle with coordinating thinlits dies. I cut the greeting out with the Lot’s of Labels framelits. I finished off my greeting by adding 2 gold circle Metallic Shapes (from the same pack as yesterday). Coordinates nicely with the little dots on the designer paper.

This view really shows the elegance of the paper and how beautifully it colors using the Stampin’ Blends. See how when the light hits it the “rose” really shows on the Rose Gold foil.

This really is an amazing designer paper and I’ll be sharing more with you.

Thank you for taking time out of your Sunday to stop by and visit. Stop back tomorrow to see the cutest “trick” I’ve seen done with the Basket Weave Embossing Folder.

Have yourself a happy day ~

Today’s Stampin’ Wish List … Did you know that if you purchased the Beautiful Bouquet Bundle you could get the Springtime Foil Designer Paper for FREE!!


Here for You …

Hello Stampin’ Friends ~

Yesterday I shared that Stampin’ Up! has released “MORE” Sale-A-Bration items for us to choose from for FREE!! I’m so excited to share with you my two “had to have” items in the SAB catalog …

Here are the Blooming Basket Bundle and the Springtime Foils Specialty Designer Paper.

Today I will share a pretty card that I created using the Blooming Basket Bundle.  The beautiful stamp set has a coordinating Embossing Folder (which will be available in the upcoming (2018-2019 Annual Catalog).

My color pallet began with the Pink Pirouette and Crumb Cake with a touch of Pear Pizzazz Cardstock (Old Olive Stampin’ Blends).

The Crumb Cake was embossed with the Basket Weave Dynamic Embossing Folder and a spritz of water … this softens the fibers on the cardstockt and allows it to emboss without putting to much strain (tearing) your cardstock.

I stamped my basket image with the Archival Black onto the Shimmery White cardstock… Then it’s colored with the Pink Pirouette, Crumb Cake, and Old Olive Stampin’ Blends. I also used the “Color Lifter” to go back over my colored area of the basket and created the highlights!

The greeting is included in the stamp set and was punched out with the Triple Banner Punch. I finished off my card with a trio of Hearts from the Metallic Enamel Shapes colored with the Pink Pirouette and Light Rich Razzleberry Stampin’ Blends! I love how the light reflects on these cute little enamel hearts!

This bundle is FREE from our Sale-A-Bration second release catalog with a $100 qualifying order. (That is $100 before ship & taxes).  Please let me know if you have any questions about our Sale-A-Bration or …

If you’d like to host a Stampin’ Party and really take advantage of all Sale-A-Bration has to offer, and have a great night or afternoon stampin’ with your friends.

Thanks for joining me today. Stop back tomorrow as I share my card using the Springtime Foils!

Have a beautiful day ~

Today’s Suggested Stampin’ Supply List …


Second Sale-A-Bration catalog release begins today!!

Hello Stampin’ Friends ~

Today Stampin’ Up! releases a second booklet with more fabulous products you can earn FREE during Sale-A-Bration!!

What is Sale-A-Bration?

The biggest sale of the year! You can earn free, exclusive products with every qualifying order. There are 3 ways to enjoy Sale-a-bration benfits …

#1.  Shop

 For every $50 you spend, you’ll receive a free Sale-A-Bration product. For anyone who has enjoyed Sale-A-Bration in the past, we have an exciting new announcement for this year: We now have a new reward level, giving your customers more flexibility and options for their free items.

Let’s break it down:

  • If you spend $50, you get one free level 1 product.
  • If you spend $100, you get one free level 2 product, OR, you can choose two level 1 items.
  • If you spend $150, you have the option to choose three level 1 items or one level 1 item and one level 2 item.

This new option allows everyone to create a personalized Sale-A-Bration experience! 

#2. Host a Party


When Sale-A-Bration goes live on January 3, consider the exciting hosting opportunity …. When you host a qualifying party with at least $250 in sales during Sale-A-Bration, you’ll earn $25 MORE in Stampin’ Rewards! Plus … you’ll enjoy an evening with your friends making some cute hand stamped cards … I’ll show you how fun and easy it is!!

12.01.17_HOSTCHART_SAB_PRE-EARN_US

These rewards can even be applied towards a Starter Kit, allowing you to also join and become one of my Stars / and the Stampin’ Up! family. 

#3.  Join!

 In addition to hosting, you’ll also want know about the fantastic benefits of joining as a Stampin’ Up! demonstrator during Sale-A-Bration. This opportunity begins January 3, as well. Joining at this time gives you the starter kit at $99, PLUS the choice of TWO additional stamp sets for your kit—any stamp set, any price. (Excludes bundles and Sale-A-Bration sets.)
Plus, the kit ships for free!
It’s a great time to try out and experience the benefits of joining the Stampin’ Up! family and my Star’s group!! I’ve got 17+ years of experience and many tips for you to get the maximum benefits and fun!!
Let’s chat (262) 334-1009 … Linda


Please let me know if you have any questions about the Petal Passion Product suite or our Sale-a-bration event.

Thank you for stopping by today, I hope yours is a good one!

Droppin’ by with Hugs for YOU!

Hello Stampin’ Friends ~

Today I’m going to show you the last of the 3 dies from the Lovely Words Thinlits … “Hugs”.  I did say that I had another version of yesterday’s card but due to technical difficulties I could not post it (weird) but I will be sharing it with you soon!

So today’s card not only features the thinlets from the Lovely Inside & Out bundle but 2 Sale-A-Bration items … the Tutti-Frutti Cards w/Envelopes but the Party Panda’s as well! So … Let’s get this party started!

I’m sure you can tell by now which of the 3 panda’s is my favorite! Although the one with the little letter is cute too! This cute little Panda is drifting over to give you “Big Hugs”.

To create the balloon I cut the “hugs” out in the same fashion I cut the heart out … using the coordinating circle die (same as pictured with hearts)

You see the coordinating die outside of the Lovely Words Framelit Die … each of the three can be cut out this way.

Then … out of the leftover card back from our “Lovely” card, I cut out the circle. Both circles come from the “Layering Circles Framlit Dies”. Then I just glued the cut out piece to the circle.  To create the “balloon” … I cut out a triangle from the scraps and glued that on … tied the string and got ready for the Panda!

The Panda was stamped with the Black Archival Ink onto Whisper White cardstock and was had cut. I actually cut the balloon (from the stamp) off but in a way that I can still put it together (like a puzzle) and use it as one again.

Thank you for dropping in on me today! It is appreciated, if you like my project today … please click on the LIKE button at the bottom of the page.

A POP-UP SALE FROM STAMPIN’ UP! …

QUESTIONS on Fast Fuse … Click on the picture, there is even a video!

Thanks again, and have a wonderful day ~

Today’s Stampin’ Supply List …

http://

Lovely Friend …

Hello Stampin’ Friends ~

I’m back today with my third card share from the Lovely Inside & Out Bundle!  These little dies are fun to play with … you are going to LOVE the simplicity of this next card.

I’m using the Pool Party card & coordinating envelope from the 2018 Sale-A-Bration item: Tutti-Frutti Cards & Envelopes.  Don’t forget this is an exclusive FREE item with a qualifying purchase.


When cutting the oval “friend” out the way I did here, you will leave your card “open” … the way it is packed, line up the die on the front. Because this front & back are identical you could get even more cards out of this pack … Stop back tomorrow and I’ll show you how!!

I used the Daisy Punch to create an accent and a little dimension to the card.

I punched two daisies out of Whisper White, put a dimensional between them, then stamped a small circle out of Pool Party.  I used the Fine Tip Glue Pen (138309) and covered the circle with glue then sprinkled it with Dazzling Diamonds Glitter (133751).


Thanks so much for stopping back … don’t forget to check back tomorrow to see another version of this card that will double your card count!

Have a wonderful week ~

TODAY’S STAMPIN’ SUPPLY LIST …