🎃 Sweet, Spooky & Party-Ready! 👻

Hello Stampin’ Friends ~

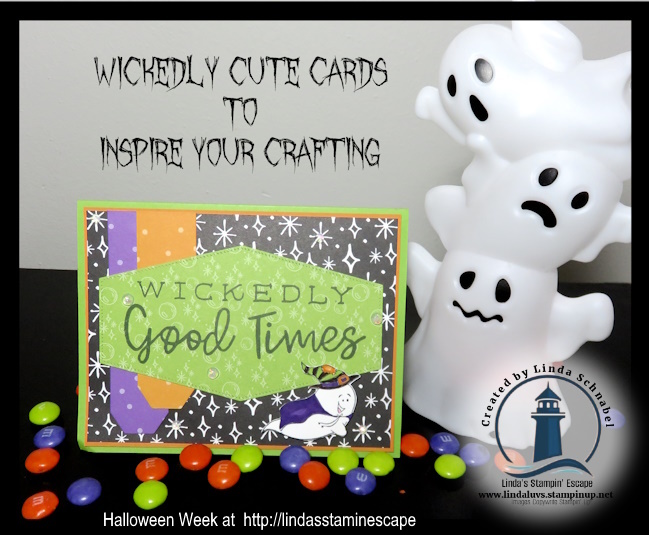
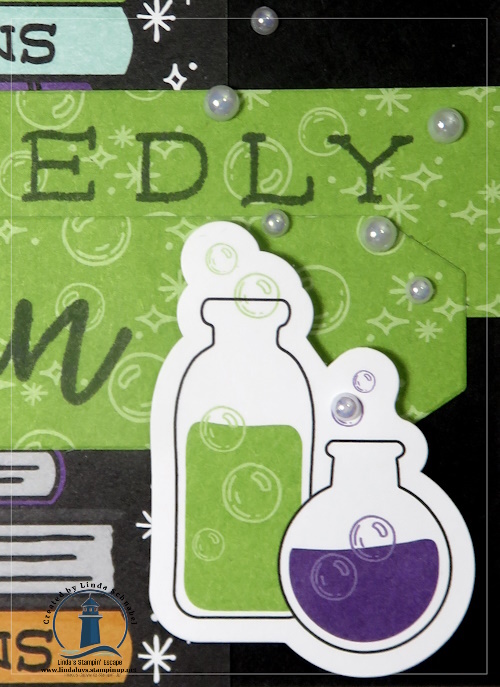
It’s the grand finale of Halloween Week here on my blog and we’re going out with a bang—because what’s a Halloween celebration without a party? 🥳 Today, I’m highlighting the Sweet & Spooky Kit, and let me tell you… this kit is one you’ll want to grab before it vanishes into the night!

Now, I know what you might be thinking—“Those little cartons are adorable, but what would I even put in them?” Well, let’s start with the obvious… CANDY! 🍫🍭 Because Halloween without candy? That’s just scary. But don’t stop there—these little treat cartons are the perfect size for:
✨ Small toys or trinkets
✨ A little cash tucked inside 🤑 (Ummm … who would love this!)
✨ How about nail polish or hand sanitizer (my granddaughters love this!!)

✨ Tea lights for a cozy glow 🕯️ (My daughters love these)
✨ Or even a sweet note to make someone’s day 💌 (Awww 🧡)

🎁 What’s in the Sweet & Spooky Kit?
You’ll get everything you need to make 18 treat cartons—that’s plenty to share at a party, with neighbors, co-workers, classmates, or just stash away for your own ghouls and goblins. Each kit includes pre-cut pieces, embellishments, adhesive, and step-by-step instructions. Easy peasy! No tricks here—just all treats. 🧡
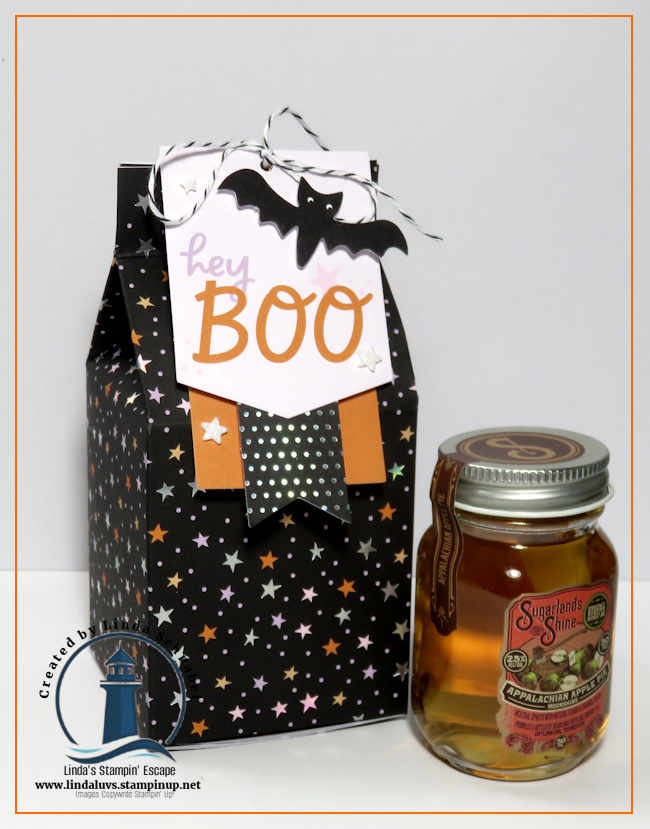
How about some adult gifts …. I even changed up the tag with some of our images from our Celebratory Sips Designer paper!

I thought a BOO-zey party favor was so cute and fun for the adults … hey, we like Halloween parties too!

It’s so fun to share the what different goodies could go inside—because once you start making them, you’ll find so many fun uses! Imagine these lined up on your Halloween party table… instant spooky-cute décor and favors! 🥳🎃👻

So, are you ready to party with me? 🎉 Don’t let this kit disappear into the mist—it’s the perfect way to wrap up your Halloween crafting with a sweet (and spooky!) finale.

Thanks for joining the party and hangin’ out with me for Halloween week… Have a great day!!

Build Your Own Haunted Mansion This Halloween 👻🎃

Hello Stampin’ Friends ~

🎃 Spooky season is here, and what better way to celebrate than by building your very own haunted mini mansion? Get ready to summon your inner ghost architect with the Haunted Home Kit — the perfect crafty treat for Halloween lovers, families, and anyone who enjoys making something magical from scratch 👻🕸️

🏚️ Why You’ll Love It

Imagine sitting around a table, glue gun in hand, as you bring to life a haunted little abode piece by piece. This kit gives you everything you need to build a creepy-cute paper house that’s ready to haunt your shelves (in the sweetest way).

Inside the box:

  • Cardboard home pieces to form the sturdy structure
  • Predesigned projects and step-by-step instructions
  • Precut vellum and die-cut paper accents
  • Enough adhesive to finish the fun
  • A 10½” × 8½” × 1¼” printed designer box (great for keeping your project safe or crafting on the go)
  • A moody color palette: Basic Black, Crushed Curry, Gray Granite, Moody Mauve, Pumpkin Pie

Just a heads-up: you’ll want a glue gun to get everything snug and spooky.

🎨 Craft It, Customize It, Flaunt It

This isn’t just “assemble and done” — it’s decorate and delight. Once the walls stand, you can add ghostly silhouettes on the vellum, drape spiderwebs across doorways, or let spectral lights glow through the windows. Invite friends or family to help, swap ideas, and watch your haunted village grow. It’s a perfect activity for a crafty night in, a small gathering, or even a Halloween party centerpiece.

🎃 Tips for a Smooth Build

  • Pre-arrange your pieces before gluing to avoid surprises
  • Use a fine-tip glue gun for precision
  • Let glued joints dry fully before adding weight or layers
  • Keep wipes nearby — crafting + glue = sticky fingers 😉
  • Use soft ambient light behind vellum windows for a haunted glow

Whether you gather friends for a Halloween craft night, involve the kids for some family fun, or simply enjoy a solo creative escape, this kit is sure to bring hours of festive fun. Ready to craft your own haunted hideaway? 🕸️ Click link below and let the haunting begin!

Thanks for joining me in my Haunted Home today!

No Tricks, All Treats! A Fun Fold Card That Pops! 🎃✨

Hello Stampin’ Friends ~

Today, we’re creating a No Tricks, All Treats Fun Fold “Easel” Card that’s playful, interactive, and—best of all—super easy to make because the Spooky Sweet Designer Paper is practically doing all the work for you! This card is perfect for Halloween, but it’s so whimsical and fun that it’s hard not to smile while making it.

We’ll start with our Petunia Pop card base, cut to 11″ x 4 1/4″ and scored at 5 1/2″ and 8 1/4″. Burnish those score lines! Since this card is a portrait/vertical layout, the 5 1/2″ score forms the top fold, and the 8 1/4″ score lands about halfway down the front of the card base. This simple fold gives us our “fun fold” mechanism that will let the card pop up and stand for display.

Next, cut two pieces of Basic Black cardstock to 4″ x 5 1/4″ (front & inside mats) and a piece of Basic White at 3 3/4″ x 5″. Grab the Spooky Sweet designer paper and cut your favorite scene—like the cute house and sidewalk—to 3 3/4″ x 5″. Then, let’s bring in our stars: fussy cut the beary sweet little fairy and the banner from the paper. I added a little sparkle using Wink of Stella on her crown, wings, and scepter—because every fairy deserves a touch of shimmer! Both the fairy and banner are popped up with Stampin’ Dimensionals for extra dimension and then attached to the designer paper… then attach to your black mat.

Here’s an important trick: when attaching the front of the card to the base, apply adhesive only from the second score line to the bottom edge of the card base. Leave the area above that top score line free of adhesive, or your fun fold won’t open properly.

Now for the inside—where the magic really happens! I stamped sparkles in Petunia Pop ink onto the white panel, then stamped my greeting on a scrap of white and die-cut it using the Textured Notes Dies. I dressed it up with some Petunia Pop shimmery ribbon and a piece of black cardstock behind it, then popped it up with Stampin’ Dimensionals in the middle of the inside panel. This creates the Easel mechanism, so your card stands perfectly. Finally, I added some fussy cut candy corn for a sweet little embellishment.

The best part? This card lays flat for mailing but pops up to display your cute creation at home—so it’s both practical and whimsical. The combination of fun folds, interactive easel design, and playful designer paper makes it a joy to create.

I encourage you to get creative with embellishments, die cuts, and colors—make this card your own! You’ll find links to all the supplies used today below for your convenience.

Thanks for flying by and spending part of your day with me …

Day 4 of Halloween Week: Brew Up Some Fun! 🧙‍♀️✨

Hello Stampin’ Friends ~

We’re in Day 4 of Halloween Week, and today I’m brewing up a card that’s equal parts spooky, playful, and colorful—just the kind of project to get your creative cauldron bubbling! We’re starting with a bold backdrop of Granny Apple Green cardstock, which I embossed with the Dotted Circles Embossing Folder to add a little texture and whimsy.

Next, I layered two pieces of designer paper—one featuring a candy theme and the other a banner design (with the ends snipped off)—and tied them together by layering a bit of Petunia Pop Iridescent ribbon for a fun, sparkly touch. The designer paper pack makes this so easy because it includes die-cut designs! I picked out the adorable broom, cauldron, and its bubbly brew to star in my card.

To create a focal point, I added a piece of Petunia Pop cardstock that I die-cut with the Spotlight on Nature Die. I enhanced the cauldron’s magical brew using Granny Apple Green Stampin’ Blends markers and a touch of Wink of Stella, then popped it front and center. The broom was popped up next to the cauldron—just in case our little witch needs a quick escape! Of course, I added a bow to the broom because, honestly, what girly witch doesn’t love a little glam?

To balance my layout, I fussy cut a few pumpkins and a crow and tucked them in as a cute accent. The greeting was stamped and popped up, along with another tiny crow for extra charm. Finally, I added Holographic Resin Dots to mimic the cauldron’s bubbling brew.

And there you have it—a fun, and totally enchanting Halloween card that you can recreate by following these simple steps. With a little embossing, some playful die cuts, and a sprinkling of sparkly accents, this card is sure to make anyone smile (and maybe even inspire a little mischief!). 🎃

🦇 Thanks for joining me around the cauldron and brewing up some fun!

A Spooktacular Halloween Fun Fold Card! 🎃✨

Hello Stampin’ Friends ~

Halloween crafting just got even sweeter on Day 3 of Halloween Week with the Halloween Sweet Suite! This collection is packed with playful images, charming characters, and patterned papers that make it a breeze to create cards and treat holders that will delight kids and grown-ups alike. For today’s project, I couldn’t resist diving right into the designer paper—the star of the show! Not only does it feature adorable characters like hippos, bears, and crows dressed for Halloween, but it also makes creating a polished project so quick and easy. Today, I’m sharing a Happy Halloween Fun Fold Card that is as fun to make as it is to give.

Let’s start with our card base: a piece of Smoky Slate cardstock cut 7 1/4″ x 5 1/2″ and scored at 3″. This simple fold is what makes our card interactive and exciting! For the front, I chose a piece of designer paper cut to 5 1/8″ x 4″—but here’s the trick: I cut it at 2 5/8″ so one piece fits on the front flap and the other slips inside. This way, the design continues seamlessly across the card, creating the look of one solid picture. How cool is that? To make the front pop, I matted the designer paper with Pumpkin Pie cardstock (5 1/4″ x 2 3/4″), stamped Happy Halloween in bold Memento Black ink, and fussy cut the cutest little hippo from the paper to give her a starring role on the front. Of course, she had to be popped up for a little extra dimension!

Now for the inside—because every fun fold should have a surprise! I started with a layer of Pumpkin Pie cardstock (5 1/4″ x 4″), then added the second piece of that cut designer paper, perfectly lined up to continue the image. To the left, I placed a strip of Basic White cardstock (5 1/8″ x 2 3/8″) so there’s space to write a special Halloween message. But the real magic? The little Vampire Bear, fussy cut and ready to stroll right out from the front flap! I tucked him so he overlaps both the designer paper and the white panel, and gave him a little crow buddy for company. To finish it off, I scattered white foam stars across the night sky and added Petunia Pop stars near the greeting for a playful sparkle.

Isn’t this card just the cutest? The Halloween Sweet Suite makes creating this fun fold so easy because the designer paper practically does all the work for you. With whimsical images, bold colors, and festive patterns, it’s the perfect collection for quick cards, treat bags, and more.

Give this fun fold a try—you’ll be amazed at how fast it comes together and how much joy it brings when that little vampire bear comes strolling out to say Happy Halloween! 🧛‍♂️🦇

Thanks for strolling in for a visit today!

Sweet & Spooky Fun with the Spooky Sweet Suite 🎃👻

Hello Stampin’ Friends ~

If you’re looking for Halloween projects that are just as fun as they are easy to create, you’re going to love today’s pair! It’s Day 2 of my Halloween week, and I had so much fun crafting a playful card and a coordinating treat bag topper—both made with the Spooky Sweet Suite. This suite has everything you need to bring a little magic (and mischief!) to your projects: whimsical ghosts, playful bats, bold sentiments, and patterned paper that makes every creation come alive. Whether you’re making cards for friends or treats for little ghouls and goblins, these products are perfect for adding charm without too much fright. 🕸️✨

When I sat down to design the card, I started flipping through the designer paper, and that adorable little ghost peeking out the window immediately caught my eye. I just knew it had to be the star of my project! I die-cut it with the new Branching Out Die, adding a sleek black mat behind it for contrast. Since the curtains in the window were green, I chose Granny Apple Green as my card base—it pulls everything together so beautifully. With my blending brush and coordinating ink, I softened the background to really make the die cuts pop.

But it still needed just a little something more … and then I spotted the cutest little bat dressed as a ghost, ready for trick-or-treating. 🦇👻 How perfect is that?! The playful idea of a ghost in the window watching a bat dressed as a ghost made me smile, so I added it to the scene. To tie it together, I die-cut a few more bats from the bundle and let them flutter around my sentiment, “Don’t worry, eat sweets.” A sprinkle of Shimmer Star Foam Stickers finished the look with just the right amount of sparkle.

This sweet card takes the spookiness down a notch so even the youngest trick-or-treaters will adore it. And speaking of sweet … I couldn’t resist making a matching treat bag topper! Using the Branching Out Dies again, scored & folded in half and paired with the candy-patterned paper from the suite—because what’s Halloween without candy, right? 🍬 I fussy cut another one of those darling bat-ghosts, added a touch of ribbon behind it to make it pop, and finished it with the same sentiment and foam stars—this time in white for a softer contrast. Even the candy is bats & ghosts! 🦇👻

How cute are these two projects together?! I had an absolute blast creating them, and it was the perfect chance to play with the new Branching Out Dies, which really highlighted my Spooky Sweet Suite! Whether you make the card, the treat bag, or both, you’ll have Halloween projects that are fun, festive, and sure to bring smiles to everyone who sees them.

Thanks for stopping by … Happy Saturday!

Halloween Isn’t Just for Kids: A Spooktacular Card to Kick Off Halloween Week

Hello Stampin’ Friends ~

Did you enjoy revisiting the cute Halloween projects I shared yesterday? I hope so, because today we’re kicking off Halloween Week with something a little more hauntingly beautiful! 🎃✨ Halloween isn’t just for kids—it’s the perfect excuse for us grown-ups to get a little spooky and a whole lot creative. Today’s card combines the Lights of Aurora Designer Paper, the Words of the Season Dies, and the Spooky Halloween Bundle, and the results are absolutely magical.

Let’s start with the background—those dreamy light streaks from the Lights of Aurora Designer Paper set the stage perfectly for a mysterious night sky. To make it shimmer with otherworldly magic, I brushed my Wink of Stella with the flow of the lights. The sparkle brings this scene to life and makes the paper glow. From there, I added the trees, cut from the Light & Wonder Dies, and attached them to the bottom edge of the card. A quick trim to fit, and the spooky forest was ready to frame our haunted scene.

Of course, no Halloween card is complete without a haunted house! Using the Spooky Halloween Dies, I cut out the house, then matted it with Crushed Curry cardstock. By trimming off the excess, the yellow glow shines through only the windows and doors, making it look as if someone—or something—might be inside. I popped it up with Stampin’ Dimensionals, giving it just the right amount of depth and drama.

Next came the moon—because what’s Halloween without a glowing full moon in the sky? I punched a circle from Crushed Curry cardstock with my 2″ circle punch, then blended a little extra Crushed Curry ink to give it a two-tone look. Before attaching it, I die-cut the “Happy Halloween” sentiment from the Words of the Season Bundle and glued the letters right onto the moon (I overlapped the “H” and “a” to connect before assembly). The moon is popped up as well, so it really shines against the background. To finish the front of my card, I added a bat, also die-cut from the Spooky Halloween Bundle—because you can never have too many bats on a Halloween night!

For the inside, I didn’t stop at plain and boring …. I carried over a strip of leftover Lights of Aurora Designer Paper, added another Crushed Curry moon, and stamped it with a sentiment from the Words of the Season Bundle. A few more bats ties everything together so the inside feels just as polished (or spooky) as the outside.

Halloween might make you think of costumes and candy, but this project proves it’s also a time for grown-up elegance and creativity. There’s still time to create your own hauntingly beautiful cards—and with these products, you’ll be amazed at how magical your projects turn out. After all, Halloween isn’t just for kids!

Thanks for joining me for my kick off …. I can’t wait to share Day 2 of Halloween Week with you tomorrow … stay tuned for more spooky inspiration! 👻🖤


🎃 Halloween Season is Coming — Are You Ready👻

Hello Stampin’ Friends ~

Halloween is creeping closer, and now is the perfect time to get your hands on the Spooky Sweet Suite Collection! Whether you’re a seasoned crafter or just getting started, this suite makes it frightfully fun to create handmade treats, cards, and party favors that your ghouls and goblins will love.

🕸️I’m so excited to announce that this Friday, I will host Halloween Week here on the blog! Each day I’ll be sharing cards, projects, and more to spark your creativity and inspire you to head into your craft room for some spooky fun. 👻From playful ghosts to charming treat holders, you’ll find plenty of ideas to bring a little extra magic to your Halloween crafting. 🎃Here are a few fun ideas to get you started …

🎃 First up: I shared how to dress up a simple jar by using the tag elements from the patterned paper. A little ribbon, a sparkle or two, and voilà — a spooky-sweet gift that’s both cute and quick!

🍫 Next up: We wrapped a classic Hershey bar to look like a mini mummy! Using torn strips of designer paper, we gave it some fun texture, then added a die-cut straight from the paper pack — no stamping required! These treats are perfect for school parties, coworkers, or BOO’ing your neighbors!

💡 Want to see how it’s done step-by-step? You can catch the full video replay CLICK HERE and enjoy the magic along with me!

The Spooky Sweet Suite Collection has everything you need to bring your Halloween crafting to life — from costumed critter stamps 🐶🐱 and coordinating dies (yes, there’s a haunted house!) to not-so-spooky patterned paper, treat bags, glittering star embellishments, and shimmery ribbon. It’s designed to mix, match, and make your projects as boo-tiful as they are fun.

🛒 Ready to add this suite to your spooky stash? Trust me, you don’t want to miss it! Head to my online store to grab your bundle or click the links below and start crafting those hauntingly cute treats today.

💀 Until next time… stay sweet and spooky, my friends!
Happy Haunting & Happy Stamping!
— Linda 💜🦇

Spooky, Sweet & Oh-So-Fun! Fun Fold Tutorial

Hello Stampin’ Friends ~

Halloween is creeping closer, and I’ve got a real treat for you today! A Fun Fold Card 🎃 We’re diving into the Spooky Sweet Suite Collection—a must-have for creating Halloween magic that’s more sweet than scary. From adorable costumed critters to a charming haunted house die, this suite has everything you need to whip up cards, tags, scrapbook pages, and treat bags that will delight ghosts and goblins of all ages!

Inside this suite, you’ll find:

  • Stamps featuring a costumed dog and cat (seriously, how cute are they?)
  • Dies that make creating your haunted house a breeze
  • Patterned paper with whimsical, not-too-spooky designs
  • Treat bags, ribbon, and shiny stickers—because it’s all in the details!

And today… we’re taking it up a notch with a spook-tacular Fun Fold card! Fun Folds always bring that extra “wow” factor, and when paired with the Spooky Sweet Suite, you’ll have a card that stands out in any Halloween lineup.

Let’s begin with the base: Cut to 10-1/2″ x 3-1/2″ and score at 3-1/2″ and 7″. Next you’ll cut 3 arches in the same color cardstock as your base. The size depends on what type of effect you want, and how much of the base you want to leave exposed.

Next, you’ll cut 3 pieces of the patterned paper … use the die that is one size smaller than the background. I used the house fronts to draw attention and then the candy background because that panel will be the core of the card.

Before you put those Arches dies away …. cut out three (one of each size) in the colors of candy corn. I’ll be using this as the focal point and highlight our little die cut flamingo. The flamingo was fussy cut from one of the patterned designer paper sheets. Then all you need is to stamp the greetings in Petunia Pop ink and cut and attach them to your card. I added some of those cute little purple glitter stars that come in this suite.

This card may look like a challenge but it is really simple to create!! Don’t wait too long to grab your supplies—especially the Everyday Arches Dies. They are the perfect match for this project and are currently on the Last Chance List (translation: once they’re gone, they’re gone!).

Whether you’re crafting cards to send a boo-tiful hello, making tags for treat bags, or decorating your scrapbook with a little Halloween charm, this suite is packed with possibilities. So grab your suite, pick your favorite patterned paper, and let’s get spooky!

Thanks for joining me for a spooky sweet card you’ll enjoy making and your recipients will be enchanted by!

STAMPIN’ TIP: When attaching your arches to the base, make sure you stay within a 5-1/2″ length so it fits in your envelope. I use a piece of colored cardstock that measures 5-1/2″ x 4-1/4″ as my guide! Easy.

🎃 Spooky Season is Coming — Are You Ready to Craft Up Some Fun? 👻

Hello Stampin’ Friends ~

Halloween is creeping closer, and now is the perfect time to get your hands on the Spooky Sweet Suite Collection! Whether you’re a seasoned crafter or just getting started, this suite makes it frightfully fun to create handmade treats, cards, and party favors that your ghouls and goblins will love.

🕸️ This past Wednesday during our Facebook Party LIVE, I showcased two super fun Halloween treat ideas using this adorable suite!

🎃 First up: I shared how to dress up a simple jar by using the tag elements from the patterned paper. A little ribbon, a sparkle or two, and voilà — a spooky-sweet gift that’s both cute and quick!

🍫 Next up: We wrapped a classic Hershey bar to look like a mini mummy! Using torn strips of designer paper, we gave it some fun texture, then added a die-cut straight from the paper pack — no stamping required! These treats are perfect for school parties, coworkers, or BOO’ing your neighbors!

💡 Want to see how it’s done step-by-step? You can catch the full video replay CLICK HERE and enjoy the magic along with me!

The Spooky Sweet Suite Collection has everything you need to bring your Halloween crafting to life — from costumed critter stamps 🐶🐱 and coordinating dies (yes, there’s a haunted house!) to not-so-spooky patterned paper, treat bags, glittering star embellishments, and shimmery ribbon. It’s designed to mix, match, and make your projects as boo-tiful as they are fun.

🛒 Ready to add this suite to your spooky stash? Trust me, you don’t want to miss it! Head to my online store to grab your bundle or click the links below and start crafting those hauntingly cute treats today.

💀 Until next time… stay sweet and spooky, my friends!
Happy Haunting & Happy Stamping!
— Linda 💜🦇

HAPPY HALLOWEEN🎃👻

Hello Stampin’ Friends ~

Today I thought we’d take a look through some of our Halloween inspiration …

I’ve summoned not one, but four hauntingly amazing products to create this wickedly wonderful design: the Halloween Spells Designer Paper, the Playful Ghosts stamp set, the Halloween Memories stamp set, and the versatile Take a Bow Dies.

For this hauntingly cute card, we’re showcasing the eerie charm of the Halloween Memories Scrapbooking Kit and its oh-so-versatile two-tone cardstock. One side is the full-strength color, while the flip side is a lighter, spookier version—perfect for creating dimensional depth. I chose to use the “tearing” technique to give this card an extra ghostly touch by revealing the white core of the cardstock.

My pencil holders are a bewitching way to share the fun of Halloween without adding more sugar to the night. Created with the hauntingly beautiful Halloween Spells Designer Paper, these cute little pouches are a cinch to make. Whether you tuck in three Halloween-themed pencils or a ghoulishly delightful pen, these treats are sure to cast a spell on whoever receives them!

These cards have it all: spooky fun, creative techniques, and of course, lots of Halloween spirit. Whether you’re crafting for a party or just want to send a frightfully fun greeting, these projects are sure to cast a spell on your recipients!

Thanks for joining me today! Happy Halloween ~

Brewing Up Some Spooky Fun

Hello Stampin’ Friends ~

Hope you’ve been having a spooktacular time during Halloween week! But, beware, today is our final day to share some crafty Halloween magic with you. No need to be too frightened, though—today’s card is brewing up all kinds of spooky fun! We’ve summoned not one, but four hauntingly amazing products to create this wickedly wonderful design: the Halloween Spells Designer Paper, the Playful Ghosts stamp set, the Halloween Memories stamp set, and the versatile Take a Bow Dies.

Let’s start with the backdrop, which sets the eerie stage for our card. Might bring your thoughts to Beetlejuice!! The Halloween Spells Designer Paper is featured prominently here, not just as the background but also transformed into spooky orbs floating across the card like enchanted bubbles. But wait—what’s that peeking out? Tucked between those orbs is none other than our mischievous little ghost from the Playful Ghosts stamp set! He may look like he’s up to some spooky antics, but he adds just the right amount of playful charm to balance the eerie with a little bit of cute.

And what’s Halloween without a chilling message? The “Spooky Fun” greeting, perfectly fitting for this card, comes from the Halloween Memories stamp set. We’ve stamped it onto more of the Halloween Spells Designer Paper because, let’s be honest, you can never have too much of this enchanting design! The message is framed using the Take a Bow Dies, which, like a spell-casting wand, create that perfect shape to highlight your greeting. Pro tip: Keep these dies handy all year long, because they’re not just for Halloween. They’re perfect for making bows and framing sentiments on cards, scrapbook pages, and more for any occasion.

So, as the witching hour of Halloween week comes to a close, don’t let the crafting fun stop here. These hauntingly versatile products are a great addition to your creative stash all year round! Keep casting those crafty spells and conjuring up creations that will delight and inspire.

Happy haunting, and keep those crafting cauldrons bubbling!

🎃 Day 5 of Halloween Week: Adorably Spooky Card 👻

Hello Stampin’ Friends ~

Boo to you, stampers! We’re nearing the end of our spook-tacular Halloween Week celebration, and today’s card is bringing all the playful, spooky vibes! 👻🎃 If you love a little mischief with your Halloween creations, this card is going to be right up your haunted alley!

Picture this: a ghost, too cute to be scary, popping right out of a jack-o’-lantern! 🎃👻 Our background is a fun splash of classic Halloween colors – think deep oranges, haunting purples, and ghoulish greens. And, of course, the star of the show, our ghost, is cheekily peeking out of the pumpkin like they’ve been caught mid-trick (or maybe treat? 👀).

The Trick or Treat greeting from the Halloween Memories stamp set dares your recipient to take their chances—will they be tricked, or will they get a treat? Only time will tell! But one thing’s for sure, this card is loaded with Halloween spirit, ready to spread smiles (and maybe a few little scares)!

Whether you’re crafting this card for a friend or sending it out to your favorite trick-or-treater, this project is sure to spread some playful Halloween magic! 🎃 Ready to recreate this adorable design? Don’t forget to grab your Halloween Memories stamp set and Playful Ghosts while they’re still in stock!. 👻 Oh yes, and the Take a Bow dies I used for our banners.

Let’s keep the Halloween fun going! What’s been your favorite project so far this week? Drop a comment below, and let’s chat all things spooky! 🎃🕸️

Until tomorrow, happy haunting and happy stamping!

Day 3: Playful Ghosts & Wickedly Good Times!

Hello Stampin’ Friends ~

Welcome back, crafty friends! It’s Day 3 of our Halloween Week, and today I’m bringing a bit of spooky fun into the mix with the Playful Ghosts stamp set. If you’ve been following along, you know we’re keeping the Halloween vibes going strong with the Halloween Spells Designer Paper, and today’s project is no different! Let’s dive into how this charming ghostly creation came together, step by step.

To start, I used the starry pattern from the Halloween Spells Designer Paper as the backdrop for our spooky scene. Measuring 3 7/8″ x 5 1/8″, this piece sets the perfect Halloween night tone when mounted onto a 4″ x 5 1/4″ piece of Pumpkin Pie cardstock. This pairing really makes those stars pop! The card base is Granny Apple Green—a must for our Halloween color palette, adding a playful and eerie contrast to the deeper tones of the card.

Now, for a bit of layering fun! I die-cut two banners using the Take a Bow dies: one in Pumpkin Pie and another in the Gorgeous Grape polka dot pattern from the same designer series paper. These playful colors work together to create a whimsical, spooky feel.

Next, I reached for the Granny Apple Green “bubbly” pattern from the designer paper and stamped the greeting “Wickedly Good Times” in bold black ink. I love how the pop of green brings this sentiment to life! To give it that finishing touch, I die-cut the greeting with the Nested Essentials Dies, giving it a sharp and clean look.

And now for the star of the show—our Playful Ghost! I stamped the adorable little “witch” ghost using Memento ink and brought her to life with markers. You can really have fun with this one by adding bright pops of color to her hat or gown. She’s spooky, but let’s face it, she’s way too cute to scare anyone!

By layering all of these elements together, you’ve got a fun, playful card that perfectly captures the Halloween spirit! Whether you’re sending this card to a friend or adding it to your stash of handmade holiday creations, it’s sure to bring a smile to their face.

All the supplies used in this project are available in my Stampin’ Up! store, so if you’re loving this card as much as I am, be sure to grab your Playful Ghosts stamp set, Halloween Spells Designer Paper, and coordinating dies before they vanish like a ghost in the night! Stay tuned for more Halloween fun coming your way tomorrow—there’s plenty more tricks and treats to come this week! 🎃

Happy stamping, and don’t forget to add these must-have Halloween supplies to your crafting stash! Until tomorrow, keep crafting wickedly good times! ✨👻 OR … You join me LIVE tonight on my Linda’s Stampin’ Escape Facebook page; I’ll be showing you how to make some cute “Trick or Treat” gifts.

Day 2 of Halloween Week: Wickedly Fun Halloween Card!

Hello Stampin’ Friends ~

Welcome back to Day 2 of Halloween Week! 🎃 Today, we’re conjuring up some wickedly fun vibes with a spooky, yet playful, card that’s perfect for this haunting season. Grab your crafting gear, because this project is not only thrilling but full of creative twists!

We’re starting with a basic black card base, a classic Halloween must! The dark backdrop sets the perfect stage for what’s to come. I added a strip of the Halloween Spells Designer Paper—the one with the mysterious Spells & Potions books. Doesn’t it just feel like we’re about to dive into a witch’s spellbook? 🧙‍♀️ This element adds intrigue and sets the scene for our magical masterpiece.

Now, let’s talk about the Take a Bow Dies—but with a twist! Instead of using them for a bow, I decided to think outside the cauldron. I used the dies to highlight the greeting on this card in a fun and quirky way. Isn’t it great when you can use your dies for more than one thing? It’s like finding a secret spell hidden in your stash!

To make things even more spellbinding, I pulled out the Halloween Memories Stamp Set. Who says it’s just for scrapbooking? I’m all about getting the most from my stamping supplies, and I love sharing creative ways to stretch your tools. That’s why I used the “omitting technique” for the greeting! I covered the part of the words I didn’t need, only inking the ones I wanted to use.

For the greeting, I stamped “Wickedly” on a larger piece from the bow die set and “Fun” on the smallest piece. I trimmed the larger die to fit the card perfectly and then layered the smaller “Fun” underneath for a wickedly fun effect! 🧛‍♀️

But we’re not done yet—this card is bubbling with more magic! ✨ I added the cute little potion bottles from the Halloween Spells Kit. These adorable die-cut stickers are just waiting to be used! I popped them up with dimensionals for some extra depth and drama. And for a final spooky touch, I sprinkled on some iridescent pearls to give the illusion of bubbles rising from the potion—totally magical and mysterious, don’t you think?

This card has it all: spooky fun, creative techniques, and of course, lots of Halloween spirit. Whether you’re crafting for a party or just want to send a frightfully fun greeting, this project is sure to cast a spell on your recipients! 👻

Happy crafting, and stay tuned for more spooky surprises as Halloween Week continues!