Road to the Holiday Stampin’ Retreat …

Hello Stampin’ Friends,

Today I will be sharing a part of our Holiday Retreat with you. Follow me for wonderful trip on our road to the Holiday Retreat ….

10409707_10203171091703724_8630962295075691698_n

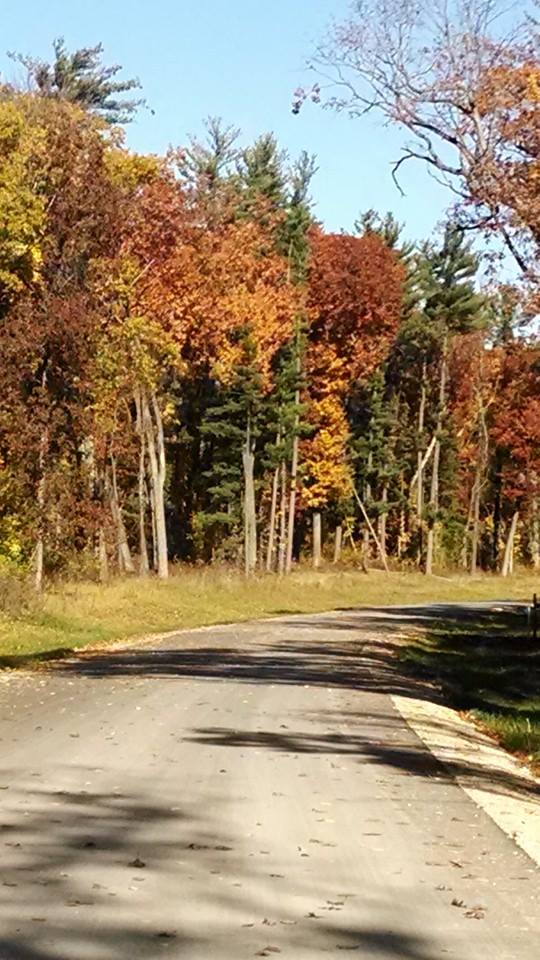
Photo was taken by Kris H.

We stay at the beautiful Green Lake Conference Center in Green Lake, WI.  Our house is a 1930 English Manor and nestled beautifully on the lake. This photo was taken during our lunch break … a time set aside so our guests can dine and then explore these beautiful grounds.

63934_740939272609550_6715905335555713241_n

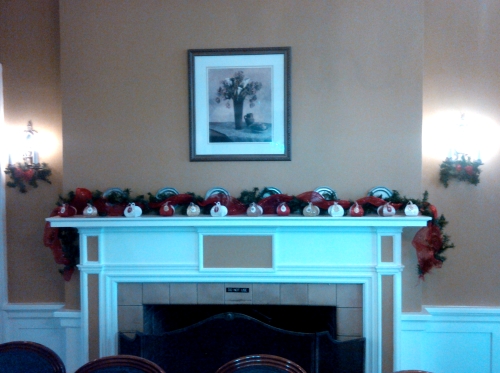
This is the view  inside that greets our stampin’ friends as they arrive…

IMG_20141024_104027

The fireplace is adorned with a touch of Christmas Cheer and the dazzling little Curvy Keepsake boxes. Each guest got to take one home with them. We treat them to many little surprises throughout their retreat stay.

IMG_20141024_103758

Close up shot of our shimmery delights ….

IMG_20141024_103846

We added contrasting tags on our boxes to highlight the snowflake embellishment, and then embellished the snowflake with a rhinestone in the center!

One of the projects our guests made was this cute little Santa box also created with the Curvy Keepsakes die. Both of the boxes were inspired by a collection of boxes I have found on Pinterest.

000_1612

Click here to view my “Curvy Keepsakes” Pinterest Collection

I also have for you, a quick video on how easy it is to create these fabulously fun boxes…

I hope you have enjoyed the journey so far, I will be back tomorrow with more of our Holiday Retreat.

Thanks for stopping by ~

blog-closing-small

STAMPING SUPPLY LIST …

Guest Stamper … Jenny’s Christmas Card

Hello Stampin’ Friends,

Hope you had a nice weekend … it looks as if we are in for a fabulous week here in Wisconsin.  Warm days and cool nights and today being the first day of Autumn – I love it!

Today I am going to share a card from my sideline / stampin’ sister Jenny F… we did her card as a Make & Take at our meeting. Jenny used a masking technique and sponging, as I did yesterday but it’s a totally different look, another beautiful Christmas card.

We began by stamping our greeting … you can choose any greeting that you have at home or one of the new ones in our Holiday catalog.

000_1499

The second step was a torn piece of paper, a sponge and the gray ink to create the layers of snow.  Just lightly pull the ink into the paper to add a bit on ink and a softness to the line.

Next, was the Serene Silhouette stamp set and we used markers to color it so our birds could be red.

The moon was created next with a mask made from the 1-1/4″ circle punch and two-way glue pen.  The two-way glue pen when applied and then let dry, will work like a post it … sticky but removable.  Once the circle is placed on the card, you simply sponge around it to create clouds, then lift it off and you’ll have the Moon!

Lastly we added glitter … always a holiday favorite on your cards.

Thank you for stopping by today, hope it’s a good one.

blog-closing-small


Season of Stars ….

Hello Stampin’ Friends,

It is beginning to get a bit chilly out…  Are you starting your Christmas cards yet?  Are you thinking about them?

Well, today I would like to share with you a beautiful Christmas card made with one of my favorite new accessories … the Star Framelits!  I teamed it up with the “All is Calm” Specialty Designer Series Paper which will surely soften the winds of winter.

000_1470

I knew I wanted to use the Silver Glimmer paper, so I layered my stars … smallest and the next two sizes up for my card. I placed all 3 onto the glimmer paper and aligned the product markings on the stars to ensure a perfect alignment.

000_1461

Each BigShot cuts or embosses differently … my stars needed a bit of help coming apart, so next time I will add a bit of a shim by placing a piece of paper into the sandwich as well. This only happened when cutting my glimmer paper and is well worth it.

My base color is the Soft Sky which coordinates with the All is Calm paper and really sets the tone for the card.  I used that and Lost Lagoon behind my stars for an added pop of color.

Adding a layer of the Shimmer paper between the base and the designer paper just adds that “holiday” touch to the card.

000_1468

This angle shows the two smaller stars and the banner are popped up with the Stampin’ Dimensionals. It creates wonderful dimension to the card … and brings it to life!

The greeting comes from the “Bright & Beautiful” stamp set found in the Holiday catalog and is stamped in with Lost Lagoon. The banner was trimmed at the end using the square punch.

The items used for creating this card are listed below, click on anyone of them for more details or to begin your shopping at my on-line store.

Thank you so much for stopping by.

Hope you weekend is a wonderful one ~

blog-closing-small


Great Savings and gifts included ….

Hello Stampin’ Friends,

Yesterday I shared 13 cards that showcased our designer series paper!  If you did not see it, please go back and take a look.  You’ll find a wide variety of occasions for you card needs.

Today I want to share with you all the wonderful goings on at Stampin’ Up!  They just added more items to their CLEARANCE RACK.  I urge you to check it out and get some savings as well.

See how you can get a special gift from me in your mailbox!  Read to the end 🙂

Best deals at a glance:
• Core’Dinations cardstock assortment packs for $9.95 instead of $23.95
• Punches for 40% off
• Designer Series 12×12 papers for $4.39 instead of $10.95
• Backyard Basics Framelits for the Big Shot, $10 off
• Dress Up Framelits for $14.95 instead of $24.95
• Embossing folders $2.39 and up
• Ribbon, twine, lace spools for as low as $1.19

Here is just a glimpse at what was added …

clearnance-Rack

Stampin’ Up! has brought us Christmas in July!!

I’m so excited that the “Beauty of the Season” stamp set is now available for purchase.  Watch for this stamp set to be featured in my Christmas in July … Oops August Stamp Camp.
Beauty of the Season


I love that Stampin’ Up! is offering “Christmas Bliss” in July.  This photopolymer stamp set is a fun, fresh Christmas set with a variety of greetings and styles. It has both images and sentiments, making it great for both cards and treat packaging.  And … I love the fonts!

Christmas Bliss Stamp set


Speaking of Photopolymer …

Stampin’ Up! has released another new photopolymer set, “Dear Heart” – SO CUTE!:

Dear Heart stamp set

Here are a couple of other promotions you might want to check out:  Just click on any of the pictures to see full details …

buy3dsp_NA


While you’re at it, check out the Blendabilities that are current available for purchase:

demoheader_blendabilities_5.1.2014_NA_SP_EU

Oh! And the Tuesday Weekly Deals were announced ! Check them out here by clicking on the picture.

CM1634B


You can combine all these deals for great savings … when you purchase on my ON-LINE STORE use HOSTESS CODE:  AT22FGCR

Purchases over $50 (before shipping & taxes) will receive a special gift in the mail from me … something you can use on your cards and projects!!  You must use the hostess code AT22FGCR to qualify.  THESE ORDERS WILL BE SHIPPED DIRECTLY TO YOU … When using the Hostess code.

Or gather your friends and place an order of $150 and receive HOSTESS BENEFITS … Do NOT use the hostess code if you have an order over $150.

Thanks for stopping by, and I’ll see you tomorrow with a card I created with one of our fabulous new stamp sets!!

Have a wonderful day ~

blog-closing-small

Exciting News and great card samples!

Hello Stampin’ Friends,

I hope you are enjoying my Quick -n- Easy card series.  Today I want to share with you all the exciting announcements that Stampin’ Up! has shared with us.  We’ve got Christmas in July and a whole bunch more!!

Christmas has arrived! Stampin’ Up! has released two new stamp sets with Christmas themes – one is from the upcoming Holiday Catalog, and the other is a new photopolymer.

I’m so excited that the “Beauty of the Season” stamp set is now available for purchase.  Watch for this stamp set to be featured in my Christmas in July … Oops August Stamp Camp.  I love cardinals, so as you read this post … mine in already on the UPS truck!  Can’t wait to share with you.

us_flyer_beauty_of_the_season

I love that Stampin’ Up! is offering “Christmas Bliss” in July.  This photopolymer stamp set is a fun, fresh Christmas set with a variety of greetings and styles. It has both images and sentiments, making it great for both cards and treat packaging.  And … I love the fonts!

us_flyer_photopolymer_christmas_bliss_0714


Speaking of Photopolymer …

Stampin’ Up! has released another new photopolymer set, “Dear Heart” – SO CUTE!:

us_flyer_photopolymer_dear_heart_0714

Here are a couple of other promotions you might want to check out:  Just click on any of the pictures to see full details …

buy3dsp_NA

While you’re at it, check out the Blendabilities that are current available for purchase:

demoheader_blendabilities_5.1.2014_NA_SP_EU

Oh! And the Tuesday Weekly Deals were announced ! Check them out here by clicking on the picture.

CM1634B


 Woooo …. I hope I didn’t forget anything!  There is so much going on and they have more in store for us in August.  This summer is HOT!!

Thanks for stopping by, and I’ll see you tomorrow with my last of the Quick -n- Easy cards.

Have a fun day ~

blog-closing-small

Happy 4th of July!

Hello Stampin’ Friends,

Today’s card share is to celebrate this great country of ours, and the men and women who risked it all to give us the freedoms we have.

Now … it may be a bit late for you to recreate this card, however I want to show you how fun and versatile the “Little Letters Framelit Dies” are!  So today I’m sharing 2 cute cards with you…

Let’s begin with the USA card… simple with a statement!  My base for both cards is Whisper White.

000_1204

I cut the U – S – A out of a 2″ x 4″ piece of Cherry Cobbler.  I used my “Paper Piercer” to gently push the alphabet pieces loose (fig. 1) , and then help pull them out (fig.2).  It’s not hard to do, just use a gentle touch.

000_1200  000_1202

I used the “negative” image on my card instead of the actual letters.  To get the center of the “A” attached … I rolled up a glue dot and stuck it on the back.  I popped the entire USA piece up with dimensionals.

000_1206

I backed the USA negative with a 2-1/4″ x 4-1/4″ piece of  “Silver” Glimmer Paper, and matted it with a 2-1/2″ x 4-1/2″ of Night of Navy.  I added a scallop to mimic those pretty Red, White, and Blue swags that I love!

To complete this card, a “Happy Birthday” wish was added from the NEW  “And Many More” stamp set.  This will be a must have stamp set with it’s 23 different greetings!

Image this card with your child’s or friend’s name … in their favorite colors!  The is no limit to the cards you can create!

My “firecracker” card was created to use the “U – S – A” letters.   Again, quite simple to make which is what we need as we prepare for holiday weekends!

000_1207

I created the firecrackers with the straws that were included in the June Paper Pumpkin Kit!  And the stars … well they come from the “Itty Bitty Accents” Punch!I created the firecrackers by placing a glue dot into the straw and the sticking a piece of bakers twine in it!!  Simple and… Oh so cute!!

Thank you for taking time out of your day to check out my blog.

I wish you a very safe and happy July 4th!

blog-closing-small

Digital Birthday & Easter cards …

Hello Stampin’ Friends,

Today I want to share a card that I created on the “My Digital Studio” program from Stampin’ Up!  I must admit, I haven’t played with it for a while and I have a dear stampin’ friend who is looking for me to teach her.  So here we go …

I will begin with a video that will explain how to begin …

Here is a simple card I made using the template …

birthday_2-001

I chose a birthday format that was included in the My Digital Studio program I purchased.  The banners are the only thing on the card, so I clicked on the “stamp” tab and added the candles.  I clicked on the candle, then on the color tab to change the colors to match the banner!  How cool is that. (I put the black around the card because the white did not show up properly on the white background of my blog)

Then I clicked back on the “stamp” tab, found an alphabet and chose the number 5 (not sure why … all my grandkids are older than that, but it looked nice!)  Back to the color tab to match that up too.  Then to finish off the card, I added the text.

Here is my Easter card that I created using a blank pallet.  I began with the ”  ” Designer Series paper download.

happy_easter_card-001

Now, you can’t get much simpler than a piece of designer series paper, a greeting and a ribbon.  Hmmmm … just like stamping, but done on your computer.  Nice for those of you who don’t have the time to bring out your supplies and hand stamp a card.

The ribbon is found under the embellishment tab and the I found an Easter greeting under the “stamp” tab.  It really is fun, just to play around with it and experiment.

Here is the inside to my card …

happy_easter_card-003

Notice a familiar stamp set?  Want to know what so cool about that… nothing ever retires in the My Digital Studio!  Colors … Stamp Sets … they are all there.  I love it!

Please share you thoughts on the digital cards.  Don’t worry stampers, I will never give up my hand made cards, but this is a quick way to create!  Plus … you can combine the two.  Print out one of those pretty designer papers and embellish it with the cool stuff you have in your craft room.  You can have the best of two worlds.

Thanks for stopping by, and again, I would love to hear what you think.

Have an awesome day!

blog-closing-small