Spring is Coming ….

Hello Stampin’ Friends,

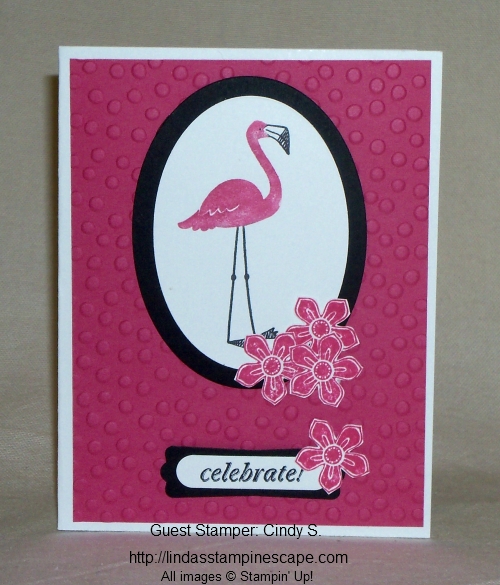
Today I’m going to share a card with you that will warm you like spring! The warm color combination of Rose Red and Daffodil Delight bring this card to life. The magical background was created using a technique call “Bokeh” ….

000_2102

This is one of the cards I created for a Make & Take project at my March Star’s by Design Team meeting … My technique club participants will be thrilled to know that they will be learning this technique in our April meetings! They however will have two totally different designs, along with a technique sheet!

I will share the details of the technique with you in April, after my technique clubs are held. It’s really not that far away.

I used the “Petal Potpourri” stamps set with the coordinating “Flower Medallion Punch”. You can bundle these two items and save 15% … love that!  Also featured on the card is the “And Many More” stamp set … a must have in your collection. We just can’t have enough greeting sets, can we?

I hope you enjoyed this touch of spring, and have a wonderful day.

Thanks for stopping by ~

blog-closing-small

Today’s Stampin’ Supply List …

Click on any of the items for more details or to begin shopping.


A Simple Tool to Mangage Your Schedule…

Hello Stampin’ Friends,

Happy Friday to you … I don’t know about you, but I’m looking forward to the weekend!

We are all locked into times and dates and such and what better way to manage your busy schedule than a calender. According to Wikipedia; A calendar is a system of organizing days for social, religious, commercial or administrative purposes.

And that’s what I have for you today! I normally don’t share my retreat projects but I had many requests, so here is the calendar our group made at the 2014 Holiday Stampin’ Retreat.

000_1716

This cute little calendar was designed to sit on your desk, kitchen counter or where ever it’s handy for you. I began by choosing my color pallet, and I started with the “All is Calm” Designer Series Paper.

The base is Smokey Slate and the pop of color is the Lost Lagoon. I created the monthly template myself and cut it out for my guests. They were held together by the Candy Dots Brad Bases. We added a Rhinestone and colored it with the Coastal Cabana Blendabilities marker.

000_1714

The piece that holds up the calendar was embossed with the Woodgrain Embossing folder. Since were making calendars, and calendars are about occasions … I chose the “A Fitting Occasion” and stamped the “made by me for you” stamp, and punched it out with the 1″ circle punch. The Soft Sky mat was punched with the 1-1/4″ circle punch.

I finished off the calendar with a banner stating “You Made My Day” … from the “And Many More” stamp set! The calendar was designed to lay flat so it could be mailed … what a cute gift that would be to get in the mail 🙂

000_1715

Hope you enjoyed my project share today. If you are interested in attending an upcoming stampin’ retreat, send me your information and I will gladly add you to my mailing list. We host a Spring (All Occasions) and Fall (Holiday) Retreat.

Our retreats are loads of fun and you not only make cards & projects … you make friends.

Thank you for stopping by Linda’s Stampin’ Escape today.

God Bless and …

blog-closing-small            000_1716

STAMPIN’ SUPPLY LIST … 


Guest Stamper … Cindy S.

Hello Stampin’ Friends,

Happy September! Today I have a fun card to share with you, created by one of my Star’s group members … Cindy S.  I believe this may be the last of our swap cards, but not to worry … we meet monthly!

Cindy used our exclusive RMHC stamp set, Flamingo Lingo.  I was not much of a Flamingo person before, but I am totally falling in love with this stamp set.  Besides … for each stamp set we sell – $3.00 is donated to the Ronald McDonald House Charities.

            134306G                 38462c7375ca777e506fb182285a0f54


Click directly onto the Ronald McDonald House to learn more about this amazing charity.  See the houses that host families so that they may be close to their seriously ill or injured children.

Cindy used the Melon Mambo and Basic Black markers to bring her Flamingo to life, and created a focal point by using the Ovals Collection Framelit dies. The background is the Decorative Dots embossing folder.

000_1399

The pretty flowers that draw your eye from the focal point to the greeting can be found in the Flamingo Lingo stamp set, and coordinate with the Petite Petals punch.

Cindy used the “And Many More” stamp set for her greeting and used the fun combination of the Word Window and Modern Label punch… they look great together!

I think Cindy did a great job and I thank her for sharing.

Thank you for dropping by today.

Hope you are having a safe and Happy Holiday weekend,

blog-closing-small

You may click on any of the items to view details or to start shopping.  Thank you.


Simply Sweet Sunday …

Hello Stampin’ Friends,

It’s Sunday … they day many of us can relax.  I hope you are enjoying your weekend.

Today I have a simply beautiful card to share with you.  We begin with Whisper White cardstock and add a splash of Daffodil Delight.  Nothing says sweet summer days more than the clean, crisp colors of white and yellow.

000_1222

I used the new “Lovely Lace” embossing folder for my background.  It’s so pretty and I know it will work on so many cards.  This was matted with the Daffodil Delight.

The pretty flower was punched with the 1-3/4″ Scallop Circle punch and petals created with the paper snips.  Make sure you do not cut all the way to the center or some of your petals will fall off!  Yikes … you don’t want that to happen.

000_1222 close up

The center of my flower is the “Very Vintage Designer Buttons” colored with the new “Daffodil Delight” Blendabilities marker.  You can color anything with those markers … so if you were thinking about getting them – you’ve just learned another technique for your markers.

I fed the ribbon through the buttons holes, then through the flower (Use our new hand held 1/8″ punch/ 134365).  I then brought it across the entire card for an added pop of color.

000_1221

My greeting was stamped in Daffodil Delight and comes from the stamp set “And Many More”.  You’re going to love this set, it’s like your favorite pillow … you miss it when you don’t have it with you.  You know, when your traveling … I don’t think you should take it to work! LOL

Just because … what better reason to send a card 🙂

Hope you enjoyed my summer card today.

Thank you for stopping by ~

blog-closing-small


Happy 4th of July!

Hello Stampin’ Friends,

Today’s card share is to celebrate this great country of ours, and the men and women who risked it all to give us the freedoms we have.

Now … it may be a bit late for you to recreate this card, however I want to show you how fun and versatile the “Little Letters Framelit Dies” are!  So today I’m sharing 2 cute cards with you…

Let’s begin with the USA card… simple with a statement!  My base for both cards is Whisper White.

000_1204

I cut the U – S – A out of a 2″ x 4″ piece of Cherry Cobbler.  I used my “Paper Piercer” to gently push the alphabet pieces loose (fig. 1) , and then help pull them out (fig.2).  It’s not hard to do, just use a gentle touch.

000_1200  000_1202

I used the “negative” image on my card instead of the actual letters.  To get the center of the “A” attached … I rolled up a glue dot and stuck it on the back.  I popped the entire USA piece up with dimensionals.

000_1206

I backed the USA negative with a 2-1/4″ x 4-1/4″ piece of  “Silver” Glimmer Paper, and matted it with a 2-1/2″ x 4-1/2″ of Night of Navy.  I added a scallop to mimic those pretty Red, White, and Blue swags that I love!

To complete this card, a “Happy Birthday” wish was added from the NEW  “And Many More” stamp set.  This will be a must have stamp set with it’s 23 different greetings!

Image this card with your child’s or friend’s name … in their favorite colors!  The is no limit to the cards you can create!

My “firecracker” card was created to use the “U – S – A” letters.   Again, quite simple to make which is what we need as we prepare for holiday weekends!

000_1207

I created the firecrackers with the straws that were included in the June Paper Pumpkin Kit!  And the stars … well they come from the “Itty Bitty Accents” Punch!I created the firecrackers by placing a glue dot into the straw and the sticking a piece of bakers twine in it!!  Simple and… Oh so cute!!

Thank you for taking time out of your day to check out my blog.

I wish you a very safe and happy July 4th!

blog-closing-small