So Very Vellum Easter Blessings Card …

Hello Stampin’ Friends ~

Back today with the third card from the So Very Vellum Designer Series paper … Our last vellum color is “Purple Posy”. This is really pretty vellum and it’s perfect for an Easter card which I made for you today.

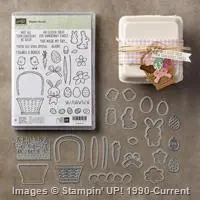
I am also featuring the March 2020 Paper Pumpkin as well.  There are so many fun and pretty elements in this kit that the ideas were just coming to me. I have yet another set of boots, and I picked some pretty flowers from the elements to place into them …

I could not resist adding these two together.  I took the Purple Posy ink and put a bit on the tip of a Q-Tip and added some color over the flower on the right to match up with the Purple Posy Vellum better.  It was close, but now it really coordinates nicely.

The Oval background was cut with the largest oval from the Stitched Shapes Dies. This really creates a focal point to the card.  I added the “Easter Blessings” greeting  which comes from teh Itty Bitty Greetings stamp set.  It was stamped on a scrap piece of paper and then I simply cut it to create a banner.

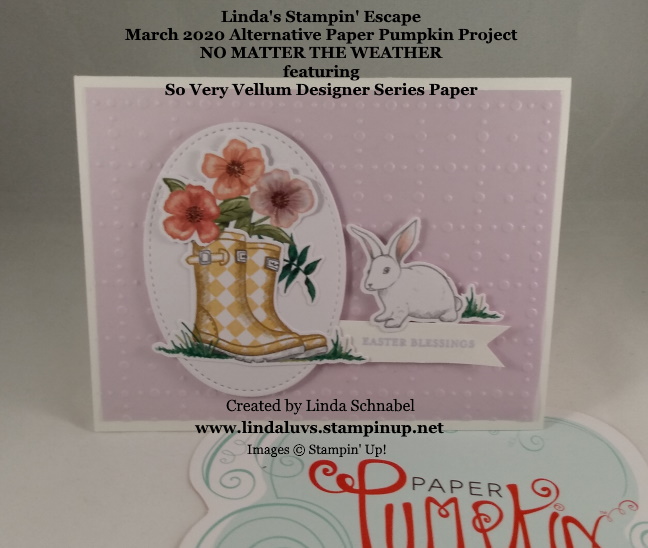
The banner draws your eye away from the focal point and right to our cute little bunny.  The bunny was also an element from the kit.  I added a touch of the Wink of Stella to our bunnies ears and to the flowers. It doesn’t really show on the picture but it will raise an eyebrow of the recipient of this card!

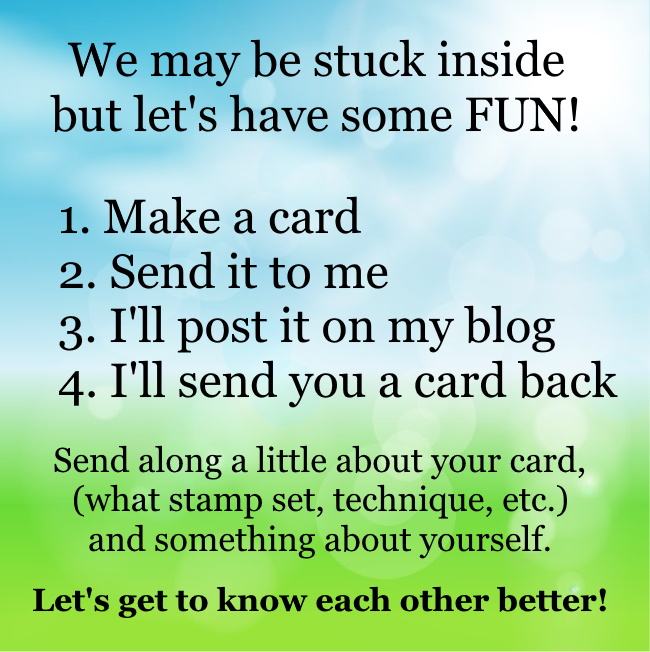
Since we are abiding by the “stay at home” / “shelter in place” orders and practicing social distancing if we have to go out … Lets have some fun and get to know each other a little better!! Lets take a break from what’s going on in the world and make a card or two. First of all, crafting is know to reduce stress levels, and I’d like to see what you’ve been up to, so send me your card and I’ll post it on this blog!! Share a little info about the card and maybe about yourself.  Then …

You can send your cards to:

Linda Schnabel   2019 Miller Street  West Bend, WI 53095

Join me … send in your card and I’ll feature it right here on my blog. We have to abide to the “social distancing” but lets create some social interaction and fun.  We can do this stampers!!  Don’t forget … I’ll send you one back, and who doesn’t want a beautiful card in the mail.

Here’s a list of the supplies I used for today’s card.  Remember … The Paper Pumpkin subscriptions listed below qualify your for a minimum of one Sale-a-bration item. The longer the subscription the more Sale-a-bration items you can earn.  Don’t forget that Sale-a-bration ends March 31st!

Thanks so much for hanging out with me today. Hope you were inspired by my card and you go into your stamp room and start creating!  Don’t forget to send me one!!

Have an awesome day!!  Linda

Easter Treats for Some Bunny ….

Hello Stampin’ Friends ~

Sometimes things are too good to pass up, like a fine glass of wine or decadent chocolates! Today I have such a blog post to share with you. This is not me … this is from our Stampin’ Up! “Get Inspired Blog” and the talented Paula Dobson from our 2017 Artisan Design Team!

Here is Paula’s post and beautiful creations …

With Easter only a couple of short weeks away, I’ve decided to make a cute Easter project for my daughter using the Basket Bunch Stamp Set (item 143186). I travel two-and-a-half hours once a month to stay with her while I teach classes, so it will be hand-delivered just in time for Easter!

1

One of my passions (besides stamping, of course) is coloring—and this super-cute stamp set is full of line art images to satisfy that need. I stamped a heap of Easter egg images and the cute little bunny rabbit on Shimmery White Cardstock (item 101910) in Basic Black Archival ink (item 140931). Shimmery White Cardstock is perfect for coloring, particularly if you want to watercolor your images without the texture of Watercolor Paper (item 122959), as it can stand up to a fair amount of moisture without pilling.

I used the Watercolor Pencils (item 141709) to color my images and then blended the colors using a Blender Pen (item 102845) to create the shade and fade on each image. I die cut all the images with my Big Shot (item 143263) and Magnetic Platform (item 130658) using the coordinating Basket Builder Framelits Dies (item 143228). P.S. Stampin’ Up! bundled together the stamps and dies as the Basket Bunch Bundle (item 144731), saving you 10% on your purchase of these great products! (I love a bargain!)

2

I added a strip of Designer Series Paper from the Pop of Pink Specialty Designer Series Paper (141648). I love the stark contrast of the black and white zig zag design against all the white. I added color to my background using Sponge Daubers (item 133773), Sahara Sand ink (item 126976), and Soft Sky ink (item 131181). I popped the die cut Easter images up with Stampin’ Dimensionals (item 104430), and the whole piece was finished with the gorgeous Gold 1/8″ Ribbon (item 134583). I love to carry themes to the inside of my cards, as well.

3

No Easter card is complete without chocolate to go with it and I wanted to create my own packaging to tie the whole gift together. I don’t often make 3D items and it can be a bit of a trial for me! I found these cute little chocolate bunnies and wanted to make a simple crate to put them in, using a Window Sheet (item 142314) sleeve to slide over the top so you can still see the bunnies.

4

I designed a template for my crate and used the Stampin’ Trimmer (126889) to cut and score my Sahara Sand Cardstock (item 121043) card. I stamped the card in Sahara Sand ink using the Hardwood Stamp (item 133032) to get a woodgrain effect for the crate.

Then I discovered a wee bit of a problem—my crate template was too big to go through the Big Shot no matter which way I turned it! I fixed that by folding one side of the crate and used that edge as a guide for my square Stitched Shapes Framelits Dies (item 145372) so I didn’t cut too low on the front of the crate.

I used the same design elements from the card to decorate the box sleeve, adding just a few strands of Melon Mambo Thick Baker’s Twine (item 141689) as well. Then I used the Tags & Labels Framelits Dies (item 138282) to die cut the tag topper. Here are a few photos of the process I have described in this post (which I hope you’ll find helpful)!

5

So if YOU are looking for a fun way to create an Easter treat for somebunny sweet—try the Basket Bunch Stamp Set and coordinating accessories! It has everything you need.

Paula Dobson
2017 Artisan Design Team

So … what do you think? Did you not fall in love with this bundle and the cute projects that Paula Dobson created!! I also grateful that she shared her “how to’s” with us. That simple sponging technique that creates the barrier between sky and ground add so much dimension to the the card.

Thank you for checking out my blog today, and I’m happy you got to see Paula’s beautiful projects.

Have a Happy Day!


TODAY’S HIGHLIGHTED PROJECT INGREDIENTS:


BUNNY BUDDIES!

Hello Stampin’ Friends ~

Oh my gosh … I got home from work yesterday and found the best thing in my mail box! No bills … just my Paper Pumpkin.  It is so stinkin’ cute!

Check it out, watch the video ~

Our Paper Pumpkin Bunny Buddies are bursting onto the scene just in time for spring! Every March kit comes with nine bunny cards and bags. Watch their personalities emerge as you customize each one with a face, ears, accessories, and a pompom cottontail. They are simply “ear”-resistible!

Stop back tomorrow and check out my alternative to the kits projects … not sure how I’m going to top these cute bunny bags!

Till then … Have a great day!


Egg-stra Awesome Wishes …

Hello Stampin’ Friends ~

Yesterday was Christmas in July … Today I have “Easter” for you!! You’re getting a whole years worth of cards in one week!! I will have one more from our “My Hero” stamp set tomorrow.

I couldn’t resist using the New Oval Framelits to help me create my Easter eggs, you will notice however that I trimmed them down a bit and tucked them into the “Garden Green” grass.  The grass is super simple to create with our “Fringe Scissors”.

000_3519

Our greeting for the “My Hero” stamp set was stamped in the NEW “Sweet Sugarplum” in, which coordinates with the Sweet Sugarplum egg.  You’ll also find Flirty Flamingo, So Saffron, Soft Sky, and Peakaboo Peach! I highlighted some of the eggs with the “Playful Palette” Washi Tape.

The greeting is backed with So Saffron as well, tying all the colors together. The card is wrapped with the Crushed Curry Bakers Twine which draws your eye right to the greeting, creating a fun focal point to the card.

000_3520

Oh yes … the greeting was cut out with the NEW “Layering Squares” Framelits. I love how these create awesome layers for your cards and projects.

Hope you enjoyed today’s card, I’ll have the last of seven cards created with the “My Hero” stamp set.

Thanks for sharing a part of your day with me …

Have a good one!

blog-closing-small

TODAY’S STAMPIN’ SUPPLY LIST …