Jar of Haunts Parade of Cards Day 3

Hello Stampin’ Friends ~

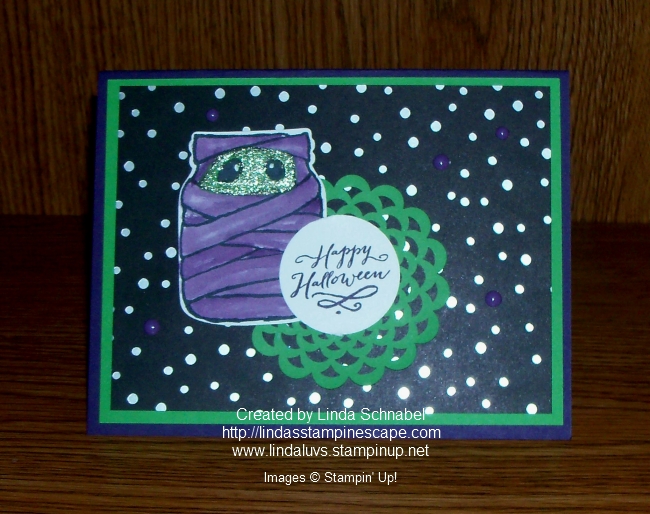
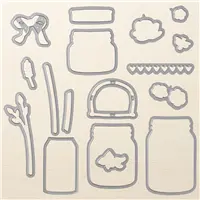
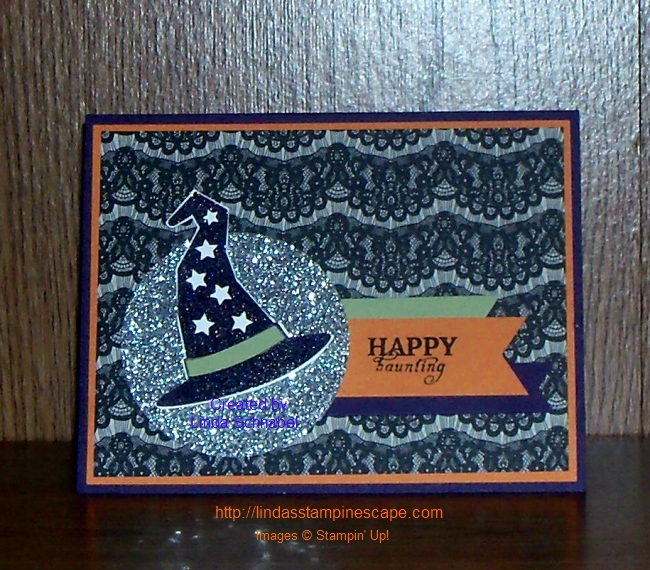
Happy Tuesday to you!!  I have another “Jar of Haunts” card for you today, with a touch of humor. Why would I do a parade of cards …. easy, I want to share all the fun and different ways you can use this cute stamp set.

Many years ago one of my stampin’ friends told me she loved all the cards I made, but she would like to see more than just one from a stamp set … well, since then it has been my mission to share multiple card ideas with you.  You will find this on my blog, in my clubs, at my classes and even at my retreats.  It’s a great idea … Thank you Sandy!

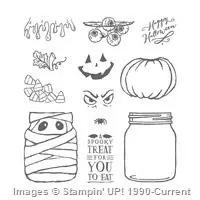
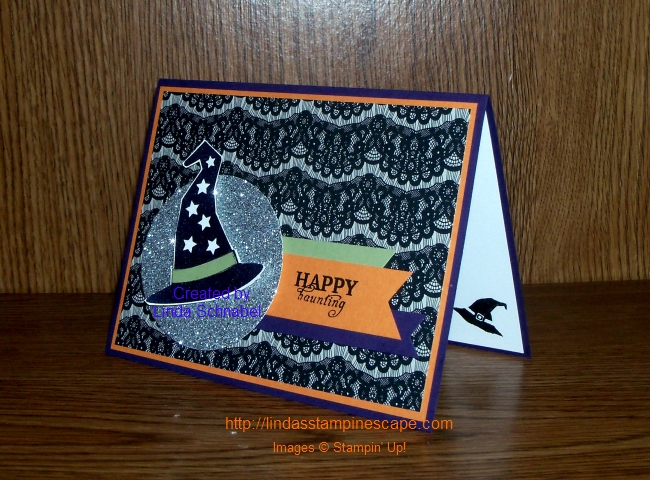
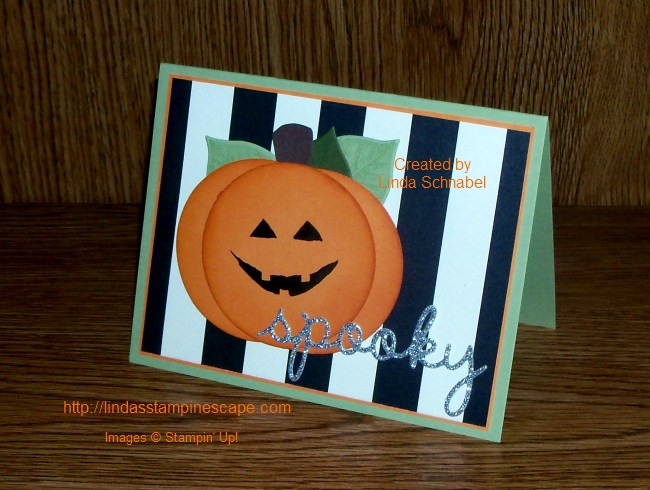
On that note, here is card #3 for “Jar of Haunts” …

000_3745

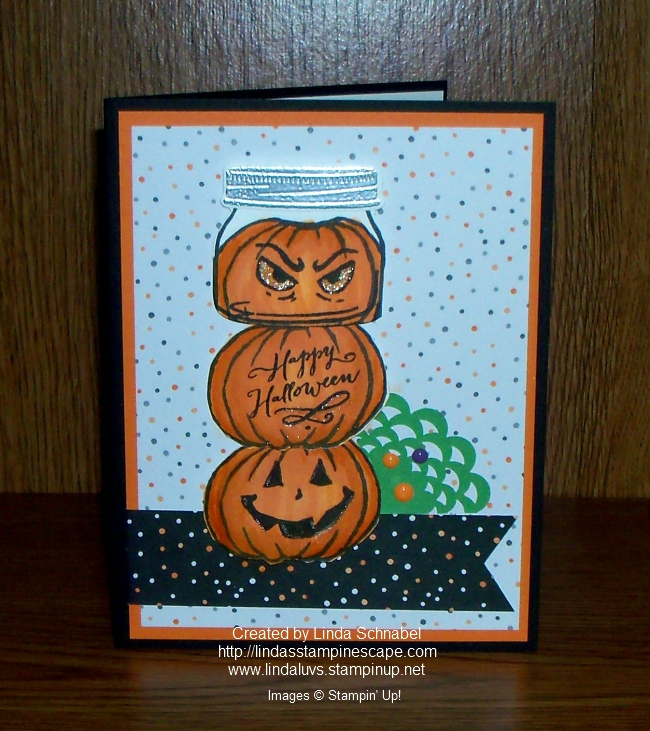
It seems to be the “rage” to stack things now days, so I thought it would be fun to stack my pumpkins. It was all fun and games for these three until one of them got canned! And he doesn’t look to happy about it either!

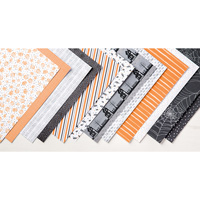
You will see a reoccurring theme in my parade of cards, because not only am I using the same stamp set, I’m using many of the same cardstocks, designer paper and embellishments. It want to show you the true value of our product suites.

000_3745-close-up

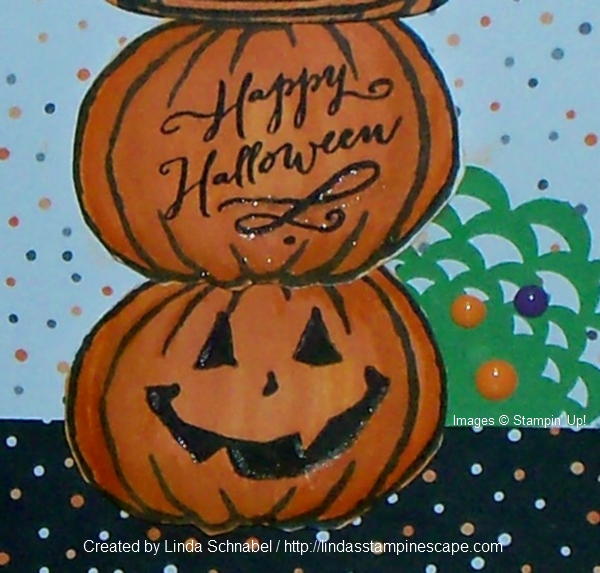
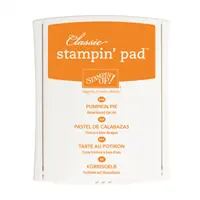
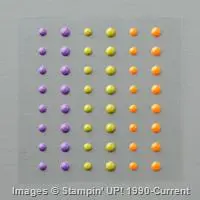
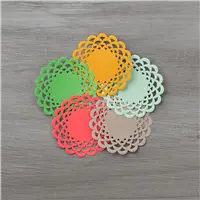
Just as I did yesterday, I water colored my pumpkins using my ink and Aqua Painters. The designer paper and enamel dots are from the “Halloween Nights” product suite, and I used the doily again for an added pop of color. I even added a touch of the Wink of Stella again!

Hope you are having as much fun as I am at this parade … I’ll see you tomorrow with another one!! Do you think it will be cute or scary?? That is the question.

Have an awesome day ~

blog-closing-small        october-2016-hostess-code

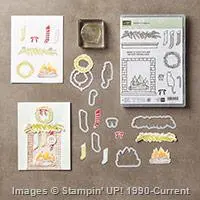
TODAY’S STAMPIN’ SUPPLY LIST …  You can click on any item for more information or to begin shopping. You can use the Hostess Code listed above and any orders over $50 before shipping and handling will get your Virtual Rewards Card punched and you’ll be one step closer to a FREE stamp set of your choice. 

000_3745


Jar of Haunts Parade of Cards Day 2 …

Hello Stampin’ Friends ~

Today is day two of our “Jar of Haunts” stamp set card parade. Today we are going to delve into the spooky side!  Our little jar of haunts has himself all wrapped up.

Today I started with the Halloween Night Specialty Designer paper. Those may look like little with dots, but they are actually silver foil and that is where the glare on the card front is coming from.

I wanted a neat Halloween color pallet… the only thing missing is the orange but we did that yesterday!

000_3740

My base is Elegant Eggplant and I teamed it up with the Cucumber Crush… these two colors look great together for Halloween. I water colored my little buddy with the Aqua Painter and Eggplant Envy ink, and his face is done in Cucumber Crush.  

You will find the doily with the 2015-2017 In Color Doilies in the annual catalog. I thought it added a nice touch to the card and highlighted our greeting which is stamped in Eggplant Envy. As I did on yesterdays card, I added the Halloween Nights Enamel Dots to the card – it just adds a fun pop to the card.

000_3735

Inside you will find a pair of ghoulish eyes … Made even creepier when I used the Wink of Stella pen and Cucumber Crush ink to paint his eyes!! You must try this!! I went back a brushed the Wink of Stella over his already colored face but the effect is slightly different.

This card really falls into the Quick -n- Easy category … even the watercoloring with the Aqua Painter went quick and it some dimension to our little friend.

000_3740

Thank you for checking back on my “Jar of Haunts” parade of cards, I’ll be back tomorrow with card 3.

Have a wonderful day ~

blog-closing-small            october-2016-hostess-code

TODAY’S STAMPIN’ SUPPLY LIST …

Simply Sunday: Sweet Treats

Hello Stampin’ Friends ~

I’m back with my Simply Sunday card today that features the cute “Jar of Haunts” stamp set from the Holiday Catalog (click to view). No tricks today … only treats!

I was totally excited when I saw this stamp set in the Holiday catalog because it coordinates with the “Everyday Jars” Framelits. I love when Stampin’ Up! introduces a new product that works with a product we already have … that way we get twice as much use out of it (and it saves us money!).

 000_3727

Today I’m using the jar with the candy corn for a quick -n- simple card. The color pallet was based off of the … you guessed it – the candy corn, making the card fun and colorful. Both pieces of the Designer paper I used come from the “Halloween Night” Specialty Designer paper. (Not included in current promotion)

The cute little candy dots are the “Halloween Night Enamel Dots” … one anchors the banner and the other two were added to balance the card and add some fun texture. The bow comes from our In-Color collection: Peekaboo Peach … it works nicely with our color scheme.

000_3730

I brought the candy corn color scheme into the inside of my card as well … why stop with the fun on the front! I also added a few more candy corn to finish it off. I used my Daffodil Delight and Pumpkin Pie markers to color all my candy corn.

Hope you enjoyed today’s card … I will be bringing you more cards from the Jar of Haunts all week long! Then on Friday I will have a special Halloween card for you! Halloween is just around the corner.

Have a great day, and thank you for stopping by.

blog-closing-small           october-2016-hostess-code

TODAY’S STAMPIN’ SUPPLY LIST …


A Few Spare Parts

Hello Stampin’ Friends ~

How are you on this Friday? I am excited to share this totally cute card with you today!!

Have you ever just looked at a stamp set or a crafting item and this “IDEA” pops into your head? Well that is exactly what happened to me when I opened my September Paper Pumpkin kit! Right away my thoughts went to our Cookie Cutter Halloween stamp set and a little item I had in my kitchen cupboards … Intrigued??

Well wait no more because here it is …

000_3691

I’m just in love with the Cookie Cutter stamp sets (Halloween and Christmas) they are just the cutest! But when my Paper Pumpkin kit came and I saw the little test tubes, something just clicked!! I remembered I had some little candy bones left over from last Halloween’s cupcake decorating, so I put it all together!

Seriously, aren’t there days when we all could use a “few spare parts”! I couldn’t resist. Hmmm … if we didn’t have the “Halloween Nights” designer paper in our background, you might be able to send this off to someone going into a surgery … they would need to have a good sense of humor though!

I hope you had as much fun with this card as I did creating it! Thanks for checking in on me today.

I think from now until Halloween … I will reserve my Friday posts for Halloween and we’ll call it Friday Frights! You may see a few in between as well 😉

 Have a Frightfully Fabulous Friday!

blog-closing-small          starry-purple-background-vector

TODAY’S PRODUCT LIST …


Happy Halloween to You …

Hello Stampin’ Friends ~

Did you check out the video yesterday?  Cute right? Well, today I have an alternative project I’d like to share with you …

000_3685

I teamed up the September Paper Pumpkin with the adorable “Halloween Night” Specialty Designer paper. Use the paper as a background and add a few banners and you’ve got a great start to a quick -n- cute card.

I added the little striped banner from the Paper Pumpkin kit along with the tag which completes are card.

000_3682

Remember all the stamps are also included in the Paper Pumpkin kit … they are valued around $14.95, and when you add all the other goodies, it makes Paper Pumpkin a steal!!

Take advantage of our BOGO sale and get October as your first kit, and November for FREE! As a subscriber … you can get any past kits! FYI ~ Our stamps are exclusive to Paper Pumpkin and will not be available anywhere else.

pp_bogo_demo-header

Hope you enjoyed today’s alternative project … stop back tomorrow and see what I’ve done with the tube!!  Oh …….. I can’t wait to show you!! See you then.

Thanks so much for dropping in on me today,

Hope your day is a good one.

blog-closing-small                starry-purple-background-vector

START YOUR PAPER PUMPKIN SUBSCRIPTION HERE …. CLICK HERE or


Two 4 Tuesday: Halloween Fun

Hello Stampin’ Friends ~

Today I have 2 cute Halloween cards to share with you. One that was inspired by the Designer Series paper I used on my scrapbook page on Sunday and the other is made from the “Cookie Cutter Halloween”.

Let’s start with the cute little scarecrow from the “Cookie Cutter Halloween” … these little characters are just irresistible! You can purchase the punch separately or get the Cookie Cutter Christmas bundle like I did… then you be set for Christmas too!

000_3663

I teamed up our cute scarecrow with the Halloween Scene / Spooky Fun Bundle … this is where the fence and the pumpkins come from. It’s amazing how well all of these stamp sets to together. I also used the “Watercolor Wash” background stamp to create an little depth on the card.

As simply as our scrapbook page was on Sunday, it was just as easy to create this cute Halloween card …

000_3666

I used the “Halloween Night” Specialty designer paper with the houses and used this fun “dotted” pattern as my background. I matted it in Basic Black and Pumpkin Pie … I love the pop of color – it brings your card to life!

Another pop of color comes from the moon, which was punched from the 1-1/4″ circle punch and stamped with the “Happy Halloween” from the “Jar of Haunts” stamp set. I’ll be sure to share my creations from that set with you too!

I love the “Halloween Night” washi tape so I added it to the background to break it up. I used the black with the silver bats, which inspired me to add the silver ribbon from the “Glitter Ribbon” Combo pack found on page 37 of the Holiday Catalog. Nothin’ like a little razzle dazzle on your Halloween card!

000_3668

Hope you enjoyed this introduction to Halloween fun … I will be sharing much more with you.

Thank you for hopping over to my page today ~

I hope you have a wonderful day.

blog-closing-small             starry-purple-background-vector

TODAY’S STAMPIN’ SUPPLY LIST …


Beware of Black Cats!

Hello Stampin’ Friends ~

Today I have another cute Halloween card to share and just in case you missed them yesterday … the Weekly Deals will also be featured.

My card today highlights the fabulous bundle; Happy Scenes stamp set & Hearth & Home Thinlits Dies, and it that isn’t fun enough … I’ve lured the black cat over from the Festive Fireside Framelits too!

000_2669

I wanted my black cat to be peering out the window on Halloween night, and what would one expect to see but a creepy little spider and a full moon! The full moon was created with the 1-1/4″ circle punch and the masking technique. I sponged on So Saffron, Calypso Coral and Perfect Plum to create my All Hallows Eve effect.

I wanted a nice sturdy house to protect me so I used the “Brick” embossing folder. To create the weathered look of the brick, I simply dragged my VersaMark™ pad across it. So simple but it really creates an awesome effect.

000_2670

 To complete my card I finished off the inside and wished you all a Happy Halloween! And Many More … is the stamp set my greeting comes from.

Thank you for stopping by my Halloween home and meeting my little black cat!

blog-closing-small

Here are the weekly deals and below I’ll have the ingredients for today’s card …

Supply List

Built for Free Using: My Stampin Blog

 TODAY’S STAMPIN’ SUPPLY LIST …

If you liked the card you saw today and would like to purchase the supplies, just click on any of the products to begin shopping.  Thank you!


Witches Happy Haunting …

Hello Stampin’ Friends ~

I hope you all got to enjoy the beautiful weekend, we were blessed with a fabulous fall day! I love this time of year.

Yesterday I used the large stripes from the “Timeless Elegance” designer paper, and today I’m going to highlight the lace pattern. Who better to wear lace than a witch! I stamped her hat in Elegant Eggplant and heat embossed it with the Iridescent Ice emboss powder.

hat-2

Her hat … oh yes, that came from the Howl-o-ween Bundle; The Howl-o-ween Treats stamp set and Boo to You Framelits Dies. It’s so cute and so much fun to play with. To create the focal point, I placed the hat on a silver 2-1/2″ circle.

I love to use purple, green and orange for Halloween so my color choices for today’s card was Elegant Eggplant, Pear Pizzazz, Pumpkin Pie which I used for my tags and base for the card. I finished my edges with the Triple Banner Punch … it can really make a banner from any size of cardstock, not just the 3 that are slotted for!

hat-1

As for my “Happy Haunting” greeting … I took that from my September Paper Pumpkin stamp set. Paper Pumpkin has some awesome “exclusive” stamps! It is really worth trying it out at least. CLICK HERE.

I hope my card inspired you to use your designer papers for any type of project … it’s always more fun to think outside the box!

Thank you for stopping by today ~

Have a marvelous Monday!

blog-closing-small

TODAY’S STAMPIN’ SUPPLY LIST … Click on any item for details or to begin shopping.  


Simply Sunday: Spooky

Hello Stampin’ Friends ~

Before we begin I would like to “WELCOME” all our new blog readers! So glad you joined us and I appreciate that you all take time out of your busy day to visit my blog… Thank You!

As many of you know, my sister and I have been busy preparing for our upcoming Holiday Retreat, so I have decided that I’m going to celebrate the upcoming holiday …. Halloween, by sharing a week long feast of “Tastefully Spooky” cards and more!!

Today’s Simply Sunday post is a quick -n- easy card that is sure to bring a smile to those who receive it. A simple pumpkin created with 3 circles punched for our 2-1/2″ punch. I sponged the edges to create an appearance of dimension that you would see on a real pumpkin.

000_2641

The cute little face on my pumpkin comes from the “Sparkly Seasons” stamp set. I purchased the bundle and saved 15% which gave the the “Spooky” from the “Seasonal Frame” thinlits dies! I used the silver glimmer paper so it would add that Halloween sparkle to my card.

The leaves come from another bundle (yes, I like things on sale!) the Vintage Leaves and Leaflets Framelits. The stem was just cut free hand … easy!

000_2644

My background designer paper comes from the “Timeless Elegance” collection. Wait till you see what I did with it on tomorrows card! Remember, I’ll be sharing “Halloween” projects all week long.

Thanks again for joining me today!

blog-closing-small

TODAY’S STAMPIN’ SUPPLY LIST … Click on any item for details or to begin shopping.         

Thank you.

000_2646

Simply Sunday: Autumn Smiles

Hello Stampin’ Friends ~

I hope you are enjoying your weekend! I am busy in my crafting room preparing for my upcoming Holiday Retreat … can’t wait!

Yesterday I shared with you a simple card layout using the Seasonal Snapshot 2015 Project Life Card Collection. Isn’t it amazing what you can do with a such a kit! Today I want to share a quick and easy card I created with the Accessory Pack!

000_2629

Look at all the fun and amazing accessories included in this packet! I really do need to get back to scrapbooking!! These kits make it so easy … but I keep sneaking it for my cards! lol

000_2630

I took the jack-o-lantern lazer cut wood piece (popped out the face to save for another card) and then sponged the Pumpkin Pie color onto it.  It’s so easy to dye these wood pieces with your ink and a sponge!

And what else would I back it with but the fabulous Black Shimmer Paper! Love it, Love it, Love it!!

WOW, how simple was that!! And … you have the coolest card on the block!! I finished off the inside with a strip of Washi Tape that is included in your Seasonal Snapshot 2015 Project Life Accessory Kit.

000_2632

I hope your Sunday brings you a smile as wide as my jack-o-lanterns face!

Thanks so much for stopping by!

blog-closing-small


Simply Sunday: Ghostly Greetings

Hello Stampin’ Friends,

Hope you are enjoying your holiday weekend! Did you get a chance to see yesterday’s post and the cute Witches Hat!? Well today, I have a bit more Halloween for you for my Simply Sunday card share.

The quickest and easiest way to create a cute card is to begin with cute paper (or a beautiful card with beautiful paper). Stampin’ Up has many flavors of designer paper to fit your needs.

Today I have chosen the “Happy Haunting” designer paper, and another simple choice is the “Happy Haunting” cardstock pack. These colors were picked to coordinate with your designer paper!

000_2506

There are soooo many cute patterns in the “Happy Haunting” designer paper but I just had to use the ghosts first! And what does a ghost say when he wants to scare you? Boo! I cut the “Boo” out of the new “Black Glimmer” paper. Don’t forget that you can bundle the “Boo to You” framelit dies with the “Howl-o-ween” stamp set and save 15%.

I wanted to highlight my greeting so I used a banner created with the “Triple Banner” punch. Then I grounded my banner with the Rhinestones – coloring them with a black Sharpie™ marker. The finished banner was mounted with the dimensionals to give the card “dimension!”

000_2504

Now … did you catch my ghostly guy inside the card? I created the little eyes with the “White Perfect Accents” that are found in our main catalog (pg. 161) in the embellishments. I colored them with a Sharpie™ marker as well.

Keepin’ my Sunday’s simple with Designer Paper and a few helpful accessories. I hope you enjoyed it.

Thanks so much for taking time out of your holiday weekend and spending it with me.

Have a wonderful day & continue to have a safe and happy holiday weekend.

blog-closing-small


Simply Sunday … BOO!

Hello Stampin’ Friends ~

Today I have a fun Halloween card to share with you… A simple black and white card.

I am using the “Boo to You” Framelit Dies again today (pg. 49 / Holiday Catalog) along with the”Black Glimmer Paper” (pg.47 / Holiday Catalog).

000_2488

The eyes were created by simply punching out two “Extra Large Ovals” out of the Black Glimmer paper. I then faced the glitter sides together and cut a slant across the top… Now your eyes will both slant in.

To create the pupil of the eye, I simply cut a notch out of the eye with a scissors … if your a perfectionist, you can use the corner of a square punch.

000_2490

I used the new “Fine-Tip Glue Pen” (pg.43 Holiday Catalog) to adhere my “BOO!” greeting to the card front. I hope you had a chance to see my tips for using the glue pen in yesterday’s blog post.

The items in the Holiday Catalog will be available to you soon … Sept. 1st, 2015! If you don’t have a demonstrator or a catalog, I’d be happy to get one to you … just leave a comment below.

Thank you for popping in today ~

I hope yours is a good one!

blog-closing-small

TODAY’S STAMPIN’ SUPPLY LIST …


Wonderfully Wicked …

Hello Stampin’ Friends ~

Wooo … ran into technical difficulties again! But we got them worked out and I can share the “Wickedly Cute” card that I have made for you today.

For those who know me … you know I love Halloween and all things “Fall”, so I’m going to grab the coolest items out of the new Holiday catalog to show you! I knew the minute I saw the stamp set Project Life’s “Seasonal Snapshot 2015 … and the stamp Wicked” that I had to team it up with the “Boo to You” Framelit Dies! And really … would you use anything else but the “Black Glimmer Paper”?!!

000_2484

The Project Life’s “Seasonal Snapshot 2015 Stamp set is so fun and versatile … It’s starts you out with “Back to School” and carries you through, well January (snowflakes) and everything in between! And it is bundled with the Card Collection and Accessory Pack … See Page 38 of your Holiday Catalog.

000_2470

So … what do you think of the “Spider Web Doilies”? They are so much fun and easy to use … and you get 24 of them for only $4.50! I used the new “Fine-Tip Glue Pen” (pg.43) to adhere my spider web doily to the Pumpkin Pie paper.

I have some tips for you for using your “Fine-Tip Glue Pen” …

First, before trying to use your glue pen, remove the cap and pull off the protective cover.  I can’t tell you how many times I’ve tried to use my Crystal Effects without pulling the tab off of it before cutting the tip bigger (oh my … we all learn the hard way! LOL)

000_2472

Secondly, there is a “pin” built into the cover of your glue pen to keep the tip from clogging up! Use your finger to guide the pin back into the glue tip.

000_2477

I also used the “Fine-Tip Glue Pen” to attach my stars to the hat … can you see where the star’s came from?

000_2483

To create some fun on the inside of my card too, I used the “Confetti Star’s Border” punch and punched out a bottom border. I then used the stars to add color to my hat on the front.

I created my focal point by punching a 2-1/2″ circle of Elegant Eggplant behind my had. The hat is popped up with dimensionals to create some additional dimension.

Sounds like a lot of steps (not really) but it was super simple and fun to make…

000_2484

I hope you found my card wickedly cute! I have a lot more Halloween cards up my sleeve and can’t wait to share with you.

Thank you for hanging out with me!

Enjoy your day ~

blog-closing-small

TODAY’S STAMPIN’ SUPPLY LIST …

The items highlighted from the 2015 Holiday Catalog will be available to order / http://www.lindaluvs.stampinup.net on September 1st, 2015 / Here are the items from the current catalog …

Simply Sweet Layout …

Hello Stampin’ Friends,

Today’s card share is all about the layout and showcasing the designer paper … Motley Monsters!  This is the last in my Halloween series of cards and super simple to make!

000_1601

Here I have the “ghostly” side of the designer paper … the large piece is 4 x 3-1/2″ and the small is 4 x 3/4″. The Whisper White is also 4 x 3/4″ and all are mounted on the Sahara Sand cardstock.

My greeting is from the Paper Pumpkin kit … those stamps sure come in handy!

On this card I just used another pattern in the Motley Monsters and everything else remained the same!

000_1602

Just think … Birthdays, Christmas … anything!  Let your imagination run wild.

The first card sample was popped up with dimensionals, and looks even better than the photo.

Let me know what you think … and have fun with this layout!

Enjoy the rest of your weekend ~


Simply Halloween

Hello Stampin’ Friends,

Today I have a cute, super simple Halloween card for you…

000_1594

I used the “Freaky Friends” stamp set – I just had to have that little skeleton! Look at him just standing there … isn’t he just the cutest!

The “Happy Halloween” comes from that tried and true greetings set … Tiny Tiny Wishes. One of my go-to stamp sets.

I simply stamped my skeleton and greeting with Whisper White “CRAFT” ink and embossed it with white embossing powder. Most people use the VersaMark for embossing, but I love the way the “white on white” works.

The majority of my stampers who have done this technique, have purchased a White Craft pad.  You can find it on the bottom of page 210 in the Stampin’ Up! catalog or just click on the link in my Stampin’ Supply List at the bottom of this post.

I layered it on Elegant Eggplant and mounted it onto the Pumpkin Pie cardstock.

000_1596

I used a bit of bling from the September Paper Pumpkin kit to finish off my card … SIMPLE.

Thank you for dropping by today! Stop back tomorrow for my last post of my Halloween Series. I will be highlighting the Freaky Friends and Motley Monsters Designer paper.

Have a wonderful day ~

blog-closing-small

STAMPIN’ SUPPLY LIST …