An Unexpected Pairing: Cute as a Bug & Prayers and Promises

Hello Stampin’ Friends ~

Today we will be turning an unexpected product pairing into a beautiful heartfelt card. Sometimes the most meaningful cards come from unexpected pairings—and this project is a perfect example of that. As you’re browsing your craft room or flipping through the catalog, I want to gently encourage you to look beyond the obvious combinations and think about who you’re creating for. When you design with a specific person in mind, products often come together in ways that feel natural, intentional, and heartfelt.

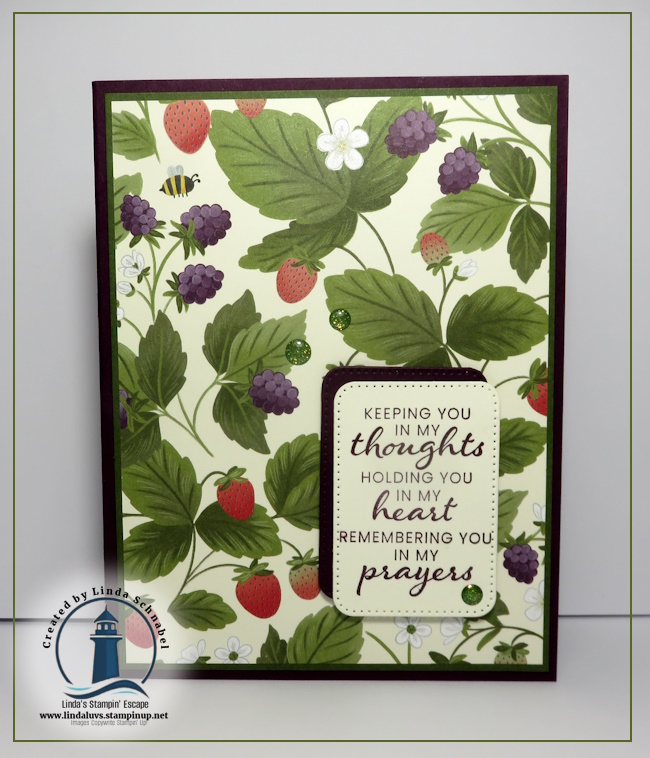
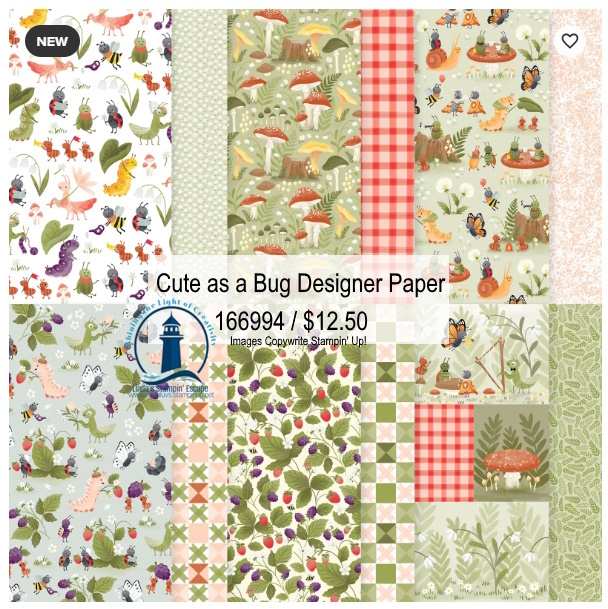
At first glance, the Cute as a Bug Designer Series Paper and the Prayers and Promises Stamp Set may not seem like a natural match. Cute as a Bug is filled with charming ladybugs, fluttering friends, and picnic-perfect prints that immediately feel playful and lighthearted. But this particular berry pattern stopped me in my tracks. It reminded me of my grandma—warm, comforting, and familiar—and that personal connection made it the perfect choice for a card meant to offer encouragement and care. This paper beautifully demonstrates just how versatile designer paper can be when you let emotion, memory, and purpose guide your choices.

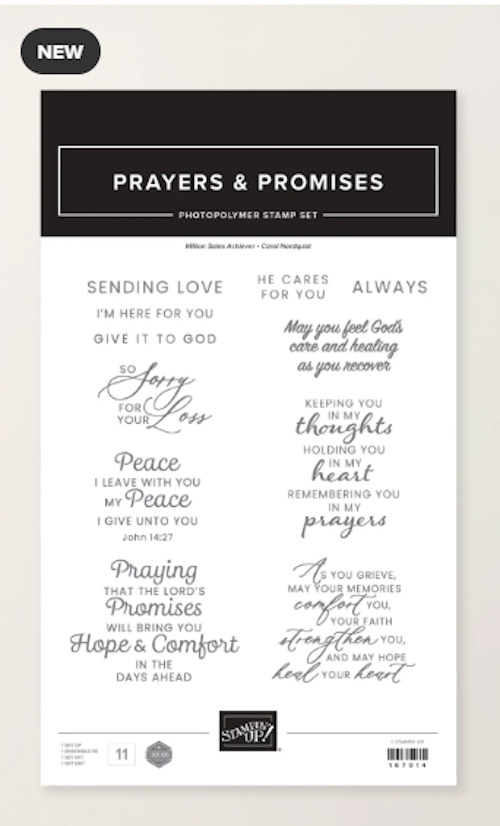
The Prayers and Promises Stamp Set is truly one of those foundational stamp sets that belongs in every stamp room. It shares words of faith, love, sympathy, and encouragement—sentiments we all reach for when someone we care about needs support. Having a go-to set like this allows you to create meaningful cards with confidence, knowing the message will be just right for the moment.

My card begins with an A2 card base in Blackberry Bliss (8½” x 5½”, scored and folded at 4¼”). I cut the Cute as a Bug Designer Series Paper to 5⅛” x 3⅞” and layered it onto a Mossy Meadow mat measuring 5¼” x 4″. The combination of these rich, earthy tones grounds the card and gives it a calm, reassuring feel—perfect for this style of sentiment. This is a color palette you’ll find yourself reaching for again and again.

The greeting was stamped in Blackberry Bliss ink onto Very Vanilla cardstock using a sentiment from Prayers and Promises. I die cut the sentiment with the Nested Essentials Dies, then die cut a second layer in Blackberry Bliss to place behind it. That extra layer adds a subtle pop of color and frames the greeting beautifully. I popped the sentiment up with Stampin’ Dimensionals to add just the right amount of dimension and draw the eye to the message.

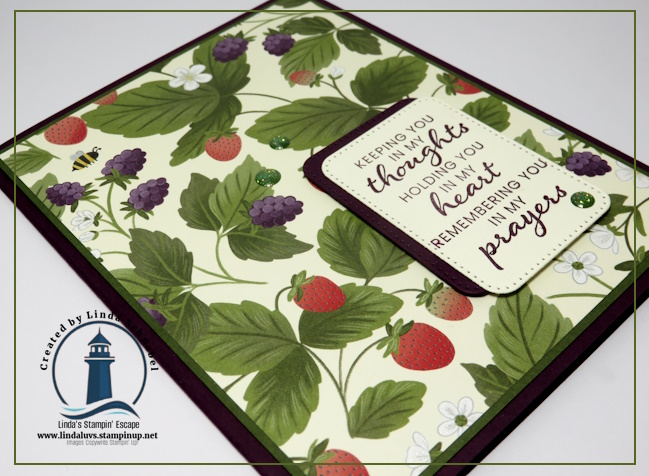
To finish the card, I added a few Low Profile Sparkle Dots in green. These small details may seem simple, but they add a gentle touch of shine and tie everything together without taking away from the sentiment.

As you can see, these two seemingly different products blend seamlessly when used with intention. This card is a wonderful reminder that it’s not about following rules—it’s about telling a story, honoring a feeling, and creating something meaningful. If you enjoy designing cards that connect on a deeper level, these are products you’ll want to keep close at hand.

The next time you sit down to create, I invite you to start with a person, a memory, or a feeling—and then let your supplies fall into place. You may be surprised how beautifully unexpected combinations come together when you design from the heart. 💜

Until next time … Happy Stamping!

From Scraps to a Stunning Christmas Card

Hello Stampin’ Friends ~

What do you do with your scraps when cutting for your main cards? Rather than letting them collect dust or tossing them, why not turn them into something extraordinary? In this blog post, I’ll walk you through a creative endeavor using leftover pieces of the Joy of Christmas designer paper. Get ready to unlock the full potential of those remnants!

I used leftover pieces of Joy of Christmas designer paper to create my background. Then, I gathered up my Joy of Noel bundle to compliment the designer paper, and some vellum cardstock along with the Nested Essentials Dies … to create my focal point.

From the Joy of Noel bundle, I chose the NOEL for my project’s theme. In this instance, the greeting was selected to serve as the focal point. The choice of stamp sets the tone for the entire piece.

Utilizing the Nested Essentials dies to cut the vellum cardstock …. the translucent quality of vellum adds a touch of sophistication to your creations, enhancing the overall visual appeal. When you layer the vellum over the leftover designer paper it allows the intricate patterns to peek through. This layering technique adds depth and visual interest.

I took my creation a step further by incorporating additional embellishments, which were created by stamping, coloring and cutting out the holly leaves from the Joy of Noel bundle. I also used the Festive Pearls to complement the color scheme and theme of the project.

Don’t let those leftover designer paper scraps go to waste. With a bit of creativity and resourcefulness, you can transform them into stunning works of art. In this project, I repurposed remnants of Joy of Noel designer paper and combined them with vellum to create a visually captivating masterpiece.

So, the next time you find yourself with leftover paper, remember – the possibilities are endless! Happy Crafting!

Quick & Easy Cards featuring the One Horse Open Sleigh Designer Paper

Hello Stampin’ Friends ~

Today I have three Quick & Easy Cards featuring the One Horse Open Sleigh Designer Paper. I will also be sharing the video replay of my Facebook LIVE last night. You’ll hear me talk about the “third” card in my video … can’t wait until you see it. Let’s begin with the video for those of you who did not catch the LIVE.

I also thought I would share the cards here as well so you can get a better look. The first card is super simple to make and I love this “looking down view” on this designer paper. This pack of designer paper is full of amazing patterns.

The second card is not hard to make and looks so cool when you have a landscape pattern like we have here. Remember, this is only half of the paper because each strip is 1″ wide. The Boho Blue and Misty Moonlight really pull the blue tones out of this paper … Wait till you see the what I did with the other 3 panels!!

Since I pulled the blue tones from the first of our designer paper panels, I decided to pull out the pinks and yellow on my next card.

The base is Basic Gray because I love how it looks with the Petal Pink. I also used it to mat my designer series paper panels. Just the the other card, my panels are cut 1″ x 5″ ….

The Petal Pink was cut at 4″ x 5-1/4″ and then the Lemon Lolly; 3-7/8″ x 5-1/8″ then was cut diagonally. I then attached the Lemon Lolly to the Petal Pink and ran it through my embossing machine using the Timeworn Type embossing folder.

The panels are now attached to the card front using Stampin’ Dimensionals. Do you see those leaves on the One Horse Open Sleigh designer paper? I decided to take this paper into autumn and cut out some leaves using the Around the Bend dies in Copper Clay. So pretty.

The Smoky Slate cardstock was stamped with Misty Moonlight with my greeting and then die cut with the Stylish Shapes dies. It was attached to the panels and then adorned with the Copper Clay leaves.

The designer paper may be called “One Horse Open Sleight” but you can use the gorgeous paper in so many ways …. just have fun!! I love the way both these cards turned out, great way to use one sheet of designer paper.

I hope you got a wave of inspiration with today’s cards, and I thank you for stopping by and hanging out with me for a bit.

Have a great day ~

Triple Time Technique: Season of Cheer Card

Hello Stampin’ Friends ~

Today I have a sweet card that invites you to take a walk into nature. I’m using the Triple Time Technique on today’s card with the One Horse Open Sleigh Designer Paper and the New Nested Essentials Dies. So simple to make but with a very dramatic effect.

Ready? Pick out your favorite pretty paper pattern and some fun dies. I used two dies for my card, you will also need a sheet of coordinating cardstock. I am using Early Espresso …. cut in half 8-1/2″ x 5-1/2″ then score at 4-1/4″ for you fold.

Next we will cut your 6″ x 6″ designer paper down to 4″ x 5-1/4″. Position your dies evenly onto your designer paper and run it through your die cutting machine.

Use your extra cardstock to “mat” your die cut designer paper …. I actually glues my die cuts directly out of the designer paper and fussy cut around it, but if your a bit more of a perfectionist, you could line it up in your paper cutter and trim it to your desired width. You can see that mine is not perfectly even but just as effective.

Attach the outer piece of designer paper directly to your cardfront, then you’ll align the largest of the two die cuts to the pattern of the paper … I used Stampin’ Dimensionals to attach it, then you’ll do the same with the smaller one.

To finish off the card I stamped the greeting directly onto the designer paper. Yes, I know that’s risky but the photopolymer stamps make it so much easier! I used the bronze snowflakes from the suite to complete it. Again, super simple to make yet it has such an impact!

Thanks for hangin’ out with me today. Enjoy your weekend, I’m entertaining two of my great grandchildren ❤ so much fun!