Crafting Marvels: Perennial Postage Dies & Perennial Lavender Designer Paper

Hello Stampin’ Friends,

In the vibrant world of card making, there are two elements that can truly elevate a creation: innovative dies and captivating designer paper. Today, we’re diving into a crafting adventure where we marry the magic of Perennial Postage Dies with the charm of designer paper. It’s a fusion of texture, movement, and elegance, resulting in cards that are not just pieces of paper, but intricate works of art.

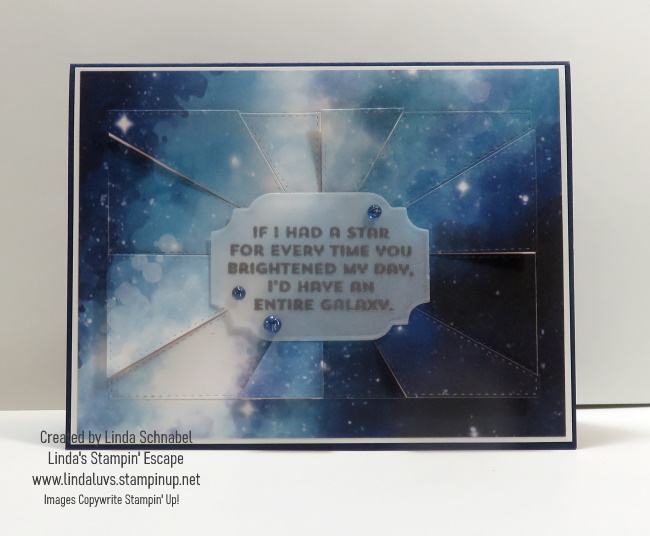
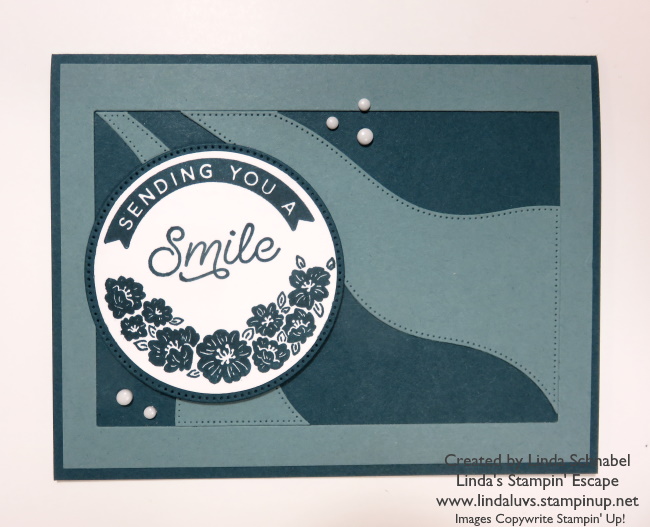
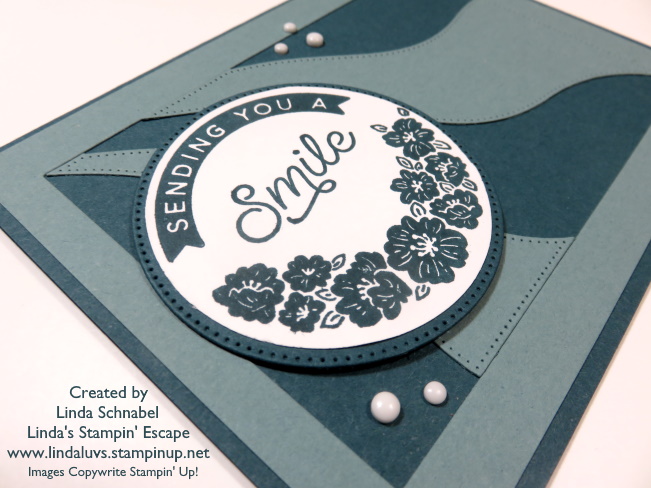
Enter the Perennial Postage Dies…. these versatile die are more than just decorative accents; they help create our focal point, drawing attention to the heart of our design. By framing our chosen elements with these dies, we create a sense of cohesion and elegance that ties the whole card together, as we align the front panel to the die cut panel inside. You’ll note the unique cut that exposes (gives you a peek) inside the card.

Now, let’s talk about technique. We’re going to take those patchwork pieces dies and work some magic. By popping every other piece up, we create a sense of movement and dimension that immediately catches the eye. It’s like watching a quilt come to life right before your very eyes. The juxtaposition of raised and flat elements adds an element of surprise and delight to our cards. As I put the finishing touches on the card, you can’t help but marvel at the transformation that has taken place… especially if you attended my Perennial Postage Class, as this is a “mash up” of two of the cards we did in class. The possibilities are endless.

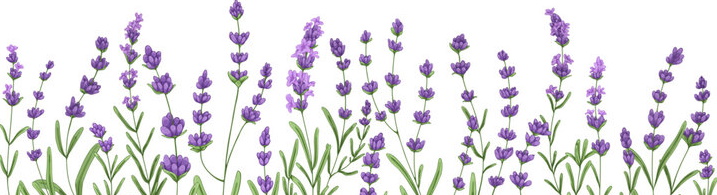
So, whether you’re a seasoned crafter or just starting out on your creative journey, take a moment to explore the world of Perennial Postage Dies and Perennial Lavender designer paper. Let your imagination run wild, and don’t be afraid to experiment. After all, the greatest masterpieces are often born from the boldest ideas.

Thanks for joining me today! Have a great weekend.

“Crafting Magic into the New Year: Stargazing Designer Paper & Patchwork Pieces Dies”

Hello Stampin’ Friends,

As the year draws to a close and we eagerly anticipate the fresh canvas of a new one, there’s a unique way to blend creativity with celestial wonder. Imagine the midnight sky sprinkled with stars, now envision capturing that enchantment in your crafts. Enter the delightful pairing of the Stargazing Designer Paper and Patchwork Pieces Dies – a dreamy fusion of artistry and cosmic allure.

I began with the “burst” pattern (on the right above). As you can see there are two different patchwork pieces patterns included in the set. I then chose the Stargazing Designer Series paper, and die cut it. If you haven’t see that designer paper yet ….

I cut my designer paper to 4″ x 5-1/4″ and picked one of the pretty galaxies in Blueberry Bushel / Night of Navy. When you cut your patchwork pattern, it leaves a frame, so I make sure to center the die on my paper. On this card I used the frame, on other cards you will see in the near future I may or may not.

I glued the frame onto a piece of Basic White measuring 4-1/8″ x 5-3/8″. My die cutting machine does not cut all the way through, the center stays in tact (yet pulls apart easily) On today’s card I used that to my advantage and once centered within the frame I glued the center down.

Then I put Stampin’ Dimensionals on every other panel, and glued the others down. This gave me a lot of dimension & texture to the card… and it looks cool!! It looks as if it’s reaching out to you!!

I used the greeting from the Reach for the Stars stamp set and heat embossed it with the VersaMark and Silver Embossing Powder onto Vellum Cardstock. I used one of the dies from the “All That” set of dies.

Mounting it onto my card was a bit tricky because you see everything through the vellum, so I used the Blueberry Bushel Tinsel Gems 4-Pack to embellish the greeting and then I cut the dimensionals down to fit underneath so you couldn’t see them!

This New Year’s Eve, let your creativity soar to the stars with the mesmerizing Stargazing Designer Paper and Patchwork Pieces Dies. Embrace the celestial allure and weave it into your crafts, ushering in the new year with cosmic charm and endless possibilities.

Have a great weekend, and a Safe and Happy New Year!

A Birthday Celebration / Celebration of Life …

Hello Stampin’ Friends ~

Today would have been Armani’s 4th birthday, as you know… he passed away unexpectedly last Friday from what they believe was a seizure. I’m sharing the Patchwork Pieces card that I created during a Facebook LIVE for him … he LOVES Orange!! This little guy had to come into my stamp room every time he was over and checked out the cards I have made … he’s was the sweetest little guy 🧡!!

Here is the video replay of my Facebook LIVE ….

Wasn’t that fun and easy to create? And by using the designer paper and cardstock, you have enough left over for a second card. Have some fun and die cut some black and turn it into a Halloween card … the possibilities are endless.

So … Do you think he will love this card? The last one he took had flowers, but it was ORANGE!! He even passed up the spaceship over those orange flowers …. told you he was a hoot!

Thank you for stopping by and checking out my blog post today. Have a great day ~

A Patchwork of Fun: DIY Birthday Card with a Twist!

Hello Stampin’ Friends,

Are you ready to embark on a creative journey filled with a blast of color and a touch of sass? Well, you’re in for a treat today as we dive into today’s birthday card that’s as fun and vibrant as it gets. So, grab your Patchwork Pieces Dies, Stargazing Designer Paper, and Wanted to Say Dies, because we’re about to get crafty!

Start by selecting your Lemon Lime Twist cardstock for the card base. This lively green hue sets the stage for our vibrant creation. Cut the cardstock to 8-1/2″ x 5-1/2″ and fold it in half – this will be the canvas for your masterpiece.

Now, it’s time to incorporate some whimsical patterns into our design. Take out your Stargazing Designer Paper, and die cut one of each of the Lemon Lime Twist and Pumpkin Pie patterns … This gives you enough for 2 cards. I added a piece of black and white dotted designer paper from some I had laying around to add some fun pops of white. Cut a piece of Basic Black 4″ x 5-1/5″ (same as the Polka dot paper) …This will be the backdrop for our patchwork pieces.

This is where the magic happens! Grab both colors of your Patchwork Pieces and adhere them to the black to create a medley of funky shapes. Arrange them on your card in a random, patchwork-style pattern. Don’t worry about perfection – the more whimsical, the better! Now, trim down the black cardstock to create a border around your funky pattern.

The greeting comes from the Wanted to Say Dies. Cut out the base sentiment from the black and the detail “birthday” from your Lemon Lime Twist cardstock. Stack them and glue them together with your Liquid glue. You can even add a touch of Wink of Stella for some glitz!

Your card is almost ready to dazzle! To really make that greeting POP, punch or die cut a circle from your Vellum Cardstock and attach to the front of your card. If you like, add a few embellishments like sequins, rhinestones, or even a ribbon bow. These little details can take your card to the next level.

There you have it, friends – a DIY birthday card that’s bursting with color, personality, and a sprinkle of sas. Perfect for all ages, this card is sure to bring a smile to anyone’s face. Time to embrace your creative side, laugh a little, and send some handmade joy to your loved ones.

Happy crafting, and even happier birthdays! 🎉🌟🎈

If you enjoyed today’s fun and colorful card and found it inspiring, here’s a list of the supplies you’ll need to recreate the card. Spread joy and connect with others through your handmade creations.

Ready for a Scary Sneak Peek …

Hello Stampin’ Friends,

As promised I have a bit of a sneak peek for your today …. something old (annual catalog) and something new (Mini catalog). My “old” / something from the Annual catalog is the Patchwork pieces dies. The “new” is the Tricks and Treats Bundle. All you Halloween lovers are going to get a kick out of this one ….

This card is just bursting with fun … Love how the rays just shoot out from under the moon, and the haunted house is gently lite not to scare our ghosts away … they are only looking for a safe haven!! lol

My cardbase is a piece of 8-1/2″ x 5-1/2″ Basic Black that’s scored at 4-1/4″ and folded. Next I cut a piece of Lemon Lime Twist at 4″ x 5-1/4″ for my mat which will be used to arrange my die cut patchwork pieces. The pieces were cut from the Stargazing 12″ x 12″ Designer Series paper and another from the Basic Black.

I used the Lemon Lime Twist cardstock as a guide to align the pieces in every other color … starting with the corners and then filling in the rest of the pieces and spacing them evenly. I used my Tombo Liquid glue to secure them to the mat.

Using the Memento Ink I stamped the Haunted House and then I die cut it with the coordinating dies. I stamped the “Trick or Treat” onto Daffodil Delight … then I punched it out with the coordinating 2-3/8″ Circle Punch. Once punched, I used the small blending brush to add some dimension / shading to it.

I used the ghosts from the Glow in the Dark Bats & Ghosts to embellish my card. These little cuties and some fun texture and a glow of warmth. Are you ready for Halloween decorating soon? The Tricks or Treats Bundle will be available on September 6th … not too long yet.

Thank you for coming over to my blog, I appreciate it. Have a great day.

Thinking of You on Your Birthday …

Hello Stampin’ Friends,

Today we are Thinking of You on Your Birthday and celebrating with a pretty pink and gray card created with the Circle Sayings and Patchwork pieces dies. There are so many combinations you can make with these two crafting tools in your stamp room… and they are fun to play with!

My cardbase is a piece of 8-1/2″ x 5-1/2″ Bubble Bath scored at 4-1/4″ then scored and folded. Next I cut a piece of Smoky Slate for my mat that will be used to arrange my die cut patchwork pieces. The pieces were cut from the Bright & Beautiful 6″ x 6″ Designer Series paper.

I used the Smoky Slate cardstock as a guide to align the pieces … starting with the corners and then filling in the rest of the pieces and spacing them evenly. I used my Tombo Liquid glue to secure them to the mat.

Using the Memento Ink I stamped the cupcake … colored it with Smoky Slate and Bubble Bath Stampin’ Blends. I stamped the flowers in Bubble Bath and then the “Thinking of You” over the top of the flowers with Memento Ink … then I punched it out with the coordinating 2-3/8″ Circle Punch.

The cupcake is fussy cut and popped up with a Stampin’ Dimensionals as was the entire punched circle when finished. I added a little Wink of Stella to the cupcake – just because!

I love the ombre look on the Bright & Beautiful designer paper, it’s subtle but pretty. Check out how I switched out every other die cut so you would get a two-toned look on our “burst” pattern, it gives it a more distinct color pallet. I have more ways to use this die and will be sharing them with you either LIVE on Facebook and / or right here on my blog.

Thank you for coming over to my blog, I appreciate it. Have a great day. PS: I will not be going LIVE today as I am on vacation … more on that too!

Patchwork Pieces Video

Hello Stampin’ Friends,

Today I’m going to share the video that I created going through step by step how I created the cards I shared with you yesterday. I will leave the cards on today’s post so you can check them out again, along with the key ingredients I used to make my cards … Enjoy the video!

Once all your colors are cut, I pull them apart and create a rainbow pattern. I used the Tombo Liquid glue to secure my pattern …

I stamped my greeting from Circle Sayings in Daffodil Delight and Starry Sky, then punched out with the coordinating 2-3/8″ punch. I used Stampin’ Dimensionals to pop it up and embellished it with the blue Tinsel Gems.

My next card is assembled as the first and then stamped with VersaMark ink … it’s a watermark ink so it works perfectly on the rainbow of color. This is a simple technique that many of us forget about, but it looks so cool ….

The flowers come from the Crafting with You stamp set as does the greeting that I stamped in Starry Sky. It was then die cut with the Stylish Shapes dies. I put a few scrap pieces on the back and trimmed them down to embellish my card.

The last card was assembled as the rest were but before I assembled it to the cardbase, I ran it the the Cut & Emboss Machine ….

Any one of our embossing folders would look great on these patterned die cuts in the Patchwork Pieces dies, and just another easy technique to change up your card and add some texture to your card.

I’ve got several more cards to make with the left over pieces … I’ll warn you, once you get started, you will have so much fun creating with these die. Have fun!! Thanks for checking in with me today.

A Rainbow of Fun & Techniques

Hello Stampin’ Friends,

Today I’m going to share 3 different ways / techniques you can use with the Patchwork Pieces dies. I’m beginning with a “rainbow” of colors: Daffodil Delight, Pumpkin Pie, Real Red, Gorgeous Grape and Starry Sky. I cut each piece of cardstock to 5″ x 3-1/2 inches … this will cut out the die pattern and leave a little frame. My “mat” the cardstock behind my die cut measures 5-1/4″ x 3-3/4″.

Once all your colors are cut, I pull them apart and create a rainbow pattern. I used the Tombo Liquid glue to secure my pattern …

I stamped my greeting from Circle Sayings in Daffodil Delight and Starry Sky, then punched out with the coordinating 2-3/8″ punch. I used Stampin’ Dimensionals to pop it up and embellished it with the blue Tinsel Gems.

My next card is assembled as the first and then stamped with VersaMark ink … it’s a watermark ink so it works perfectly on the rainbow of color. This is a simple technique that many of us forget about, but it looks so cool ….

The flowers come from the Crafting with You stamp set as does the greeting that I stamped in Starry Sky. It was then die cut with the Stylish Shapes dies. I put a few scrap pieces on the back and trimmed them down to embellish my card.

The last card was assembled as the rest were but before I assembled it to the cardbase, I ran it the the Cut & Emboss Machine ….

Any one of our embossing folders would look great on these patterned die cuts in the Patchwork Pieces dies, and just another easy technique to change up your card and add some texture to your card.

I’ve got several more cards to make with the left over pieces … I’ll warn you, once you get started, you will have so much fun creating with these die. Have fun!! Thanks for checking in with me today.

Sending You a Smile Card …

Hello Stampin’ Friends,

So … Do you want to see what I did with the left overs from yesterdays Circle Sayings card? Today I’m using the Lost Lagoon die cuts and frame from the Patchwork Pieces dies that were not used on yesterdays card …

Today’s card will show you another way you can use your Patchwork Pieces dies. The card base is Pretty Peacock and uses the 3-7/8″ x 5-3/8″ Lost Lagoon frame. Instead of using several colors like I did yesterday, I only used 2 die cut pieces of the Lost Lagoon so that the Pretty Peacock shows through. Because I used the frame, the pieces line up nicely.

I also wanted to highlight another one of the stamp images … actually 3 of them. I like the fact that you can build your own designs for your cards, and I thought I’d send out smiles today. They are the best gift you can give ❤

I stamped my images in Pretty Peacock on Basic White cardstock and then punched it out with the coordinating 2-3/8″ Circle Punch. The mat is Pretty Peacock and die cut from the Stylish Shapes Dies. The stitched marks from both the Patchwork Pieces dies and Stylish Shapes add a lovely touch of texture to the card. To add dimension, I popped up my greeting with Stampin’ Dimensionals.

To finish off the card, I added the white embellishments from the Classic Mat Dots. It carries the white from the greeting throughout the card so your eyes automatically travel around the card.

Are you liking all the fun things you can do with the Circle Sayings bundle and the Patchwork Pieces dies? I have even more to share … I may even host a class! Would YOU be interested?

Thanks for joining me today ….Enjoy your weekend, and Happy Stamping!

Sunshine to Brighten Your Day

Hello Stampin’ Friends,

Are you ready for more Circle Sayings? This card will bring the Sunshine to Brighten Your Day and will leave you yearning to hear the waves crashing against the rocks. Yesterday I shared the Sea Shells with you … today, the waves, and I will be combining the Patchwork Pieces dies into the card.

Let’s begin with out color pallet; I wanted the feel of the ocean and all it’s beautiful blue/green tones; Coastal Cabana, Azure Afternoon, Tahitian Tide, Pool Party, and Lost Lagoon dance across this card. You will have to cut one of each of these colors but then you’ll have enough left overs for 5 more cards!!

My card base is Coastal Cabana and then I matted with Azure Afternoon 4″ x 5-1/2″. For the layers you will cut one of each; I began with a 3-7/8″ x 5-3/8″ of each color. CENTER your die onto your cardstock … this way you can use the “frame” if you want to. I did on this card.

Now comes the fun part … choose the colors in a pattern that you prefer. I began with Pool Party, then Lost Lagoon, followed by Coastal Cabana, Tahitian Tide, then Azure Afternoon and the small piece on the bottom is Lost Lagoon. Experiment and have fun creating your color scheme.

Before I secured my layers down with the Tombo Liquid Glue, I used a Sponge Dauber to sponge on some Craft White Ink to make them look more like waves rippling through the ocean. It also created a softer transition between colors.

Next up was my waves from the Circle Sayings set. I simply colored this with my Lemon Lolly and Tahitian Tide Stampin’ Blends, but then after it dried, I added the Coastal Cabana from my Stampin’ Write Markers as there is not one in the alcohol based blends yet. Then I added some Shimmery White Embossing Paste to my wave!! Talk about texture… I love it!

I punched out my design with the coordinating 2-3/8″ punch from the Circle Sayings Bundle. The Coastal Cabana mat was die cut from the Reach for the Stars bundle.

I attached my stamped image with the Stampin’ Dimensionals to give some added dimension to the card. The greeting “Sunshine to Brighten Your Day” comes from the Sending Smiles stamp set and was stamped with Memento Ink to coordinate with our stamped image.

The fun color pallet and texture of this card will leave you feeling inspired. Happy Stamping and have a wonderful weekend!

Patchwork Pieces Dies are Out of this World

Hello Stampin’ Friends,

Today I have a fun card for you … let me just say that the Patchwork Pieces Dies are Out of this World. I have been playing with these dies ever since they arrived on my door step earlier this week. I used them for my club projects so I’m sure the members are going love to see this one.

I began with the “burst” pattern (on the right above). As you can see there are two different patchwork pieces patterns included in the set. I then chose the Stargazing Designer Series paper, and die cut it. If you haven’t see that designer paper yet ….

I cut my designer paper to 4″ x 5-1/4″ and picked one of the pretty galaxies in Blueberry Bushel / Night of Navy. When you cut your patchwork pattern, it leaves a frame, so I make sure to center the die on my paper. On this card I used the frame, on other cards you will see in the near future I may or may not.

I glued the frame onto a piece of Basic White measuring 4-1/8″ x 5-3/8″. My die cutting machine does not cut all the way through, the center stays in tact (yet pulls apart easily) On today’s card I used that to my advantage and once centered within the frame I glued the center down.

Then I put Stampin’ Dimensionals on every other panel, and glued the others down. This gave me a lot of dimension & texture to the card… and it looks cool!! It looks as if it’s reaching out to you!!

I used the greeting from the Reach for the Stars stamp set and heat embossed it with the VersaMark and Silver Embossing Powder onto Vellum Cardstock. I used one of the dies from the “All That” set of dies.

Mounting it onto my card was a bit tricky because you see everything through the vellum, so I used the Blueberry Bushel Tinsel Gems 4-Pack to embellish the greeting and then I cut the dimensionals down to fit underneath so you couldn’t see them!

I will admit, I sure am having fun with these dies. Such a different twist to “regular” cards. I don’t know if it’s retirement and that fact that I can just “play” but I’m truly enjoying being in my stamp room!!

Hope I sent some inspiration your way to get into your craft room and play today!

Have a great weekend,