Saying Farewell to a Classic: In the Moment Stamp Set

Hello Stampin’ Friends ~

As April approaches, so does the end of an era for many stamping enthusiasts. Stampin’ Up’s retirement list is out, and among the beloved sets bidding us adieu is the timeless “In the Moment” stamp set. This set has been a staple for many of us, offering versatility and creativity for a multitude of projects. As we bid farewell to this classic, let’s take a moment to appreciate its beauty and versatility.

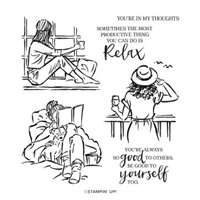
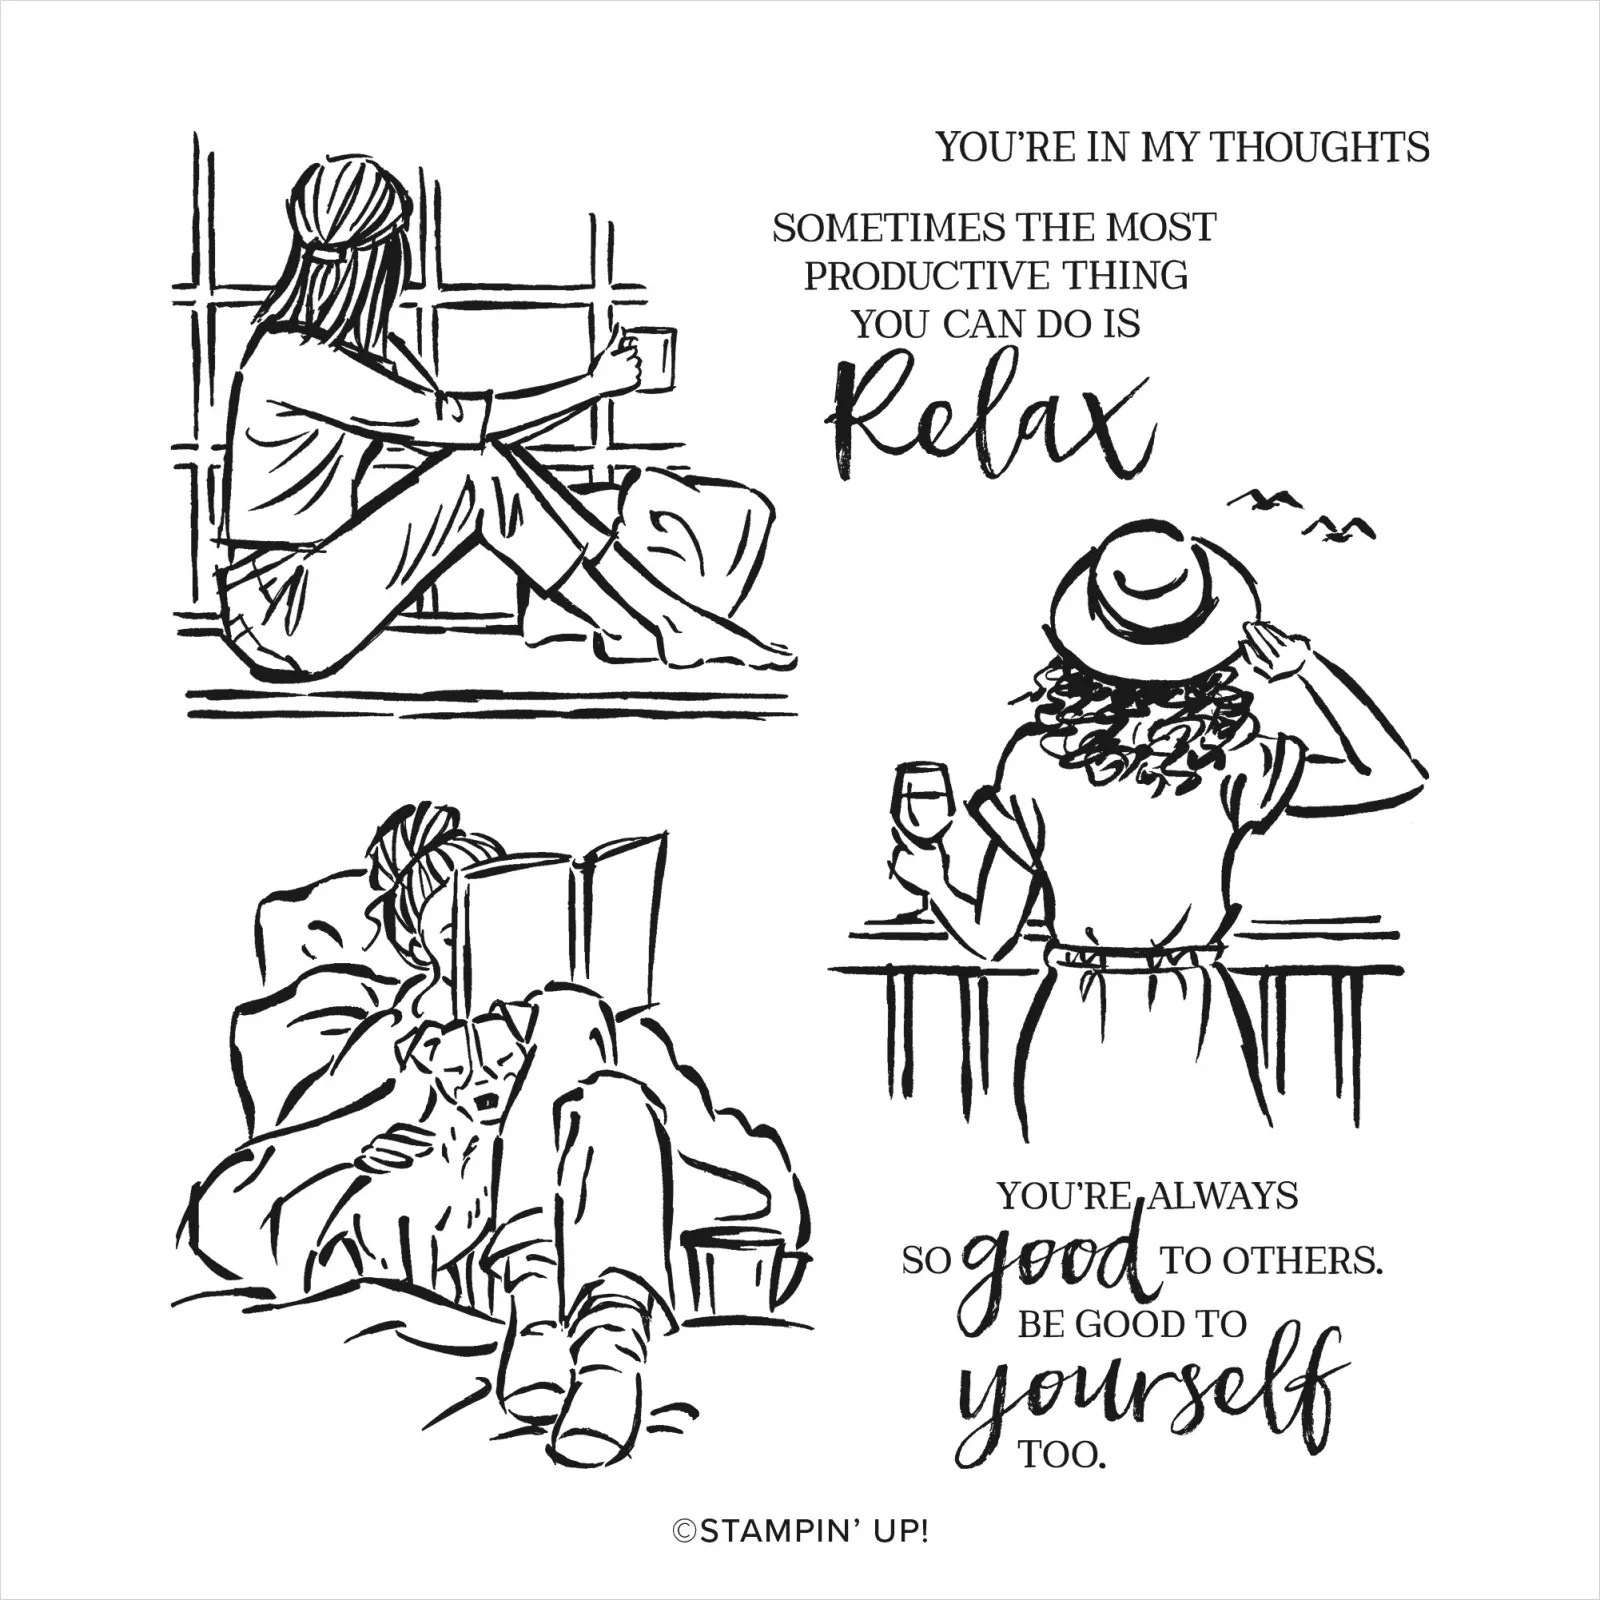
I had to add this stamp set to my collection because it captures the essence of life in a way that resonates deeply with those we make our cards for. The “In the Moment” stamp offers a glimpse into the beauty of everyday moments with its heartfelt imagery and sentiments.

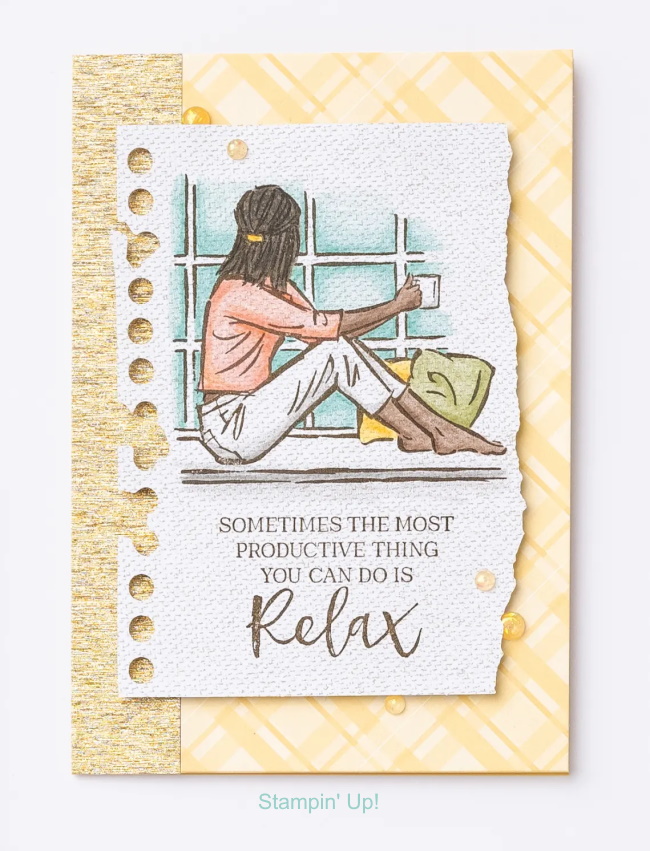
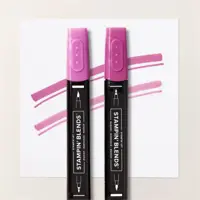
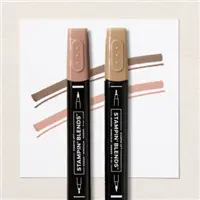
What I love about this set is the line-art images can be colored using your favorite coloring techniques. The intricate line art of the images lends itself beautifully to the soft, ethereal look of watercolors. By simply stamping the images onto watercolor paper and adding a touch of color, you can create stunning works of art that are sure to impress.

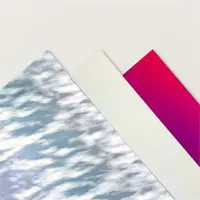
Another way to make the most of “In the Moment” is by pairing it with any one of our beautiful designer series paper. The next card highlights the Countryside Inn Designer Series Paper,

At the heart of the “In the Moment” stamp set lies a charming depiction of a woman and her faithful companion, a dog by her side as she reads a book. This captures the simple joy of companionship and relaxation. Whether you’re a dog lover yourself or know someone who is, this stamp is sure to tug at the heartstrings and evoke feelings of warmth and that moment one needs for themselves …. Because you deserve it!

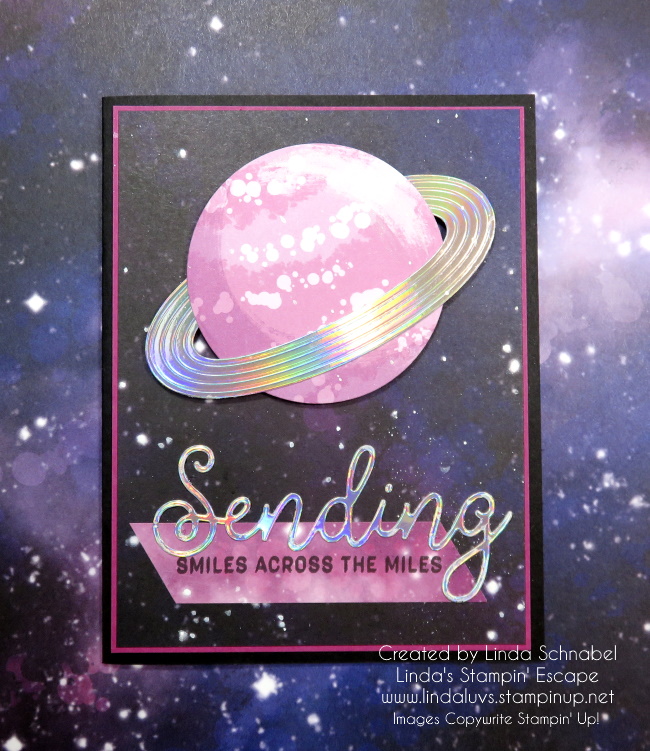
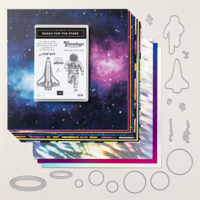
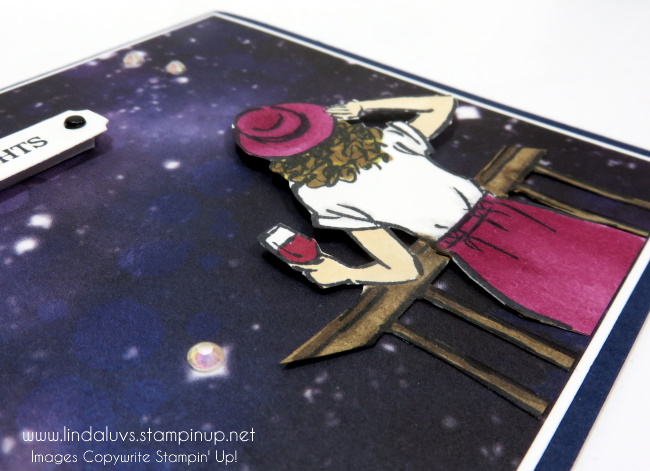
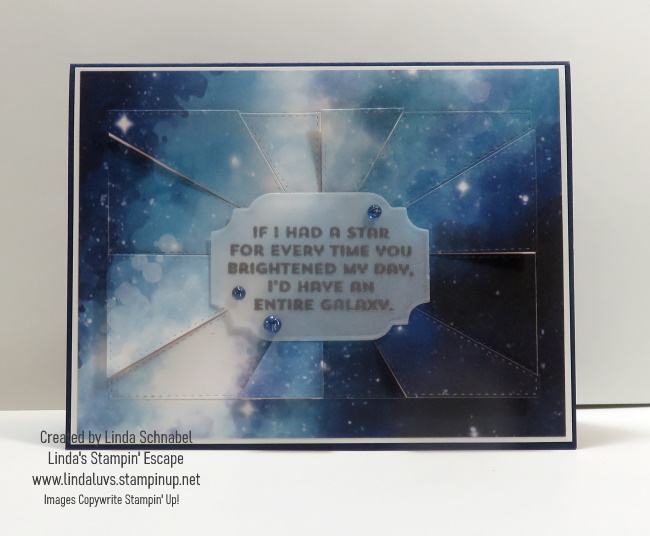
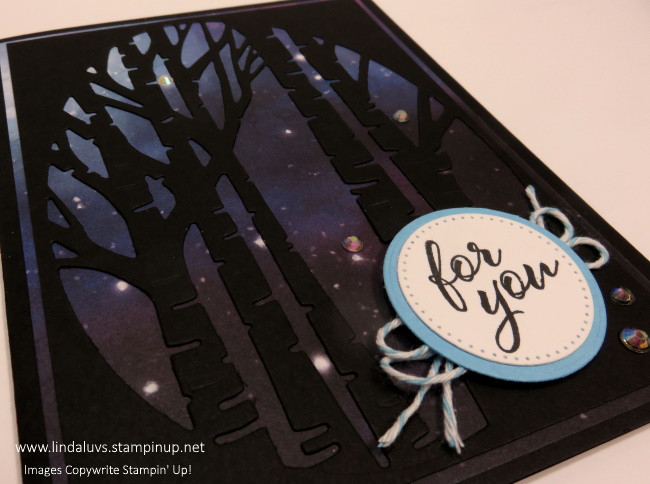
If you love a touch of celestial beauty in your projects, look no further than the Stargazing Designer Series Paper. Paired with the “In the Moment” stamp set, this paper brings a sense of serenity and wonder to your cards. The Stargazing paper adds a magical touch to your crafting.

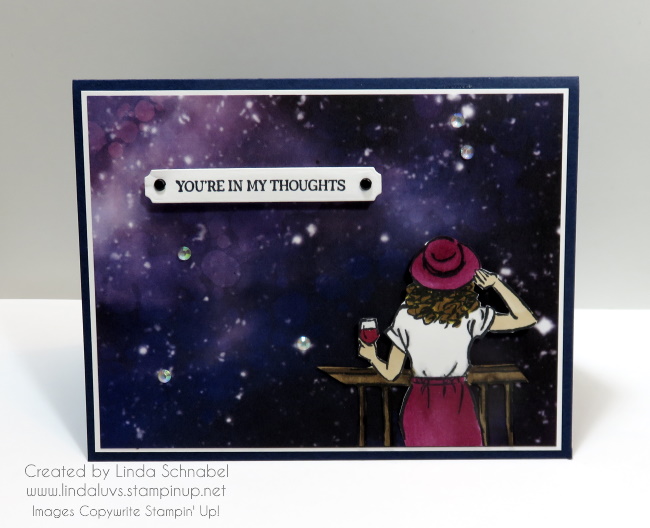
You have to love the image of a woman leisurely enjoying a glass of wine, her gaze fixated on the stars, or make it what you’d like …. watching the sunset, admiring nature’s beauty, or simply lost in her own thoughts, this scene exudes an air of relaxation. It’s a beautiful way to tell someone that they are in your thoughts.

As we bid farewell to the “In the Moment” stamp set, now is the perfect time to stock up on this versatile set and coordinating designer series papers before they retire at the end of April 2024. The “In the Moment” stamp set has something to offer for everyone. Don’t miss your chance to add this classic set to your collection and create heartfelt works of art that will be cherished for years to come.

Thanks for stopping buy. Enjoy your day ~

Farewell to the Stargazing Suite: An Ode to the Cosmic Journey

Hello Stampin’ Friends,

Step into a world where the stars dance and the galaxies swirl – welcome to the enchanting realm of the Stargazing Suite! Bursting with fun and versatility, this celestial collection is a must-have for all crafters seeking to embark on a cosmic adventure.

However, like all great journeys, its time among us draws to a close as it prepares to retire from our annual catalog. You’ll find in our 2023-2024 Annual Catalog on pages 86 & 87. This suite blew my mind and has me over the moon with excitement. to LOVE

With its captivating designs featuring spaceships, astronauts, and planets, the Stargazing Suite offers endless possibilities for creativity. Whether you’re crafting cards for a space-themed birthday bash or scrapbooking memories of a starlit night, these designs add a touch of magic to any project.

Measurements:

  • Cardbase: 8-1/2″ x 5-1/2″ scored and folded at 4-1/4″
  • Holographic paper: 4″ x 5-1/4″
  • Designer Paper: 3-3/4″ x 5″

I used a 4″ x 5-1/4″ sheet of Basic White to stamp both the Astronaut and the Space Shuttle (as I call them) I mentioned in the video that I stamped several at a time, and then die cut them all. I did the same for the planets on both card #1 and card #2. It’s so much easier to just keep making cards when the basics are all ready for you!

The dimensions for Card #2 are exactly the same as our first card! My card base is Berry Burst and I used the funky holographic design (it has a pattern). Don’t forget to cut some stars out of the center of your holographic paper … want to use a much as you can, and no one will see it anyway.

I colored the shuttle with the LIGHT Night of Navy Stampin’ Blend and then highlighted it with Wink of Stella … that gives it the blueish silvery tone! Looks cool right!

What truly sets the Stargazing Suite apart is its designer paper, a tapestry of galaxies and planets that stretches across the cosmos. Each sheet is a masterpiece in its own right, capturing the beauty and majesty of the universe in stunning detail. And for those seeking an extra touch of magic, the addition of holographic specialty paper lends an out-of-this-world shimmer to every creation.

I couldn’t resist but to explore the galaxies myself, to move into a different dimension, so … I created a ride of my own… I created my very own UFO!! Oh I had so much fun with this and my grandkids just loved it. It even had flames shooting out of the spaceship to propel it across the galaxy!

As we prepare to bid adieu to the Stargazing Suite, let us remember the journeys it has inspired and the dreams it has ignited…. Let’s look at two other cards that take you away in a different sense of the word.

Our first card is teamed up the “In the Moment” stamp set (also on the Retiring List). With our Stargazing Designer paper and the heartfelt sentiment, “You’re in my Thoughts”, this card becomes a heartfelt expression of connection and care. As you send this token of affection to a loved one, may it serve as a reminder to cherish the beauty of the present moment and the bonds that unite us across the vastness of space and time.

Introducing the perfect fusion of nature’s tranquility and the cosmic wonders of the Stargazing Designer paper – our latest creation features the enchanting Aspen Tree die set against a backdrop of swirling galaxies and twinkling stars. This harmonious blend of earthly beauty and celestial charm brings a touch of magic to any card. Our Aspen Tree Die is also on the Retiring List ….

The Stargazing Suite transcends the ordinary, inviting crafters on a journey from spaceships to stargazing. Its seamless compatibility with other stamp sets transforms mere creations into expressions of heartfelt emotions. Whether exploring the cosmos or delving into the depths of human connection, this suite serves as a versatile tool for crafting unforgettable moments.

So why wait? Take your creativity to infinity and beyond with the Stargazing Suite, there’s something for everyone in this stellar collection.

Thank you for joining me today and hanging out for a while. Have yourself a good day!

Stargazing, In the Moment Card

Hello Stampin’ Friends ~

Wow … I am loving the way this card mash up turned out! I took the Stargazing Designer Paper and teamed it up with the In the Moment stamp set. I had mentioned in one of my YouTube videos that I thought these two would pair nicely …. What do you think?

I knew I’d be using the image of the lady that is looking out towards (whatever you choose) and today it’s the Stargazing paper. I picked the pattern that include the blues and pinks … I really wanted her image to pop off the page.

I felt that she actually makes the best sense and easiest to “fussy cut” … although, with a steady hand and an exacto knife, you probably could use the lady looking out the window as well.

I actually picked out which of the Stargazing patterns I wanted to use first, I wanted to make sure there was plenty of stars and a little bit of color. Then I cut it down to 3-7/8″ x 5-1/8″ so I could mat it with Basic White that measured 4 x 5-1/8″. I chose white so that the greeting, her shirt and the stars would coordinate nicely. The card base is Night of Navy 8-1/2″ x 5-1/2″.

I used the Stampin’ Blends to color her … I used the Light and Dark Pecan Pie for her hair, and the Light and Dark Berry Burst for her hat and her skirt. Her shirt has a touch of Light Smoky Slate (only by the lines) and then I smoothed it out with the “Color Lifter”. Her arms are the #800 from the Natural Tones. The wine is also Berry Burst … sounds yummy too!

The wood deck was colored with #100, #300 and #500 from the Natural Tones … You will find these Stampin’ Blends on page 136 in the Annual Catalog.

I glued the bottom of her skirt and the deck directly to the cardfront and then popped up the head, arms and shirt to give it some dimension and texture. The greeting was stamped with Memento Ink and die cut from the “Sending” die … and then I used the small round black brad from the Round and Square Brads. I love using brad because I never have to worry if they will fall off my card!

The greeting was popped up too. Then to finish off my card, I added 5 of the Iridescent Rhinestone around the stars. This card was one of the ideas I shared in my video so I thought I would bring it to life … and I really love the way it turned out.

I may have to order more of this paper … and the sale ends at midnight tonight!

Thank you for joining me today, and a happy Friday to you!!

Enjoy your weekend ~

Fun Folds & Just Kidding Designer Paper

Hello Stampin’ Friends ~

Today, I am thrilled to share the world of fun folds with whimsical designs, featuring the delightful Just Kidding Designer Series Paper from Stampin’ Up! In this blog post, we’ll explore two unique fun fold card designs, each showcasing the playful charm of this paper collection. Sit back and enjoy the video which is a replay of a Facebook LIVE ….

Our first card features the Reach for the Stars stamp set and the coordinating Thoughtful Expressions Dies, along with the vibrant patterns of the Just Kidding Designer Series Paper. This fun fold, known as the Book Binder Fun Fold, adds an interesting element to your card-making repertoire, especially because I have chosen to use the “kids reading books” as my focal point. Oh, card making can be so fun and clever!

The dimensions are posted in the video so if you missed them, grab your pencil and give it another watch. I love the Just Kidding Designer Series Paper, the colorful and whimsical designs will instantly add charm to your project.

Die-cut the greeting from the Reach for the Stars stamp set and our focal point (the children) using the Thoughtful Expressions Dies. This sentiment adds a touch of encouragement and positivity to your card. I embellished my card with Bakers Twine and the Blue Gems from the Tinsel Gems pack, adding a pop of texture and sparkle to your design.

My second card takes inspiration from the Stargazing Designer Series Paper, complemented by the endearing illustrations found in the Just Kidding Designer Series Paper. The focal point of this design is a charming illustration of a young boy in a wheelchair dressed as an astronaut, perfectly coordinated with the theme of exploration and adventure.

I selected a coordinating pattern from the Stargazing Designer Series Paper for the background of the card. The celestial motifs will set the stage for our astronaut-themed focal point. You’ll adhere the Just Kidding Designer Series Paper featuring the boy in the wheelchair onto the faux step … this adds dimension and visual interest to your card.

I also fussy cut out the one wheel and his head to create some fun dimension to our little astronaut! This card creation really is …out of this world.

You’ll also notice that I added the Iridescent Foil Gems to my project, which are not in the video. It just added to our celestial look and tied everything together.

The Just Kidding Designer Series Paper offers endless possibilities for creating whimsical and heartfelt cards that bring joy to both you and the recipient. Experiment with fun fold designs and playful patterns to unleash your creativity and spread smiles wherever your cards may go. Happy crafting!

Thanks for joining me today! Until next time …

“Crafting Magic into the New Year: Stargazing Designer Paper & Patchwork Pieces Dies”

Hello Stampin’ Friends,

As the year draws to a close and we eagerly anticipate the fresh canvas of a new one, there’s a unique way to blend creativity with celestial wonder. Imagine the midnight sky sprinkled with stars, now envision capturing that enchantment in your crafts. Enter the delightful pairing of the Stargazing Designer Paper and Patchwork Pieces Dies – a dreamy fusion of artistry and cosmic allure.

I began with the “burst” pattern (on the right above). As you can see there are two different patchwork pieces patterns included in the set. I then chose the Stargazing Designer Series paper, and die cut it. If you haven’t see that designer paper yet ….

I cut my designer paper to 4″ x 5-1/4″ and picked one of the pretty galaxies in Blueberry Bushel / Night of Navy. When you cut your patchwork pattern, it leaves a frame, so I make sure to center the die on my paper. On this card I used the frame, on other cards you will see in the near future I may or may not.

I glued the frame onto a piece of Basic White measuring 4-1/8″ x 5-3/8″. My die cutting machine does not cut all the way through, the center stays in tact (yet pulls apart easily) On today’s card I used that to my advantage and once centered within the frame I glued the center down.

Then I put Stampin’ Dimensionals on every other panel, and glued the others down. This gave me a lot of dimension & texture to the card… and it looks cool!! It looks as if it’s reaching out to you!!

I used the greeting from the Reach for the Stars stamp set and heat embossed it with the VersaMark and Silver Embossing Powder onto Vellum Cardstock. I used one of the dies from the “All That” set of dies.

Mounting it onto my card was a bit tricky because you see everything through the vellum, so I used the Blueberry Bushel Tinsel Gems 4-Pack to embellish the greeting and then I cut the dimensionals down to fit underneath so you couldn’t see them!

This New Year’s Eve, let your creativity soar to the stars with the mesmerizing Stargazing Designer Paper and Patchwork Pieces Dies. Embrace the celestial allure and weave it into your crafts, ushering in the new year with cosmic charm and endless possibilities.

Have a great weekend, and a Safe and Happy New Year!

Stargazing Suite; It’s Out of this World!

Hello Stampin’ Friends,

Today I’m thrilled to share Stampin’ Up!s Stargazing Suite! You’ll find in our 2023-2024 Annual Catalog on pages 86 & 87. This suite blew my mind and has me over the moon with excitement. Not normally my first pick out of the catalog but I bought it on a whim and soooo happy I did. I’m amazed at how much fun I’m having creating with a suite I didn’t even know I wanted!! My grandkids are going to LOVE these …

For this card I used Pumpkin Pie for my card base, Basic White, the Stargazing Designer paper and the Holographic Specialty Paper. The background was cut directly from the designer paper, only one planet was die cut.

Measurements:

  • Cardbase: 8-1/2″ x 5-1/2″ scored and folded at 4-1/4″
  • Holographic paper: 4″ x 5-1/4″
  • Designer Paper: 3-3/4″ x 5″

I used a 4″ x 5-1/4″ sheet of Basic White to stamp both the Astronaut and the Space Shuttle (as I call them) I mentioned in the video that I stamped several at a time, and then die cut them all. I did the same for the planets on both card #1 and card #2. It’s so much easier to just keep making cards when the basics are all ready for you!

The dimensions for Card #2 are exactly the same as our first card! My card base is Berry Burst and I used the funky holographic design (it has a pattern). Don’t forget to cut some stars out of the center of your holographic paper … want to use a much as you can, and no one will see it anyway.

I colored the shuttle with the LIGHT Night of Navy Stampin’ Blend and then highlighted it with Wink of Stella … that gives it the blueish silvery tone! Looks cool right!

Hope you enjoyed today’s cards … If you would like to purchase this suite / bundle, or the papers, I have the links down below for you.

Thank you for joining me today and hanging out for a while. Have yourself a good day!

A Birthday Celebration / Celebration of Life …

Hello Stampin’ Friends ~

Today would have been Armani’s 4th birthday, as you know… he passed away unexpectedly last Friday from what they believe was a seizure. I’m sharing the Patchwork Pieces card that I created during a Facebook LIVE for him … he LOVES Orange!! This little guy had to come into my stamp room every time he was over and checked out the cards I have made … he’s was the sweetest little guy 🧡!!

Here is the video replay of my Facebook LIVE ….

Wasn’t that fun and easy to create? And by using the designer paper and cardstock, you have enough left over for a second card. Have some fun and die cut some black and turn it into a Halloween card … the possibilities are endless.

So … Do you think he will love this card? The last one he took had flowers, but it was ORANGE!! He even passed up the spaceship over those orange flowers …. told you he was a hoot!

Thank you for stopping by and checking out my blog post today. Have a great day ~

A Patchwork of Fun: DIY Birthday Card with a Twist!

Hello Stampin’ Friends,

Are you ready to embark on a creative journey filled with a blast of color and a touch of sass? Well, you’re in for a treat today as we dive into today’s birthday card that’s as fun and vibrant as it gets. So, grab your Patchwork Pieces Dies, Stargazing Designer Paper, and Wanted to Say Dies, because we’re about to get crafty!

Start by selecting your Lemon Lime Twist cardstock for the card base. This lively green hue sets the stage for our vibrant creation. Cut the cardstock to 8-1/2″ x 5-1/2″ and fold it in half – this will be the canvas for your masterpiece.

Now, it’s time to incorporate some whimsical patterns into our design. Take out your Stargazing Designer Paper, and die cut one of each of the Lemon Lime Twist and Pumpkin Pie patterns … This gives you enough for 2 cards. I added a piece of black and white dotted designer paper from some I had laying around to add some fun pops of white. Cut a piece of Basic Black 4″ x 5-1/5″ (same as the Polka dot paper) …This will be the backdrop for our patchwork pieces.

This is where the magic happens! Grab both colors of your Patchwork Pieces and adhere them to the black to create a medley of funky shapes. Arrange them on your card in a random, patchwork-style pattern. Don’t worry about perfection – the more whimsical, the better! Now, trim down the black cardstock to create a border around your funky pattern.

The greeting comes from the Wanted to Say Dies. Cut out the base sentiment from the black and the detail “birthday” from your Lemon Lime Twist cardstock. Stack them and glue them together with your Liquid glue. You can even add a touch of Wink of Stella for some glitz!

Your card is almost ready to dazzle! To really make that greeting POP, punch or die cut a circle from your Vellum Cardstock and attach to the front of your card. If you like, add a few embellishments like sequins, rhinestones, or even a ribbon bow. These little details can take your card to the next level.

There you have it, friends – a DIY birthday card that’s bursting with color, personality, and a sprinkle of sas. Perfect for all ages, this card is sure to bring a smile to anyone’s face. Time to embrace your creative side, laugh a little, and send some handmade joy to your loved ones.

Happy crafting, and even happier birthdays! 🎉🌟🎈

If you enjoyed today’s fun and colorful card and found it inspiring, here’s a list of the supplies you’ll need to recreate the card. Spread joy and connect with others through your handmade creations.

Ready for a Scary Sneak Peek …

Hello Stampin’ Friends,

As promised I have a bit of a sneak peek for your today …. something old (annual catalog) and something new (Mini catalog). My “old” / something from the Annual catalog is the Patchwork pieces dies. The “new” is the Tricks and Treats Bundle. All you Halloween lovers are going to get a kick out of this one ….

This card is just bursting with fun … Love how the rays just shoot out from under the moon, and the haunted house is gently lite not to scare our ghosts away … they are only looking for a safe haven!! lol

My cardbase is a piece of 8-1/2″ x 5-1/2″ Basic Black that’s scored at 4-1/4″ and folded. Next I cut a piece of Lemon Lime Twist at 4″ x 5-1/4″ for my mat which will be used to arrange my die cut patchwork pieces. The pieces were cut from the Stargazing 12″ x 12″ Designer Series paper and another from the Basic Black.

I used the Lemon Lime Twist cardstock as a guide to align the pieces in every other color … starting with the corners and then filling in the rest of the pieces and spacing them evenly. I used my Tombo Liquid glue to secure them to the mat.

Using the Memento Ink I stamped the Haunted House and then I die cut it with the coordinating dies. I stamped the “Trick or Treat” onto Daffodil Delight … then I punched it out with the coordinating 2-3/8″ Circle Punch. Once punched, I used the small blending brush to add some dimension / shading to it.

I used the ghosts from the Glow in the Dark Bats & Ghosts to embellish my card. These little cuties and some fun texture and a glow of warmth. Are you ready for Halloween decorating soon? The Tricks or Treats Bundle will be available on September 6th … not too long yet.

Thank you for coming over to my blog, I appreciate it. Have a great day.

Too Cool Ice Cream Cone Card

Hello Stampin’ Friends ~

Have you ever made a card … thought it was cute …. but the more you looked at it, the more you thought it needed something? That is how I felt about this card I created with the Share a Milkshake stamps & Dies, along with the Wanted to Say Dies.

My cardbase is Early Espresso to coordinate with my chocolate ice cream, or if you’re a Chocolate Shoppe Ice Cream fan (out of Madison, WI) we call that deep rich chocolate; Zanzibar! My background is the Stargazing Designer paper and matted with Basic White. The cone is made from the Pecan Pie cardstock. It looked a little plain so I used the “waffle” die and pow ….. gave my pop I was looking for.

The Happy Birthday base or mat, is also die cut from the Stargazing designer paper and then topped off with the Basic White … a touch of Wink of Stella on our Happy Birthday. Just like building our cone! A few Berry Burst Tinsel Gems (4-pack) to embellish our cone … or you could call them “sprinkles”.

Making ice cream cones is pretty easy with these few ingredients and soooo tasty looking too. And that cone is going to be so good with all the warm weather we’ve been having

Thanks for joining me for a cone… Enjoy your weekend!

National Ice Cream Day Birthday Card!

Hello Stampin’ Friends ~

Happy National Ice Cream Day!! We’re going to celebrate using the Share a Milkshake stamps & Dies, along with the Wanted to Say Dies. What’s your favorite flavor? Today’s treat consists of a waffle cone with a scoop of vanilla, chocolate and topped off with raspberry! YUMMY

My cardbase is Early Espresso to coordinate with my chocolate ice cream, or if you’re a Chocolate Shoppe Ice Cream fan (out of Madison, WI) we call that deep rich chocolate; Zanzibar! My background is the Stargazing Designer paper and matted with Basic White. The cone is made from the Pecan Pie cardstock.

The Happy Birthday base or mat, is also die cut from the Stargazing designer paper and then topped off with the Basic White … a touch of Wink of Stella on our Happy Birthday. Just like building our cone! A few Berry Burst Tinsel Gems (4-pack) to embellish our cone … or you could call them “sprinkles”.

Making ice cream cones is pretty easy with these few ingredients and soooo tasty looking too.

Enjoy your Sunday and I hope you get out and grab some ice cream to celebrate National Ice Cream Day.

Thanks for joining me for a cone!

Patchwork Pieces Dies are Out of this World

Hello Stampin’ Friends,

Today I have a fun card for you … let me just say that the Patchwork Pieces Dies are Out of this World. I have been playing with these dies ever since they arrived on my door step earlier this week. I used them for my club projects so I’m sure the members are going love to see this one.

I began with the “burst” pattern (on the right above). As you can see there are two different patchwork pieces patterns included in the set. I then chose the Stargazing Designer Series paper, and die cut it. If you haven’t see that designer paper yet ….

I cut my designer paper to 4″ x 5-1/4″ and picked one of the pretty galaxies in Blueberry Bushel / Night of Navy. When you cut your patchwork pattern, it leaves a frame, so I make sure to center the die on my paper. On this card I used the frame, on other cards you will see in the near future I may or may not.

I glued the frame onto a piece of Basic White measuring 4-1/8″ x 5-3/8″. My die cutting machine does not cut all the way through, the center stays in tact (yet pulls apart easily) On today’s card I used that to my advantage and once centered within the frame I glued the center down.

Then I put Stampin’ Dimensionals on every other panel, and glued the others down. This gave me a lot of dimension & texture to the card… and it looks cool!! It looks as if it’s reaching out to you!!

I used the greeting from the Reach for the Stars stamp set and heat embossed it with the VersaMark and Silver Embossing Powder onto Vellum Cardstock. I used one of the dies from the “All That” set of dies.

Mounting it onto my card was a bit tricky because you see everything through the vellum, so I used the Blueberry Bushel Tinsel Gems 4-Pack to embellish the greeting and then I cut the dimensionals down to fit underneath so you couldn’t see them!

I will admit, I sure am having fun with these dies. Such a different twist to “regular” cards. I don’t know if it’s retirement and that fact that I can just “play” but I’m truly enjoying being in my stamp room!!

Hope I sent some inspiration your way to get into your craft room and play today!

Have a great weekend,

Do You Believe?

Hello Stampin’ Friends ~

I have been sharing cards the past several day using the Stargazing Suite / Reach for the Stars bundle but Did You Know that TODAY is world UFO Day!! My timing couldn’t be better … LOL

There used to be quiet a stigma around believing in UFO’s however the latest survey states 65% believe their is life beyond us … Men are more inclined to believe in extraterrestrial life — 70 per cent versus 60 per cent of women. More than three-quarters of people under the age of 30 are believers versus 57 per cent of those over 50 years old.

Meanwhile, I’m just having FUN making cards, and I created a UFO just for this day. I used the circle die from Stylish Shapes because it added texture, then I die cut the larger of the rings, both were die cut from the Holographic paper ….

I cut the exposed circle from the bottom as I wanted to make it look like a spaceship and not a planet with rings! I then added 3 windows, also known as the Black Square Brads! If I was to do my windows over, I would follow the line of the ring instead of being straight across.

I die cut three flames that power my UFO from some of the 1/2 planets on the designer paper.

My greeting comes from the Layered Leaves stamp set and was die cut with the banner from Stylish Shapes. I also cut a mat for behind it. Both the mat and the card base are Blackberry Bliss … YES, you can use colors that are not listed on the coordinating color list for your designer paper. The Blackberry really pulled the darker shades out.

The mat to my designer paper is the Holographic paper … but before I glued down my designer paper, I cut that UFO and stars out first. I don’t want to waste any of that cool specialty holographic paper … I use up every bit. Needless to say, I have lots of extra stars! I used some on this card.

So …. What do you think? Did I nail it? Does it look like a UFO? I have to say, playing with this suite has taken my mind to places I normally don’t think of when stamping … it’s FUN!

Speaking of fun, hope you are having some this weekend!

Thank your for popping in today.

Please Note that the Designer Paper is NO Longer on sale … Sale ended 6/30 however this blog post was created prior to the end of the sale.

Starry, Starry Night Card …

Hello Stampin’ Friends ~ Are you ready to relax and enjoy some quiet time in the woods on a clear starry night? Then follow me as I take you there through today’s card. It’s so peaceful, and today’s card is so easy to make.

You’ll need some Basic Black cardstock, the Aspen Tree Dies and your favorite starry pattern from the Stargazing Designer paper, and you’ll create an enchanting evening!

You’re base measures as an A2: 8-1/2″ x 5-1/2″ scored and folded at 4-1/4″. You designer paper is 5-1/4″ x 4″ … use the same dimension for your card front and then trim to desired width. I liked leaving a little edge of my designer paper showing but you wouldn’t have to.

I glued the front directly to the designer paper and then added my greeting. Use what you have at home … I used the “For You” from the Layering Leaves and then die cut it using Stylish Shapes and one of the Circle dies from the Reach for the Stars Bundle. I used Tahitian Tide for the mat.

I embellished the greeting with the Tahitian Tide Bakers Twine from the In Color Twine Bundle. I finished off my card with some twinkling Iridescent Rhinestones … amazing when the light hits this!

So, are you ready to set up your tent and build a campfire yet? Sounds like a great weekend.

Hope you enjoy yours, and thanks for taking a break to visit my site.

Please note that the Designer Paper Sale ended at Midnight on 6/30 … the sale is listed because the post was created before then end of the sale.

Mash Up: Stargazing & In the Moment Card

Hello Stampin’ Friends ~

Wow … I am loving the way this card mash up turned out! I took the Stargazing Designer Paper and teamed it up with the In the Moment stamp set. If you watched my latest video, I had mentioned that I thought these two would pair nicely …. What do you think?

I knew I’d be using the image of the lady that is looking out towards (whatever you choose) and today it’s the Stargazing paper. I picked the pattern that include the blues and pinks … I really wanted her image to pop off the page.

I felt that she actually makes the best sense and easiest to “fussy cut” … although, with a steady hand and an exacto knife, you probably could use the lady looking out the window as well.

I actually picked out which of the Stargazing patterns I wanted to use first, I wanted to make sure there was plenty of stars and a little bit of color. Then I cut it down to 3-7/8″ x 5-1/8″ so I could mat it with Basic White that measured 4 x 5-1/8″. I chose white so that the greeting, her shirt and the stars would coordinate nicely. The card base is Night of Navy 8-1/2″ x 5-1/2″.

I used the Stampin’ Blends to color her … I used the Light and Dark Pecan Pie for her hair, and the Light and Dark Berry Burst for her hat and her skirt. Her shirt has a touch of Light Smoky Slate (only by the lines) and then I smoothed it out with the “Color Lifter”. Her arms are the #800 from the Natural Tones. The wine is also Berry Burst … sounds yummy too!

The wood deck was colored with #100, #300 and #500 from the Natural Tones … You will find these Stampin’ Blends on page 136 in the Annual Catalog.

I glued the bottom of her skirt and the deck directly to the cardfront and then popped up the head, arms and shirt to give it some dimension and texture. The greeting was stamped with Memento Ink and die cut from the “Sending” die … and then I used the small round black brad from the Round and Square Brads. I love using brad because I never have to worry if they will fall off my card!

The greeting was popped up too. Then to finish off my card, I added 5 of the Iridescent Rhinestone around the stars. This card was one of the ideas I shared in my video so I thought I would bring it to life … and I really love the way it turned out.

I may have to order more of this paper … and the sale ends at midnight tonight!

Thank you for joining me today, and a happy Friday to you!!

Enjoy your weekend ~

DESIGNER PAPER – SAVE 15% on Select Designer Papers/ Here is a direct link to check them all out. https://www.stampinup.com/categories/specials/designer-series-paper-sale?demoid=26646

JOIN / STARTER KIT: Pick out $155 worth of product for only $99 (You can purchase demo only pre-order stamps too!) Then get 20% OFF all future orders while you’re active. https://www.stampinup.com/join?demoid=26646