Twelve Weeks of Christmas: Week 2 / Pretty Paper

Hello Stampin’ Friends,

Today I’ll be sharing the cards we made last night during the LIVE, the Video replay, the measurement sheets and two extra cards!! I have an action packed day for you today. Let’s begin with the video with the measurements and cards to follow.

Here is the measurements for our Double View Designer Paper card that highlights your designer paper showing both sides .. Our pretty papers make these easy to assemble cards with the message and feelings you intend.

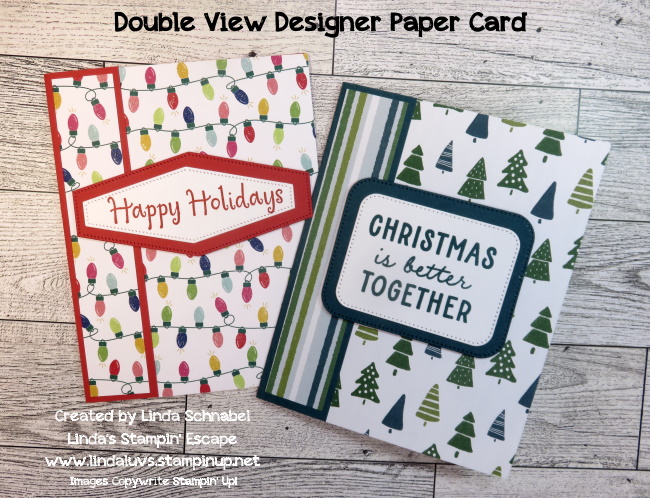
On today’s cards I used the Merry & Bright and the Walk in the Woods Designer Series papers, with the Poppy Parade and Pretty Peacock cardstocks. The “Christmas is Better Together” greeting comes from the Beary Cute Bundle and the “Happy Holidays” came from the Throughout the Year stamp set. Both greetings were die cut from the Nested Essentials Dies.

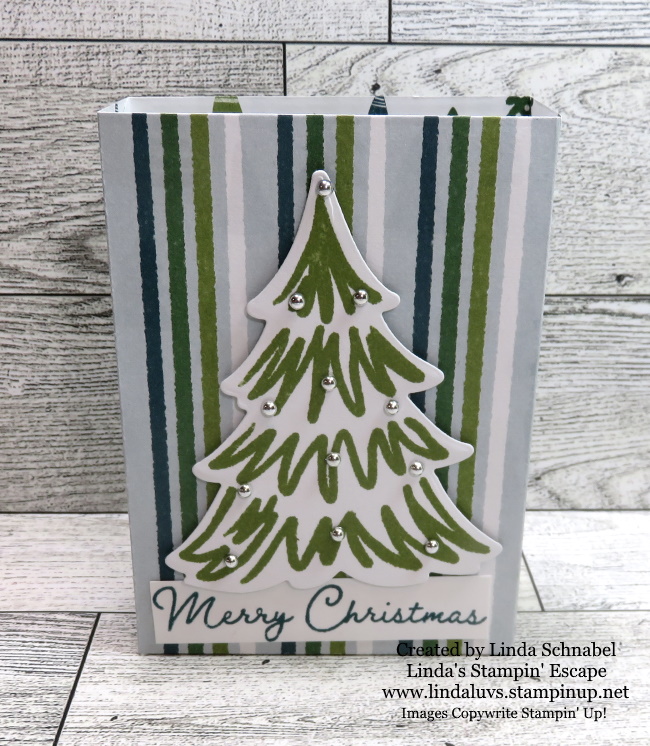
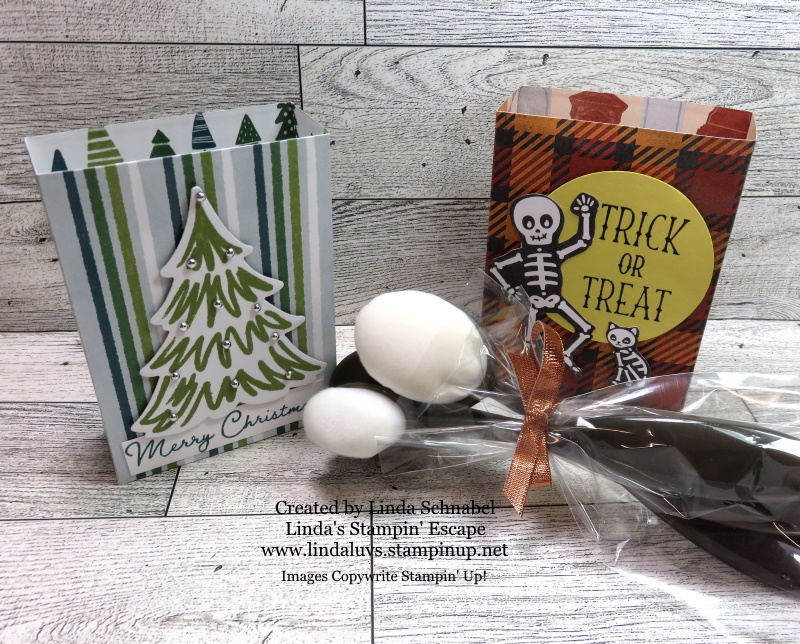
For the fun fold I used the same designer paper and cardstock. On the Poppy Parade card I again used the Throughout the Year stamp set and the 2 3/8″ punch for our greeting, and then embellished with the Iridescent Rhinestones. The greeting, the tag & tree dies all come from the Merriest Tree Bundle.

Now let’s take a look at some alternatives for our Quick & Easy Double View card ….

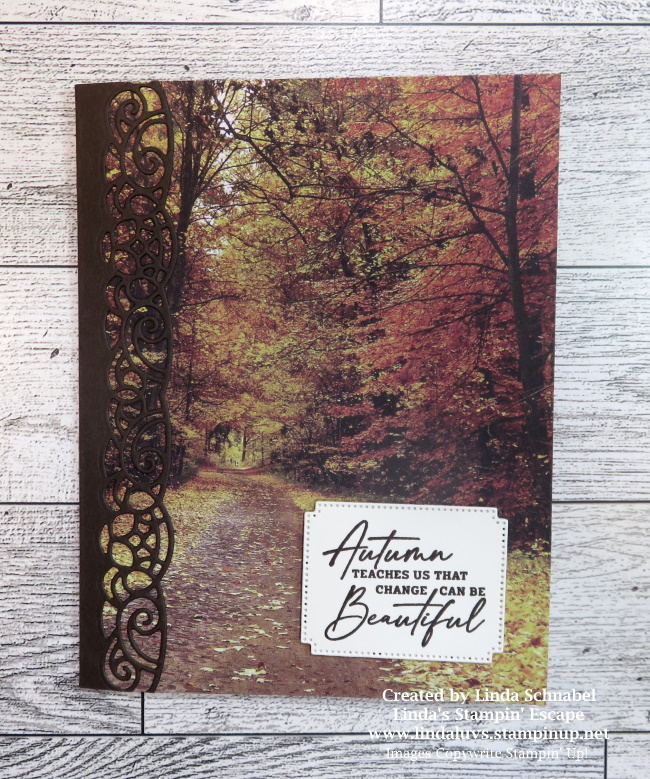
On this card I used the designer paper, greeting and die all from the All About Autumn suite of products and the Elegant Borders Dies. This adds a beautiful touch to the stunning designer paper. This just shows that you can change up the 1 1/4″ section of our cardstock.

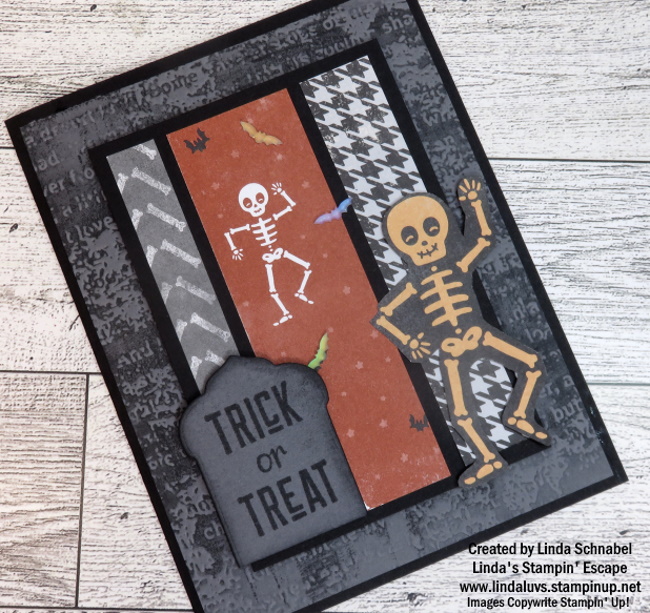
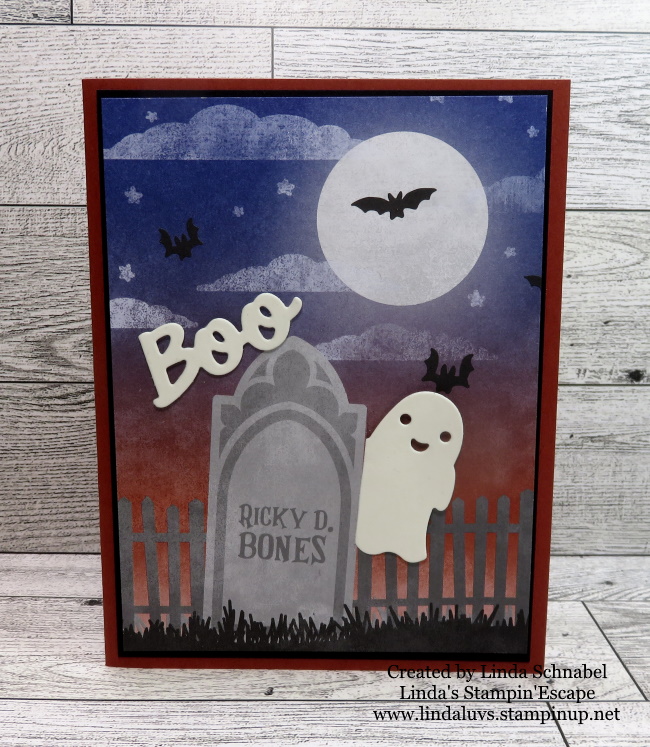
Our second card was designed to celebrate Halloween …

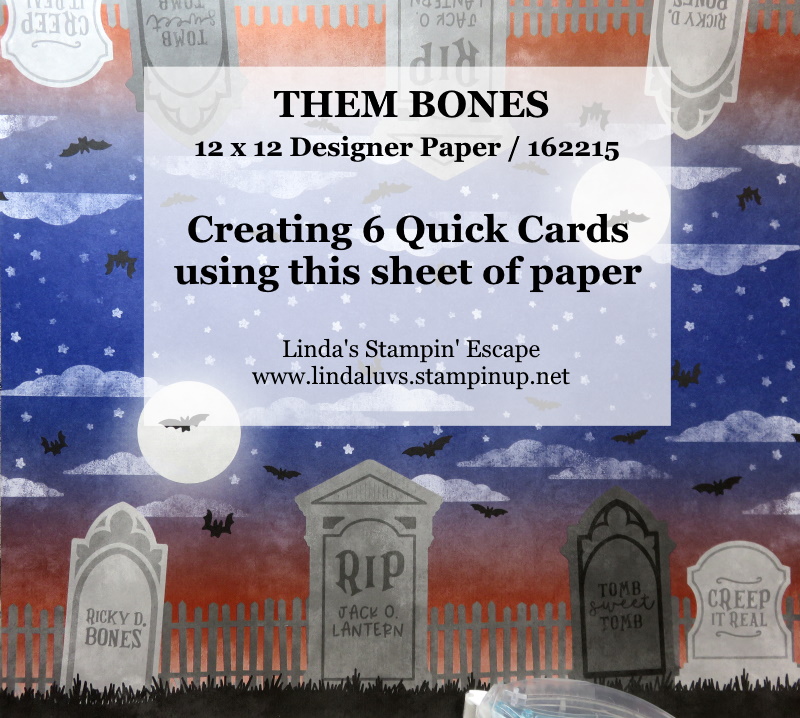
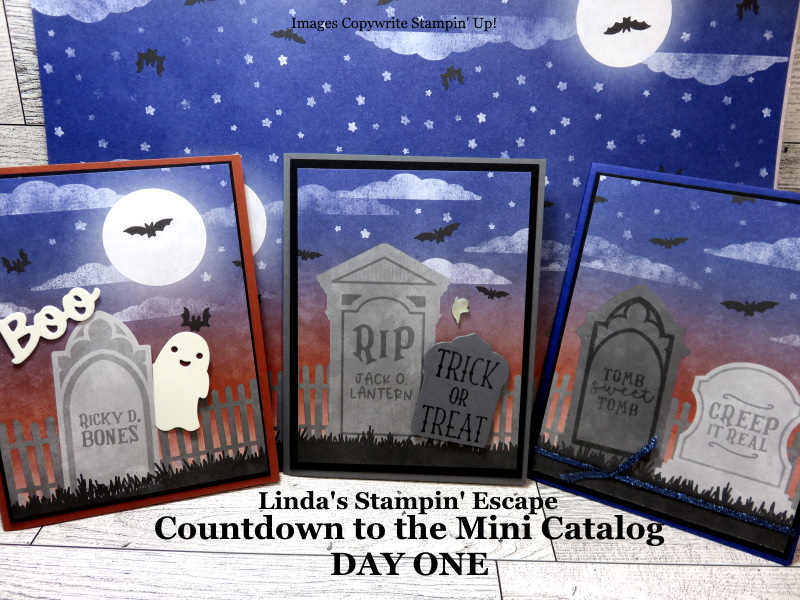
This little cutie screams fun! The Elegant Borders dies were also used on our Halloween card to enhance and create a fun border. A strip of designer paper and bakers twine were also used to embellish our card and tie in all the colors. I used the “Them Bones” Designer paper for our last card, along with the die cuts from the “Tricks and Treats” bundle.

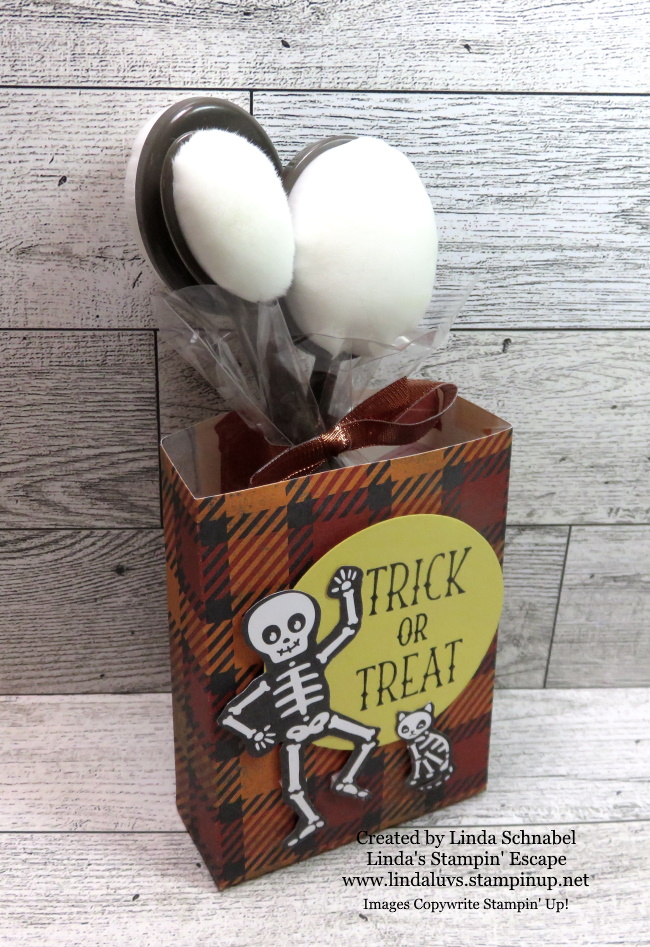
And this brings me into more Halloween FUN on my Facebook page …. Be sure to head on over and join in the fun, games and specials!

Halloween Graveyard with Them Bones

Hello Stampin’ Friends ~

Yesterday’s “Stamp with Me” video and card layout featuring the Joy of Christmas Suite/Collection were an absolute delight, weren’t they? It’s always a pleasure to explore new creative avenues and share our crafting joys.

The clean and straightforward card layout demonstrated in the video is not only visually appealing but also easy to recreate. It allows room for creativity and personalization, making it a go-to design for card makers. You don’t need “what I have” … use the measurements with the goodies YOU have.

But today, we’re shifting gears and getting into the Halloween spirit! We’re all set to embark on a spine-tingling crafting adventure with the “Them Bones” Designer Paper and the “Tricks and Treats” bundle. Get ready for some frightful fun!

The “Them Bones” Designer Paper is a spooktacular choice for crafting during the Halloween season. With its hauntingly fun skeletons, bats, and other creepy critters, this paper pack is bound to add an extra dose of Halloween spirit to your creations.

Pair this paper with the “Tricks and Treats” bundle, and you’re in for a wickedly good time. This bundle offers a delightful stamp set and coordinating dies, perfect for crafting spooky cards, treat bags, and more.

I used the Timeworn Typed Embossing Folder to create the look of an old headstone to add an added touch of spookiness… on that note, I created a headstone from the die which highlights our greeting. We’ve got skeletons dancing in the graveyard with our Glow in Dark bats lighting up the way!

Stay tuned for more exciting crafting adventures, and remember, it’s not just about the destination; it’s the joy we find in the journey.

Happy crafting, and have a spine-tingling Halloween season!

Halloween Card Magic

Hello Stampin’ Friends ~

If you’re as batty about Halloween as I am, you’re in for a treat today. I recently had a fangtastic time at our Halloween class on Wednesday night, where we brewed up some spooky-cute fun with the Them Bones Designer Paper and the Tricks and Treats Bundle.

Today I’ll share my adorable Halloween card featuring candy corn die cuts and the spook-tacular Z-Fold … a super simple fun fold! Start with an 4-1/4″ x 11″ piece of cardstock then score at 2-3/4″ and 5-1/2″ … that simple.

Picture this: a room filled with fellow Halloween aficionados, a cauldron of stamping supplies, a dash of creativity, and a sprinkle of eerie ambiance. That’s exactly what our Halloween class was all about!

Our bewitching adventure began with the Them Bones Designer Paper. 🦇🦴This paper pack is a Halloween dream come true, featuring quirky skulls, spooky spiders, and haunted houses. It’s a perfect backdrop for all your Halloween crafting endeavors, and it set the mood for our ghoulishly delightful evening.

To cast our crafting spell, we enlisted the help of the Tricks and Treats Bundle. 🎃 This bundle is chock-full of charming Halloween-themed stamps and coordinating dies that make crafting a breeze. But the true star of the night? The candy corn die cuts!

So, as you prepare for Halloween this year, don’t forget the magic of crafting. The Them Bones Designer Paper and Tricks and Treats Bundle are your partners in Halloween crafting crime. Give it a try, and who knows, you might just conjure up some Halloween magic of your own!

Until next time, may your cauldron be bubbling and your Halloween crafting be absolutely spook-tacular! 🎃🕷️🌙

Countdown to the Mini Catalog Party: A Week to Remember!

Hello Stampin’ Friends!

I know I’ve been little MIA lately, but there’s a perfectly good reason for it – I’ve been having a blast with many of you on my Linda’s Stampin’ Escape Facebook page for the Countdown to the Mini Catalog party! It’s been three incredible days filled with creativity, games, prizes, and live demonstrations, and I can’t wait to tell you all about it.

Our party kicked off with a bang, diving straight into the spooky spirit of Halloween. We explored the exciting new products in the Mini Catalog designed for this hauntingly delightful holiday. From whimsical ghosts to eerie pumpkins, there was something for everyone to fall in love with. The comment section was buzzing with ideas and inspiration as we shared our favorite picks and creative tips.

This cute little bag was just one of the products shared during a LIVE demonstration. It comes from the Tricks and Treat Bundle, and includes the die to cut your favorite designer paper. It’s so simple, just cut 2 pieces out, fold on the score lines and glue the small flaps to the sides … then don’t forget to glue the bottom flaps!! And yes, I fussy cut the skeleton and his scaredy cat!!

As we rolled into the second day of the party, our focus shifted from pumpkins to twinkling lights and ornaments. The Mini Catalog’s Christmas-themed products had us all giddy with excitement. We explored festive card designs, handmade gift ideas, and elegant decorations for the holiday season. The virtual party room was filled with the sound of joyful anticipation for the most wonderful time of the year. I have so much to share with you yet.

Till then, let me show you the cute Christmas bag we made using the same bag die …. I used “A Walk in the Forest” Designer paper. The tree is also from the designer paper and was die cut from the Merriest Tree’s Bundle.

The “A Walk in the Forest” Designer paper… Is not just another designer paper, it’s a heartfelt contribution to Stampin’ Up!’s Making A Difference campaign. For every package of this beautiful paper sold, Stampin’ Up! is committed to donating $3 to Toys for Tots. It’s such a wonderful way to make a difference while indulging in our crafting passion. So, when you use this paper for your projects, know that you’re not only adding charm and creativity to your creation but also spreading joy to children in need during the holiday season. What could be more heartwarming than that?

Just when we thought the party couldn’t get any better, I had a little surprise up my sleeve. I announced that I would be turning this fantastic gathering into a Mystery Hostess Party! The excitement in the virtual room reached a fever pitch – what an incredible twist! One lucky participant will get to shop with the party rewards.

Throughout these three days, I was reminded of why I love what I do. Being able to share my passion for stamping and crafting with all of you, my Stampin’ Friends, is an absolute joy. I want to thank each and every one of you for making this Countdown to the Mini Catalog party so special.

But let me tell you a little secret – this won’t be the last surprise you’ll see from me at my parties, events, or retreats. I’m always looking for ways to make our stamping adventures even more memorable, so stay tuned for what’s coming next!

Thanks for joining me today ~

Here is a list of supplies used to create both of my Gift Boxes … All items are available as of this morning 9/7/2023

Create Six Quick & Cute Halloween Cards

Hello Stampin’ Friends and Halloween aficionados!

It’s that time of year again, where the air gets chillier, the leaves change colors, and pumpkin spice everything is back in action. But you know what makes this season even more thrilling? Crafting your way through Halloween with the Tricks and Treats Bundle and the spooktacular Them Bones Designer Series Paper from Stampin’ Up!

We’ll be diving headfirst into the magic of Halloween crafting using these bewitching products. To get you in the spirit, I’m going to show you how to create not one, not two, but three fantastic Halloween cards from a single sheet of the Them Bones Designer Series Paper! 🦴🕸️

Start by cutting your 12 x 12 in half … we’ll trim it down from there. You’ll want to trim it down to 5-1/4″ and then cut your long piece in 4″ sections for your cards … just attach these to a card base and voilà! You’ve just conjured up six spine-chillingly fabulous Halloween cards using only one sheet of the Them Bones Designer Series Paper!!

Now I wanted to take it up a bit so I trimmed my individual pieces down a little further and added a 4″ x 5-1/4″ Black Mat.

Lets take a walk through our graveyard and I’ll share my spooky secrets for creating these cards and I’ll begin to add the Tricks and Treats Bundle.

CARD 1: Simply Creeping it Real …

Once I mounted the designer paper onto the Black Matte, I added the Starry Sky Ribbon and attached the card front directly on to the base.

CARD 2: Trick or Treat

For this card I simply stamped my greeting and then die cut it, the stamp and die comes from the Tricks and Treats bundle. The die is actually a tag die but I cut off the bottom to turn it into a gravestone! Spooky cool stampin’ tip!! I then embellished with one little Glow in the Dark Ghost.

CARD 3: Ricky D. Bones

Hope you have a strong heart because this graveyard is haunted! Using the Glow in the Dark Specialty paper, I die cut my ghost and greeting. I used an exacto knife to create a slit next to my gravestone so my ghost appears to be coming out from behind it.

Once you create the first 3, the second set will be easier! These cards are sure to delight your friends and family with their ghostly charm.

Get ready to make your Halloween crafting dreams come true with the Tricks and Treats Bundle and the Them Bones Designer Series Paper when the catalog goes LIVE tomorrow 🦇🌙🎃

Thanks for stopping by 🧙‍♂️👻🦴 Join me tomorrow during Day 2 of my Countdown to the Mini Catalog … we’re heading into Beary cool territory tomorrow!