For a True Friend…

Hello Stampin’ Friends,

Wow … what I night!! I hosted my monthly stampin’ meeting with my downline and fellow demonstrators last night and let me just say … the swap cards were awesome (I will be sharing over time) and we had a lot of fun.

I didn’t know which card to start with today … so I’m starting with mine, the one we didn’t make!  It seems my Make & Take wasn’t a Christmas card, and that was our “theme” for September!  Oooops! So, I created one on the fly … which I will share with you tomorrow.

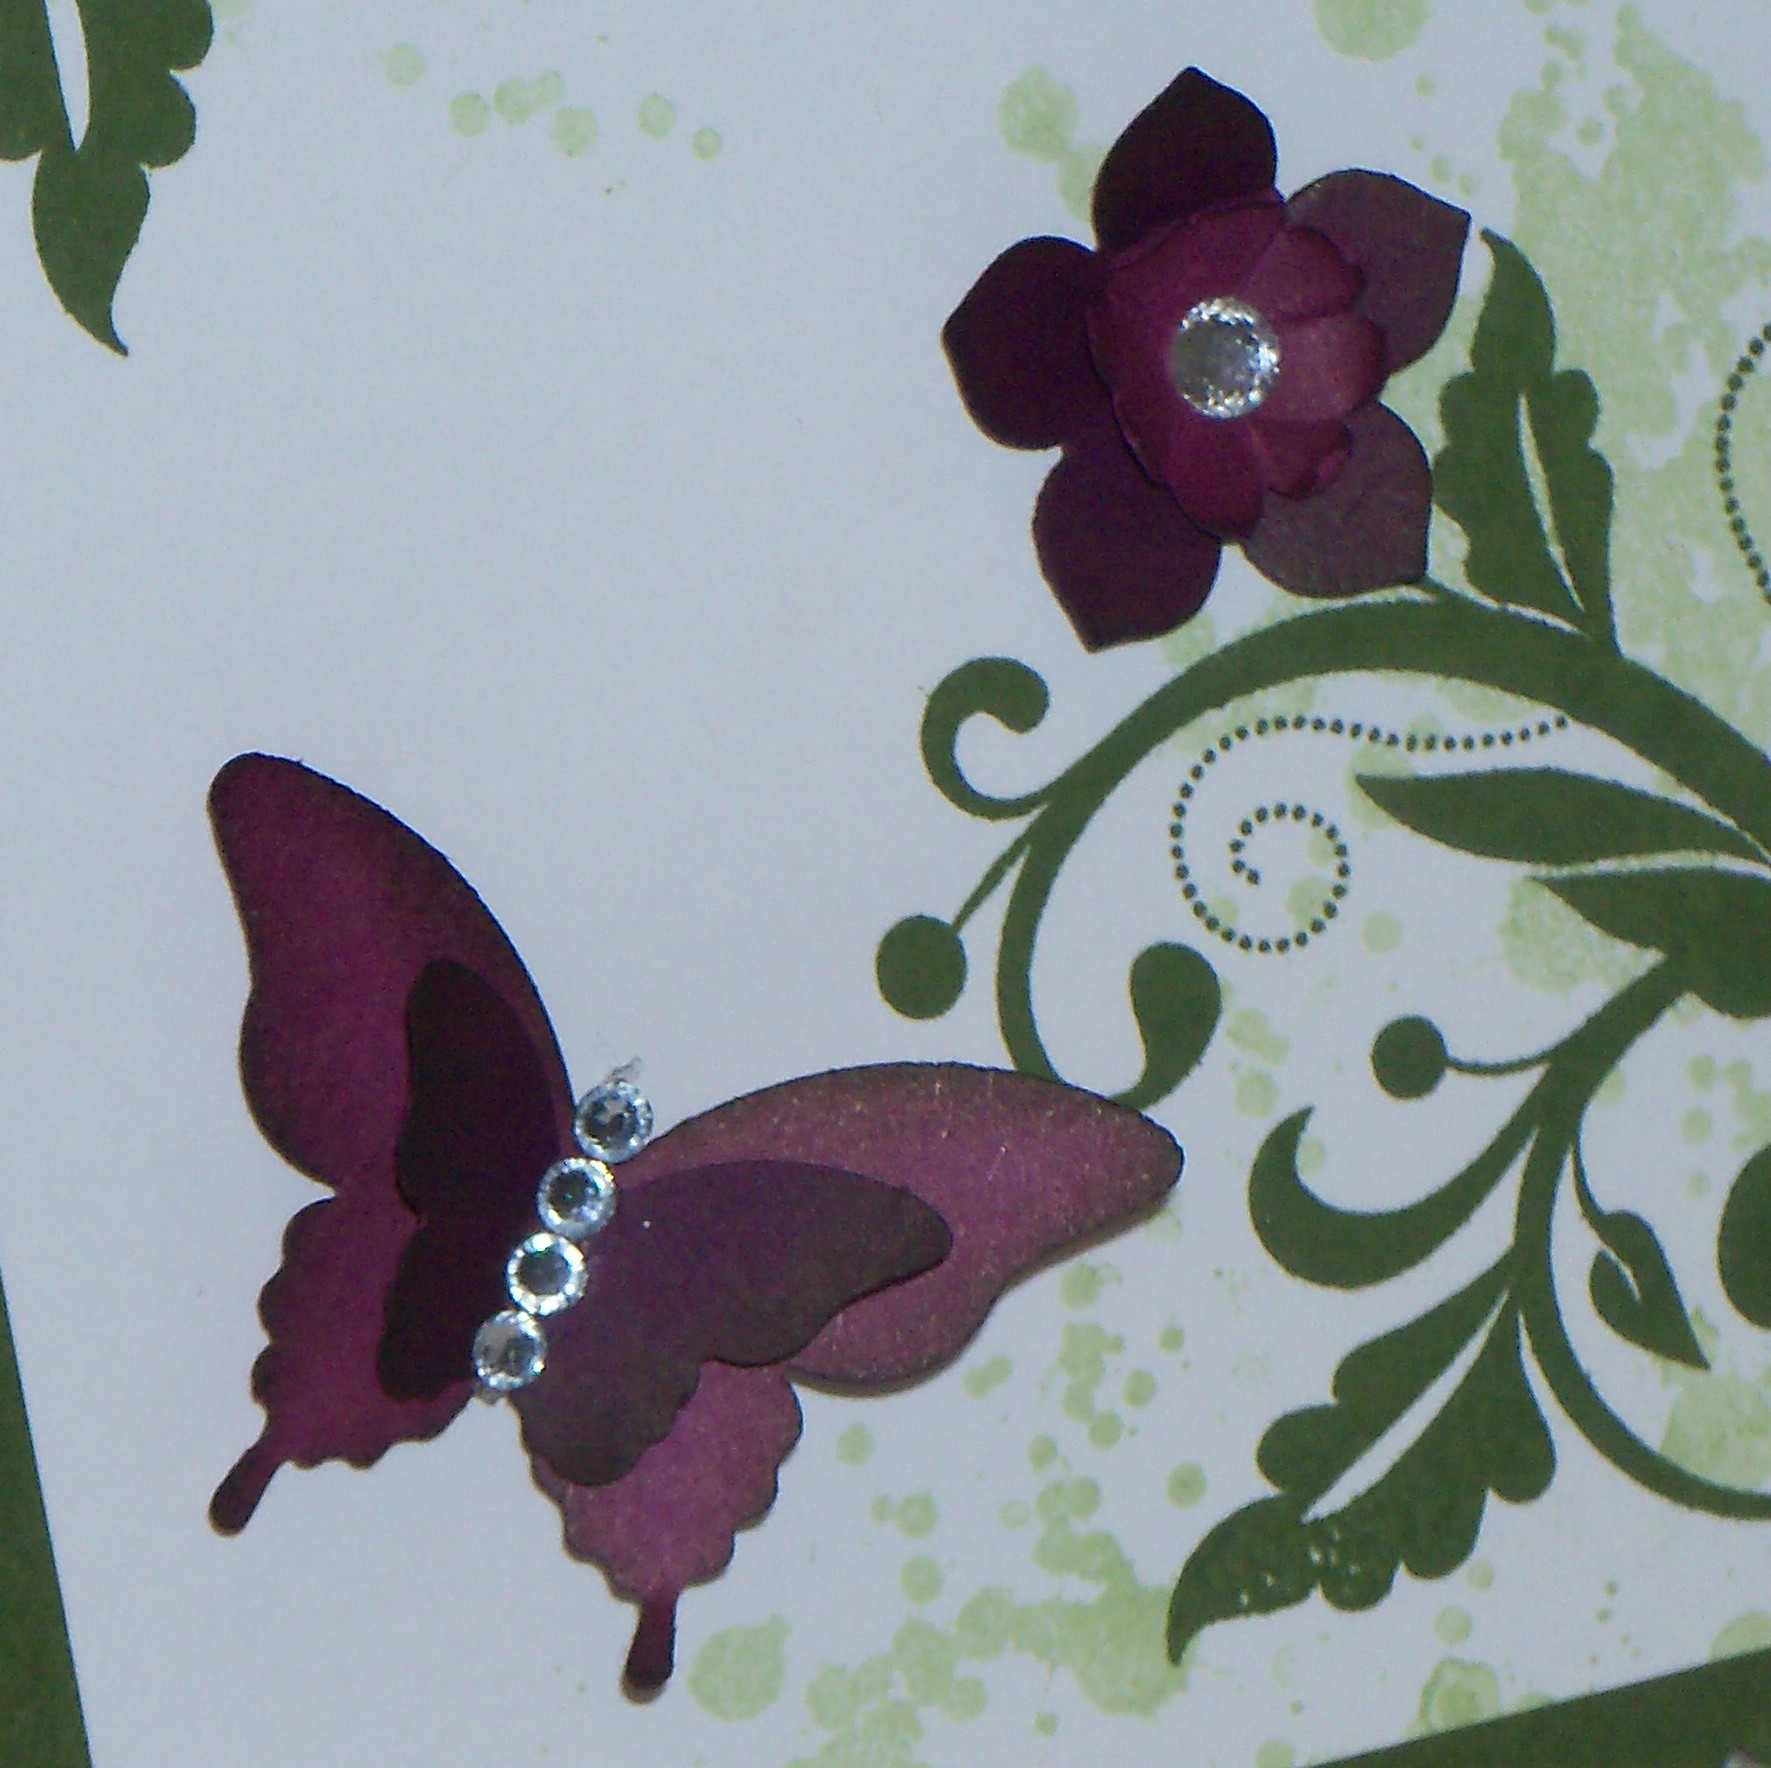
Since I gave each one of my Hostesses and downline members the “Hearts & Star’s” Decorative Masks, I thought it was only appropriate to make cards using the masks.  You can find them on page 205 of our annual catalog (or below). So today’s card and tomorrow card share will highlight the decorative masks… today, the hearts!

000_1490

My card uses the Ombre technique which is a graduation of color.  Once I placed my decorative mask over my cardstock, I began at the bottom and applied the Pink Pirouette with a sponge dauber, continued with Strawberry Slush and topped it off with Rose Red.

My card base and greeting are also Rose Red.  The greeting comes from the Hostess stamp set “Let Your Hair Down”.  I used the new Sweetheart punch (which is currently on sale through Monday) to add a little sparkle with the Silver Glimmer Paper.

This sweet card is topped off with the Pink Pirouette seam binding … it really does tie in all the colors to create a completed card. It’s just a great card for a true friend.

000_1488

Thanks so much for visiting today, stop back tomorrow to check out my “Christmas Card” that was designed “on the spot”!

Have a good day ~

blog-closing-small


You’re Wonderful …

Hello Stampin’ Friends,

I’m happy to announce the September photopolymer stamp set, You’re Wonderful—inspired by one of our Concept Artists; Melody’s carved stamps.


6a00d8354941d869e201a73e1250c6970d-500wi

3-youre-wonderful_crbwonderful-birthday

I love the whimsical feel of the scripted sentiment, the fun flow of the banners, and the pops of color from the gorgeous flowers. This card makes me happy.


4-youre-wonderful_crbsister

She used the flower stamps on this card to create her background. She stamped the flowers in sections using Crumb Cake ink, then quickly added Clear Stampin’ Emboss Powder over the damp ink to give the flowers a softer look.

Here is a cute little note card Melody created …

5-youre-wonderful_crbto-my-friend

I love how she framed the flowers –  All 3 cards are beautiful.  You will be able to purchase this new stamp set on my on-line store.

Have a wonderful day ~

blog-closing-small

Beautiful Day …

Hello Stampin’ Friends,

So … Did you guess which one of the new Weekly Deals was my favorite?  If you guessed the Elegant Butterfly – YOU were correct!  The Square framelit dies come in a close second.

I thought I would share with you a card I created using my 2 favorites from this weeks, Weekly Deals … the Elegant Butterfly and the Square Framelits!

000_1362

The “Mossy Meadow” cardstock you see, is simply folded in half.  Make sure your framelit sits above the fold so you do not cut the cardstock into 2 pieces.

I used the beautiful “Flowering Flourishes” stamp set, and teamed it up with the “Gorgeous Grunge” to create some depth to the card.

000_1364

As you can see … I layered the Petite Petals (in Black Raspberry) with the Boho Blossom (in Razzleberry) punches to create my flower.  The Elegant Butterfly and Bitty Butterflies also used the above color combination.

000_1366

I topped them off with the Rhinestones to create a bit of contrast and add some sparkle.  A beautiful friend always “shines”.

And finally, the greeting comes from the stamp set; Flower Patch.  I just used that stamp set on Sunday, so you can add this to your collection of samples for the Flower Patch set … so versatile.

000_1365

I hope I’ve inspired you to add the Square Framelits and Elegant Butterfly to your stampin’ collection … and while they are on Sale.  Just click on any links below for details – although the sale items do not reflect the sale price below, they will come up in your shopping card as the sale price.

I would be more than happy to place an order for you, if you do not shop on-line.  You can e-mail me at lindaluvs2stamp@aol.com

Thanks for stopping by ~

Have a “BE*YOU*TIFUL Day!

blog-closing-small


A Flower for a Friend …

Hello Stampin’ Friends,

I hope you had a nice weekend.  I spent a big part of mine cutting cardstock and preparing for the upcoming Appreciation Party.  I really do find it quite relaxing, and quality time with my sister Eileen.

Today I’d like to share with you a simple card with the cutest little punched flower!  Let’s begin with our card base … I am using the beautiful Blackberry Bliss.  It not only looks but sounds yummy!

000_1357

I paired the Blackberry Bliss with the Whisper White and Park Lane designer series paper and added the Blackberry Bliss 3/8″ Stitched Satin Ribbon to soften the edge between the two.

The pretty little flower was created with the Pansy and Petite Petals punches in Blackberry Bliss and Perfect Plum.

STAMPIN’ TIP: The Perfect Plum portion of the flower was created by cutting out one of the petals from the Pansy Punch and then bringing the ends together to form a smaller flower.  The leaves were also created from the Pansy Punch – cutting into the center and then trimming into a leaf shape.

000_1361

The greeting comes from the Feel Goods stamp set and is stamped in the Blackberry Bliss to coordinate with the card base, flower, ribbon and designer paper.  Gotta love that!

000_1360

My list of ingredients are listed below for your convenience … just click on the image to view details or begin shopping.

Thank you for stopping by today.

Enjoy your Monday ~

blog-closing-small


Tickled Pink …

Hello Stampin’ Friends,

Eileen and I have been busy creating boards for the annual Hostess Appreciation Party.  By “boards” I mean that we showcase several stamp sets at the event, and then create about 5 different cards for each board … then we raffle them off!

Everyone loves seeing the different cards and how versatile the stamp sets are. Create * Inspire * Share!

OK … why am I telling you this?  Because I just had to share one of the cards that will be posted on the “Flamingo Lingo” board.  Each year I highlight the Ronald McDonald House Exclusive stamp set,  because $3 from each stamp set sold goes to the Ronald McDonald Charity Houses.  Great Cause … great stamp set!

000_1343

Now … Isn’t this just too cute!

My flamingo is stamped in Strawberry Slush and highlighted with a Coastal Cabana scallop and twine bow.   The cute flower in this stamp set, coordinates with the Petite Petals Punch.

000_1342

Stampin’ Tip of the Day: Pretty Pearls … in any color!  Our new Blendabilities markers work great for coloring our pearls, rhinestones, and even our buttons!  Watch for upcoming “Blendabilities” classes.

I wanted to bring in that touch of “Florida” so I added the big bright shining sun from the “Kinda Eclectic” stamp set.  Warms it up nicely … don’t you think!?

Picture this ….I wanted to use my “On Film” Framelit die, and just love the way it frames our flamingo.

000_1343

I hope you enjoyed today’s card share, and consider purchasing the “Flamingo Lingo” stamp set.

Click Here to Shop Now. ..

I’d be “Tickled Pink” and I’ll send you a special “Flamingo Lingo” Thank You card!

Have a bright and sunny day ~

blog-closing-small


Butterfly in Black & White *Guest Stamper: Anne T.

Hello Stampin’ Friends,

Happy Weekend!!  Hope  you have some fun planned for this weekend.

Yesterday I came home to a wonderful surprise!  I had borrowed a stamp to a friend and when she returned it … she had added a beautiful card.  How sweet is that!?

So today’s guest stamper is Anne T.  I don’t think I could honor her card anymore than by sharing it’s beauty with all of you.

000_1278

Anne used the Swallowtail stamp set and the card is done in Black & White … very stunning.  A second butterfly was stamped and cut to layer and add dimension to the card.

Although the verse is discontinued, I’m sure many of you have it and it is so pretty.  If not, we have beautiful sayings in our current catalog.

That touch of bling with the rhinestones really finishes off the card beautifully.

000_1280

Thank you Anne for the card … you can borrow my stamp sets anytime! lol

Thanks all for stopping by.

Have a fun day ~

blog-closing-small

New Colors … New Stamp Sets!

Hello Stampin’ Friends,

A bit late on my post today but I wanted to share this cute card created by Stampin’ Up!  It features our newest In-Colors and the new stamp sets; Hi There and What’s Up!  You’ll find this card on page 176 of our annual catalog.

A fun and simple card to recreate using the new “Little Letters” framelits!  It’s a perfect match with your BigShot and magnetic plate!

10412006_10152420780532512_808486911841964691_n

Stampin’ Up! showcased each of the new In-Colors on this card… the Blackberry Bliss is the background.  They teamed up the What’s Up? stamp set with the Lost Lagoon and Hello Honey colors!

The hello in Tangelo Twist is from the “Hi There” stamp set and compliments the HELLO cut out of the Mossy Meadow with the Little Letter framelits beautifully!

I love how all these colors complement each other, and with so many of the other Stampin’ Up! colors.  Have some fun and experiment with new color combinations…. but if that scares you, you can always get one of the Color Coaches.  Our Color Coach is a great tool to help you with your color combo’s!

Hope you enjoyed that card share and your weekend.

Thanks for stopping in ~

blog-closing-small


Simply Sweet Sunday …

Hello Stampin’ Friends,

It’s Sunday … they day many of us can relax.  I hope you are enjoying your weekend.

Today I have a simply beautiful card to share with you.  We begin with Whisper White cardstock and add a splash of Daffodil Delight.  Nothing says sweet summer days more than the clean, crisp colors of white and yellow.

000_1222

I used the new “Lovely Lace” embossing folder for my background.  It’s so pretty and I know it will work on so many cards.  This was matted with the Daffodil Delight.

The pretty flower was punched with the 1-3/4″ Scallop Circle punch and petals created with the paper snips.  Make sure you do not cut all the way to the center or some of your petals will fall off!  Yikes … you don’t want that to happen.

000_1222 close up

The center of my flower is the “Very Vintage Designer Buttons” colored with the new “Daffodil Delight” Blendabilities marker.  You can color anything with those markers … so if you were thinking about getting them – you’ve just learned another technique for your markers.

I fed the ribbon through the buttons holes, then through the flower (Use our new hand held 1/8″ punch/ 134365).  I then brought it across the entire card for an added pop of color.

000_1221

My greeting was stamped in Daffodil Delight and comes from the stamp set “And Many More”.  You’re going to love this set, it’s like your favorite pillow … you miss it when you don’t have it with you.  You know, when your traveling … I don’t think you should take it to work! LOL

Just because … what better reason to send a card 🙂

Hope you enjoyed my summer card today.

Thank you for stopping by ~

blog-closing-small


Hello … S’Up?

Hello Stampin’ Friends,

What’s Up?  Hope you are having a fabulous holiday weekend!  My “Hello” card share today comes from a swap from my sister Eileen.  She is showcasing the new “Hi There” stamp set found on page 18 of the catalog.

Eileen also highlighted 2 of the new In-colors … Hello Honey and Blackberry Bliss.  She used Whisper White for the S’ UP? and inside of the card.

000_1210

The beautiful designer paper Eileen used comes from the “Moonlight” paper stack.  Simply cut your designer paper to the desired width, and a bit longer than needed so it sticks out past your base.  Adhere and trim off the edges.

The “Moonlight” designer paper stack is not one of the designer papers on sale, but if you click on the picture below – it will take you to my website so you can see all the designer papers that are on sale.

buy3dsp_NA

The “hello” and “S’ UP?” were stamped in that tasty Blackberry Bliss color!  The “S’ UP?” was then punched out with the 3/4″ Circle punch.  Eileen matted it with the new Gold Glimmer Paper punched with the 1″ circle punch.

This is a perfect layout to use with any of the designer papers … Simple and fun!

000_1215

Thanks for dropping in … enjoy the beautiful weekend!

blog-closing-small


Hello There Friends …

Hello Stampin’ Friends,

Today I have a sweet and simple card for you in beautiful shades of blue.  I’m also using the very versatile “Lullaby” Designer Series Paper.  You can create so many different styles and types of cards with this designer paper … don’t let the name “Lullaby” hold you to one type of card.

000_1130

I chose the pattern with the dots … they are so fun, and you can use is for Babies, Birthdays and just to say Hello.  My color pallet consists of Coastal Cabana, Bermuda Bay and Whisper White.

My greeting is from “Hello There” … a fun new Hostess Stamp Set, and is stamped in Bermuda Bay.  I wanted a color that coordinated with the Coastal Cabana and gave it more depth.

To accessorize my card, I used the new “Thick Bakers Twine”, also in Coastal Cabana.  I wrapped the twine around the left corner and then pulled the ends up around the lower right-hand corner and tied it… one piece!  I wanted to pop up my greeting so I also used the Stampin’ Dimensionals to secure the twine on the back.

000_1128

Now … you know you can’t purchase this cute stamp set, however … I’d be happy to show you and your friends even more when you host a stampin’ party.  Book before the end of June and you will be invited to my exclusive “Hostess Only” Appreciation Party!

You can contact me at lindaluvs2stamp@aol.com

Have a terrific Tuesday ~

blog-closing-small


Guest Stamper: Linda S.

Hello Stampin’ Friends,

Today I am going to share with you a card I received from one of my Star’s by Design Group member for a swap.  Even with all the samples you can find on-line now days … it’s so much nicer to swap cards!

Linda’s cute card is done in Old Olive and Daffodil Delight … I  just love how bright and pretty it is.  It would surely bring a smile to anyone’s face.

000_1122

Linda used the Honeycomb embossing folder for some added texture to the card, and if you look closely, you will see that she cut out a piece and used it inside her flower.  The flower was punched with the Pansy punch.  The inner flower was punched from the Boho Blossoms punch … and finished off with a Candy Dot!

The images were stamped in Old Olive and Daffodil Delight from the Six Sided Sampler Stamp set.  Each was punched out using the hexagon punch.  I like the tile effect created on the card and really draws your eye to the flower.

000_1124

I hope you enjoyed Linda’s card as much as I did.  So cute!

Thank you so much for dropping by today.

Have a wonderful weekend!

blog-closing-small


Hello Sweet Friend and Goodbye …

Hello Stampin’ Friends,

We are nearing the end of an old friendship – the 2013-14 Catalog.  There’s only a few days left, and some of the items on today’s card with be gone forever.

Today I want to share a card with you that I created for some special friends.  This is one of my favorite cards that I have ever made and thought it was time to share.

000_1109

I wanted something special and different so I came up with my color pallet first; Basic Black, Basic Gray, Smoky Slate and Pink Pirouette.  I used the black as my base and then only to stamp the greeting.  It created an elegant look.

Next, I inked up the stamp  “En Francias” in Smoky Slate and stamped it onto the Smoky Slate cardstock.  This is my depth (extra texture) for the card.  Unfortunately, the “En Francias” stamp is sold out in both the clear and wood mount.

I choose the “Six Sided Sampler” and paired it with the “Hexagon” punch.  I needed to recreate this card several times, so I created a “punch template”.  I figured out where I wanted to place my stamped images, and where I wanted to punch and then made the template.

101_1434

Once the template was created, I held the Basic Gray cardstock with it, and punched out the area’s punched on the template.  After that was done I ran the cardstock through the BigShot with the Perfect Polka Dot folder…. adding a bit more texture.  The entire background was mounted using the Stampin’ Dimensionals to lift it off the base.

Using the Six-Sided Sampler stamp set, I stamped a couple of images and my greetings onto the Smoky Slate.  Then used the Hexagon punch to punch them out.  The punched images were placed around the punched areas on the Basic Gray… the greeting was popped up with Stampin’ Dimensionals.

000_1111

For an accent, I created a layered butterfly, Elegant Butterfly in Smoky Slate and stamped with “En Francias” and then topped with the Bitty Butterfly in Pink Pirouette.

To balance the color and draw your eye to the greeting, I punched out a small flower from the “Itty Bitty Shapes” trio punches (On the retirement list) also in Pink Pirouette.  Both of these items were embellished with the beautiful Rhinestones.  I hope they NEVER retire those … I love them and use them all the time!

000_1109

I hope you enjoyed my card creation and that you’ve learned how to create a template for punching multiple cards.  I only with the photographs showed the full dimension of this card.  I will have the ingredients listed below for you.

I love sharing ideas, and with the new catalog coming out … it will be a joy to share these fabulous new stamp sets and accessories with you.  You can begin ordering from the New 2014-15 Catalog today at NOON … Mountain time!

Thank you so much for stopping by today.

blog-closing-small

ITK_RetiredList_demo_April2114_NA intheknow_PaperPumpkin_2.23.2014_NA intheknow_sign-save-US

Click on the photo for more details

Here is the list of ingredients for today’s card share.  Just click on it for more information or to begin shopping. Thank you.


Thoughts of You ….

Hello Stampin’ Friends,

Not sure how the weather is by you … hope it’s warm, but here in southeastern Wisconsin, it’s chilly again.  So today I’m going to share with you a lovely card that brings back memories of warm sunny days on the beach.

000_1066

The background was created with a simple watercolor wash using the Aqua Painter.  Choose the colors that remind you of a summer morning (or evening) as the sandpipers cross the beach.  The color pallet for the cardstock include:  Naturals White, Crumb Cake and Early Espresso.  The warm neutral colors really highlight the watercolor wash.

The sandpipers come from the “Wetlands” stamp set.  The simple reflections are already on the stamp so no extra work required.  Just image them running down the beach.  I can almost hear the sandpipers call!

000_1068

The “Thoughts of You” greeting comes from the very versatile stamp set – Loving Thoughts.  A fitting name for this stamp set!  I am really sorry that this is one of the stamp sets on the Discontinued Stamp List.  All good things must come to an end … only to make room for more beautiful sets!

Below is a list of ingredients used to make the card, just click on the item for more details or to begin shopping.

Thank you for coming along with me on my walk on the beach.

Wishing you a warm and sunny weekend ~

blog-closing-small


Thinking of You Swap Card …

Hello Stampin’ Friends,

Hope all you Mom’s had a wonderful day yesterday!

Today I am going to share with you another swap card from our Spring Retreat.  The guest stamper is Eileen S.  This card is so pretty, I’m sure you’ll agree.

000_1063

Eileen used the Serene Silhouettes stamp set.  This is another one of those versatile   stamp sets that can be used for women or men.   Eileen put a feminine flare to this card by adding the butterfly image.  The butterfly image was punched out using the 1-3/4″ Circle Punch.

The colors used on this card are Sahara Sand, Early Espresso and Whisper White.  The Sahara Sand cardstock was embossed with the “Fancy Fan” embossing folder.

000_1062

The “Thinking of You” greeting comes from the stamp set “Wetlands” … I think this font coordinates well with the Serene Silhouettes stamp set.

Thanks for stopping by today.

Have a wonderful week ~

blog-closing-small


Technique Tuesday: Wooden Elements

Hello Stampin’ Friends,

And H-E-L-L-O-O-O April!  I think spring is finally here 🙂

Yesterday I showed you the March Paper Pumpkin and how much fun I had creating different looks with the supplies they sent.  What I didn’t know was that Paper Pumpkin actually turned one yesterday!  And in true Stampin’ Up! fashion, they threw a party …

Paper Pumpkin Turns One!

Even more amazing is the incredible year Paper Pumpkin has had.

  • We’ve sent out 229,000 Paper Pumpkin projects (say that three times fast!) to our friends.
  • We’ve helped over 45,000 women bring out their creative sides—(and we know that they were just waiting to break out)!
  • We even had 13,000 take advantage of our Free Marker offer—ended yesterday!

Yep. Not bad for something that is only ONE-year old!

To celebrate, we held a birthday party at our Riverton Campus, complete with yummy cake, festive balloons, and even party hats.

I told you it was a fun company to be associated with!  Well hang in there because my 15th anniversary is next year, and in Stampin’ Up! fashion … I will be hosting parties, specials and more all year long.  Don’t worry, you will be invited to them all!

I also told you yesterday that I would show you some fabulous products that we have in our “Celebrate the Everyday” catalog that you could use to recreate the techniques I showed you.  We will be using the “Essentials Wooden Elements” and the “Watercolor Wonder Designer Note Cards”.

000_0519

On my “Life Doesn’t Have to Be Perfect” card … I used the “Direct to” technique in which we applied the Ink Pad directly to our wood element, the heart.  You can see I dragged the ink pad across the heart for a streaked look, as compared to yesterdays card when I fully inked up the wood greeting.

I teamed this card up with the Perfect Pennant Bundle, which includes the Perfect Pennant stamp set and the Banners Framelit Dies.

000_0518

Yesterday’s card I stamped a pattern onto the wood, today I actually stamped a greeting onto the wood element.  I also sponged the edges.

As you can see, the Wooden Elements are very versatile and you can use many techniques on these fun embellishments!

These two cards were also very quick and easy to create, with this combination of note cards, elements and the bundle … the possibilities are endless!

Here are the items that I used to create these cards…

I hope you were inspired to try out some of these fabulous products and / or the techniques I used on the Wooden Elements.

I thank you for dropping by today!

Have yourself a terrific Tuesday ~

blog-closing-small