Hello There Card … Happy Monday!

Hello Stampin’ Friends,

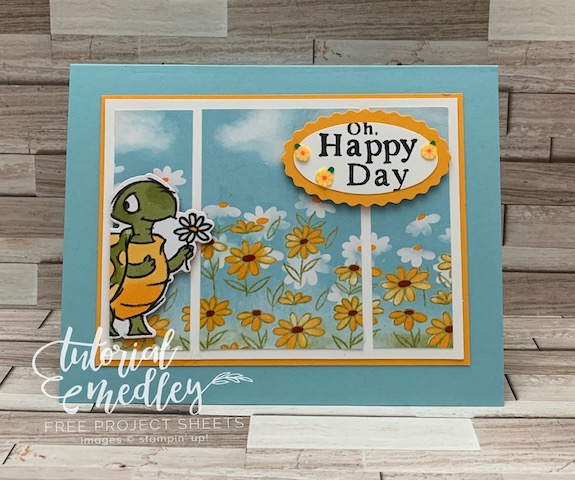
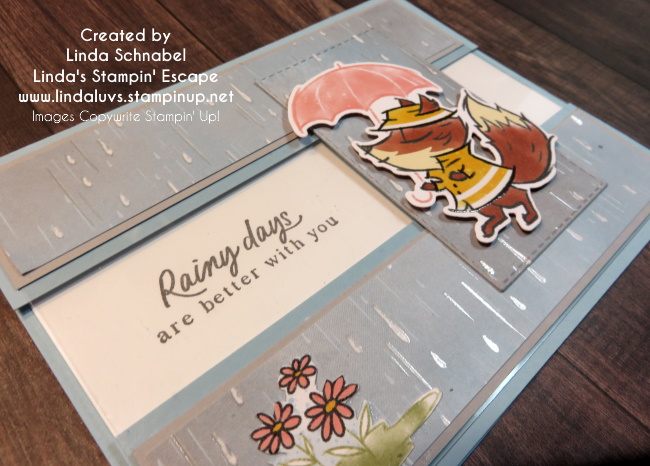
Today I have a quick & cute card saying Hello There, and our turtle is back with a friend. Today is also International Day of Happiness and this card will surely put a smile on someones face and make them happy!

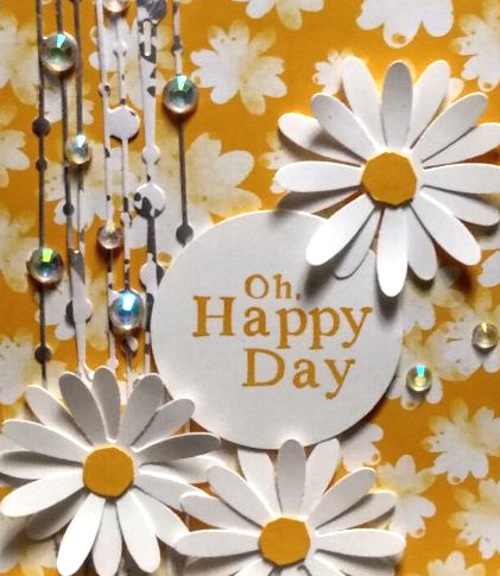
The core of our card today is created with the Enjoy the Adventure Memories & More Cards & Envelopes which is the base, and the Enjoy the Adventure Memories & More Card Pack … then I stamped my greeting from the Around the Bend stamp set.

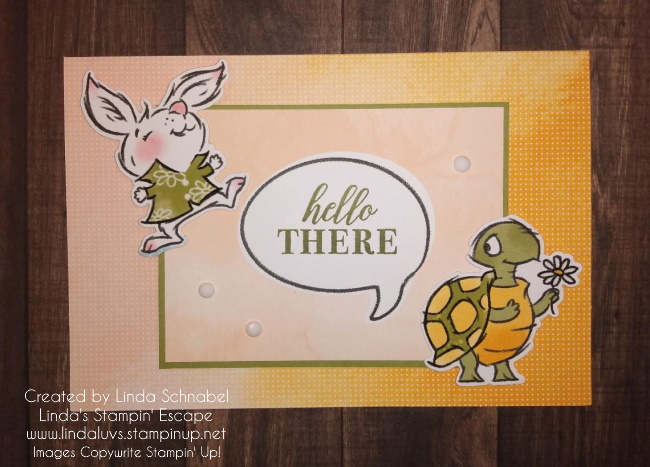
The card measures 3″ x 4″ and I added a Old Olive mat measuring 3-1/8″ x 4-1/8″. The card and mat have popped up with the Stampin’ Dimensionals. The turtle and the bunny were die cut from the Rain or Shine Specialty Designer paper. To complete the card I added the Opaque Adhesive-Backed Gems. The layout I used today is similar to yesterday’s layout, just a few changes can change the entire look of the card.

Such a simple and cute card to make to say hello to your friends or family members.

Thank you for joining for this quick card today. I hope you enjoy your Monday!

Simply Sunday: You’re On My Mind Card

Hello Stampin’ Friends ~

Today I have the cutest card to share with you made from left overs!! So what do you do with a left over frame when you used the oval for an Easter Egg? Here is the card I created earlier this week which produced that left over frame ….

To view this blog post just CLICK HERE If you haven’t seen the post, it will show how I cut these.

I also used a sweet little turtle from the Rain or Shine Designer paper (I cut out a whole bunch of little critters) and then I used a daisy that I had punched out for another project, so all those odds and ends were brought together and created this sweet and simple card ….

The greeting works perfectly inside the frame (which is also cut from the Rain or Shine Designer paper). You can find it in the Good Feelings stamp set and I used the Tuxedo Memento Ink. To complete my card I used the Adhesive Backed Milky Dots… love those!!

Thanks for stopping by on this Sunday, hope you have a great day. Relax and Enjoy.

Magically turn Framed Florets Dies into Easter Egg Cards!

Hello Stampin’ Friends ~

I’m so excited about this fun technique, turning the Floral Dies into Easter Egg Cards. I think the cards turned out so cute / lovely … yes, I have 2 cards for you today along with a video – a replay of my Facebook LIVE from last night.

Let’s take a look at the video …

As promised, I have the dimensions for our Easter Egg card. My cardstock base is Flirty Flamingo and measures 7-1/4″ x 5-1/4″ … Score at 4-1/4″ on the 7-1/4″ length. This will give you a front “flap” and exposes a portion of the inside. You need 2 pieces of Basic White (and one scrap to die cut greeting). Front measures 5-1/4″ x 2-3/4″ … emboss with the “splatter” embossing folder and the inside measures 5-1/4″ x 4″ … add a strip of the designer paper.

The designer paper I’m using on this card is the Rain or Shine Designer paper. The patterns I picked look great as Easter Eggs … the splatter one reminds me of how your dyed eggs always end up with “some” spots! lol The greeting for both cards come from the Charming Sentiments stamp set and die cut from the Stylish Shapes.

Our next card has an easy layout / dimensions and boasts the Floating Element Technique … I love this technique. Let’s begin with your Petal Pink card base measuring 8-1/2″ x 5-1/2″ scored and folded at 4-1/4″.

Trim down the 6″ x 6″ Fancy Flora Designer paper to 5-1/4″ to 4″ and adhere it directly to your card front. I use a 4″ x 3″ piece of Window Sheet to die cut my oval /egg and then I attach the 1″ strips which were embossed with the Quatrefoil Tile Embossing Folder. Don’t you love the elegance of the embossed egg?

The greeting for the card comes from the Charming Sentiments stamp set and die cut from the Stylish Shapes. The butterfly is die cut using the Brilliant Wings Dies … and we finished off with the Opaque Adhesive Backed Gems.

You can used any designer paper to create your Easter Eggs and / or use it as a background like I did on this card. So fun and versatile.

Thank You for hanging out with me today, I hope I inspired you to try this fun technique. You can also do it with circles!!

Have a great day ~

Friday Fun Mash-Up Card

Hello Stampin’ Friends ~

Today I’ve got a Friday Fun Mash-Up Card. Now days they call it “Mash Up” but you and I know that we’ve been creating cards using multiple different stamp sets, dies and papers … it’s just what we do!

I have been wanting to use that cute Pale Papaya paper from the “Rain of Shine” Designer paper since I saw it … it is bright and makes me happy!! You can click on the link to view all patterns.

Isn’t it pretty!? It’s such happy paper, so it will be my card front because I want to highlight it. Next I have a leftover piece over die cut piece that I used on yesterday’s card that came from the Irresistible Blooms Bundle. I die cut that piece from the Naturally Gilded Specialty paper. Click to view!

And since the piece had silver in it and all those little dots … I draped it in Rhinestones! Because friends, you’re worth it!!

I decided to use the Daisy Punch because it is similar to the flowers on my paper and to me … they are happy flowers! For my centers … I punched out the daisy in Mango Melody and snipped off the petals, so if you look closely, they are not perfect circles.

The greeting comes from the Playing in the Rain stamp set and “punched” … yes, punched! If you go to my online store, you will find that the 1-3/4″ and 2″ punches are back. Check it out here.

It’s just been a bit gloomy here in Wisconsin so I thought this would be the perfect card to brighten someones day. And …. isn’t that why we send the cards we make?

Thank you so much for stopping by my blog today.

Have a “Fun” and “Happy” Friday ~

Oh Happy Day Card / Rain or Shine!

Hello Stampin’ Friends ~

I have another Rain or Shine card for you, in fact … I’m sharing them all here today. I like to share several samples of the same product so you are inspired to create / play with you goodies and to maximize the value of your purchase. I want to make sure you get your moneys worth!

You will enjoy this little cutie for sure …

Using the same pattern of designer paper as I did yesterday, you’ll want to start with a 3” X 4” and cut at 1” and 3” leaving you with 1” left (and a 2″ center). These are layered onto Basic White and the Mango Melody.

The turtle is die cut from the Rain or Shine designer paper … you want the one that is at the edge, then there is no waste because he looks pretty awesome coming in from the side of your card! The front will be attached to the Balmy Blue card base.

To finish off the card, stamp your greeting with Momento ink and punch from the Dual Oval Punch (Mango Melody from Scallop Oval). Attach 3 of the loose daisy’s using liquid glue to the sentiment on your card front and you are done!

There is so much you can do with this bundle, have you seen these yet?

These two bunnies, above and below have designer paper shirts!! Just stamp the bunny image onto the designer paper and cut it out (the die coordinates with the stamp and designer paper!) Love it!

And then there was yesterday’s card ….

So, are you falling in love yet? I’ll have more to share soon but I will be sharing Sale-a-bration samples with you because time is running out, only 11 more days to Sale-a-brate!

Have an awesome Friday, and I’ll see you tomorrow!

Just for You Free Tutorial …

Hello Stampin’ Friends ~

Hot off my craft table is today’s quick card created with the Rain or Shine Specialty Designer paper and the Sentimental Park bundle. I created this card for the Design Team I am on, so I combined two of my Mini Catalog favorites (well, there are so many awesome things in the mini it’s hard to pick favorites!)

Message me below in the comment section and I will send you the Tutorial that includes the full color photo, list of ingredients, measurements and step by step instructions! Print it out or Save it in your files.

Let’s see how many I can give away!!

Thank you ~

Another Window Card using Playing in the Rain

Hello Stampin’ Friends ~

Today I want to share another card from the Playing in the Rain using the same Window Card layout as I did yesterday. The only thing I changed was moving my “bridge” to the other side of the card, and of course my designer paper pattern and critter!

I wanted to share one of the two “rain” patterns that are included in the Rain or Shine Specialty designer series paper. This paper is a bit on the stormy side, however life can still be beautiful if we have a positive attitude. They say, it’s not what happens in life, but how we react to it …

And this happy fox doesn’t seem to let that stormy weather bother him at all. I fussy cut the flowers out again because I wanted a touch of pink in the card to coordinate with the umbrella and to create a better flow on my card. I changed the greeting as well … and I agree, rainy days are always better when your with people you care about.

Measurements:

  • Card base = 8-1/2″ x 5-1/2″ Score at 4-1/4″ then Cut at 5-3/4″ … cut 1-1/2″ from the piece you cut off.
  • Window Sheet & Basic White Inside: 5-1/4″ x 4″
  • Mat: 5-1/4″ x 1-1/4″
  • Designer Paper: 5-1/8″ x 1-1/8″

I wanted to show the “embossing” on the Rain or Shine Specialty Designer paper and how much dimension and texture you create with the layers of this card …

And by the way … got the greeting down on the first try! lol I have just begun to play with this cute bundle … Don’t worry, I’ll be sharing them with you!

Thanks so much for stopping back today. Hope you have a wonderful weekend.

Here is the list of supplies that I used for today’s card ….

Window Card using Playing in the Rain by Stampin’ Up!

Hello Stampin’ Friends ~

Today I’m going to share the replay and the card from my Facebook LIVE last night. It was so much fun playing with the Playing in the Rain bundle, it actually just made me happy! The song Singing in the Rain just keeps playing over and over again in my head.

Let’s get right to the video …

So, what did you think? Cutest paper right! I have my two little granddaughters this weekend (for a princess party) while mama’s at work so we are going to be “Playing in the Rain”!

Let’s talk measurements again:

  • Card base = 8-1/2″ x 5-1/2″ Score at 4-1/4″ then Cut at 5-3/4″ … cut 1-1/2″ from the piece you cut off.
  • Window Sheet & Basic White Inside: 5-1/4″ x 4″
  • Mat: 5-1/4″ x 1-1/4″
  • Designer Paper: 5-1/8″ x 1-1/8″

And my greeting … Well, I pulled out my Stamparatus and the greeting was aligned perfectly. Ahhhh … the tools we have to make our cardmaking easier. Not sure why I didn’t think of that sooner.

I did a little addition to the inside as well …

I used some of the scraps left over from trimming my designer paper and added to the inside. Someone once told me it was not nice to have naked envelopes or insides!! lol

Thanks so much for stopping by my blog today. Hope you have all the information and instruction you need to create this quick & easy window card using the Playing in the Rain bundle and Rain or Shine Specialty Designer paper.

Have a sun shiny day … or have fun playing in the rain!

Here is the list of supplies that I used for today’s card ….