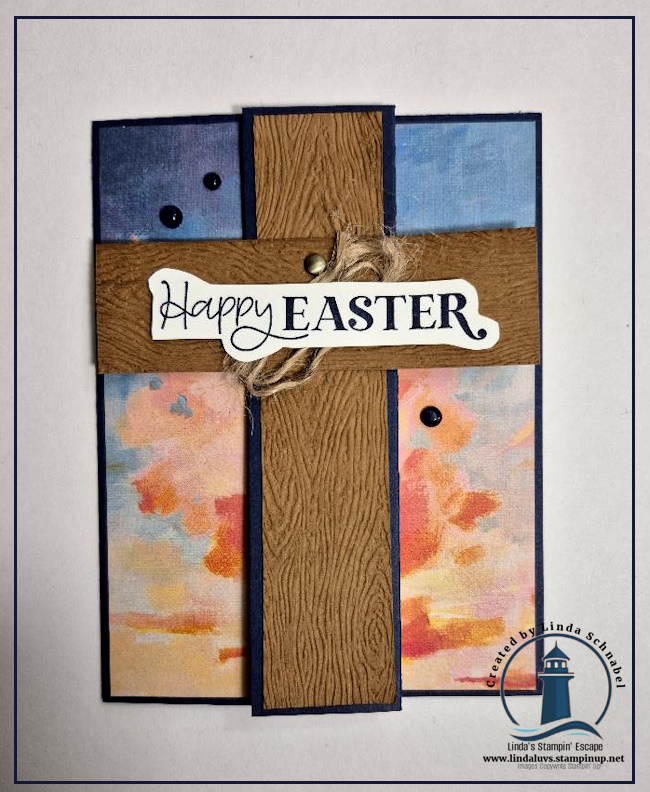
Today, I’m excited to share a special card that’s perfect for Easter that I created last year but is still relative – a beautiful and simple Fun Fold that features a striking cross as the focal point. While it may look intricate at first glance, this card is actually quite easy to make, and it creates a dramatic impact when displayed. It’s the kind of card that speaks volumes with its elegant design and heartfelt message, making it perfect for celebrating the true meaning of the Easter season.
Whether you’re sending it to a loved one or displaying it in your home, this card is a beautiful reminder of hope and faith. The fold adds just the right amount of dimension and interest, while still being easy to mail or tuck into an Easter basket. I walk you through the entire process in my video tutorial, so don’t worry if you’re new to Fun Folds — I’ve got you covered!
Today, I’m excited to share a special card that’s perfect for Easter – a beautiful and simple Fun Fold that features a striking cross as the focal point. While it may look intricate at first glance, this card is actually quite easy to make, and it creates a dramatic impact when displayed. It’s the kind of card that speaks volumes with its elegant design and heartfelt message, making it perfect for celebrating the true meaning of the Easter season.
Whether you’re sending it to a loved one or displaying it in your home, this card is a beautiful reminder of hope and faith. The fold adds just the right amount of dimension and interest, while still being easy to mail or tuck into an Easter basket. I walk you through the entire process in my video tutorial, so don’t worry if you’re new to Fun Folds — I’ve got you covered!
Today, the world celebrates the spirit of St. Patrick’s Day. It’s a day where green reigns supreme, shamrocks dance in the breeze, and the luck of the Irish is celebrated far and wide. What better way to honor this festive occasion than by crafting a card that embodies the essence of this joyous day?
Today I’ve conjured up a delightful ode to St. Patrick’s Day with my latest creation – a green and gold card adorned with a charming shamrock made of die-cut hearts. Let’s dive into the enchanting details …
The heart of our design lies in the Radiating Stitches Dies – a set that allows you to create intricate shapes with ease. By arranging these die-cut hearts in the shape of a shamrock, we capture the essence of luck and love intertwined. But what’s a shamrock without its stem? Fear not, for crafting the stem is as easy as a flick of the wrist with a circle punch. Simply punch twice from the edge of your cardstock, and voila – the perfect stem to complete our shamrock.
Now, let’s talk about the greeting which comes from the Throughout the Year stamp set. In crafting, there’s a technique called omitting – covering up part of the image and inking only the part you want to stamp. This technique adds depth and dimension to your creations. For our St. Patrick’s Day card, we’ve used this technique to highlight a festive message. And what better way to frame our greeting than with a gold mat, reminiscent of a shimmering coin found at the end of a rainbow? Then embellished with more gold from our Blooming Pearls collection.
But the magic doesn’t stop there. The background of our card is embossed with the Countryside Blossoms Embossing Folder to give it a Celtic look, paying homage to the rich cultural heritage of Ireland. Image each swirl and knot which tells a story of tradition and folklore, adding an extra layer of charm to our St. Patrick’s Day creation. Bringing it all together is the spirit of St. Patrick’s Day – a day filled with laughter, joy, and a touch of mischief. This card captures the essence of this beloved holiday.
From my crafting home to yours, may your St. Patrick’s Day be filled with laughter, love, and the magic of handmade creations. Sláinte!
In my last blog post I shared the “Double Box Fold” Card with you, but what do you do with the leftovers? You repurpose your leftover materials to craft a charming shaker card. If you’re a fan of recycling and getting creative with what you have on hand, this project is perfect for you! Are you ready to add an extra touch of love to your Valentine’s Day greetings?
Cut a piece of clear acetate sheet slightly larger than the opening of the leftover piece. Adhere it to the backside of the die-cut piece using adhesive, ensuring it covers the entire opening securely.
Carefully apply foam adhesive strips around the edges of the die-cut piece, creating a border around the acetate window. Make sure there are no gaps where the sequins could escape. Pour a generous amount of Loose Silver Sequins onto the center of your card base. Sprinkle in some hearts from the Sending Love Dies to add a romantic touch to your shaker card.
Now, carefully place the acetate-covered die-cut piece over the card base (centering it), and ensuring the sequins and hearts are securely trapped inside. Press down firmly on the edges to seal the shaker element.
Once your shaker portion is complete, it’s ready to add a greeting and embellish. Greeting comes from the Throughout the Year stamp set and die cut with the Everyday Details Dies. I glued a few of my sequins on the card front to embellish, and then embellished my embellishments by adding the Iridescent Rhinestones inside of them. I also add a couple hearts at the top for a pop of color and interest.
Now it’s ready to spread love and joy to your friends and family. Whether you’re mailing it to a loved one or hand-delivering it with a hug, this handmade creation is sure to bring a smile to their face. PS. Swap out the greeting for an All Occasion / Just Because I Care card!!
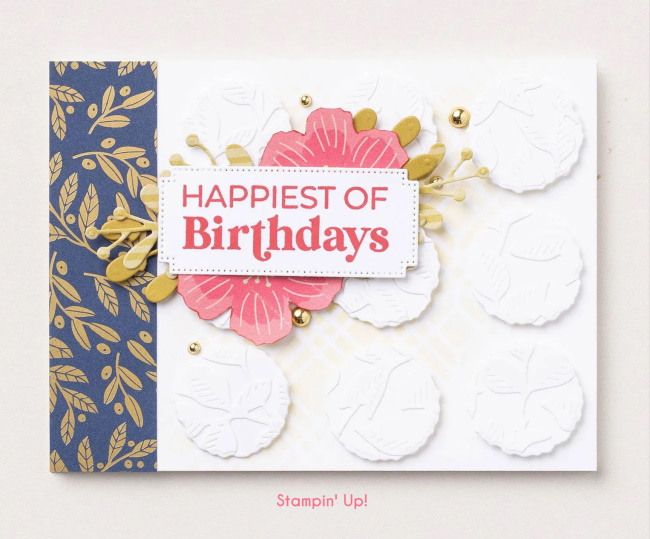
As I’m creating in my stamp room, I noticed I gravitate to certain items time after time and the Throughout the Year Stamp Set. Finding versatile and timeless stamp sets is like discovering hidden treasures. One such gem that has stood the test of time is the “Throughout the Year” stamp set. This remarkable set has not only earned its place as a staple but has also been carried over to the Online Exclusives, making it a must-have for every crafter.
The hallmark of a great stamp set lies in its versatility, and the Throughout the Year stamp set certainly doesn’t disappoint. With a diverse range of sentiments and images, this set is designed to cater to a myriad of occasions throughout the year. Whether it’s birthdays, anniversaries, holidays, or just sending a heartfelt message, this stamp set has you covered.
One of the standout features of the Throughout the Year stamp set is its seamless compatibility with any designer paper. The ability to team it up with various patterns and color schemes makes it an excellent choice for creating quick and stunning cards. Imagine the joy of effortlessly matching this stamp set with your favorite designer paper to create personalized and visually appealing cards for any occasion.
The beauty of the Throughout the Year stamp set lies in its ability to be used throughout every season. Its diverse collection of sentiments and images allows you to create cards that resonate with the spirit of any occasion. Whether it’s a cheerful spring card, a vibrant summer greeting, or a cozy winter message, this stamp set is your go-to companion for expressing sentiments all year round.
Crafting enthusiasts know the value of a great investment, and the Throughout the Year stamp set undoubtedly falls into that category. Its enduring appeal and timeless design ensure that it remains a valuable addition to your crafting arsenal all year long. Unlike seasonal sets that may only see use during specific times, this set provides endless creative possibilities for every season and celebration.
As we discover our “go to” tools in stamping, the Throughout the Year stamp set emerges as a shining example of versatility and enduring appeal. Its such a great investment, with the ability to be used throughout the year, this stamp set is a true game-changer for cardmakers. Find it in the Online Exclusives and let your creativity soar as you create personalized, heartfelt cards for every occasion. Link is below for your convenience ….
Thanks for stopping by today ~
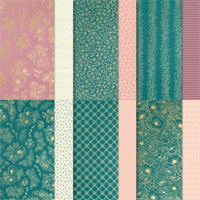
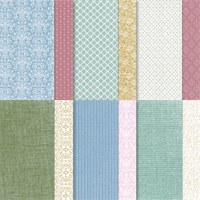
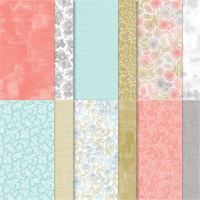
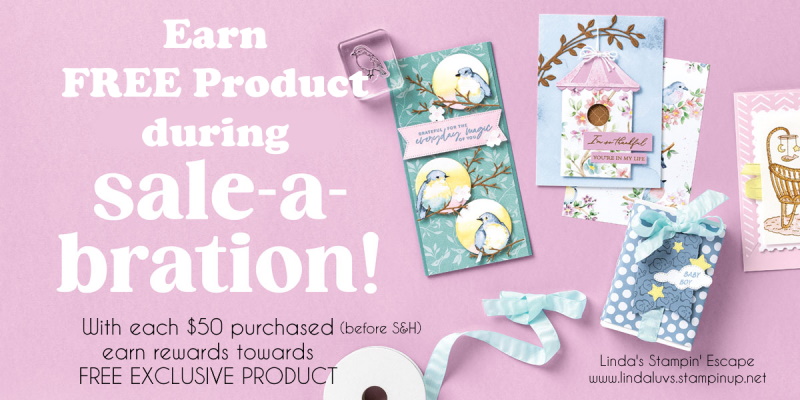
I used “Garden Walk” Designer paper for several of the cards above (Now Retired) but you can choose any of the beautiful papers we are currently offering. Also … We have 5 Designer Papers you can earn for FREE during Sale-a-bration!!
Today I’ll be sharing my Twelve Weeks of Christmas: Week 10 Video along with the individual cards, including a brand new one not shown during the video!! I’m highlighting the amazing and versatile Garden Walk Designer Series paper. You’ll see quick cards, split cards and ways to highlight it. Teamed with the designer paper is the Throughout the Year stamp set. Grab your coffee and let’s take a look at the video ….
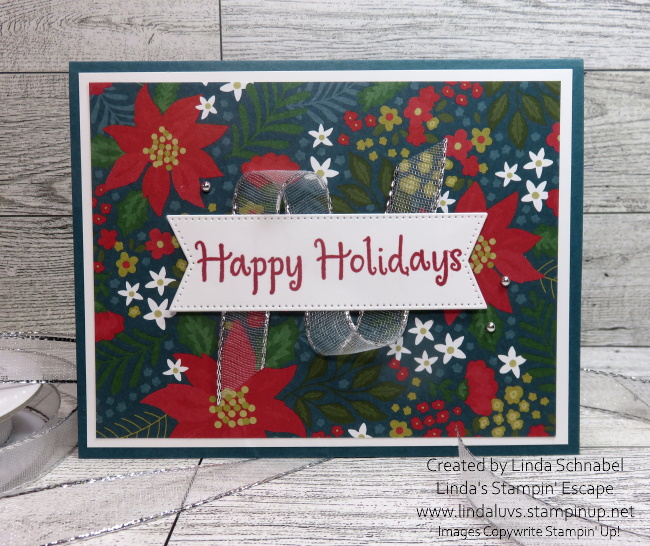
Yesterday I shared the poinsettia card, here is a reminder …
Just to help you see different patterns from the designer paper and different styles of cards! Next up is a collage of banners that’s backlit with some brushed color ….
You got to hear how each of these were made so I won’t be covering that here. Our next 2 cards were created when I cut down the 6 x 6 designer paper into 4 – 3 x 3 sheets. Our first is super simple to create and is a great layout when you need to make many cards quickly ….
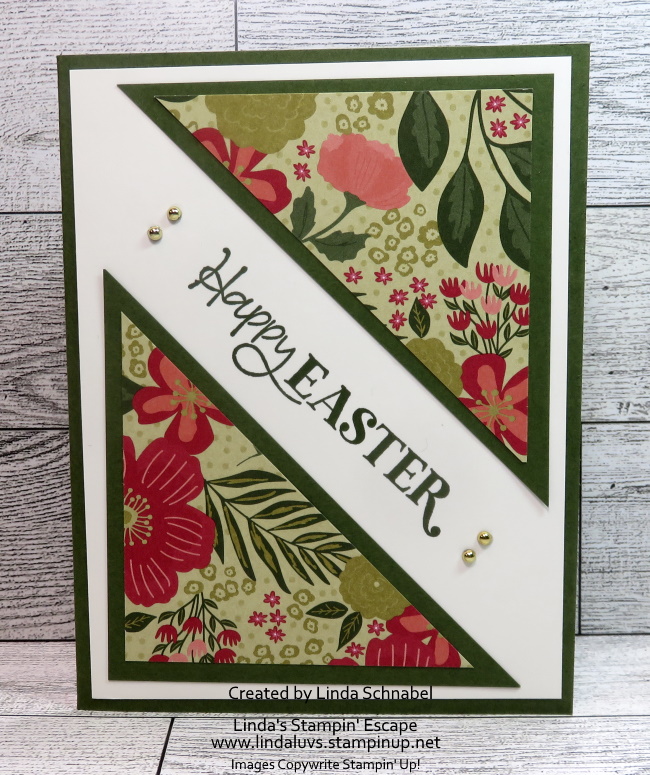
Next is the second of those 4 – 3 x 3 inch squared and is created with one of my favorite / simple card techniques: Split Cards! Simply cut from corner to corner diagonally ….
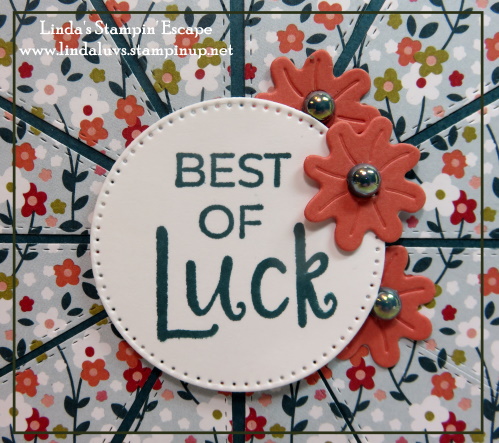
And lastly … this card was created with the help of the Patchwork Pieces dies. Don’t ever be afraid to pull out those dies and experiment! You just may fall in love with your creation ….
With yet another pretty pattern, your creativity can soar and choosing a color pattern is easy, just follow what’s in the paper. My card base is the Calypso Coral which was embossed with the Timeworn Type embossing folder. I wanted some texture on my card, and this made it easy.
Once I die cut the Garden Walk designer paper with the Patchwork Pieces dies, I mounted it onto Pretty Peacock cardstock … I wouldn’t have put these two colors together myself, but they sure do look good together.
My greeting was stamped in Pretty Peacock and die cut with the Stylish Shapes dies. I then grabbed a flower from another die set to embellish my card.
Creating all of these cards with the combined elements of Garden Walk Designer paper and the Throughout the Year stamp set brings out the magic of both the paper and stamp set. Add these to your wish list and let your creativity flow!
Thank you for joining me today … I hope you enjoyed this showcase
Don’t forget …. FREE SHIPPING on Thursday for all orders over $75. Plus, I have a FREE Gift for all who use the Host Code: HJ2ENVG4
December 12th marks a delightful celebration – National Poinsettia Day! What better way to honor this festive occasion than by creating a beautiful card adorned with the Garden Walk Designer Paper? This versatile paper collection is a treasure trove of patterns perfect for all occasions and holidays, making it an ideal choice for your crafting endeavors.
Teaming up this splendid paper with the “Throughout the Year” stamp set elevates your creations to a whole new level. This stamp set is a true companion to the Garden Walk Designer Paper, offering a range of sentiments suited for different times of the year. Whether you’re celebrating holidays, sending heartfelt messages, or marking special occasions, this stamp set has you covered.
Creating a card with these combined elements brings out the magic of both the paper and stamp set. Imagine a stunning Poinsettia-themed card, adorned with rich reds and lush greens from the Garden Walk Designer Paper. Pair it with a warm and thoughtful sentiment from the “Throughout the Year” stamp set, and you have a heartfelt creation ready to spread joy.
I chose Pretty Peacock for my base to pull that beautiful rich color out of the designer paper, then I framed the Garden Walk Designer paper with the basic white. I enhanced my greeting with the Silver & White Sheer ribbon … dressed it up like a Christmas present, then added a few Silver embellishments from the Festive Pearls. So, whether you’re making cards, scrapbook pages, or other paper crafts, let this combination be your inspiration for spreading happiness and warmth throughout the year.
If you’re “looking” for inspiration, join me tonight on Linda’s Stampin’ Escape at 6:30 pm Central Time … LIVE with this combination of the Garden Walk Designer Series Paper and the Throughout the Year Stamp Set. Looking forward to seeing you there! Till then, have a great day!