There’s something so classic and elegant about red and gold at the holidays — and today I’m sharing a card that brings that traditional beauty to life. This card highlights the Traditional Labels Bundle paired with the gorgeous red-and-gold poinsettia pattern from the Traditions of Christmas Designer Series Paper. I’ve included every measurement and step-by-step instruction so you can recreate it exactly (or use it as a jumping off point for your own variations). Let’s make something beautiful!
Measurements:
Red Cardstock: 8 ½” x 5 ½” – Score at 4 ¼” and 3 ½” x 2 ½” – greeting
Basic White cardstock: 4” x 5 ¼” – inside
Gold Foil: 4” x 5 ¼”
Designer Paper: 3 ¾” x 5”
Gold Mesh Ribbon: Approximately 24” – to create a fluffy bow!
Instructions:
Start with Real Red cardstock measuring 8 ½” x 5 ½” to make your card base. Score at 4 ¼” and burnish.
Attach Designer paper onto Gold Foil Specialty Paper / cardfront
Wrap approximately 14” around card front and tie a knot on the right-hand side – but not to edge
Stamp Greeting onto small Real Red with VersaMark
Emboss greeting with Gold embossing powder
Die cut greeting with shaped die from Traditional labels bundle
Adhere die cut greeting over ribbon & onto cardfront with dimensionals.
Weave remaining ribbon back and forth over knot and secure it with loose ends of the tied ribbon. Tie with knot and trim ends.
Using liquid glue, embellish with sequins as desired.
Secure white cardstock to inside of card.
This card is a lovely way to showcase the Traditions of Christmas poinsettia paper — the red and gold are pure holiday glamour, and the Traditional Labels Bundle makes sentiment placement quick and beautiful. I hope you enjoy making this as much as I did! If you try it, please share a photo — I’d love to see your color choices and embellishment ideas. ❤️🎄
Have a warm and beautiful Sunday … enjoy your day!
Well, well, well… we are officially in the thick of a snowstorm here in Wisconsin— and honestly, it feels like the entire state is buried under a fluffy white blanket today! ❄️ It’s the perfect kind of day to stay inside, stay warm, and enjoy a little creativity.
Today also happens to be Small Business Saturday, and while I never want to shout “shop small” at anyone, I do love the gentle reminder that days like this are a wonderful opportunity to support the people behind the storefronts—whether they’re local shops in town or the online businesses you’ve grown to trust. It’s really about connection, community, and choosing to lift each other up.
Yesterday I shared the replay of my Facebook LIVE where I highlighted two amazing kits, the Adventure Awaits Card Kit and the Nutcracker Tag Kit. Today, with the snow swirling outside, it seems like the perfect moment to cozy in and give you a closer look at the cards I created— Those tags are adorable on their own, but transforming them into cards felt like giving them a whole new purpose. I’ll walk through how I layered them, how I chose coordinating cardstock, and why simple tweaks made them feel extra festive and giftable.
Snowy days like this remind me just how comforting it is to create something with your hands. There’s a certain warmth that comes from crafting— from the quiet moments trimming paper, to the satisfaction of adding that last embellishment, to the joy of knowing someone will smile when they open your handmade card.
Let’s begin with our first tag / card ….
You’ll notice that I switch out banners and greetings to create a whole new feel. My background is the Garden Green Two Tone paper, and secured to a Basic White A2 Card base. I embossed it with the Peaceful Greenery Embossing Folder and used a sanding block to remove some of the color and pull the white out! I love the festive look!!
Next up ….
I had a lot of fun with this card!! I was playing with the Designer papers I had on hand … my card front was create using the Branching Out dies and the Traditions of Christmas Designer Paper. I matted this backdrop with Crumb Cake to match her boot & hat. That piece was cut slightly larger and then I used my 1″ Circle Punch to create the same look as the dies. The little presents around her feet … they come from the North Pole Delivery Specialty paper. I also die cut a piece of Vellum using the Spotlight on Nature dies.
My third tag into card is …
I began by trimming the Pool Party color off my Nutcracker … I wanted to pull the Real Red and Old Olive out of this one. You’ll see the Old Olive in his shoulder pads. I again use the Traditions of Christmas Designer paper and the Branching Out dies. This time I used a partial sheet of cardstock as my mat … I wanted to leave a little more red showing. I added a smaller circle cut from Vellum using the Spotlight on Nature Dies… I do this technique to highlight either the tag (as in our second card) or the greeting as in this card.
My last tag to card is ….
Here’s my Little Drummer Boy card! Not sure if you caught this, but on cards 2 and 3 – I did not use the banners, so I used them as my backdrop!! My cardfront is Basic White and die cut with the Textured Notes Dies. I used Pecan Pie as my cardbase – I thought it looked nice with his hair and highlighted the rest of the colors. The bakers twine used for tying up the tags, was used as an embellishment to showcase the tags. On this one is saved the “For You” greeting because the Drummer Boy asks … Shall I play for you?
I had so much fun making these special cards. Cards truly make the perfect gift. They’re personal. They’re thoughtful… And they’re filled with a little piece of you. I hope this inspires you to share your creativity with someone who could use a little lift.
Stay warm, stay safe, and enjoy the beauty of a good snow day… it’s Wisconsin, after all. Tell me where you’re from and how’s the weather by you!!
There’s something magical about crafting on a Sunday morning—especially when we blend the classic beauty of Christmas with a fresh, modern twist. Today’s project is all about celebrating the Simply Beautiful Traditions of Christmas using the gorgeous Traditions of Christmas Suite, but with a little unexpected flair… PINK! Yes, pink is everywhere this year—Halloween, fall décor, and now Christmas cards. And honestly? I’m here for it!
I began with a soft Bubble Bath card base measuring 8-1/2″ x 5-1/2″, scored at 4-1/4″. Clean, simple, perfect. For the card front, I trimmed a piece to 4″ x 5-1/4″ and ran it through the Peaceful Greenery Embossing Folder. This embossed frame is everything—delicate leaves, soft texture, and a beautiful focal point that sets the stage for the entire card.
Inside that embossed frame, I heat embossed the sentiment in gold embossing powder, using the “Just for You” from the Traditional Labels Stamp Set. Even though this suite leans into Christmas, this sentiment gives the card wonderful versatility. With just one phrase, this becomes an all-occasion card wrapped in festive elegance. Perfect for my daughters December 23rd birthday!
For the finishing touch, I die cut one of the stunning floral sprays from the Traditions of Christmas Specialty Designer Paper. The gold foiling on this collection is absolutely breathtaking, and layering that spray along the embossed frame instantly elevated the card—no stamping required!
As I look at the finished card, I’m thinking it could use just a sprinkle more sparkle… maybe a few of the Traditional Sparkling Sequins to catch the light and add that extra holiday charm.
If you’re loving today’s Simply Sunday project, imagine the endless combinations you can create with the Traditions of Christmas Suite. From quick & elegant cards like this one to rich, traditional holiday creations—it’s truly a suite that does it all, without overwhelm.
Wishing you a creative and peaceful Sunday, my friends. 💗✨
Today we’re sharing the 3rd runner-up from our Fall Stamping Retreat Attendee Swap, and let me tell you — this one is just stunning! 🌟
This beautiful card was created by Karie Kahrs using the Traditions of Christmas Suite. At first glance, you might think, “Christmas card,” but Karie took her creativity to the next level… she turned it into a Birthday Card! How clever is that? So many of us have loved ones with birthdays close to the holidays who prefer a “real” birthday card — this is pure inspiration! 🎂✨
The base of the card is Old Olive, with coordinating mats and a banner to frame the design perfectly. Karie die-cut the floral piece from the suite and popped it up on her focal point, creating dimension and a gorgeous layered look.
Here’s where her creativity really shone: the birthday greeting was heat embossed in gold, giving it that elegant, celebratory feel. She then added a swatch of gold foil paper behind the flowers and sentiment to make everything pop. And to top it off, she added the Traditional Sparkling Sequins in Gold from the suite — just the perfect finishing touch! ✨💛
This card is a fantastic example of taking a Christmas-themed suite and using it beyond the holidays. Karie’s design proves that a little imagination and clever use of products can create something totally unique — and that’s exactly why she earned 3rd place in our Attendee Swap Contest! 🏆
We hope Karie’s card inspires you to look at your stamp sets and papers in a whole new way. Who says Christmas products are just for December? 😉
Thanks for joining me today … stop back for our 2nd runner up tomorrow!
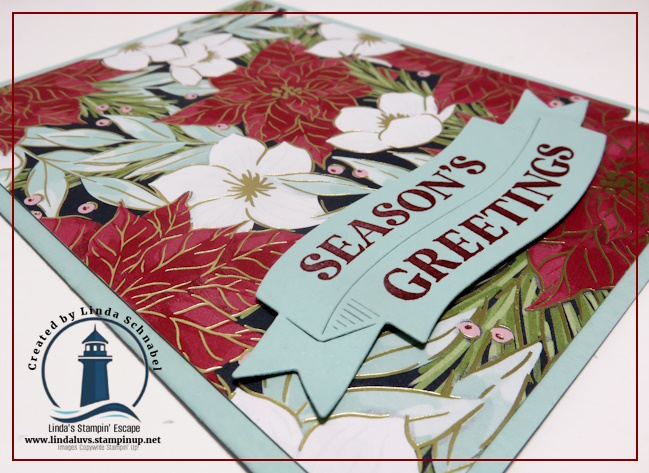
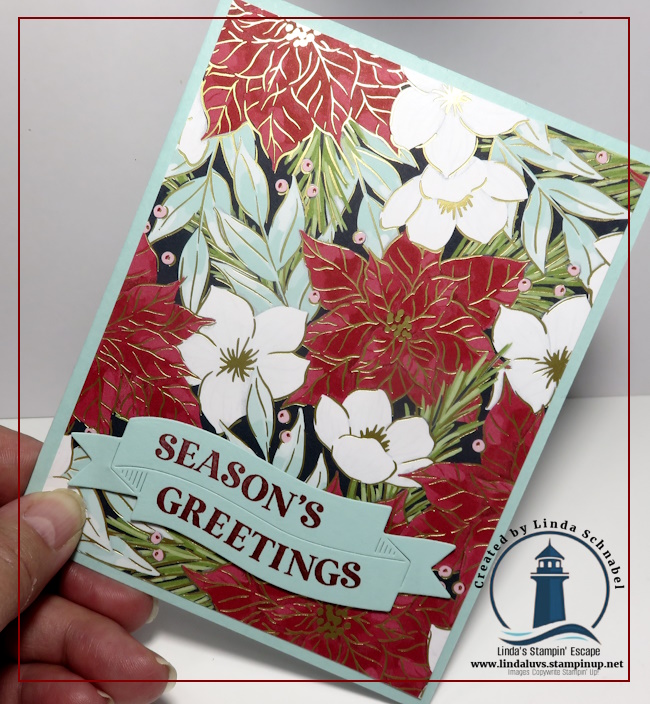
Happy Sunday! Today’s project brings together two of my favorite things from the Holiday Mini Catalog—the Traditions of Christmas Specialty Designer Series Paper and the Traditional Labels Bundle. These two pair beautifully to create timeless cards that capture the spirit of the season while staying easy and fun to make.
The Traditions of Christmas Designer Paper is a classic choice for holiday crafting. With bold poinsettias, delicate white flowers, and lush greenery accented with gold foil, it offers a warm and traditional palette that feels just right for Christmas. Pair that with the Traditional Labels Bundle, which includes versatile greetings and perfectly sized dies, and you have everything you need for cards that are both elegant and effortless.
For today’s card, I chose patterned paper featuring red poinsettias, white flowers, and hints of Pool Party and Old Olive greenery upon a Secret Sea backdrop. The base of the card is Pool Party cardstock (8 1/2″ x 5 1/2″, scored and folded at 4 1/4″), which makes those seasonal colors pop. I die cut the double label banner from the Traditional Labels in Pool Party cardstock and stamped my greeting in Cherry Cobbler ink to tie in with the poinsettias.
Popping the sentiment up with dimensionals adds just the right amount of depth and texture. Although I didn’t, I suggest a few embellishments finish it off. Even this simple layout, our card still shines.
What I love about this design is that it’s perfect for beginners while still looking polished enough to impress. The die-cut label gives it that “next level” look without adding any complicated steps, so it’s a win for both new and experienced stampers alike.
Thanks so much for joining me for this Simply Sunday inspiration! I hope today’s project encourages you to reach for the Traditions of Christmas Designer Paper and the Traditional Labels Bundle as you craft your holiday cards. These products are truly timeless and will help you create keepsakes that capture the magic of the season.