Halloween Card Magic

Hello Stampin’ Friends ~

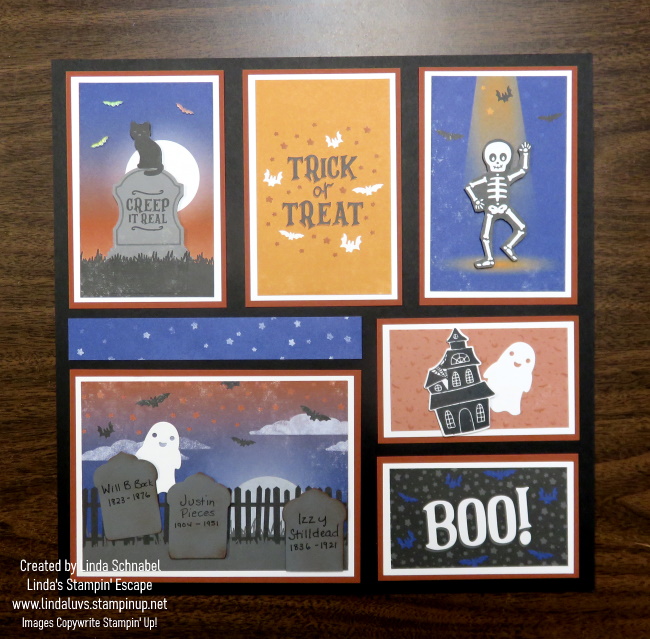
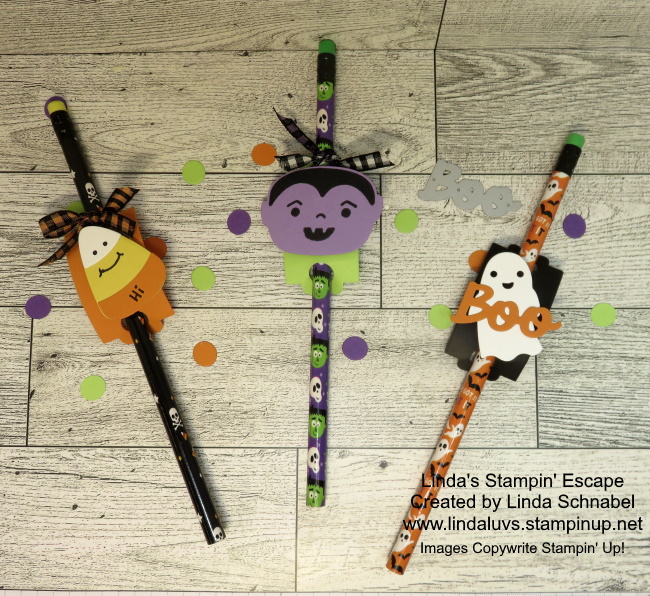
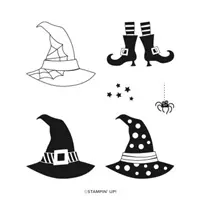
If you’re as batty about Halloween as I am, you’re in for a treat today. I recently had a fangtastic time at our Halloween class on Wednesday night, where we brewed up some spooky-cute fun with the Them Bones Designer Paper and the Tricks and Treats Bundle.

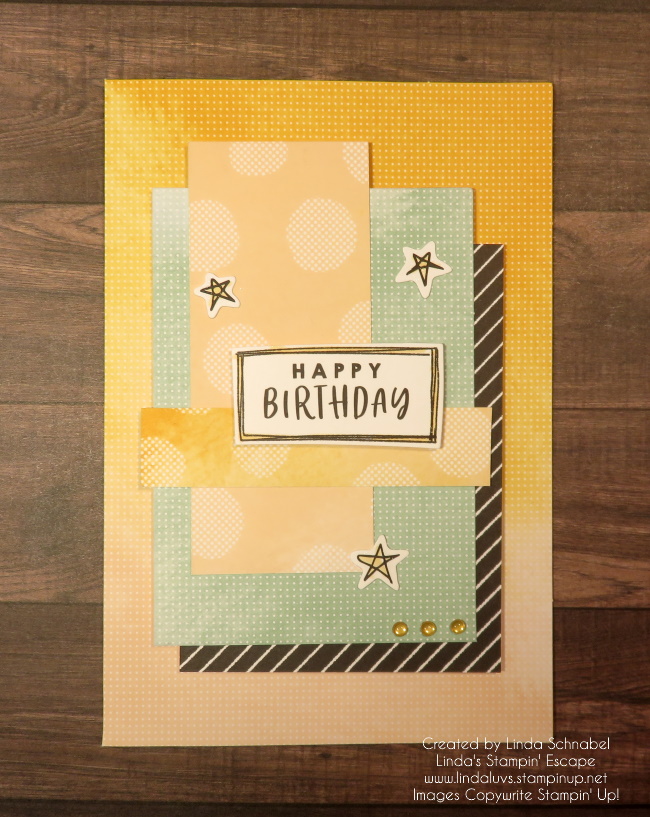
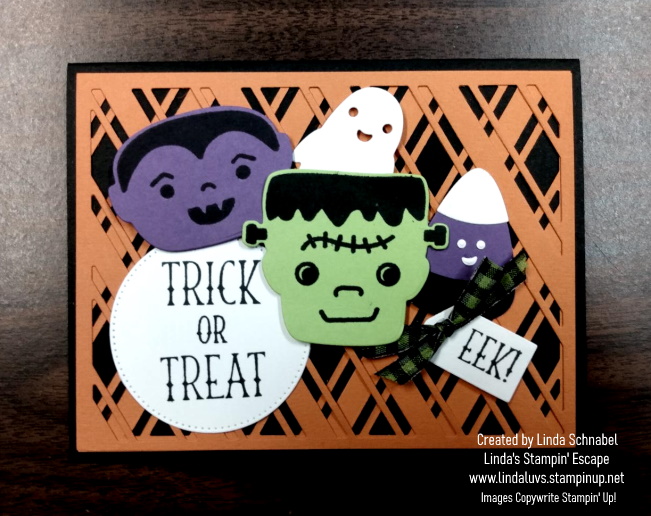
Today I’ll share my adorable Halloween card featuring candy corn die cuts and the spook-tacular Z-Fold … a super simple fun fold! Start with an 4-1/4″ x 11″ piece of cardstock then score at 2-3/4″ and 5-1/2″ … that simple.

Picture this: a room filled with fellow Halloween aficionados, a cauldron of stamping supplies, a dash of creativity, and a sprinkle of eerie ambiance. That’s exactly what our Halloween class was all about!

Our bewitching adventure began with the Them Bones Designer Paper. πŸ¦‡πŸ¦΄This paper pack is a Halloween dream come true, featuring quirky skulls, spooky spiders, and haunted houses. It’s a perfect backdrop for all your Halloween crafting endeavors, and it set the mood for our ghoulishly delightful evening.

To cast our crafting spell, we enlisted the help of the Tricks and Treats Bundle. πŸŽƒ This bundle is chock-full of charming Halloween-themed stamps and coordinating dies that make crafting a breeze. But the true star of the night? The candy corn die cuts!

So, as you prepare for Halloween this year, don’t forget the magic of crafting. The Them Bones Designer Paper and Tricks and Treats Bundle are your partners in Halloween crafting crime. Give it a try, and who knows, you might just conjure up some Halloween magic of your own!

Until next time, may your cauldron be bubbling and your Halloween crafting be absolutely spook-tacular! πŸŽƒπŸ•·οΈπŸŒ™

Explore Creative Possibilities with the “Enjoy the Adventure Memories and More” Card Pack!

Hello Stampin’ Friends ~

Are you ready to embark on a creative journey? Look no further than the “Enjoy the Adventure Memories and More” card pack, currently on sale in our clearance rack. This versatile card pack is not only perfect for scrapbooking but also for crafting quick and easy cards that will leave a lasting impression. Let’s dive into what makes this card pack a must-have for any crafting enthusiast.

My first card was the “Thank You” card … the simplest of the bunch. The base comes from the Cards & Envelopes which coordinate with the Memories & More Card Pack. I simply cut down the 4″ x 6″ Thank you card to 3-1/2″ x 5-1/2″ (so a 1/2″ off the top and 1/2″ off one side). I then colored in the THANK YOU with Mint Macaron and Petal Pink Stampin’ Blends. Super Simple!

On to the next card, we begin with the Mango Melody and Petal Pink card base. These are scored for you so they fold nicely …

I took a second card base and cut off the front, then I cut the front down to 3-1/4″ x 4-1/4″ (you’ll get 2 from the front piece). I then layered the “heart” card which measure 3″ x 4″ … not cutting needed.

The rest is easy as I used the die cut adhesive backed elements from the sticker sheet included in the Enjoy the Adventure Memories & More Card Pack. Each of the elements were popped up with Stampin’ Dimensionals and then brushed with Wink of Stella.

The next card also starts with the Mango Melody and Petal Pink card base…

This card is all about layers … the bottom two layers are actually 2 of the 3″ x 4″ cards from the card pack. The two smaller pieces; the Petal Pink is 4″ x 1-3/4″ and was attached vertically, then the Mango Melody piece 3-1/4″ x 3/4″ was layered vertically. Both of these smaller pieces were cut from the 1/2 front that was left over from the second card!

The Happy Birthday (popped up) and Stars are elements from the sticker sheet. You’ll have to substitute a coordinating color for your cardbase the the “cards & envelopes” have sold out.

Now … I have one more card to share with you. If the first card was a bit too simple for you, this card will show you how you can get the same look, but a little more jacked up …

The card begins exactly how our first card was created, except I took the left over pieces cut off and found a full “THANK YOU” to trim down and color … this will give us more dimension. Then I punched a scalloped heart from vellum to place behind the “Thank You” so it stands out more.

Don’t miss out on this fantastic opportunity to grab the “Enjoy the Adventure Memories and More” card pack at a discounted price from our clearance rack. Start your creative adventure today and enjoy the versatility and beauty that this card pack has to offer. Whether you’re a scrapbooking enthusiast or simply looking to make quick & easy cards, this pack has you covered. Hurry, because this offer won’t last forever!

Thank you for joining me today. Which one of these cards is your favorite??

Creating Magic with Water-Based Inks & Autumn Leaves …

Hello Stampin’ Friends,

It’s time to Create Magic with Water-Based Inks with some tips and techniques to help you in your cardmaking and scrapbooking! Previously I shared the differences between three of our most popular inks (Click Here to View) Whether you’re a seasoned crafter or just starting on your creative journey, water-based inks offer a world of possibilities to enhance your projects.

Today, we’ll explore the exciting world of water-based inks with share tips and a fun technique that will take your card making and scrapbooking to the next level.

Why Water-Based Inks?

Water-based inks are immensely popular in the crafting community for several reasons:

  1. Versatility: Water-based inks work on a variety of surfaces, including paper, cardstock, vellum, and even fabric. They’re also great for different crafting techniques, making them incredibly versatile.
  2. Ease of Use: These inks are beginner-friendly, forgiving, and easy to clean up. You don’t need specialized equipment or ventilation like you do with some other types of inks.
  3. Blendability: Water-based inks can be effortlessly blended to create beautiful gradients and backgrounds. This feature is especially handy for creating unique card backgrounds and scrapbook pages.
  4. Layering: You can layer multiple colors to achieve complex effects and depth in your projects. This allows for endless creative possibilities.

Today we’re going to start with the basics … Simple stamping with a hint of a fun technique called “Stamping Off”. You can use pre-folded cards or cut and fold your own from cardstock. My base is an A2 size card; 8-1/2″ x 5-1/2″ scored and folded at 4-1/4″. Decide on the card’s theme and the colors you want to use. This is where your creativity shines.

Today we are using the new Autumn Leaves Stamp Set along with the Crushed Curry, Old Olive and Pumpkin Pie water-based ink pads! The Autumn Leaves is a photopolymer stamp set so for best results I use the Stampin’ Pierce mat to stamp onto. (Use a scrap piece of paper over the top to keep it clean).

As for our technique to “stamp off” … you’ll ink up your image and then stamp it onto a scrap piece of paper before stamping it onto your cardstock. Position your inked stamp over the desired area on your card. Apply even pressure, pressing down firmly but not too hard. Hold the stamp in place for a moment to ensure the ink transfers. The veins for the leaves are inked up and then stamped directly over the stamped off leaf, giving it the look of dimension. It’s magical.

After use, clean your stamp with the Stampin’ Scrub or paper towel. I stay away from baby wipes, but if you use them, make sure they are alcohol, lotion and lint free… the last thing you want is to have on your stamps or ink pads is a foreign substance. This maintains the quality of your stamps.

I stamped the greeting onto a scrap piece of white cardstock using the Old Olive ink then trimmed it down. I added some of the Threaded Twine behind it after breaking it apart by pulling out a few threads. I used Stampin’ Dimensionals to pop it up. This was all layered onto a piece of 4-1/4″ x 5-5/8″ Crushed Curry mat.

Stamping cards with water-based inks is a fun and rewarding creative hobby. With practice and these tips, you’ll feel like a master card maker in no time. Each card you create will be a work of art, made with love and care…. and that is why we stamp! So, gather your materials, unleash your imagination, and start stamping your way to heartfelt greetings and beautiful cards!

Thank you for joining me today.

You Choose: 35% Off -or- 35% More!!

Hello Stampin’ Friends,

Get ready to shine brighter than ever as we celebrate 35 incredible years of creativity and community with Stampin’ Up! We are thrilled to invite you to join our Stars by Design team and be part of this remarkable milestone.

Why Join Now?

Stampin’ Up! is making this anniversary celebration extra special with two fantastic options for new demonstrators who join between October 3rd – 31st:

  1. Join at a 35% Discount: When you sign up as a demonstrator, you’ll enjoy a fabulous 35% discount on your Stampin’ Up! products. It’s the perfect opportunity to stock up on your crafting essentials and discover new favorites while saving big.
  2. Choose 35% MORE FREE Merchandise: If you prefer more crafting goodies over a discount, this option is tailor-made for you. When you join during this time, you’ll receive an additional 35% in FREE merchandise of your choice with your Starter Kit. It’s like a crafting shopping spree that keeps on giving!

But wait, there’s more!

FREE Registration for OnStage @Home Virtual Event:

Stampin’ Up! is adding another layer of excitement by offering FREE registration for our OnStage @Home virtual event on November 11th. It’s an opportunity to connect with fellow crafters, get a sneak peek at upcoming products, and gain inspiration for your creative projects. And here’s the cherry on top: if you choose, you can join us at my home to enjoy the event together with your fellow stars. It’s a chance to bond, learn, and create lasting memories.

Why Join Our Stars by Design Team?

Becoming a Stampin’ Up! demonstrator and a member of my Stars by Design team opens the door to a world of incredible benefits:

  1. Friendships: Joining our team means becoming part of a close-knit crafting family. You’ll make new friends who share your passion for paper crafting and creativity.
  2. Confidence: As a demonstrator, you’ll gain confidence in your crafting skills. Whether you’re a seasoned pro or just starting, we provide support and resources to help you succeed.
  3. Extra Cash: Earn extra income doing what you love. You can choose to make your Stampin’ Up! journey a full-time career, or simply enjoy the financial perks on the side.
  4. Exclusive Access: Get a sneak peek at new products, enjoy early releases, and attend exclusive events. Stampin’ Up! demonstrator perks are endless!

This is an extraordinary time to join Stampin’ Up! and our Stars by Design team. We’re here to help you flourish as a crafter, make new friends, and enjoy the incredible benefits that come with being a demonstrator.

Don’t miss out on this golden opportunity to shine as we celebrate 35 years of creativity. Join our Stars by Design team today and let your crafting journey take flight!

Ready to take the plunge or have questions? Contact me today to get started or learn more about this fantastic opportunity.

Let’s create, inspire, and celebrate together!

Gifts from Santa Claus …

Hello Stampin’ Friends,

Prepare to be charmed by the heartwarming holiday spirit embodied in this adorable Christmas card created with the “Gift of Giving” stamp set and “Shining Brightly Specialty Designer Series Paper” from Stampin’ Up!

The “Gift of Giving” stamp set features endearing images, perfect for conveying the warmest wishes of the season. Pairing it with the “Shining Brightly Specialty Designer Series Paper” adds a touch of festive elegance, with its rich colors and sparkling accents.

Measurements:

  • Very Vanilla Thick:  8 ½” x 5 1/2”, scored at 4 ¼”
  • Navy Star DSP: 5” x 3 ¾”
  • Vanilla Star DSP: Largest square and Second square from Stylish Shapes Dies
  • Vanilla: Scrap for Santa

Instructions:

  • Glue the Navy Star DSP to the card front.
  • Cut the two squares from the Vanilla Star DSP.
  • Pierce two holes into the smallest square, as shown.Β  Take a length (8”) of the Night of Navy & Gold Glitter Ribbon and cut it lengthways into 4 thin strips.Β  Thread one of the small strips through the holes from the back.Β  Take the other three strips and wrap them around your fingers.Β  Carefully remove the ribbon from your fingers and squash the centre to create two loops (held with tweezers).Β  Place the loops on to the square and tie in place with the ribbon ends on the square.Β  Arrange the bow as you wish and trim the ends.
  • Stamp Santa in Memento ink and colour using Stampin’ Blends.  Cut out.
  • Attach the two squares (parcels) on to the card front using Stampin’ Dimensionals.
  • Attach Santa to the card front using Stampin’ Dimensionals.
  • Add a few gems to complete your card.

Today’s card not only captures the joy of giving during the holidays but also adds a delightful dash of whimsy and style. It’s a true testament to the magic of handmade cards, where every detail conveys love and thoughtfulness. Share the joy of the season with a card that radiates warmth, created with the “Gift of Giving” stamp set and “Shining Brightly Specialty Designer Series Paper.”

Have a wonderful Sunday and thanks for stopping by ~

Delighting friends with the Joy to You stamps

Hello Stampin’ Friends,

Today I’m introducing the delightful “Joy to You” stamp set from Stampin’ Up!’s Mini Catalog, a delightful collection of holiday-themed stamps designed to spread joy and warmth. Paired with the exquisite “Snowflake Magic Specialty” paper, today’s card creation is nothing short of magical.

The “Joy to You” stamp set offers a versatile array of seasonal sentiments, perfect for sending your heartfelt holiday greetings. Meanwhile, the “Snowflake Magic Specialty” paper, with its intricate snowflake designs and shimmering accents, adds an extra layer of elegance and sophistication to your projects.

Measurements:Β 

  • Card Base: Lost Lagoon 4-1/4” x 11”, scored at 5-1/2”
  • Cardstock #1: Pretty Peacock 4” x 5-1/4”     
  • Cardstock #2: Lost Lagoon 3-7/8” x 5-1/8”
  • DSP: Snowflake Magic Specialty 2” x 5-1/8”
  • DSP: More Dazzle Specialty 1/2” x 5-1/8”
  • Cardstock #3: Basic White 3” x 3” for die-cut sentiment

Instructions:

  • Fold the Lost Lagoon card base in half at the score line and burnish the fold.
  • Emboss Lost Lagoon layer with Basics 3D Embossing Folder.
  • Adhere strip of More Dazzle Specialty Paper to left side of Embossed Lost Lagoon layer with Stampin’ SEAL.
  • Adhere Snowflake Magic Specialty Designer Paper to the Lost Lagoon layer with Stampin’ SEAL, slightly overlapping More Dazzle layer . Leave approximately a 1/8” border of More Dazzle paper visible.
  • Wrap a piece of Silver & White Sheer ribbon around embossed Lost Lagoon layerΒ (approx 1-1/8” from bottom) and secure ends of ribbon on back with Stampin’ SEAL, or tape.
  • Adhere Lost Lagoon layer to Pretty Peacock layer with Stampin’ SEAL, then adhere to card base with Stampin’ SEAL.
  • Stamp sentiment on Basic White Cardstock in Pretty Peacock ink.
  • Die-cut sentiment with largest square in Stylish Shapes Dies.
  • Adhere the sentiment layer to card Stampin’ Dimensionals.
  • Tie a bow with Silver & White Sheer Ribbon and adhere to left side of die-cut square with a Mini Glue Dot.
  • Add (3) Festive Pearls to the card front, as shown.

Together, the “Joy to You” stamp set and “Snowflake Magic Specialty” paper create a harmonious blend of festivity and beauty, making your cards and crafts truly stand out this holiday season. Whether you’re sending wishes to friends and family or creating stunning holiday decor, the “Joy to You” stamp set and “Snowflake Magic Specialty” paper will undoubtedly make your creations sparkle with joy and charm.

Thank you for joining me today ~

Embrace the Beauty of the Season: Graceful Deer Stamp Set

Hello Stampin’ Friends ~

Today we embrace the beauty of the season with the Graceful Deer Stamp Set. The holidays are a time when we come together with our loved ones to create lasting memories and exchange heartfelt greetings. And what better way to convey your warm wishes and spread the festive spirit than with beautifully crafted, hand-stamped cards and projects?

The Graceful Deer stamp set is a masterpiece that captures the serene beauty of nature in the wintertime. This set is perfect for anyone who appreciates the elegance and grace of deer against a backdrop of snow-covered trees. Today’s card was created by one of my fellow Design Team members.

Measurements:Β 

  • Thick Very Vanilla: 8 ½” x 5 ½”, scored at 4 ¼”
  • Pool Party: 5 3/8” x 4 1/8” and 2 Β½ x 1
  • Very Vanilla: 5 ¼” x 4” and scrap

Instructions:

  • Cut card base & fold at score line.
  • Glue Pool Party to card front.
  • Stamp Graceful Deer image on Very Vanilla piece using Pecan Pie ink. Color using Stampin’ Blends: Wild Wheat deer, Cherry Cobbler bird, Pool Party snow drifts, Crumb Cake Antlers, Petal Pink ears.
  • Add sparkle using Wink of Stella on the snow drifts.
  • Glue to Pool Party layer.
  • Stamp sentiment on Very Vanilla scrap using Wild Wheat ink then cut out using Countryside Corner Dies.Β  Glue to small Pool Party piece, then pop it up using Stampin’ Dimensionals.

The Stampin’ Up! Graceful Deer stamp set from the Holiday Mini Catalog is a must-have for anyone looking to add a touch of elegance and warmth to their holiday crafting. Whether you’re creating cards, gift tags, home decor, or heartfelt gifts, this versatile set will help you capture the beauty and grace of the season. So, embrace your creativity and let the Graceful Deer stamp set bring a touch of magic to your holiday projects this year.

Happy crafting!

A Spooktacular Halloween Treat Card

Hello Stampin’ Friends,

As the leaves change color and the air turns crisp, we know that Halloween is just around the corner. It’s that time of the year when creativity and spookiness collide to bring out the inner child in all of us. And what better way to celebrate the season than with the Stampin’ Up! Tricks and Treats Bundle?

This bewitching bundle brings together the magic of Halloween with timeless classic movie monsters; Dracula and Frankenstein, a friendly ghost, and a candy corn that will sweeten up your crafting projects. Whether you’re an avid paper crafter or just looking to add a touch of spookiness to your holiday decor, this bundle is sure to cast a spell on you.

Nothing says Halloween like a “Trick or Treat” greeting, and with the Stampin’ Up! Tricks and Treats Bundle, you can easily create your own. Using the Stylish Shapes Die makes crafting a breeze. Simply stamp your greeting, die cut it, and you’re ready to go. It’s a quick and easy way to add a festive touch to your projects.

What’s Halloween without a little “EEK!”? This bundle includes a fun and quirky “EEK” tag that adds a playful element to your creations. Use it as a tag on a treat bag, a spooky accent on your cards, or even as a cute decoration for your home. It’s these little details that make the Stampin’ Up! Tricks and Treats Bundle a must-have for Halloween crafting.

To truly elevate your Halloween projects, add in the Candycane Background Dies that are now in the Clearance Rack. These dies allow you to create intricate and eye-catching backgrounds that will make your creations stand out. With the Candycane Background Dies, there’s no shortage of dimension, texture, and fun. They’re perfect for adding a touch of spookiness to your cards, or any Halloween-themed project.

Time to grab your crafting supplies, embrace the Halloween spirit, and get ready to have a hauntingly good time with the Stampin’ Up! Tricks and Treats Bundle.

Happy crafting,

Spooktacular Halloween Sampler & Video

Hello Stampin’ Friends ~

Halloween is just around the corner, and what better way to get into the spooky spirit than by creating your very own Halloween sampler? Last night, we hosted an exciting Facebook LIVE event where we walked you through the process of making a Halloween sampler using the “Them Bones” 12 x 12 designer paper and the Tricks and Treats bundle.

In case you missed it, don’t worry! We’ve got the video replay right here …

Creating a Halloween sampler using the “Them Bones” designer paper and the Tricks and Treats bundle is a fantastic way to get into the Halloween spirit. Whether you’re a seasoned crafter or a beginner, this project is fun and easy to do. With the video replay of our Facebook LIVE event and these step-by-step instructions, you’ll have everything you need to create your own spooktacular Halloween decor.

  • The top 3 designer paper pieces are all cut at 3″ x 4-3/4″, with 3-1/4″ x 5″ White mat and 3-1/2″ x 5-1/4″ Cajun Craze matte.
  • The 2 pieces of designer paper on the right side are cut down to 2-1/4″ x 4″ with 2-1/2″ x 4-1/4″ White mat and 2-3/4″ x 4-1/2″ Cajun Craze matte.
  • The large piece on the bottom left is cut to 4-1/4″ x 6″ with a white mat at 4-1/2″ x 6-1/4″ and a Cajun Craze at 4-3/4″ x 6-1/2″.
  • The blue strip measures 3/4″ x 6-1/2″

So, gather your materials, watch the video replay, and let your creativity shine as you embark on this Halloween crafting adventure. Your DIY Halloween sampler will be a bewitching addition to your home decor, and it’s sure to impress your friends and family.

Happy crafting,

Discover Unbelievable Bargains on Our Revamped Clearance Rack!

Hello Stampin’ Friends,

Are you ready for some fantastic news, fellow craft enthusiasts? Brace yourselves because our clearance rack just got a jaw-dropping makeover! If you thought the deals were good before, you won’t believe your eyes when you see what we have in store for you now. Get ready for a shopping spree that’s bound to make your creative heart skip a beat.

Here are just a few examples of the amazing products we have in store for you ….

Pastel Paradise

First up, we’ve stocked our refreshed clearance rack with the Soft Pastel Assortment… what some call “chalks” these are artist quality pastels. Whether you’re into scrapbooking, cardmaking, or DIY projects, these pastel gems will add a touch of elegance to your creations. With a range of shades to choose from, your crafting possibilities are practically endless.

Thank You & Hello Embossing Folders

Are you tired of the same old plain paper? Elevate your projects with our “Thank You” and “Hello” embossing folders. These versatile tools are perfect for adding texture and style to your greeting cards and paper crafts. They’re a must-have for any crafter looking to make a lasting impression.

Fun Flowers Resin Shapes

Bring a touch of nature into your projects with our fun flowers resin shapes. These adorable, durable embellishments are ideal for adding dimension and personality to your creations. Whether you’re crafting greeting cards or decorating scrapbook pages, these flower-shaped gems are a delightful addition.

Scallop Kraft Gift Boxes

Looking to add that extra special touch to your gift-giving? Our scallop kraft gift boxes are the answer! These charming boxes are not only eco-friendly but also perfect for presenting your handmade gifts with flair. Grab them now, and be ready to impress your loved ones with beautifully packaged presents.

Pretty Prints Designer Paper

Last but not least, our clearance rack boasts a selection of pretty prints designer paper. With an array of patterns and colors, you’ll find the perfect paper to complement your artistic vision. Whether you’re working on a vintage-inspired masterpiece or a modern design, these papers will make your projects stand out.

Now, the best part – the prices! We’ve slashed the prices on these crafting treasures to make sure you get the best value for your money. These deals are so amazing that they won’t last long, so don’t hesitate. Head to our refreshed clearance rack today and snag these incredible bargains before they’re gone!

Shop Now for Unbeatable Bargains: Click Here

We’ve made it even easier for you to explore our refreshed clearance rack and grab those amazing deals. Just click the link above and start filling your cart with crafting treasures. Hurry, these offers won’t last long!

Happy crafting, everyone!

Simply Sunday: Christmas Everywhere Cards

Hello Stampin’ Friends,

The holiday season is fast approaching, and what better way to spread the Christmas cheer than with heartfelt greetings sent to your loved ones? If you’re looking for a creative and meaningful way to send warm wishes, our “Christmas Everywhere” card kit is the perfect solution to holiday cardmaking.

One of the best things about our “Share the Joy of Christmas” card kit is that it comes with everything you need to create nine charming Christmas cards. No need to scramble for supplies or spend hours browsing for the perfect decorations; we’ve got you covered.

This kit includes:Β 

  • Enough supplies to create 9 cardsβ€”3 each of 3 designs
  • 9 coordinating envelopes
  • Christmas Everywhere photopolymer stamp set
  • One Lost Lagoon Ink Spot
  • Printed card bases, printed die-cut labels and images with red glitter, adhesive, and a clear block
  • Finished card size: 5-1/2″ x 4-1/4″ (14 x 10.8 cm)
  • Coordinating colors: Granny Apple Green, Lost Lagoon, Pecan Pie, Pretty Peacock, Real Red

This holiday season, let our card kit be your companion in sending warm Christmas wishes to friends and family across the globe. Make this Christmas truly special by sharing the beauty of trees from around the world and spreading the joy of the season.

With three unique card designs and three copies of each, you can send warm Christmas wishes to a variety of recipients. Whether it’s family, friends, coworkers, or distant relatives, these cards are the perfect way to let them know you’re thinking of them during this special season.

The “Share the Joy of Christmas” card kit is more than just a creative project; it’s a meaningful way to send love and warmth to the people who matter most to you. Celebrate the diversity of our planet and the magic of the holiday season with these beautifully crafted cards. Order your kit today and start spreading the joy of Christmas, one card at a time!

Thank you for sharing a part of your Sunday with me.

Have a beautiful day ~

So Creative: Transform from Halloween to Birthday… Card!

Hello Stampin’ Friends,

I’m back with a pop of color, and I promised in my last video that I would show you exactly what you can do with the “leftovers”. Are you ready to take your card-making to the next level? If so, you’re in for a treat (no tricks here!) with our Candy Cane Dies from the clearance rack. These versatile dies offer endless possibilities, and today I’ll show you a simple yet creative way to use them to make a spooktacular Halloween birthday card.

The first step in our creative journey is to choose our cardbase / Basic Black and the I’m using Pumpkin Pie cardstock and will then modify the background die. So simple to trim down this die … just follow the lines and cut with your paper snips.

Now, let’s get creative with those leftover pieces from the tag die. Instead of letting them go to waste, we’re going to use them to create a playful polka dot background for your card. Simply adhere the tag die cutouts onto your cardstock in a random pattern. This will give your card a fun and festive polka dot look, perfect for Halloween.

To complete your Halloween birthday card, use the Wanted to Say Dies to add a birthday greeting. Place the greeting strategically on your card to balance the design, and I layered the greeting over some Vellum cardstock to really create a focal point.

Creating this Halloween birthday card using the Candy Cane Dies has been a blast, hasn’t it? The best part is that it was quick and easy to put together, thanks to these versatile dies.

So, the next time you’re in the mood for some creative crafting, don’t forget to check out the clearance rack for hidden gems like the Candy Cane Dies. With a little imagination, you can transform ordinary dies into extraordinary designs that will delight your friends and family.

Have fun, get creative, and enjoy making one-of-a-kind cards that will leave a lasting impression.

Happy crafting! πŸŽƒπŸŽ‚πŸ‘»

Candy Cane Dies & Trick and Treat Bundle Unite for Spooktacular Treats!

Hello Stampin’ Friends,

Something Old and Something New: The Candy Cane Dies and Trick or Treat Bundle Unite! If you’re itching to infuse some DIY magic into your Halloween, you’re in for a treat! I’ve got a spine-tingling combination that’s bound to enchant both young and old. And if you want to “save” some cash as well, our Candy Cane Dies are on the clearance rack!! You’ll find the Trick or Treat Bundle in the Holiday Mini catalog. Together, they’re about to bring your Halloween handouts to life!

Check out the video, and then I’ll share the projects with you one more time ….

Use the Candy Cane Tag Die and pair it with the Trick or Treat stamps to create eerily delightful Halloween sucker holders. These make fantastic handouts for trick-or-treaters or party favors for your Halloween bash.

Jazz up your holiday pencils by crafting decorative pencil slides. Add the spooky motifs from the Trick or Treat Bundle, and you’ve got a simple yet charming treat to distribute at school or during your Halloween festivities.

Now lets elevate your candy distribution game by decking out your holiday hand outs. Just a few more ideas for the Halloween party, school treats and handing out when that door bell rings; Trick or Treat!

With the Candy Cane Dies from the clearance rack and the Trick or Treat Bundle from the Holiday Mini catalog, you can easily take your Halloween handouts from ordinary to extraordinary. These delightful creations are perfect for enchanting ghouls and goblins this Halloween night.

Get ready to add a touch of homemade magic to your Halloween celebrations! Happy crafting and a spooktacular Halloween!

The Hidden Treasures of Clearance Racks: A Crafters Delight

Hello Stampin’ Friends, Today I’m sharing a few Hidden Treasures on the Clearance Rack. To me, it’s a secret treasure trove just waiting to be discovered. You can find incredible deals on a wide range of your favorite crafting supplies. If you like a deal like me, you know the thrill of finding those hidden gems that can elevate your projects. Today, I want to share some of my current favorites from the clearance rack, and why I believe these items can be used year-round, transcending their initial holiday designs.

The Splendid Day stamp set and coordinating dies are a must-have for any crafter. While they may seem tailored for specific occasions, their versatility knows no bounds. The beautiful floral designs and heartfelt sentiments can be used to celebrate birthdays, anniversaries, or simply to send a heartfelt message to someone you care about. By selecting different ink colors and paper textures, you can easily adapt these stamps and dies to fit any occasion, whether it’s a spring wedding or a summer garden party.

Candy Cane dies are a must-have in your crafting arsenal, not just for their delightful holiday charm but for their incredible versatility. Don’t you love it when crafting supplies multitask? The tag die in the Candy Cane set is a prime example of this. While it’s designed to hold candy canes during the holidays, it’s also a fantastic tag for any celebration or gift-giving occasion. Birthdays, anniversaries, graduations, or even a simple thank youβ€”you name it, and this tag die can transform your presents into a work of art.

The diagonal background die adds texture and elegance, the tag die suits any celebration, and the leaves bring nature’s beauty to your projects, no matter the season. So, the next time you’re brainstorming crafting ideas, remember the Candy Cane diesβ€”you’ll be surprised at how they can add a touch of magic to your year-round creations.

One of the joys of crafting is the ability to mix and match different elements to create something truly unique. The Bewitching stamp set can be combined with the Candy Cane dies to weave a tapestry of creativity that transcends seasons and occasions… image the possibility.

Shopping the clearance rack is not only a treasure hunt but also a smart way to stretch your crafting budget. The Bewitching stamp set’s presence on the clearance rack is a fantastic opportunity to invest in quality stamps without breaking the bank. The money saved on any of these fabulous finds can be used to stock up on other crafting essentials or explore new creative avenues.

If your looking for some creative ideas, join me tonight at 6:30 pm on my Linda’s Stampin’ Escape Facebook page ….

Thanks for stopping by today and I hope you join me tonight for some tricks -n- treats!

Crafting Holiday Magic: A Merriest Trees Christmas Card

Hello Stampin’ Friends,

The holiday season will soon be upon us, and what better way to spread some festive cheer than by sending heartfelt Christmas cards to your loved ones? Today, we’re going to create a stunning Christmas card using the Merriest Trees Dies and the Snowflake Magic 12 x 12 Specialty Designer Paper. This card not only captures the spirit of the season but also showcases some must-have products for your holiday crafting collection.

Let’s begin with a piece of Basic White Cardstock for your card base 8-1/2″ x 5-1/2″ that will be scored at folded at 4-1/4″ . You will also need a card front (white) 5-1/4″ x 4″ and your blending brush with Balmy Blue Classic Ink. Apply a small amount of ink to the brush in a circular motion apply the ink to the card front, this will create a soft glow for behind your tree.

Now, it’s time to bring out the star of the show: the Merriest Trees Dies. Choose a beautiful design from the Snowflake Magic Designer Paper, and die-cut your tree. This paper is ideal for creating intricate and elegant holiday-themed die-cuts.

Carefully place your die-cut tree onto the Balmy Blue background you created earlier. The soft blue glow behind the tree will give it a magical appearance, as if it’s nestled in a snowy forest.

For the finishing touch, let’s add a heartfelt message. The Beary Cute Stamp Set comes to the rescue! I used the “Merry Christmas” to convey my holiday wishes, and stamped onto a scrap piece of cardstock and adhered it near the bottom of the card.

Time to decorate the tree to add your personal touch to the card. Die cut the garland in Balmy Blue that’s included in the Merriest Trees stamp set and add a little sparkle with your Wink of Stella. Lastly you’ll tuck a little Balmy Blue Sparkly ribbon behind the greeting.

Your Merriest Trees Christmas card is now complete and ready to spread holiday joy to your friends and family. Whether you’re sending it in the mail or delivering it in person, your handmade card will surely bring smiles and warmth to those who receive it.

This Merriest Trees Christmas card combines the beauty of Snowflake Magic Designer Paper, the elegance of the Merriest Trees Dies, and the heartfelt sentiment from the Beary Cute Stamp Set. With a touch of Balmy Blue ink, you’ve created a masterpiece that captures the enchantment of the holiday season.

As you embark on your holiday crafting journey, remember that the magic of Christmas lies not only in the materials you use but in the love and thoughtfulness you put into your creations. Happy crafting, and may your holiday season be filled with warmth, joy, and creativity!

Thanks for hangin’ with me today ~