Category Archives: Quick -n- Easy
Happy Blooming Birthday …
Hello Stampin’ Friends,
Today I would like to share a sweet and simple birthday card that will bring a smile to anyone who receives it. I used the new “Flower Patch” stamp set! This is one of our Photopolymer sets, and makes the two-step stamping super simple because of the clear images.
I have a video for you to view that highlights the “Flower Patch” stamp set …
My card base color is the new In-Color Mossy Meadow along with the Whisper White which truly highlights to ink colors we will be using on our card.
The flower was created by stamping our largest image first, in the lightest color: Crisp Cantaloupe. I then layers the Calypso Coral next, and completed the flower with the Cajun Craze… and topped it off with a pearl.
STAMPIN’ TIP: The leaves were added behind the flower by creating a mask. Stamp the largest flower image on a piece of scrap paper and cut it out. I always cut inside the line. Then place it over the flower and stamp your leaves … it gives the appearance they are behind the flower!
It’s been a while since I’ve used a two-step stamping set and forgot how fast you can create a beautifully layered, colorful card. I added the Daffodil Delight flowers in the background to create another pop of color.
As the video states, the Flower Patch stamp set has a coordinating framelit; Flower Flair, and when bundled you get a 15% savings!
I hope you enjoyed today’s card and video!
Happy Birthday ~
12 Quick -n- Easy Cards using Designer Series Paper!
Hello Stampin’ Friends,
Today I thought I would share a recap of the many cards using the new Designer Series papers! I thought this would be a great way to finish off the Quick -n- Easy cards series.
Our first three cards are from the “LULLABY” Designer Series Papers …
As you can see, this beautiful paper can be used for many styles of cards … not just baby cards as the name “Lullaby” would imply. I love the fun playful patterns in the Soft Subtle colors.
My next three cards are from the “PARK LANE” Designer Series Paper…
Don’t you just love these papers! The rich Blackberry Bliss color teamed up with colors like Old Olive and Soft Suede make these colors perfect for a man or women’s card… and the patterns are there to support it.
My next 2 cards are from the “Back to Black” Designer Series Paper ….
For me … this is my go to Designer Paper because you can team it up with any colors you want! The patterns range from floral, to fun, to funky! It’s great to pick out your pattern and then accessorize it the way you want … like having a little black dress!
The next two cards come from the “SWEET TAFFY” Designer Series paper and from my Quick -n- Easy collection …
This is definitely a fun designer paper to have around… the colors and patterns are just waiting for you to come out and play!
The next three card samples come from the “MARITIME” Designer Paper …
This is a great designer paper to have in your collection! Right off the bat you think masculine, guy cards … but you can see this is so much more! From a playful kids card to yes … a baby card!
Isn’t it great to see the different styles all together on one page! I thought it was a great way to showcase the different designer papers in the different designer series packages. Hope you enjoyed the cards. I’d love to know which one is your favorite?
I’ll have the links below so you can just click on them and begin shopping. Don’t forget …
Thanks for stopping by… have an awesome weekend!
A Wonderful Journey …
Hello Stampin’ Friends,
Today I want to share with you another card from my Quick -n- Easy series focusing on the Designer Series Paper. My card is a bit more sophisticated than the fun and bold birthday card you saw yesterday.
Nothing says sophistication like black and white, so I pulled out the “Back to Black” Designer Series Paper. It’s like pulling out your favorite outfit from your closet! I used it as my background and with one of the banners so you could see two different patterns.
I quickly made the banners using the “Banner Framelit Dies”, this is where I introduced the Mossy Meadow, one of the new 2014-16 In-colors. I secured these to the top of the designer paper and topped it off with the beautiful Mossy Meadow Stitched Ribbon. It’s so soft and ties beautifully.
To complete the card, I chose the new “World of Dreams” stamp set found on page 127. This was on my wish list from the moment I opened the new catalog, it didn’t take long before it was in my stamp collection and I was a very happy stamper!
What a beautiful greeting … “Wishing you a wonderful journey through a world of dreams come true”. The second greeting in the set is; “The best thing about a person like you is that you bring out the best in everyone”. Perfect … perfect stamp set!
I stamped the saying in Black StazOn, then cut it out with the “Circle Framelit Dies”. Lastly, I inked up the leaves in Mossy Meadow and “stamped off” onto scrap paper before stamping over my verse. To create some dimension, I popped up the verse using the Stampin’ Dimensionals.
It is a very easy card to make and the use of the framelits make it quick and professional looking.
Now is a great time to purchase the designer papers … It’s buy 3, get 1 FREE.
Thanks again for stopping by and following along with my Quick -n- Easy series. I would love to know which one is your favorite?
Have a wonderful day ~
Monday can be Awesome!
Hello Stampin’ Friends,
I hope you had an enjoyable holiday weekend. Mine was somewhat quite … a bit of stampin’ and a bit of planning for upcoming events! I need all my Hostesses to save the 28th of July so they can attend my Hostess Appreciation Party! It’s going to be a good one.
My stampin’ was upon request. I have been asked to share some quick -n- easy cards that showcase the designer paper, since that is our special of the month! So for the next couple of days, I will do just that. You asked for it, you got it!
You’ve seen samples created with the Park Lane and the Lullaby, so today I am introducing you to the Sweet Taffy … sounds yummy doesn’t it. I definitely have a taste for this designer paper, I love the colors and the patterns are fun!
I’ve teamed up this hexagon pattern with Tempting Turquoise and Old Olive. I used my markers to color the greeting so I could have a two-tone effect.
My “awesome” greeting comes from the stamp set “Big News” found on page 68 of the annual catalog. This stamp set also contains greetings for brides, babies, and birthdays!!
I thought it would be fun to show you another button from the Vintage buttons I showed you yesterday. Today I colored it with the Old Olive Blendabilities markers. There is still one more style of button in the container!
I finished off the card by adding a bit of bling to highlight the button and greeting. Who doesn’t have an awesome friend that deserves a bit of bling and a card to tell them how special they are.
Just a bit of coloring on the greeting and the button, along with some awesome designer paper and you have a quick and easy card. Hope you enjoyed it.
Thank you for stopping in, come back tomorrow for another sample of a quick-n-easy DSP card.
Have an awesome day!
Simply Sweet Sunday …
Hello Stampin’ Friends,
It’s Sunday … they day many of us can relax. I hope you are enjoying your weekend.
Today I have a simply beautiful card to share with you. We begin with Whisper White cardstock and add a splash of Daffodil Delight. Nothing says sweet summer days more than the clean, crisp colors of white and yellow.
I used the new “Lovely Lace” embossing folder for my background. It’s so pretty and I know it will work on so many cards. This was matted with the Daffodil Delight.
The pretty flower was punched with the 1-3/4″ Scallop Circle punch and petals created with the paper snips. Make sure you do not cut all the way to the center or some of your petals will fall off! Yikes … you don’t want that to happen.
The center of my flower is the “Very Vintage Designer Buttons” colored with the new “Daffodil Delight” Blendabilities marker. You can color anything with those markers … so if you were thinking about getting them – you’ve just learned another technique for your markers.
I fed the ribbon through the buttons holes, then through the flower (Use our new hand held 1/8″ punch/ 134365). I then brought it across the entire card for an added pop of color.
My greeting was stamped in Daffodil Delight and comes from the stamp set “And Many More”. You’re going to love this set, it’s like your favorite pillow … you miss it when you don’t have it with you. You know, when your traveling … I don’t think you should take it to work! LOL
Just because … what better reason to send a card 🙂
Hope you enjoyed my summer card today.
Thank you for stopping by ~
Hello … S’Up?
Hello Stampin’ Friends,
What’s Up? Hope you are having a fabulous holiday weekend! My “Hello” card share today comes from a swap from my sister Eileen. She is showcasing the new “Hi There” stamp set found on page 18 of the catalog.
Eileen also highlighted 2 of the new In-colors … Hello Honey and Blackberry Bliss. She used Whisper White for the S’ UP? and inside of the card.
The beautiful designer paper Eileen used comes from the “Moonlight” paper stack. Simply cut your designer paper to the desired width, and a bit longer than needed so it sticks out past your base. Adhere and trim off the edges.
The “Moonlight” designer paper stack is not one of the designer papers on sale, but if you click on the picture below – it will take you to my website so you can see all the designer papers that are on sale.
The “hello” and “S’ UP?” were stamped in that tasty Blackberry Bliss color! The “S’ UP?” was then punched out with the 3/4″ Circle punch. Eileen matted it with the new Gold Glimmer Paper punched with the 1″ circle punch.
This is a perfect layout to use with any of the designer papers … Simple and fun!
Thanks for dropping in … enjoy the beautiful weekend!
Blooming Fast to Blooming Beautiful
Hello Stampin’ Friends,
My card share today reflects my “Fast Friday” theme. This beautiful birthday card is so easy to make, you could pump out a dozen in less than 1/2 hour!! It’s a great way to create a stash of birthday cards and then get back to the fun in the sun!
I began with the beautiful “Park Lane” Designer Series paper. This package has many unique designs and will work great for the ladies, the guys and even the kids!
I chose the floral pattern in Whisper White and Old Olive, and cut the paper to use the large flower as the focal point of my card.
The greeting comes from the new “Flower Patch” stamp set … fitting, don’t you think! The “Flower Patch” stamp set is in the new Photopolymer material. I love it, it’s perfectly clear and sticks to the blocks fabulously!!
I then cut my greeting and Old Olive mat from the “Apothecary Accents” framelits. I did not want the greeting to overpower the card, but just added a bit of bling to draw your eye to it.
I hope you enjoyed today’s quick card. Stop back tomorrow … I’ll be sharing another beautiful card using the “Park Lane” Designer paper.
Thanks much & have an awesome day! It’s Friday 🙂
Way to Go Man!
Hello Stampin’ Friends,
Today I would like to share with you a masculine card that can be used for a birthday, or celebrate an accomplishment. It’s also pretty easy to make, and you gotta love that.
I began by choosing the Silver Foil Sheet. I love the way it looks when it’s embossed so I grabbed the “Arrows” Embossing Folder and ran it through the BigShot. It makes such a statement!
I then decided to use banners to create a focal point for my greeting. Of course I used the “Banners” Framelit Dies because you get a perfect banner every time.
For my black “mat” banner, I cut the cardstock to the size of the banner, the I threaded it through the top so I would increase the length. After I cut it out, I ended up with two pieces, the normal banner and the other end … I chose to use the other piece because I thought it looked a bit like the pattern in the embossed background.
The greeting “Way to Go” comes from the new stamp set “Bravo”. You can find that on page 133 in the New Catalog. (If you need a new catalog… let me know). I stamped with Black StazOn onto Naturals White cardstock.
T0 finish off the card and add a touch of color, I wrapped the Cherry Cobbler Bakers Twine around the top. The entire piece was then adhered to the card with Stampin’ Dimensionals.
So there is my quick and easy masculine card for today … I hope you enjoyed it.
Thank you for stopping by.
Have a wonderful day ~
Mossy Meadow Sympathy Card …
Hello Stampin’ Friends,
I’m back … I took a little break on Friday the 13th! Today, I would like to share with you a card that I cased from a fellow demonstrator that I found on Pinterest.
Here is the card that inspired me. It was created by “Rachel Tessman” …
I loved the simplicity of her card. As I’ve always said … sometimes less is more. I wanted to share Rachel’s card with you, so you could see where my inspiration came from, and to give her credit for the original design.
Because I was using this card for my “Kick-Off Party” … I wanted to showcase the new In-color “Mossy Meadow” and chose to mat the stamped image with the Mossy Meadow cardstock.
The image is from the Hostess stamp set … Bloom with Hope”. I used StazOn to stamp the image, and then colored it in with the ink pad and Blender Pen.
I love texture, so I decided to add a subtle touch with the “Woodgrain” embossing folder and white on white cardstock.
Both cards are beautiful, and you can clearly see I was inspired by Rachel’s card. There is a lot of “casing” in the stamping world (CASE … Copy And Share Everything).
I hope Rachel and I inspired you today!
Have a wonderful weekend.
Something for Baby …
Hello Stampin’ Friends,
I am excited to share with you today, one more card that I have created for my 2014 Catalog Kick-Off party. This sweet card is done in Crisp Cantaloupe.
It doesn’t matter at what stage we are in our lives, because life goes on and we are blessed with God’s little treasures somewhere in our families or lives… sweet little baby’s. I fell in love with the new “Something for Baby” the minute I saw it… the nostalgic buggy, the onsie and even the rubber ducky! You can find it on page 74 of the new catalog.
The “Something for Baby” stamp set also has coordinating framelit dies. You gotta love it when you don’t have to cut the stamped images out manually. Personally … I like to use that time stamping!
I teamed up this fabulous stamp set with the “Lullaby” Designer Series paper. If you look closely at the little hearts you will see little stripes. I added the 1/8″ Silver ribbon to compliment that designer paper, and then added the fun mini brads to the carriage to tie it all together.
I used the “Circle Collections” framelits to cut out the carriage and make it my focal point.
The sweet saying comes from the “Something to Say” stamp set, and the circle punched were used to highlight the greeting. The card also has a coordinating verse for the inside as well.
You will find all the ingredients listed at the bottom of my post to create this card (any many more). Just click on the photo to view more information on that product or purchase.
Thank you for visiting me today.
Have a wonderful week ~
Bloom with Hope …
Hello Stampin’ Friends,
Today I’d like to share with you one more card from my Kick-Off Party. I am lovin’ the new In-Colors this year. “Stampin’ Up! has done it again! The new 2014-16 In-colors offer something for everyone.
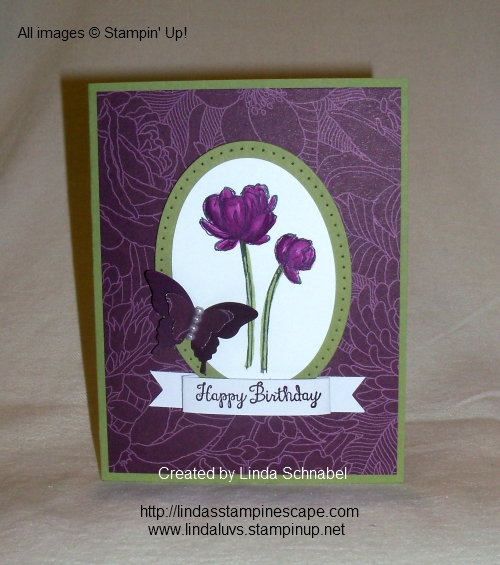
My favorite …Blackberry Bliss is amazing as a dark grape color with hints of brown… you got a taste of it yesterday on my “Time to Celebrate” card. I must say it looks awesome next to the Mossy Meadow color! But that was another card. (sorry for the tease)
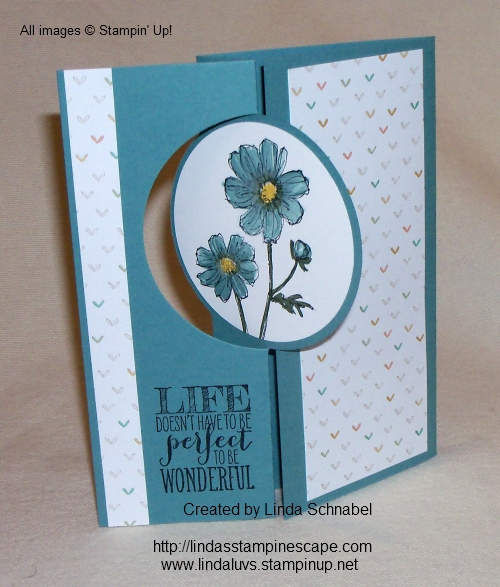
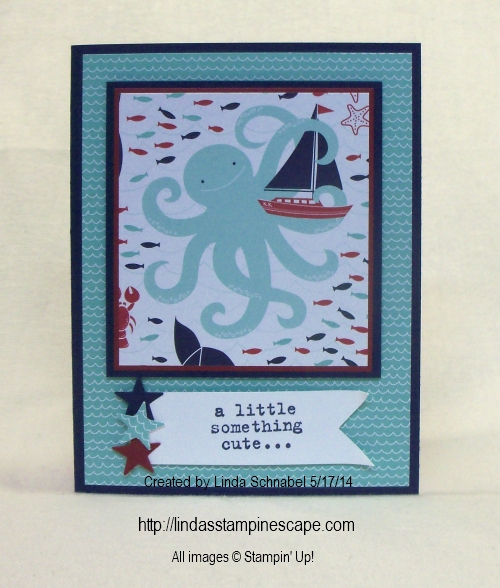
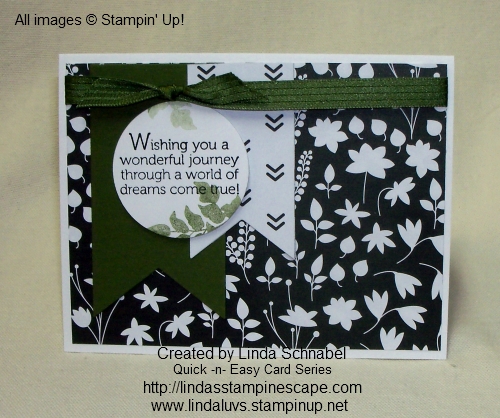
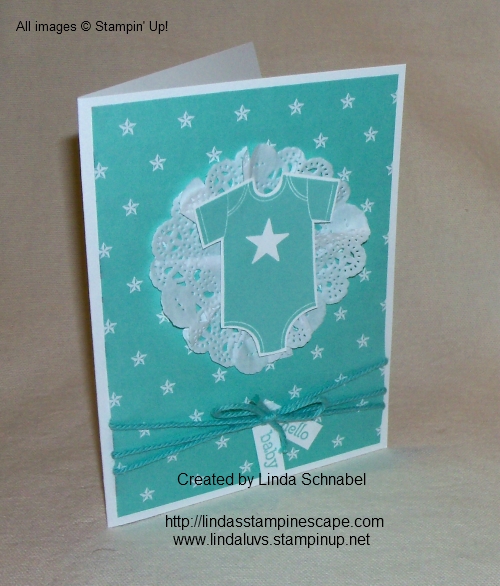
Today’s card features Lost Lagoon, a cool color – and I mean cool – because it has hints of green in it, which makes it a perfect pair with many of the subtles, because it will highlight the intensity of those colors without overwhelming them.
I used the “Circle Card Framelit” die and paired it with gorgeous Hostess set “Bloom with Hope”. This stamp set is filled with beautiful flowers and salutations.
The flower was stamped with Black StazOn and colored in with a Blender Pen and the Lost Lagoon Ink pad. A basic technique but a great way to color … makes blending easy. The center was colored in using the “Hello Honey” marker.
The flower image was punched using the 2-1/2″ Circle punch, which coordinates perfectly with the Circle card framelit die! Another clever decision by Stampin’ Up!
The charming designer series paper I used is “Lullaby”. It work so well with the flower. Then again, any of our beautiful designer papers would look great with this stamp set.
I can’t finish this post without sharing the remaining In-Colors. The Hello Honey is “sweet”! Like the word says, it has great Honey hues with a nice brown under-tone, so it’s not to bright or too light.
And finally Tangelo Twist… a soft orange that will blend seamlessly with so many other colors, especially the pinks since it does have some pink and yellow undertones. Who knew … right! I am definitely going to try out that color combination!
OK … I have been so excited to share all the fun new items that I forgot to share with you the “Weekly Deals”. I have now made it easier by putting the link on the side bar! Just click on it at anytime and check out the “Weekly Specials” !
Have yourself a most awesome day!!
Please remember that the “Bloom with Hope” is a Hostess stamp set. You will need to host a qualifying workshop (stampin’ party) or purchase $150 or more. You can order directly on-line, have a book party, or I’ll come over to show you this beautiful and more!!
Let’s get this party started …
Hello Stampin’ Friends,
I just want to send a quick “thank you” to all those who came last night and helped me kick off the brand new catalog … and the beginning of my celebrating 15 years with Stampin’ Up!
Today I want to share with you, one of the cards the ladies made last night. It comes from the stamp set “We’re in this Together” … how fitting, don’t you think? And isn’t that what stamping is about? … Doing something we love, with people we love to hang with, for people we love to give to.
The image was stamped onto a 2″ wide strip of Whisper White using the StazOn Ink pad. StazOn is what I like to use when coloring. The tag was topped off with the beautiful new Blackberry Bliss 3/8″ Stitched Satin Ribbon.
I love the greeting on this stamp “It’s Time to Celebrate!”… which was strategically picked out for this event. lol (It’s actually on the stamp)
Our party girl was colored in with the new 2014-16 In-Color Stampin’ Write Markers – Blackberry Bliss and Hello Honey! All of these new In-colors pair up so nicely. I just love working with them, and you will see more of the colors used in the next few posts.
The background is the new Blackberry Bliss cardstock (Congratulations to Barb who won the prize for picking out my favorite new In-color) Oh my gosh … this color is so luscious!! It was embossed with the “Perfect Polka Dots” embossing folder.
To add a splash of color and to draw your eye right to the focal point (our stamped image) we added 3 pretty flowers punched from the “Petite Petals” punch. Of course you must have pretties in the center, so we added the largest of the pearls.
I have a sneak peek of another card in this photo taken of Kris during the stampin’ party…
Congrats to our Door Prize winners … Payton, Ann W., Cindy P., Kris H., Olivia, Kathie, Alice, Janet H., Janet Z., Connie, Cindy B., Karie, Amy, Cheryl, and Marge. We had 15 winners, one for each year!! I wish I would have gotten a picture of all my winners together… that would have looked so cool!
We also want to say “CONGRATULATIONS” to Connie for winning the Grand Prize of the Creative Options Tote, Cardstock, Designer Paper, Ribbon Pack, and Buttons, on my!
And what a better way to complete the night but to have my upline, Vicki Towell stop in and surprise me with a bouquet of flowers. THANK YOU VICKI … that was so sweet and they are beautiful!
It was a fun night, and there is much more fun coming this year! I’ll keep you posted 🙂
Thank you for checking out my blog today ~
Welcoming the new …
Hello Stampin’ Friends,
Today is the first “full” day of the new 2014-15 Stampin’ Up! catalog … how exciting is that! And what better way to “welcome” something than the new stamp set “Something for Baby”.
You are going to simply fall in love with this cute set and today’s card share ….
Sweet and simple is how I’m describing today’s card. I simply stamped the cute little one’sie in Bermuda Bay (a very nice gender neutral color) and then cut it out with the coordinating framelit “Baby’s First”.
The designer Series paper that I used for the background is “Maritime” … I just loved those little star’s. Stampin’ Up! does have a very nice designer paper called “Lullaby” also.
I used the Tea Lace Paper Doilies to create a “blankie” for our baby. I did this by folding it up like a flower and folding the center over, then just adhered it to my designer paper.
The bow was created with the new “Thick Bakers Twine” … wow, that is really nice to work with! Of course I used the Coastal Cabana which coordinates with the rest of my card.
Thank you for joining me today. I will list the ingredients for this card below… just click on the product for full details or to purchase.
Have a great day ~
Scrapbooking Road Trip …
Hello Stampin’ Friends ~
Today I am going to share with you another one of my favorite items off the Weekly Deals list.
I love the Typeset Alphabet Dies … there is so much you can do with these, especially if you have school kids. My grandkids use them for their school projects all the time!
Here a just a few of the projects I have made with my stampin’ groups. For my first project, let’s go on a little road trip…
We used the alphabets as designed, by cutting out the letters, but we also used the reverse or negative of the alphabet to highlight the “R” in Road Trip. You will also see the use of the Top Note die in the lower right hand corner.
Let’s see where our road trip is taking us ….
Wooo Hooo, a Badger Football Game!! You can’t get any better than that! I made this page with my granddaughter Shayla for a demonstration I was doing at a local college.
Now … wasn’t that a “HOOT”!
Nothing like a good road trip down memory lane. The Typeset alphabet worked perfectly for our scrapbook pages.
I have reposted the Weekly Deals so you can view them again. Don’t forget we also have the Blowout Sale and the Clearance Rack! So many deals … so little time. The new catalog is right around the corner.
We hope you enjoy this week’s Weekly Deals!
![]() |
Neutrals Designer Series Paper Stack Item # 130132 Discounted Price: $16.46 |
![]() |
3-1/2 Inch Circle Originals Die Item # 121811 Discounted Price: $13.46 |
![]() |
Sweet Buttons Embosslit Die Item # 121813 Discounted Price: $8.96 |
![]() |
Natural Composition Specialty Designer Series Paper Item # 126917 Discounted Price: $9.71 |
![]() |
Full Heart Punch Item # 119883 Discounted Price: $12.71 |
![]() |
Typeset Alphabet Bigz Die Item # 127553 Discounted Price: $67.46 |
![]() |
Stripes Textured Impressions Embossing Folder Die Item # 123128 Discounted Price: $5.96 |
![]() |
Spring To Life Kit – Digital Download Item # 133026 Discounted Price: $5.97 |
You can click on any of the items descriptions to view more details or begin your purchase.
Thank you so much for stopping by today.


