Halloween Treat Bag & Tutorial

Hello Stampin’ Friends ~

I hope you had a chance to view all the cards and projects for Halloween that I shared with you yesterday.  Today, as promised, I have another 3-D project for you along with the instructions so you can create it too!  These are super cute -n- easy Halloween bags, however, with a switch of designer paper … you can have these for any holiday or family occasion!

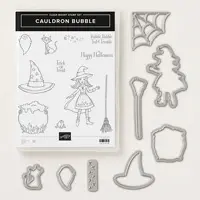
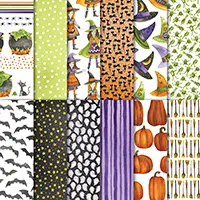
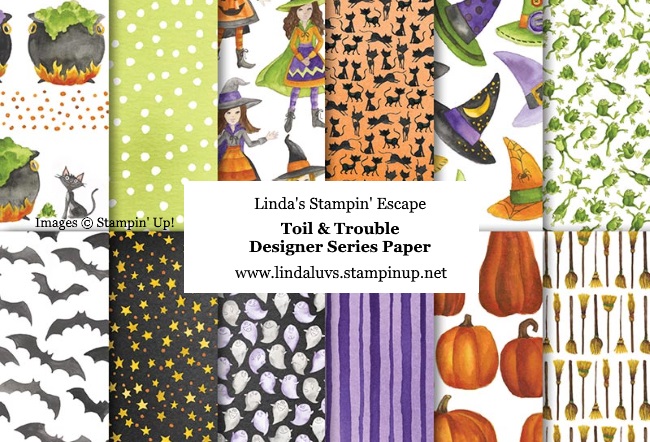
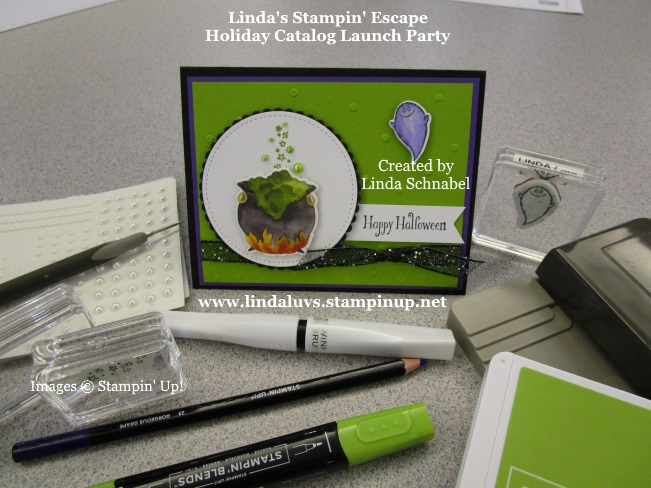
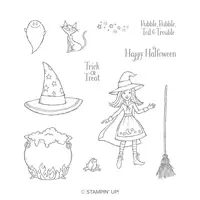
I used many of the items in the Toil & Trouble product suite found on pages 48 and 49 of the Holiday Catalog. Halloween is one of my favorite Holidays … it’s the “fun” one for me.  Fun to decorate, fun with the kids … and candy!

I have several photos for you to take you step by step through the process of making these cute bags … except the decorations – those are just elements that I cut out (with the help of the coordinating dies) from the designer paper!

You will need any 12 x 12 piece of designer paper.  Cut in half … You will have 2 – 6″ x 12″ pieces and can create 2 treat bags from this one sheet.

Once you have your paper cut, you will place it on your Simply Score board or you can use your paper cutter with the scoring blade. Lay it on the board as shown … 12″ should be horizontal (the long way).  Now you’ll score at 1-1/2″, 5-1/2″, 7″ and then 11″.  The last 1″ will be your flap that holds the bag together.

Now turn your paper 90° so the short side is at the top (horizontal) and score at 1″ and 5″ … this will be the top piece that gets folded over to create the two tone look and the bottom flaps!

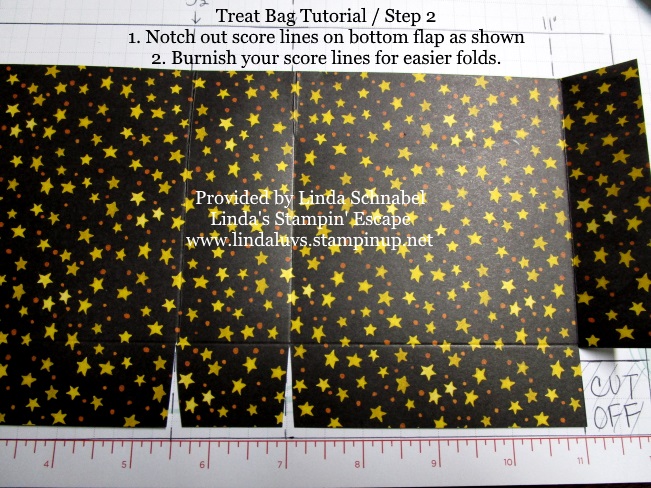
I always fold over (burnish) all my score lines – it just makes it easier to assemble.  You will notch out the score lines on the bottom (that is edge that has the piece cut out) See sample above.  Before you assemble you bag – You will fold over the top flap to reveal the second pattern and glue that flap down.  Now you are ready for assembly.

You can see on this next picture (on the flap) the two tone patterns from folding down the top flap.

On the flap that has the 1″ x 1″ piece notched out … fold the flap in (the stars are actually the inside of this bag) and then align the flap with the opposite side of your bag.  I like using glue for creating bags because it allows you to move your flaps a little when aligning (it’s more forgiving) … the sticky strip and adhesives like that – once they’re down … they are down and there is no fixing that.  The glue holds beautifully once set.

Next you will add glue to the two small flaps to begin your bottom …

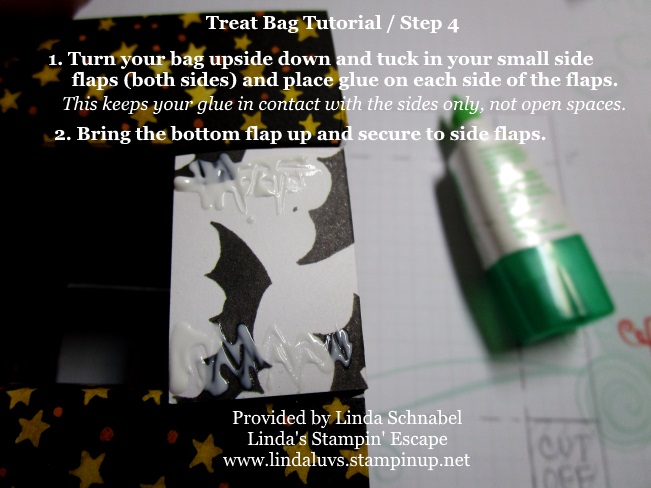
Add your glue to the sides of the flap as shown, and be sure to glue both of the small flaps. Then flip the bottom flap over the two small flaps and check your sides to see if they are aligned (so you don’t get a crooked bag).

Next you will add glue to the very top of the top flap (shown in picture below) and fold over.  There is a little glue exposed from the small flaps the will help hold the top flap to the entire bottom.

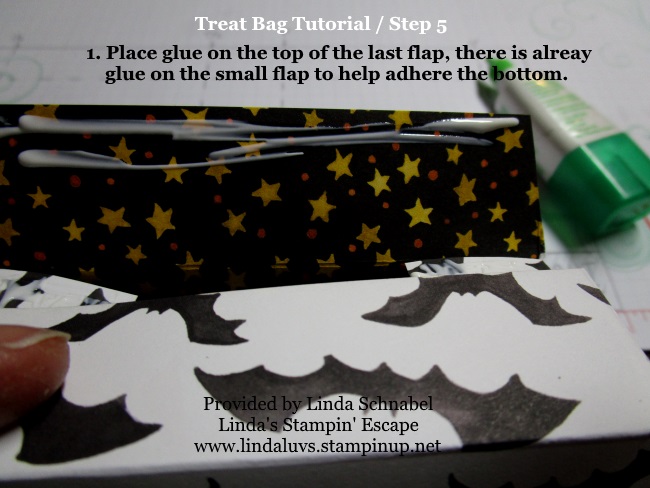
Here’s a stampin’ tip: To ensure the bottom is secure, sit your bag up and then I use a pencil with the eraser side down and give a firm push on the bottom and make sure all flaps are down and secure.  Walla … Your done.

Now if you’d like, you can decorate the bag ~

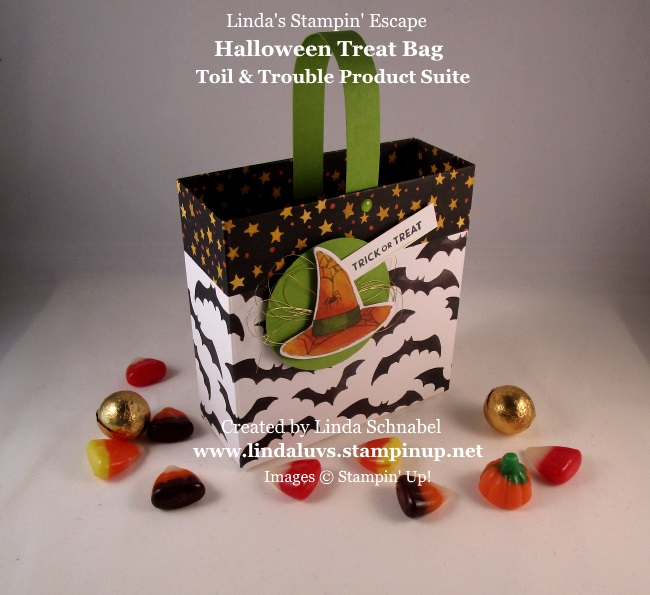
On this bag I highlighted the bats and used the stars as my topper.  Here I punched out a 2″ circle and used the hat from another pattern in the Toil & Trouble designer series paper.  I wrapped a little gold thread around my fingers and then placed it onto a stampin’ dimensional to hold it in place… I thought the gold tied in with the stars nicely. This one was finished off with a simple cardstock handle 🙂

On my second bag I just folded my score lines opposite from the first to expose the stars and highlight them!

The base for my decoration was the Pretty Label punch and embellished with cut out pieces from the designer places … all popped up to create some fun dimension! The Happy Halloween greeting comes from the coordinating stamp set and the ends were punched to create a banner.  To finish off this bag, I used the beautiful Black Glittered Organdy ribbon to create my handle… oh so cute!!

I hope I inspired you to pick up some of this amazing paper and even the Toil & Trouble bundle so you can create these cute little treat bags for your special little ghouls and goblins.

Thank you for joining me today … let me know (below) how you liked the projects and the tutorial. Either Like or Comment … I would appreciate the feedback.

Have a fun day ~

TODAY’S STAMPIN’ SUPPLY LIST ….


No Toil … No Trouble … Just treats!!

Hello Stampin’ Friends ~

To the catalog went LIVE yesterday and of course I had to put another order in (you know, things I didn’t pick up on the pre-order) lol.  Truth is, is buy in stages … my Halloween and Fall first, with a touch of Christmas. Yesterday, a few more Christmas items for my upcoming Holiday Stamping Retreat. (Which is Sold Out) Thank you ladies!!

Today however, I’m focusing on Halloween … before you know it, those little ghouls and goblins will be ringing our doorbells in celebration of the holiday.  I like to make special little treats for my grandkids and this year decided not to recreate the wheel but copy the cute projects in the catalog!!

My Bakers Boxes should be arriving tomorrow! I’m going to create the cute little green box with the spider webs.  So easy to color … just fill your Stampin’ Spritzer with alcohol, then add a few drops of the ink refill. The alcohol allows your ink to dry much quicker than if you would use water.

The tag is quick -n- easy to make with the Toil & Trouble Designer Series paper! There are so many cute patterns, I don’t know which one I like best (but that little ghost does pull at my heart strings).

Here is my little ghost card …

And since we are having fun with the Designer paper, what do you think about the “bat” pattern?  I took this paper and sponged on some fun color effects and this is what I ended up with …

You can get full details … just CLICK HERE.  And while I’m bragging about this amazing designer paper, lets talk about how it coordinates so nicely with the Cauldron Bubble stamp set and Cauldron dies.  Some of the dies actually cut images from the Toil & Trouble designer paper!!

There’s my little ghost again! He just seems to keep turning up throughout this entire blog post! This entire product suite will make your card and gift making as easy as a ghost floating through air.  A totally versatile product suite… so stop back tomorrow because I have another cute project for you to “gift” your little ghouls and goblins!

Thank you so much for sharing a part of your Friday with me! I’ve listed the products used for the projects I shared today. Click on any item for more details or to begin your shopping.  Don’t forget I’m tracking your Virtual Rewards Points … I will be sending out more on Monday!!

Have a wonderful weekend ~

TODAY’S STAMPING SUPPLY LIST …


Quick -n- Easy Christmas Tags!!

Hello Stampin’ Friends ~

Today I have a fun and informative video (and quick) and some cute projects too! Want to make 16 tiny tags with just one pass through your Big Shot? The Tags & Tidings Bundle is perfect for creating simple tags to use for celebrating your holiday season.

Let’s start out with the video … grab your coffee and relax for a few minutes while Chad shows you how easy this bundle is …

Did you notice the informative tips Chad shared?  First … It’s a great idea to place your stamps face down on the table and then pick it up with your block. I use this technique a lot when using long sentiments, I place them on my grid paper so I know they are straight and then pick it up with my block as well.

The second tip I love, and have been sharing with my customers for quite some time. I call it the “Show it Who’s Boss” technique.  Place your block on the table with stamps facing up and then ink up your stamps (tap, tap, tap) … this way you have much more control over how much ink you are adding because you have a birds eye view.

Here are the samples made with the Tags & Tidings Bundle …

The cute tags you’ve create can be used on gifts, on cards, and can easily be embellished.  Do you see the “merry” on the card … that comes from the “Festive Farmhouse” product suite (I just ordered them yesterday).  Did you also notice that the “tags” stamp was used for the background? How cool is that!!

I also see the “naughty / nice” tag embellished with you know who! And you can find this jolly old fellow on pages 18 and 19 in the Santa’s Workshop Suite. He’s on his way to my house too … first in a Stampin’ Up! box and then on the 24th of December! Yes, I was a good girl 😉

I hope you enjoyed these quick -n- cute Christmas tags, and the great stampin’ tips.  Thank you so much for kickin’ back with me for a time today.

Enjoy your day ~

TODAY’S STAMPIN’ SUPPLY LIST …


A Delightful Dash

Hello Stampin’ Friends ~

Today is an exciting day … I’ve got 3 awesome cards to share today and the Holiday Catalog goes live!!  I’m thrilled that we can finally order from this fabulous catalog …

and don’t forget, now is the perfect time to turn in your Bonus Day Codes and get your savings you earned from your orders last month!!

You can cash in your coupon codes while shopping my online store or through me … Bring your coupon codes and your friends together and lets have a stamping party.

It’s the perfect time of year to gather with friends and family and create! And this festive sampler highlights several different bundles and the Dashing Along Designer Series Paper.

Remember, the Dashing Along Designer Series Paper is only available through the Dashing Along Host Promotion with a qualifying order during the month of September. This paper will not be featured in any catalog, so get it now!

What is a qualifying order you ask? Well, only $250 … so, you could do it yourself and collect the hostess benefits too, or … I say you gather your friends for a fun night of stamping and still collect the hostess benefits!  You can do an online or catalog party as well … what ever works best for you.

I thank you for checking in with me today … I’ll be back tomorrow with another fun card share.

Have a great day ~


Spooky-cute goodies …

Hello Stampin’ Friends ~
I hope you enjoyed your Labor Day weekend… I love long weekends, because it means I have a short week ahead of me (at work … the “other” job). We used to laugh at my last job because I always referred to my stinkin’ job or my stampin’ job! Now I work in a Candy Store … it has it’s sweet moments!! lol

Yesterday I shared another one of my Halloween cards, and if you love Halloween you should consider trying out our Paper Pumpkin kit. You can buy it for a month, or 3 – 6 -or- 12 months. You can also do a monthly subscription where to can keep it coming or put it on hold for a designated time of your choice and then start it back up again.

If you’ve tried it before, now is a great time to sign back up because you will be in for a frightfully delightful kit in a scary-cute, special edition box…

October is on its way! And when hordes of little ghosts and goblins descend on your doorstep this Halloween, be prepared with spooky-cute goodies just for them—handmade by you with a little help from Paper Pumpkin. How? Simply subscribe by September 10 at … https://www.paperpumpkin.com/en-us/sign-up/?demoid=26646  .

This terrific kit is quick, easy, and all-inclusive. (P.S. You’ll love our frightfully fun special-edition box!) Don’t miss out! I heard there were 24 projects in this kit!! When you subscribe you can order additional kits … or purchase refills later in the month.

I want to thank you for sharing a part of your day with me today!  Let me know if you have any questions with our Paper Pumpkin kits.  When you subscribe … find me on Facebook and I’ll hook you up with my Paper Pumpkin Pals page!

Have a beautiful day ~

You may also like to sign up for a pre-determined time …


Chasing Ghosts … Halloween Card

Hello Stampin’ Friends ~

Happy Labor Day!! Hope the sun is shining where you are.  We have been inundated with rain for days, so I headed down to my Stampin’ Studio (fancy word for basement craft area) and began to play with all my new goodies from the Holiday Catalog.  Whenever I’m creating something with my hands, all my stress instantly melts away. It’s so satisfying.

If you’re looking for that escape to melt away your stress and get some of your creative mojo going … join me at my Annual Holiday Stampin’ Retreat – November 2nd thru the 4th. I had a cancellation so we now have one room open and you are welcome to join us.  This does not happen very often!

Our retreat is like no other, we’re All Inclusive … just contact me and I can answer any questions you may have.

While I was in my craft room, I created a sweet -n- simple Halloween card … the Toil & Trouble product suite is really fun to work with (or should I say play). You really get a good look at the entire product suite with today’s card.  I used the stamps for the ghost and greeting, used the designer paper, the dies and the “really cool” Black Foil Sheets and cardstock pack.

The Toil & Trouble Designer paper is so stinkin’ cute! From these friendly little ghosts, to happy frogs, hats, cauldrons, bats and more! Did you know some of the images from the designer paper can be cut out with the coordinating dies in this bundle … Fabulous!

The spider webs were cut from the new Black Foil Sheets with the dies included in the bundle. I even brought out the punches: 1-1/4″ Circle and 1-3/8″ Scallop Circle to highlight my greeting.  Whenever I use ghosts I have to make sure there is some ectoplasm present … lol, so you will recognize it as the Glitter Enamel Dots.

I love fun, simple cards … they are easy to create and oh so fun to share.  Using designer paper on your cards adds so much without all the work.  You can get a better look at the products I used below.  The Toil & Trouble product suite will be available for purchase on September 5th … see you then.

Thank you for hanging out with me … or should I say “Ghost Hunting” on this Labor Day!

Have a great day ~

TODAY’S STAMPIN’ SUPPLY LIST…


Simply Sunday: Dashing Along

Hello Stampin’ Friends ~

Happy Sunday to you … and I hope you are enjoying your Labor Day weekend, and (for some of you) the extra day off work!

I’m excited to share with you a cute whimsical card and an amazing promotion to go with it!! Our September promotion is called “Dashing Along” and offers you a FREE 12 x 12 package of this amazing Designer Paper!

When creating the exclusive Dashing Along Designer Series Paper, Stampin’ Up! decided to use a mix of old favorites and new patterns to bring you beautiful, traditional Christmas paper. This collection of patterns has an eclectic feel and is perfect for layering, and while the newsprint design isn’t Christmas-themed, we selected it for its versatility and popularity with you, our customers.

I hope you’ll love this Designer Series Paper as much as I do, and remember, it’s available for a limited time only! So lets get on with the show …

This simple card is easy to create with the Dashing Deer Bundle featured on pages 8 and 9 of the Holiday Catalog and is most definitely highlighted with the Dashing Along Designer paper.

September is a great time to host a workshop … first, you could qualify for this great designer paper for FREE plus even more goodies, and you could pick them from the Holiday catalog!!  Because the Holiday catalog goes live on the 5th – you could be the first to show all your friends some of the beautiful product suites in the catalog!

Let me share another card that really shows you this great paper …

Wow … you can see 3 beautiful designer paper patterns on this card, and there is that beautiful deer again! I can see your friends dashing to the catalog to get a look at this bundle.

Hmmm … I can host a private party for you and your friends – sharing ideas from the Holiday catalog and YOU can be the Hostess! You bring the treats and your friends, and I’ll bring the fun and the card making packets!! What do you think??  Message me below or email me at  lindaluvs2stamp@aol.com

Enjoy the rest of your Labor Day weekend, relax, and take some time to look through your Holiday catalog … it goes live in 5! (Well … September 5)

Thanks for joining me today ~


Happy Harvest Blessings

Hello Stampin’ Friends,

And a Happy September 1st to you!  With fall just around the corner, it seems this is the time many people get reflective and have gratitude for all they have in their life, so my card today reflects the same sentiment.

I am using the Country Home stamp set from the Country Lane Suite of products found on pages 42 and 43 of your Holiday Catalog.  This stamp set reminds me of a simpler time … the pitcher from grandma’s kitchen and when I used to work in a flower shop! I loved designing dried flower arrangements … you don’t see that much anymore.

I will also be highlighting the Galvanized Metallic paper and the Tin Tile Dynamic Embossing Folder ….

The base of our card is Basic Black and the inside and the piece we stamp our images are Crumb Cake cardstock. Our background is the Galvanized Metallic paper embossed with the Tile Dynamic Embossing Folder.  This is such a dramatic piece and looks great embossed with any paper medium.

Next we stamp our two images … the pitcher and the floral piece (there are two) Using the Photopolymer stamps makes it easy to align the pitcher and floral images.  When you’re done, you can begin to color.  I used the Stampin’ Blends Markers because they are so quick and easy to use and can create so much dimension on the image.

For the pitcher … I just followed the sides of the pitcher with my marker twice, giving me nice dark color along the sides and leaving the center untouched.  Then I simply colored the pitcher going side to side with the marker to fill in the blank spaces leaving an area that looks like the light is bouncing off of it (highlighting it).

Again, I used the Stampin’ Blends to do the floral piece except for the cotton … that was done with the White Stampin’ Chalk Marker.  Don’t you just love the way the chalk marker brings the cotton to life!!

Our greeting “Happy Harvest Blessings” was stamped with VersaMark® onto the Vellum Cardstock and then heat embossed with Silver Embossing Powder… this ties all of our elements on the card together, so nothing looks out of place, just a nice flow in the design.

Thanks much for stopping by today, I have the list of ingredients below. Click on any image to see more details about the product of to begin shopping.  HOWEVER, the Country Lane product suite is not available to purchase until the 5th of September … so just a few short days and the Holiday Catalog will come alive!!

Have a great Saturday, September 1st … and I’ll see you back here tomorrow for my Simply Sunday post.

TODAY’S STAMPIN’ SUPPLY LIST …


Last Chance plus FREE Rhinestones!

Hello Stampin’ Friends ~

Today I’m going to share one more card from the Color Your Season Bundle: The Blended Seasons Stamp set and the Stitched Seasons Dies and then we’ll take a look at all of the different and beautiful cards you can make with this one bundle … and this bundle goes away today.  True, today is the last day to order this amazing stamp set and die.

We made this card at my Holiday Catalog Launch Party …

I used the middle size die and stamped the Holly swag onto it.  The holly was colored with the Watercolor Pencil Assortment 2 which are available with the Blended Season stamp set and dies. The designer paper is the Under the Mistletoe and is the driver of my color pallet.

I stamped my greeting in Real Red ink onto the Vellum Cardstock and then I heat embossed it with clear embossing powder. It is much prettier on the card than what shoes up on the photo. Oh yes … and the little berries on the holly are the pretty Red Rhinestones. YOU CAN GET THEM FREE (Keep reading)

Here is another card with this bundle in which I you could use the Red Rhinestones  …

One more Christmas card to share with you.  Kind of fun to see them all together!

What comes after Christmas … but spring! This is one of Stampin’ Up!s card creations, I just love how they created a wreath using the leaves …

I also have a card that can be used anytime during the year … Spring, Summer, you name it~

How about one more before the color weather returns and the colors begin to change …

Even the last 3 cards look so different from each other … yet all so pretty.

Next would be Fall / Autumn cards … I challenged myself because I had not used the “wheat” stamp up to this point so here it is…

The Country Lane Designer paper used on this card will first be Available Sept.5th).  Now … if you purchase the bundle today, you will qualify for the Bonus Buy and receive a $5 Coupon code to spend next month!!

Here is another card for the upcoming fall season … One of my favorites, this card was heat embossed with Gold embossing powder and colored with the Watercolor Pencils Assortment 2 and blender pen …

I just want to remind you that this bundle is gone today.  Today is the last day you can order the bundle (See below)

I wish this was in our Annual Catalog … it is one stamp set that I have no trouble trying to come up with ideas for!  One that note, here are a few more cards ~

This card was created with the Watercolor Pencils Assortment 2 and today is possibly the last to get them for sure …

This was yesterday’s card where I also used the Watercolor Pencils and the Blender pen …

Wow … amazing right!! So many styles, so many occasions … This is such a fun and versatile stamp set and dies.  And don’t forget the Watercolor pencils.  IN FACT, If you purchase the bundle from me and include the watercolor pencils … I will send you the Real Red Rhinestones as a special gift for shopping with me.

PLUS … It’s Bonus Days, so you will receive a $5 Bonus Coupon Code to spend in September.  That’s not all … YOU will also receive your Virtual Rewards Points from me!! This is a really sweet deal for a really sweet bundle!!

PLEASE … Let me know if you need help placing your order, or if you have any questions about this promotion.

I hope you are having a wonderful day … and let the weekend begin!

TODAY’S STAMPIN’ SUPPLY LIST …


A Spooky Little Peek into the Holiday Catalog …

Hello Stampin’ Friends ~

Today a I have a spooky little Halloween card from the Holiday Catalog. I’m featuring the Toil & Trouble Product Suite on pages 48 and 49. Today’s card highlights the Cauldron Bubbles Designer Series paper and the “Sponging” technique and has a fun little twist!

First … let’s start with our designer paper, grab the pattern with the bats on, bring over the Daffodil Delight, Gorgeous Grape, and Night of Navy ink pads and some sponges.  Wait … I have another technique for you! Masking!! You will need your 1-1/4″ Circle punch.

First you will use the paper that you punched the hole from and align it onto your cardstock so you can sponge yourself a moon.  Now take the circle you punched out, add a touch of removable adhesive (so your mask comes back off) and place it over you moon on your batty paper.

Once your moon is done and you have placed your mask over the top … you can begin sponging your Gorgeous Grape around the sky.  The fun part is … your bats are already there.  Now I added some Night of Navy to create a deeper nighttime color.  I also sponged a little color over the moon to create a spooky little effect.

Now I’m sure you noticed that the bats were flying high about the houses … I love the silhouette look that using the die cuts from the Hometown Greetings Edgelits.  Who said it just had to be used on Christmas cards! I like to cross-over a lot of my stamping supplies – gives me the best value for my buck!

Sponging creates so much dimension on your card and it’s so simple to create. The greeting comes from the Cauldron Bubbles stamp set and was cut out with the Layering Ovals Framelits.  Wow … that at that, you just created this really cute card in minutes.

Thank you for hanging out and stamping with me today.

Make today a good one … enjoy.

Today’s Stampin’ Supply List … Don’t forget Bonus Days. I appreciate your order and choosing me as your demonstrator.  Thank you.


And Heaven & Nature Sing …

Hello Stampin’ Friends ~

Did you get a chance to check out yesterday’s blog? It has 3 great card shares … Halloween, Autumn and Christmas. These cards were all from my Holiday Catalog Launch party and I have one more to share with you today!

Today’s card features the Nature Sings stamp set in the Annual Catalog. I think this stamp set is perfect for a masculine card (even a birthday card) or a family that enjoys the outdoors and nature.  We used the pair of deer and the trees …

My color pallet is natural – highlighting the new Shaded Spruce and teaming it with Old Olive. I based these from the pattern of Designer paper I chose in the Under the Mistletoe designer paper… I thought it was cool that there was that pretty deer patterned paper, then I added the stacked wood from the Wood Textures Designer paper stack.  It all fits so … well, naturally! It Brings the wood tones in with the green tones … just like nature gives us.

My base is Shaded Spruce cardstock and the card front is Old Olive … I stamped the trees 2 times before re-inking the stamp onto the front so you get a double shade of the Shaded Spruce. Also gives you an appearance of distance or dimension.

The deer where highlighted by stamping them onto Whisper White cardstock and cut out with the circle die from the Stitched Shapes Thinlits Dies. The coloring was done with the Old Olive and Crumb Cake Stampin’ Blend markers.

I finished off my card with the Bakers Twine (yes … it’s Garden Green) but it looks really nice with the card. The greens tie nicely together and the white ties in the deer on the designer paper and it all brings your eye to the focal point … the Nature Sings stamp set.

I thank you for joining me today and checking out my Christmas card creation.

Hope this inspires you to discover a little nature today … enjoy.

TODAY’S STAMPIN’ SUPPLY LIST … Don’t forget “Bonus Buys” going on through the end of the month … When you spend $50 before ship/taxes, you will receive a bonus coupon code which you can redeem in September!


Oh What a Night …

Hello Stampin’  Friends ~

Oh what a night … I always liked that song! And last night was a blast! I held my Catalog Launch party and we gathered to made 8 Holiday cards, ranging from Halloween to Christmas. Even our snacks ranged from Halloweens Nutter Butter Peanut Butter Mummies to White Chocolate Dipped Rice Krispy Yummies!

We all had a great time, met some new people and enjoyed a night full of stamping …

Let’s start our card share with Halloween!! This enchanting card will put a spell on you with it’s bubbling cauldron of fun. It comes from the new Toil & Trouble product suite …

Our Granny Apple Green background was embossed with the  Scattered Sequins Embossing Folder … I like that it looked like little bubbles floating up, just like my cauldron is doing!  It was matted with the Gorgeous Grape and adhered to the Basic Black base… all of these are in the Toil & Trouble Cardstock pack.

My bubbling cauldron is from the Toil & Trouble Designer Series paper and cut with the Cauldron Framelits Dies. I stamped the bubbles above it, added some pearls colored with the Granny Apple Green Stampin’ Blends and a touch of the Wink of Stella! I finished off my card with the awesome Black Glitter Ribbon – LOVE IT!!

I forgot to tell you that my sweet -n- spooky ghost was created with the Gorgeous Grape Watercolor Pencil from  Assortment 2, a blender pen and a touch of Wink of Stella.  I also used the Watercolor Pencils on my Fall card …

There it is … that Blended Seasons Bundle again!! I have more cards up in my head because there is are just so many things you can to with bundle. I don’t think I need to explain much on this card, I’ve said it all before with my past cards… This stamp really should be in your stamp collection.

The last card I’m going to share with you is the Christmas card … so simple and so elegant!  My base is the new Balmy Blue. The greeting is from the new Timeless Tidings stamp set and is Heat Embossed in white. It brings out that touch of white that surrounds the silver.

We embossed the “Seasonal Wreath” onto the Silver Foil Sheet. If you like it on the photo, you should see it in person … it’s stunning!!

We also added some Silver Twine and the Clear Faceted Gem to add some bling, dimension and texture.

I hope you enjoyed the cards we made last night, and we’d love to have you join us at our next stamp camp ..

Thank you so much coming over today. See you soon.

Just a reminder that with each $50 purchase (before shipping & handling) you will receive a Bonus Buy coupon code worth $5 from Stampin’ Up! to spend on your September purchase … when the Holiday Catalog goes live!!  AND … you will also get a Virtual Rewards point from me as well … double the fun!

TODAY’S STAMPIN’ SUPPLY LIST …


Simply Sunday: Reflections + One

Hello Stampin’ Friends ~

I have some new subscribers … welcome everyone!  I’m so excited today to share my reflection of the Color Your Season cards I’ve created so far (I have 2 more for my Launch Party tomorrow) and a new one to share today.

Lets begin with the Spring / Summer cards … This card was created from a mistake I made in class (there are no mistakes in stamping … just opportunities to improve or embellish!)  I just realized that I never shared the original card! lol  I must admit, I don’t always share the cards we do in class, I want them to be special for my attendees.

This is one of Stampin’ Up!s card creations, I just love how they created a wreath using the leaves …

Next would be Fall / Autumn cards … I challenged myself today because I have not used the “wheat” stamp up to this point so I’m introducing you to my creation today. This really is a simple card to create, and made easier when I looked up and saw this beautiful pattern paper sitting in front of me (I originally had a hand-stamped background) ~

Sponging is that “old” technique that will never go away … It’s quick, easy and creates a dramatic look!! When I think of wheat, I think of fields of wheat dancing in the breeze on a warm sunny day, and the golden color is so beautiful.

I cut my card front out first with the middle size die (there are 3 in the die set) and the vellum cardstock with the largest die.  I punched a 1-1/4 circle punch and used it to mask my front.  The sponging was done in Crushed Curry and at the very bottom there is a touch of Sahara Sand.

The wheat and the greeting (included in the stamp set) are stamped in Crumb Cake. I know, it looks much darker, but it is the gold tones that really bring out the richness of the Crumb Cake.

Now remember … the background for the base of my card was originally hand-stamped but as fate had it, I looked up and saw the Country Lane Designer paper (Available Sept.5th).  I laid the card front on top of it and knew that is exactly what this card need to finish it off!!

I just want to remind you that this bundle is only available for a few more days (or while supplies last) …

I wish this was in our Annual Catalog … it is one stamp set that I have no trouble trying to come up with ideas for!  One that note, here are a few more cards ~

This card was created with the Watercolor Pencils Assortment 2 which is also leaving in a few days …

This was yesterday’s card where I also used the Watercolor Pencils and the Blender pen …

My Christmas card was created using the Stampin’ Blends … that is the beauty of this bundle.  There are endless coloring techniques you can use!!

Again, I used the Stampin’ Blends and did some fussy cutting to create the arrangement on my wreath.  The bow is cut from the Silver Foil paper and colored with the Cherry Cobbler Stampin’ Blend.

So … what do you think? Versatile right? I haven’t shown the bells yet … In class we used them for a wedding card.  Here is today’s card once more, I think it turned out even better than I imaged when I began.

Oh wow … it appears I can’t spell – lol. That is “Blended Seasons” … Oh my!!

Thank you so much for joining me this Sunday. I appreciate you taking the time to visit on your weekend.

I hope you are having a wonderful and relaxing day.

TODAY’S STAMPIN’ SUPPLY LIST …


Color Your Season Wishes …

Hello Stampin’ Friends ~

Today I have a beautiful autumn card filled with color and a touch of Gold … oh so pretty.  This is just one of the cards that we created in my Color Your Season Class. I am head over heels with this bundle because there is so much possibility and so many occasions you can create.

This amazing bundle will cover every season and is perfect for Birthday’s, Christmas, Thank You, and even Weddings!

My card today brings on the warmth of the Autumn season and is the perfect card to share with “your” person, the friend that is always there for you …

The leaves were stamped with the VersaMark pad and heat embossed with Gold Embossing powder.  The amazing color in the leaves comes from the new Watercolor Pencils and a Blender Pen… simple yet stunning!  You could also use your Aqua Painter with the Watercolor Pencils and create a “softer” look.

The Watercolor Pencils and the Color Your Season bundle are only available through August 31st, 2018 or while supplies last! Tomorrow I will be sharing a “Reflection of the Seasons” which will highlight all of the cards that I’ve shared so far and another NEW Creation for you!

Today’s card was done on Very Vanilla, embossed with Gold and backed with Gold Foil Paper.  The beautiful greeting comes with this amazing stamp set and was also heat embossed in Gold …

As the leaves gently fall you will notice that we began with our greens and slowly adding Crushed Curry … then Cajun Craze and finally the Cherry Cobbler – just like the color changes in the fall. I wanted to add a gold leaf just to highlight the gold and pull everything together (plus it’s really pretty).

It really didn’t take long to color and blend on the card and it was very relaxing … brings you back to the days when you were a kid and your Mom gave you a coloring book to keep you busy on a rainy day. We don’t seem to take advantage of that type of downtime … now you can relax and create beautiful cards that will bring joy to a friend. Life doesn’t get better than that.

I thank you for stopping by today and spending some time with me. Stop back tomorrow for a “Reflection of the Seasons” which will highlight all of the “Color Your Seasons” cards that I’ve shared so far and another NEW Creation for you!

Have a beautiful day and share a smile with a friend.

TODAY’S STAMPIN’ SUPPLY LIST … Click on any image to view details or to begin your shopping at my Stampin’ Store. Thank you for choosing me as your demonstrator when you purchase from me.


Reminder … Holiday Catalog Launch Party!

Hello Stampin’ Friends ~

Just a friendly reminder that today is the last day to RSVP to the Holiday Catalog Launch Party.

If you were a Club Member or Hostess this past year … You won’t want to miss this event!!

EVERYONE IS INVITED!!
RSVP now and be part of this fun filled night of stamping…
Invite your friends and enjoy a girls night out.
I’ll have all the work done for you, so let’s stamp & have FUN!
BRING A FRIEND!!

You can RSVP by phone 262-334-1009 or email me at: lindaluvs2stamp@aol.com

Thank you so much for stopping by today … Make sure you come back tomorrow because I’ve got a card that will WOW you!!

Kick off the weekend right and have a fabulous Friday!!

Catalog Launch Party