Sale-A-Bration Inspiration Part 2

Hello Stampin’ Friends,

Today I am going to share part 2 of the “Earn a Free Sale-a-bration item” from the Stampin’ Up! blog “Get Inspired”.  Concept artist today is Melody.  Hope you enjoy …

Earn a Free Sale-A-Bration Item (Part 2)

During Sale-A-Bration, when you spend $50 USD/ $60 CAD, you earn a free, exclusive product. To make it easier to get to $50 USD/ $60 CAD, we’re suggesting a second bundle of products that work well together and will help you earn a free item. Enjoy!

Anyone who knows me, knows that I am absolutely obsessed with the Undefined Stamp Carving Kit and carving my own stamps. I jump at every opportunity I get to talk about and share what I’ve made with the kit. I just love the creative process involved—and of course, the end result.

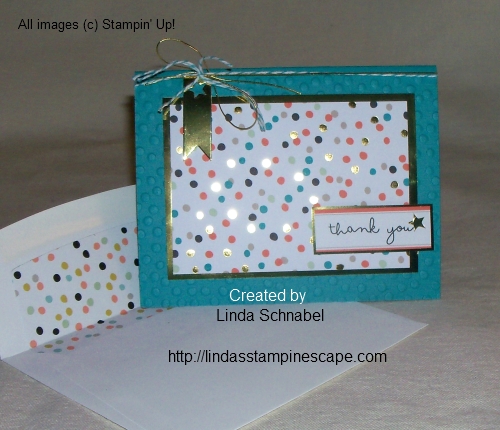
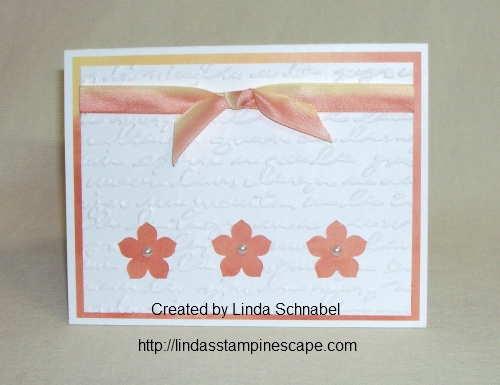
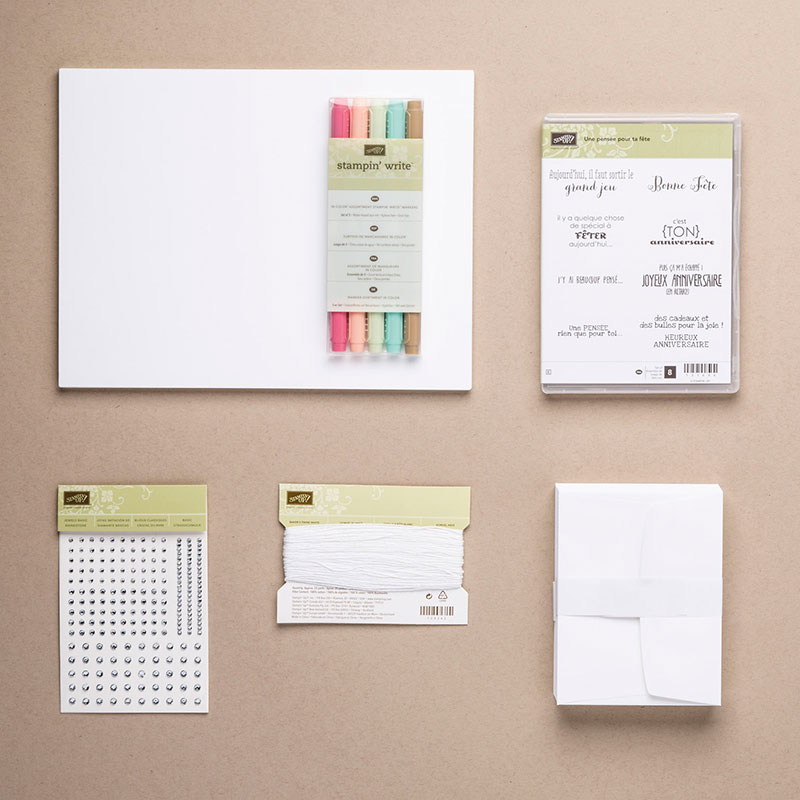
Here’s what I included in my Undefined bundle:

Supplies:

Undefined Stamp Carving Kit 133402

Note Cards & Envelopes 131527

Itty Bitty Shapes Punch Pack 118309

Rhinestone Basic Jewels 119246

Linen Thread 104199

Stampin’ Pierce Mat 126199

Sweet Sorbet Designer Series Paper 133521 (FREE with a qualifying purchase!)

(Total supplies equal SAB minimum)

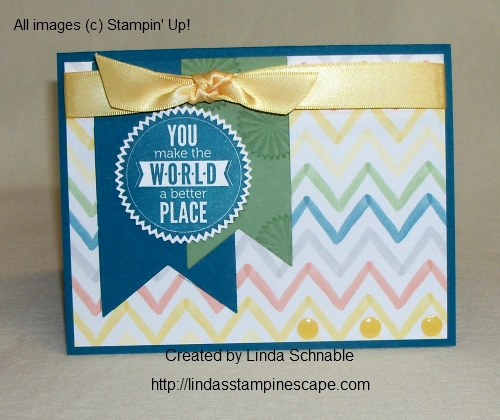
You may look at the samples I’ve made and then at my bundle list and wonder why I’ve included the Stampin’ Pierce Mat. Because the rubber in the Undefined Kit is stiffer than our regular rubber, I have found that it takes more pressure to get an evenly stamped image. The Stampin’ Pierce Mat makes it easier to get an even image without as much pressure.

I’ve included a PDF of my sketches for this stamp set. Feel free to carve your own set if you’d like.

Note: The Undefined Kit comes with four wood blocks. To accommodate five stamps, the smallest stamps were double-mounted.

I’d love to see the fun stamps you’ve carved. E-mail me a link to a blog post or attach a JPEG of your carved creations to undefined@stampinup.com and I’ll add it to the Stampin’ Up! Undefined (http://www.pinterest.com/stampinup/undefined/) Pinterest board.

Melody H.
Concept Artist

Don’t you just love Melody’s cards?  What do you think of the “Undefined”?  I’d love to hear from you.

I’ll be back tomorrow with a card share designed by me 🙂

Thank you so much for stopping by.

blog-closing-small

Sale-a-bration inspiration …

Hello Stampin’ Friends,

Some more to share from our “Get Inspired” blogs about Sale-a-bration…

Earn a Free Sale-A-Bration Item (Part 1)

During Sale-A-Bration, when you spend $50, you earn a free, exclusive product. To make it easier to get to $50, we’re suggesting bundles of products that work well together and will help you earn a free item. Enjoy!


Cards, Cards, Cards! Bundle


134998 Hip Hip Hooray Card Kit

131373 On Its Way Simply Sent Kit x 2

131459 Thanks & Hello Stamp Set 


You’ll get 36 card bases with envelopes, five stamps, an assortment of clips and Baker’s Twine, a Classic Stampin’ Spot, stickers, Stampin’ Dimensionals, etc.


I recommend selecting the Good as Gold Kit (133512) as your free Sale-A-Bration item. You’ll add eight more cards and envelopes to your stash! That’s 44 cards and envelopes—and you’ll really enjoy mixing and matching all of the pieces to make them your own.

Here are a few of my cards that I made with the Good as Gold Sale-a-bration kit …

000_0708

000_0705

I have added cardstock and product to these cards.

Here is what the cards in the kit look like … pretty!

101_2297

Hope you have enjoyed them, and I hope you get yours for FREE too!

Just click on the product descriptions to view kits and begin to shop.  Thanks for stopping by.

Have a nice day ~

blog-closing-small

Weekly Deals

Hello Stampin’ Friends,

Weekly Deals

Here they are … hope you enjoy this week’s Weekly Deals!

Coastal Cabana 3/8″ Ruffle Stretch Trim Item # 130024
Regular Price: 8.95
Discounted Price: 6.7125 US/9.375 CAN
Strawberry Slush 3/8″ Ruffle Stretch Trim Item # 130023
Regular Price: 8.95 US/12.5 CAN
Discounted Price: 6.7125 US
Adorning Accents Textured Impressions Embossing Folders Item # 125601
Regular Price: 8.95 US
Discounted Price: 6.7125 US
Large Rhinestone Basic Jewels Item # 129324
Regular Price: 4.95 US
Discounted Price: 3.7125
Midnight Muse 3/8″ Stitched Satin Ribbon Item # 126847
Regular Price: 8.95
Discounted Price: 6.7125
Betsy’S Blooms Stampin’ Around Standard Wheel Item # 126943
Regular Price: 6.5 US/7.95 CAN
Discounted Price: 4.875 US/5.9625 CAN
2012-2014 In Color Designer Series Paper Stack Item # 130137
Regular Price: 21.95
Discounted Price: 16.4625
Everything Easter Ensemble – Digital Download Item # 129363
Regular Price: 14.95
Discounted Price: 8.97

You can click on any of the item descriptions to take you to my stampin’ store for purchasing.

Thanks for stopping by today.

blog-closing-small

Escape the Winter Blues …

Hello Stampin’ Friends,

I am pleased to offer you a magnificent stampin’ experience … My Annual Spring Stamping Retreat.  This is a retreat in every sense of the word, and like no other… it is all inclusive!  Your weekend stay, all your meals, and the fabulous stampin’ projects are all included in one low price.

We will be staying at the amazing Green Lake Conference Center in a stunning English Stone Manor nestled on the shore of beautiful Green Lake.

On May 2nd, 3rd, and 4th … I invite you to escape the winter blahs, and begin the spring season by being pampered and creating beautiful hand stamped cards and projects.


Join the fun at my all inclusive Holiday Retreat

Early Bird Special _ Only $180 thru March 10th

After March 10th – $200.  


CHRISTIAN WRITING CENTER  

Your Room
christian writing center bedroom
Prepare to indulge in the comfort of the clean and tranquil  amenities of this English Manor.   

Experience the feel of yester-year which includes a relaxing lakefront atmosphere.

The rooms will be assigned on a first come, first serve basis.   

The beautiful house

host rooms for  

2 or 3 guests per room.

The Food

All your meals will be prepared for you & includes:

Dinner – when you arrive

Breakfast … Saturday & Sunday Morning

Lunch & Supper on Saturday

Drinks include: Flavored water, coffee & more throughout your stay!

Your  Projects

Your inclusive retreat stay includes  all projects!

Enjoy creating beautiful all occasion cards and projects  in a relaxing setting.

We will be making some fun and creative cards & projects featuring some of the new items in the Occasions catalog.

On May 2nd, 3rd, and 4th... escape back to a simpler and more relaxing time while creating beautiful hand stamped cards -n- more at my “All Inclusive Spring Stamping Retreat”.


There will be ample downtime to do your own thing, whether its reading, scrapbooking, exploring the beautiful grounds of the Green Lake Conference Center (which includes a look-out tower, hiking trails, the Worldwide Gift Store or the lake!) or just relaxing with friends!


Occupancy is based on First Come / First Serve… Space is Limited

RSVP with PAYMENT REQUIRED

$180 thru March 10th (Early Bird Special)

$200 after March 10th


TO REGISTER:

Click Here to e-mail me   /or/  Call:  262-334-1009

I look forward to spending a wonderful stamping weekend get-a-way with you! 


Happy Stampin’
Linda

Linda Schnabel

Linda Schnabel – Independent Stampin’ Up! Demonstrator

Visit my Website: www.lindaluvs.stampinup.net

262-334-1009  /  e-mail:  lindaluvs2stamp@aol.com

Life Doesn’t Have to be Perfect …

Hello Stampin’ Friends,

I hope you all have a wonderful weekend.  It was cold, but we had sunshine … and I am grateful for that.  Life doesn’t have to be perfect to be wonderful.

I began with the “Retro Fresh” Designer Series paper.  The pattern I picked was so fun and colorful, I didn’t think I needed much else.

000_0849

Since the edges are rounded on the little squares in the designer paper, I decided I wanted all my edges rounded too.  Since my “Envelope Punch Board” was already sitting on the table, I used the corner rounder from there.  I was a little leery about punching though the folded card, but it worked fine.  And trust me … it does so much more than punch corners!

To give it a more dramatic look, I cut out additional squares from the “Retro Fresh” designer paper … no measuring, I just count 4 x 4 blocks!  I popped those up using our Stampin’ Dimensionals.

000_0848

I was so careful to line up the squares horizontally, that I didn’t notice that they were off vertically.  Did you? lol

The greeting is from the “Perfect Pennants” stamp set, I find it very versatile and have used it many times already.

Hope you enjoyed today’s post & quick card.

Have a marvelous Monday!

blog-closing-small

Here is the list of ingredients I used today …

132993

 Retro Fresh Designer Series Paper  / $10.95

133227

 Perfect Pennants Stamp Set – Wood / $29.95

133230

 Perfect Pennants Stamp Set – Clear / $21.95

133774

 Envelope Punch Board / $19.95

Thanks again for stopping by.  You may click on the item number to view the product or make a purchase at my stampin’ store.

You Make the World a Better Place …

Hello Stampin’ Friends,

How are you this fine Sunday? Oops, some of you are on a waaaay different time zone, but I hope you are having a wonderful day too.  I am blessed to have visitors to my blog from all over the world … I would love for you to leave a comment at the end and tell me where “you” are from.

OK … today’s card share is going to look a bit familiar to my stampin’ clubs, at least the layout.   I want to share with you a card that I created using the Sunburst Saying Bundle (stamp set and framelits).

000_0844

As you can see, I have chosen the “Watercolor Wonder” designer series paper again.  I love that paper, but I will start sharing ideas with other paper I have 🙂  I also used the “Banner Framelit” Dies… banners made easy!

My card base color is “Island Indigo” and I have accented it with the Wild Wassabi, and Daffodil Delight.  It really is easy to pick colors when they’re already on the paper (and now listed on the back of the designer paper packet).

000_0843

The little daffodil dots on the bottom are just punched out of the “Owl Builder” punch and then covered with Crystal Effects.  It balances not only the card, but the color.

So today, another quick and simple card to re-create and can be used for a guy or a gal.

Don’t forget to jot me a little note to introduce yourself … your name and where you live.  I’d love to hear from you.

So happy you joined me today, I thank you for that.

Have a super Sunday!

blog-closing-small

Here is the list of ingredients I used today …

133104

 Watercolor Wonder Designer Series Paper  / $28.95

134817

 Starburst Saying (BUNDLE) – Wood / $44.95

134818

 Starburst Saying (BUNDLE) – Clear / $38.95

132172

 Banner Framelit Dies / $26.95

118074

 Owl Builder Punch  / $16.95

101055

 Crystal Effects / $6.25

125583

 Daffodil Delight Seam Binding

You may view or purchase any of these items just by clicking on the item number.  It will take you directly to my stampin’ store.  Shop 24/7 – 365 …

The Starbust Saying Bundle and another item … will bring you to a qualifying order of $50 or more!  Now it’s time to pick out your free Sale-a-bration item!

Thank you.

Thinkin’ Spring …

Hello Stampin’ Friends,

Whew … didn’t think it would take me this long to get back to my computer today!  Sorry for the late post, too many chores last night.  Once I sat down … I was out for the count and woke up around 3:30 this morning!  We’ve all had those days, and now I’m back down in my stampin’ studio!

Today’s card is to inspire you to Think Spring!  I was happy to hear that our forecast of 5 to 8″ of snow has now turned into only 1 t0 3 inches!  I can deal with that.

000_0837

I chose the “Watercolor Wonder” designer series paper.  The design is the Daffodil Delight and Tangerine Tango watercolor sheet.  Those colors are so warming, and that is just what we need right now!

The designer paper is cut to 5-1/4″ x 4″ … that will leave a 1/4″ border when you adhere it to the Whisper White card.

The front of the card is also Whisper White and cut to 5″ x 3-3/4″ … then emboss it using one of your favorite embossing folders and the Bigshot.  My apologies for grabbing the one that was from the Holiday catalog … let’s hope they put it back in the new 2014-15 Catalog!  It’s not on the Clearance Rack so let’s keep our fingers crossed!

000_0839

I used the cute little “Petite Petals” punch found on page 33 of the Occasions catalog.  Center your punch in the middle of your card front that you just embossed and punch.  Then punch out additional flowers on each side of the center flower.

Now … for the ribbon.  You may remember this technique from my February 22nd post (Faux Dipping) where I colored it with marks and spritzed it.  If not, your in luck because this time I took pictures to help explain how I did it.

000_0832

I began with the 3/8″ Whisper White Taffeta Ribbon and colored it with my Daffodil Delight and Tangerine Tango Markers.  Just slide your “brush end” (it also has a writing end) across the ribbon, don’t be afraid to go darker.

Once your finished inking up your ribbon, place it on some paper towel.  The paper towel will absorb some of the ink, that is why it’s OK to go darker when coloring it.  Fill your Stampin’ Spritzer with water and spritz over your ribbon… the more water you spritz on, the lighter your ribbon will become.  Set aside to dry.

000_0834

Tip:  You can the new Heat Tool to dry your ribbon because it actually has a low setting for drying!

I love this technique and it looks so nice with the Watercolor Wonder Designer Series Paper.  Give it a try… it really is quite easy and can add a stunning look to your card.

Thanks for stopping by today.

blog-closing-small

Here is the list of ingredients I used today …

132994

 Watercolor Wonder Designer Series Paper  / $10.95

133322

 Petite Petals Punch / $12.95

109070

 Taffeta Ribbon – Whisper White / $6.95

126185

 Stampin’ Spritzer / $2.95 – Set of 2

119247

 Pearls Basic Jewels / $4.95

 You may view or purchase any of these items just by clicking on the item number.  It will take you directly to my stampin’ store.  Shop 24/7 – 365

Thank you.

Inspiration comes in many forms …

Hello Stampin’ Friends,

Today I want to share with you the wonderful ideas created by our Concept Team, taken from the Be Inspired Blog.

Be Inspired!

Do you ever struggle to find inspiration? Do you need something to jumpstart your creativity? You’re not alone. As concept artists, staying inspired can be challenging at times. We look to various places for inspiration.

We recently made some projects based on a mood board. A mood board illustrates visual direction and conveys a look and feel. We loved the look of this board from http://virrrrrr.blogspot.it. It has soft colors and textures, a spring look and feel—with a fun touch of gold.  Here are the projects that this mood board inspired:

Jen

One of my favorite elements on this board is the tufted suitcase chair. I was inspired by the fun colors and pops of gold. I made this mini pinboard to mimic the tufted chair and added colorful elements to it. I love the color blocking on the eggs and created a color-blocked tag to hang on my mini board. It’s the perfect little piece to keep by my computer.

Chrissy

There’s nothing to get your creative juices flowing like a mood board. If you’re finding yourself in a rut, just looking at one is a great creative exercise. It pushes you out of your comfort zone and inspires you to try new things.

The gold polka dots were the first thing that jumped out at me. I love polka dots, and the fact that they are gold just makes them that much more fantastic!

I began my project by putting together a pretty, bright color scheme, then noticed that most of the mood board was pastel. I thought the overall feel of pastel with a few fun, bright pops was so inspiring. That’s when I decided to make my project pastel with bright pink stitching. It added just enough “pop.” I created more polka dots using circle punches (US/CA), then layered the circles in the corner (as you see on the mood board).

I love the handwritten descriptions next to the macarons. There’s something very charming about something that looks handwritten. The So Very Grateful Stamp Set has some awesome greetings. They look handwritten and are perfect for the look I was going for. I’m in love with the finished project. It’s something I’m not sure I would have done on my own—in a good kind of way. It feels new and different, and I think that’s my favorite part about it.

Arika

When creating my card, I tried to mimic some of the elements from the board. The balloons have the same overlapping colors as the mood board. The colors in the chevron stripes also come from the mood board. And I added just a small bit of gold with the Gold Baker’s Twine.

Melody

I was inspired by the colors and patterns on this mood board. The woodgrain background and the Pool Party Designer Series Paper stripes were inspired by the different hangers. The center circle came from the colored eggs—and I couldn’t pass up an opportunity to have some gold dots on my project. The macarons and spoonfuls of ice cream made me think of a celebration, so I picked my “Hooray for today” sentiment from the Geometrical Stamp Set.

Kasia

I was inspired by the bottom row of the mood board. The transparent circles reminded me of the hanging lanterns in the Happy Congratulations Stamp Set. I first embossed the image and the greeting on vellum, then turned it around and stamped the colors on the back. By stamping on the back I was able to create a more subtle look and also reduce smearing of the colors. I stuck with the same color pattern and finished it off with the “scoops of ice cream” colors.

Hope you feel inspired to go create something, too!

Concept Art Team

Hope you enjoyed, aren’t they great?  I love the “Thank You” card!  Which is your favorite?

Be sure to stop back tomorrow … I have a neat card to share with you.

Have an awesome Friday!!

blog-closing-small

See ya later … Alligator

Hello Stampin’ Friends,

Today’s card share is a fun card I created using my FREE Sale-a-bration items!  I teamed up the “Decorative Dots” embossing folder and the “See Ya Later” stamp set.  Both of these items are in our Sale-a-bration catalog and you can get one or both of them for FREE with a qualifying order.

So … what’s a qualifying order?  All you need to do is purchase $50 of your favorite stampin’ supplies, or try something new.  Total is before shipping and taxes.  Stampin’ Up! has made it even easier by bundling some of the great products introduced in the Occasions catalog.  You could just choose one of these, and then one of the free items.  Here are two of my favorites …

This is the “BIRTHDAY BASH BUNDLE

135318G

Birthday Bash Clear Bundle 135318
Price: $55.80
Love to give handmade birthday cards but don’t love to figure out what goes together? Then we have a bundle for you! Our Birthday Bash Bundle has the paper products, accents, and birthday stamp set. The bundle coordinates with the Bannières en folie Stamp Set for even more birthday fun! Available in wood-mount and clear-mount. Coordinates with the Banner Blast Stamp Set. You can add it for FREE at checkout, or you can choose any other Sale-A-Bration free item.Bundle includes:• Remembering Your Birthday Stamp Set
• 8-1/2″ x 11″ Whisper White Cardstock (40 sheets)
• Whisper White Medium Envelopes (40)
• 2013-2015 In Color Stampin’ Write Markers
• Whisper White Baker’s Twine
• Rhinestone Basic Jewels

Here is the “YAY FOR CARDS” BUNDLE … (my absolute favorite!)

135336G

Yay For Cards Bundle 135336
Price: $52.70
If you’re the kind of person who never has enough cards on hand but never has enough time to make a bunch, don’t despair! Our Yay for Cards bundle pulls together what you need to create loads of cards without spending loads of time. Bundle includes:• Happenings Simply Created Card Kit (makes 15 cards; envelopes included)
• On Its Way Simply Sent Kit (makes 8 cards; envelopes included)
• Thanks & Hello Wood-Mount Stamp Set
• Smoky Slate and Strawberry Slush Classic Stampin’ Pads
• Mini Glue Dots

I think they did a fantastic job at putting together these bundles … or card kits, as some would call them.  For those who have a hard time deciding what to get … this gives them everything they need to get stamping!  You can just click on the links (in pink) to get to my on-line store.

Now, on to my card share!  I did a fun little technique today with our “Decorative Dots” embossing folder … I colored it.  This is an easy, and fun technique that you can use on any of your embossing folders (and not as messy as some other coloring of folders).

000_0823

Roll your desired folder through your BigShot (or the new Texture Boutique) – then ink up your brayer with the ink color you want to apply onto your embossing.  Yes, we brayer over the embossing … don’t push to hard, you don’t want to flatten out your embossed images.

I began with “Garden Green” and inked up my brayer with “Tempting Turquoise” … then gently rolled the turquoise over the garden green embossed cardstock.  I was thinking alligator, and I thought the colors looked really fun together.

I stamped up my gator image with the Black StazOn and cut it out using the “Ovals Collection” framelits.  I also added a mat and popped it up with the Stampin’ Dimensionals.

Oh my … almost forgot to say that I pulled out my paper piercer and added some texture around the greeting.  Hmmm… next time I will use the template to do that straight line!  Then I popped it all up.

000_0826

To add a bit of contrast to the card … I simply added strips of black cardstock on to the card front.  I also added some Garden Green and Black strips to the inside … just for fun.

Thank you for stopping by my blog today.

See you later, alligator!

blog-closing-small

Say it Your Way …

Hello Stampin’ Friends,

Today I want to show you our new ….

Personalized Name Stamp

With our personalized stamps you can create a cool address label or even use it for everything from marking your territory on books or other belongings to having a fun way to give a personal touch to gifts and goodies. Here are just a few customization ideas (for you or for the perfect gift):

  • Address stamp
  • Thank you
  • From the classroom of (for a teacher gift)
  • From the kitchen of
  • Made with love
  • This book belongs to
  • From the desk of
  • Just married
  • Save the date
  • Promote your business (add your name, website, and contact info)

Check out our newest offering:

Item

Description

Price

 132852  Circle Monogram Stamp  $23.95

Coordinates with the 1-3/8″ Circle Punch (item 119860). Clear Block B (item 117147) recommended. Purchase separately. Available in photopolymer only.

Here are a few of my designs:


CLICK HERE TO TRY IT OUT … Click on the words “Add to Bag” to create your own!

The Fine Print

  • Stamps will be available for ordering on my online store which will now allow for a preview option before the order is submitted.
  • You need to be logged in to the store to be able to personalize and preview their stamp.
  • Personalized name stamps from the 2013-2014 annual catalog can also now be ordered and previewed online;  Note that 2013-2014 annual catalog sets come in wood-mount lased rubber.
  • The font and design of the stamps are set.
  • Stamps are non-refundable.
  • Expedited shipping is not available.
  • Stamps will ship from a third party vendor.
  • Stamps are not approved Angel Policy stamps. For more information about the Angel Policy, contact me.

Let me know if you have any questions.  It’s really easy and so much fun to watch your stamp set being created right before your eyes!

Have a fantastic week ~

blog-closing-small

Sale-a-bration Inspiration & Weekly Deals …

Hello Stampin’ Friends,

Today I have a Sale-a-bration card share for you.  I’m using the creations from Stampin’ Up!s fabulous Concept Artists … and the blog “Get Inspired”.  Just in case you haven’t seen them, here they are:

https://i0.wp.com/www.stampinup.com/home/images/default-source/corporate-blog-posts/8-sab_cards.jpg

I am also posting a close-up picture of their cards.  I know some of you have a few of these Sale-a-bration items already, I’m sure these will inspire you!

Didn’t they do an awesome job!  I’d love to hear which one is your favorite!

Here are this weeks “WEEKLY DEALS” …

Weekly Deals

We hope you enjoy this week’s Weekly Deals!

Backyard Basics Framelits Dies Item # 129380
Regular Price: 24.95
Discounted Price: 18.71
Gold Metallic Encore Pad Item # 132141
Regular Price: 9.95
Discounted Price: 7.46
Basics Glimmer Brads Item # 121003
Regular Price: 4.95
Discounted Price: 3.71
Paper Doily Sizzlits Die Item # 125592
Regular Price: 21.95
Discounted Price: 16.46
Primrose Petals 3/8″ Stitched Satin Ribbon Item # 126844
Regular Price: 8.95
Discounted Price: 6.71
Summer Starfruit 3/8″ Stitched Satin Ribbon Item # 126846
Regular Price: 8.95
Discounted Price: 6.71
Season By Season Kit – Digital Download Item # 130060
Regular Price: 9.95
Discounted Price: 5.97

Please let me know if you have any questions, or need help with any of the items you saw here today.

Thank you for dropping by …

Have yourself a wonderful day.

blog-closing-small

Digital Birthday & Easter cards …

Hello Stampin’ Friends,

Today I want to share a card that I created on the “My Digital Studio” program from Stampin’ Up!  I must admit, I haven’t played with it for a while and I have a dear stampin’ friend who is looking for me to teach her.  So here we go …

I will begin with a video that will explain how to begin …

Here is a simple card I made using the template …

birthday_2-001

I chose a birthday format that was included in the My Digital Studio program I purchased.  The banners are the only thing on the card, so I clicked on the “stamp” tab and added the candles.  I clicked on the candle, then on the color tab to change the colors to match the banner!  How cool is that. (I put the black around the card because the white did not show up properly on the white background of my blog)

Then I clicked back on the “stamp” tab, found an alphabet and chose the number 5 (not sure why … all my grandkids are older than that, but it looked nice!)  Back to the color tab to match that up too.  Then to finish off the card, I added the text.

Here is my Easter card that I created using a blank pallet.  I began with the ”  ” Designer Series paper download.

happy_easter_card-001

Now, you can’t get much simpler than a piece of designer series paper, a greeting and a ribbon.  Hmmmm … just like stamping, but done on your computer.  Nice for those of you who don’t have the time to bring out your supplies and hand stamp a card.

The ribbon is found under the embellishment tab and the I found an Easter greeting under the “stamp” tab.  It really is fun, just to play around with it and experiment.

Here is the inside to my card …

happy_easter_card-003

Notice a familiar stamp set?  Want to know what so cool about that… nothing ever retires in the My Digital Studio!  Colors … Stamp Sets … they are all there.  I love it!

Please share you thoughts on the digital cards.  Don’t worry stampers, I will never give up my hand made cards, but this is a quick way to create!  Plus … you can combine the two.  Print out one of those pretty designer papers and embellish it with the cool stuff you have in your craft room.  You can have the best of two worlds.

Thanks for stopping by, and again, I would love to hear what you think.

Have an awesome day!

blog-closing-small

Smile Flip Card …

Hello my Stampin’ Friends,

Hope you are having a nice weekend.  I have been working in my Stampin’ room, cleaning, purging, tossing … you know how things build up.  I came upon a packet of pre-cut cards, so I decided to use what was already cut to make my card share today.

000_0814

I began with a circle flip card that was cut out of Gumball Green.  It must have been left over from when I was experimenting with the “extending” of the card.  This is where you place the end of the cardstock over the end of the circle framelit so it does not cut it off.

000_0630

I like to use Designer Series Paper with the flip cards because it just adds a nice splash of color.  I chose the “Watercolor Wonder” because it has Gumball Green in it’s color pallet.  Next I wanted a contrast color in the circle flip area, tried “Smokey Slate, but ended up punching the 2-1/2” circle from the Whisper White because it just looked better.

000_0815

I wanted to have some added dimension to the card so I embossed the front with the “Needlepoint Border” folder and the white circle with the “Wildflower Meadow” folder.  I knew I was going to add butterflies and wanted it to look as if they were sitting on the flowers.

To create the butterflies I used “Island Indigo for the “Elegant Butterfly” which is the larger of the two, and then punched out the inner (smaller) butterfly “Bitty Butterfly” out of the gumball green area of the “Watercolor Wonder” designer paper.  I then punched another Bitty Butterfly out of the indigo on the Watercolor Wonder paper.

000_0817

I used the row of pearls for the body of the large butterfly and the smallest pearls to create the body of the smaller butterfly.

I embellished the card by placing the smallest pearls onto the scallop of the embossing.  I then added a fine strip of the island indigo to complete the card.  This brings the indigo color all throughout the card.

My greeting “smile” comes from the stamp set “Fabulous Phrases” … you can find that on page 70 of the idea book and catalog.  It’s a fabulous stamp set!  You can use it in small areas like I did here, or you can combine the words to make up a phrase!

000_0819

Hope you enjoyed the card share.  I think I will challenge myself to complete all the cards I have pre-cut … and if I can’t do them all, maybe I’ll sell them!  Like I said, it’s time to purge.  I’m getting prepared for a huge retired sale this summer.  Don’t worry … I will send out an invitation when the time comes.

Thank you so much for stopping by my blog.

Enjoy the day ~

blog-closing-small

Here is the list of ingredients I used today …

128577

 Fabulous Phrases Stamp Set – Wood / $37.95

120501

 Fabulous Phrases Stamp Set – Clear / $26.95

133480

 Circle Card Framelit Die – Whisper White / $32.95

120906

 2-1/2” Circle Punch / $16.95

132994

 Watercolor Wonder Designer Series Paper / $10.95

129383

 Needlepoint Border Embossing Folder / $7.95

129376

 Wildflower Meadow Embossing Folder / $7.95

You may view or purchase any of these items just by clicking on the item number.  It will take you directly to my stampin’ store.  Shop 24/7 – 365

Remember the purchase of $50 before shipping and taxes will get you a FREE Sale-a-bration item.  Thank you.

Faux Dipping Technique + Mono Chromatic Coloring = Beautiful!

Hello Stampin’ Friends,

I am really excited to share my card with you today!  You didn’t think I was going to show you a technique without following it up with a card did you?  I thought the way Stampin’ Up! colored the ribbon was really cool … so I had to try it out.

I didn’t have the ribbon they used, so I used the Taffeta Ribbon in Whisper White.  I then ran my markers across the length of the ribbon (as Stampin’ Up! did) starting with the lightest color … Pink Pirouette and finishing with Melon Mambo.

000_0808

I did however change up the next step… I laid my ribbon across a layer of paper toweling and spritzed it with water.  You can find the Stampin’ Spritzers on page 164 of the Idea Book & Catalog.  It blended nicely!  Once the water absorbed into the ribbon, and excess in the paper towel, I moved the ribbon off to the side to dry.  I love the way it looks!  I’ll be trying out some additional color combinations this weekend.

I tried to do the same technique on paper, but it did not work the same as it did on the ribbon.  You can however create the watercolor look with the Shimmery White paper and the Aqua Pens … but that’s another day, and another card.

For my flower, I tried a technique that I will be showing my Technique clubs in the upcoming month.  It is embossed in white embossing powder, and colored in with the Stampin’ Write marker.  Both my card stock and my marker are Pink Pirouette.  It is unbelievable that you can get that much variation … using the same color marker!

To get the darker color, you simply keep coloring over the same area.  To create the light / highlighting … leave it blank or only go over that area once.  I did however add a touch of Melon Mambo right around the center of the flower so it matched the ribbon better.

000_0812

The white card stock you see, is the Shimmery White … it’s so pretty!  I wish my camera would capture it better.  I embossed the bottom area with the “Needlepoint Border” embossing folder.

The flower was cut out, popped up with Stampin’ Dimensionals, and framed with the “Oval Collection” framelits.

I hope you enjoyed seeing the “Faux Dipping” technique on today’s card share.  I’d like to hear from you, are you going to try this technique??

Have a wonderful weekend ~

blog-closing-small

Here is the list of ingredients I used today …

133104

 Peaceful Petals Stamp Set – Wood / $28.95

133107

 Peaceful Petals Stamp Set – Clear / $20.95

109070

 Taffeta Ribbon – Whisper White / $6.95

126185

 Stampin’ Spritzer / $2.95 – Set of 2

101910

 Shimmery White Cardstock / $7.95

129383

 Needlepoint Border Embossing Folder / $7.95

129381

 Ovals Collection Framelits / $26.95

 You may view or purchase any of these items just by clicking on the item number.  It will take you directly to my stampin’ store.  Shop 24/7 – 365 … Thank you.

Stampin’ Technique Video & More …

Hello Stampin’ Friends,

Today I want to share with you a fun technique from Stampin’ Up …

This was one of the techniques that Stampin’ Up! showcased in our demonstrator magazine ” Stampin’ Success”.  It’s packed full of helpful stampin’ and business tips.  Just one of the many benefits of being a demonstrator.  Thinking about it??  Let’s talk.

I also want to share the video for February’s Paper Pumpkin …

Did you know that Stampin’ Up! extended the FREE MARKERS promotion when you sign up for Paper Pumpkin?

demoheader_paperpumpkin_demo_1.11-1.27.2014_US_CA

Afraid to make a monthly commitment … just try it for a month, you can cancel anytime, or just skip a month or two.   CLICK HERE FOR DETAILS

Have an awesome weekend ~

blog-closing-small