Amazing Silhouettes Card in Watercolor

Hello Stampin’ Friends ~

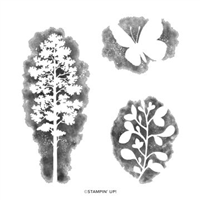
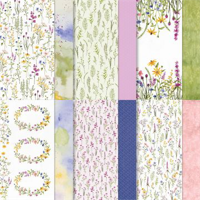
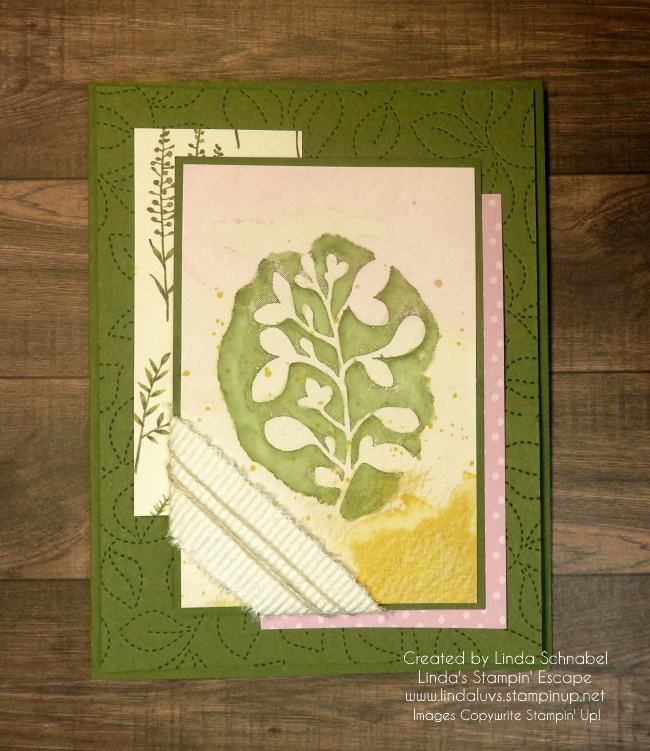
Today I’m sharing the last of the 3 images in the Amazing Silhouettes stamp set. I’m using a touch of watercoloring with this one. I began by stamping the leaf image on to one of the watercolor patterns in the Dainty Flowers Designer papers in Old Olive. Yes, I stamped my image onto designer paper.

I added water to the middle size Water Painter and I used it to activate the ink and give it a more watercolor look. Then I added a little more ink to the image using the Water Painter giving it more depth of color…..

Once dry, I added a Mossy Meadow mat to it and wrapped the corner with the 3/4″ White Frayed Ribbon and then some of the natural Bakers Twine. These add so much texture to the card and create a framed edge for our foliage.

Using another pattern from the Dainty Flowers I cut into two pieces and used one side to highlight the green and the other to highlight the freesia that is found on the original piece that I stamped on. I layered these three pieces together and mounted them onto my cardfront.

I used Mossy Meadow for my card front and then embossed it with the Stitched Greenery Die. It gives the project some texture and a touch of greenery! You’ll love how the intricate detail dresses up the card perfectly.

No bling on this card because I wanted to keep it more natural. I added the card front to my base in Mossy Meadow … I love layering color on color, it’s such soft and subtle look.

Hope you enjoyed the three different looks / techniques that showcased the Amazing Silhouettes. I have to “Thank” my friend Karen who booked a workshop and asked to see this stamp set. It totally changed my mind … I love it! It’s unique and lends itself to many different techniques.

Thanks for popping in today, I hope you have a wonderful Tuesday!

Here is a list of ingredients used in today’s card. You can click on any one for more information about the product, or to begin shopping at my OnLine store. Thank you for your support

Simply Sunday: Amazing Silhouettes Stamp Set

Hello Stampin’ Friends ~

Today I’d like to share a simple card created with the Amazing Silhouettes stamp set from our Annual Stampin’ Up! Catalog. Get back to nature with the nature-inspired images in the Amazing Silhouettes Stamp Set. Create beautiful silhouettes in one simple step. Use one color to make a bold impression or multiple colors for an ombre look.

My card base is Mossy Meadow and the beautiful designer paper is Sale-a-brations very own Dainty Flowers … the paper you can get for FREE with a $50 purchase. Because the Dainty Flowers paper has shades of Mossy Meadow and Old Olive, I used the Old Olive ink for my stamped silhouette and my greeting…. both on Basic White cardstock.

I wrapped bakers twine around my stamped image to create some texture and add a touch of nature to the card. This entire piece was popped up with Stampin’ Dimensionals.

The greeting is a bit more than what I usually use for a Simply Sunday card but I couldn’t resist. Meet the Charming Sentiments Stamp Set, which includes various sentiments in different stylistic fonts designed to be used for all occasions. With this set, say thank you and congratulations, wish happy birthday and good luck, and show people you care. Grab some ink, pair with the images of your choice, and create your personalized handmade cards.

Love this sentiment set, and it gets better because it has coordinating dies!! That’s right … you can stamp your sentiments directly or die cut them and add them anywhere on your card! I also cut out a mat using the greeting die for some additional layering and to enhance the sentiment.

A great sentiment stamp set (with dies) is a must have for any stamp room, and a good investment as you can use it with any other stamp set, or just to add it to some of our stunning designer paper that doesn’t need anything else!

A simple card today that could be used for a man or a women, perfect isn’t it? I thank you for taking time out of your Sunday for the visit.

Have a great day ~

Here is a list of ingredients used in today’s card. You can click on any one for more information about the product, or to begin shopping at my OnLine store. Thank you for your support.

Featuring Stampin’ Up! Dainty Delight

Hello Stampin’ Friends ~

Happy Friday! I’m excited to feature the Stampin’ Up! Dainty Delight stamp set with you today. I’ve shared several card designs that highlighted the Dainty Flowers Designer paper from the Sale-a-bration catalog, now it’s time to feature the star of the show!

The polka dot background paper comes from the Dainty Flowers designer paper but I kept it subtle to really showcase that beautiful bouquet of flowers.

I used the Fresh Freesia paper and Basic Black to make a bold statement because the beautiful flower bouquets in the Dainty Delight bundle are so delicate. I have just begun to play with this amazing bundle … In fact, I am hosting a class highlighting the best features of this bundle!

If you would like to attend, you can message me below or “call me” … it’s a landline: 262-334-1009 / You will get to discover hands-on the several different ways to use this bundle, and maximize the value.

On today’s card I used the Fresh Freesia and Soft Succulent Stampin’ Blends to color my floral bouquet and then I wrapped it up with a pretty little Fresh Freesia Open Weave Ribbon bow.

I snuck the greeting out of the Flowering Tulips stamp set … I love this stamp, it’s one of my favorite greetings and I use it a lot. I used the Tuxedo Black Momento Ink pad on the greeting and my flowers.

The greeting was attached to the piece with the flower and then the entire piece was popped up with Stampin’ Dimensionals. It’s a pretty card that is easy to replicate … so have fun with it!

Thank you for the visit today, I appreciate you taking time out of your day to see me. I’d love to have you join me for my class as well … it’s going to be a “Galentine” party!!

Have a great weekend. I’ll see you tomorrow with a “stunning” Dainty Delight card.

Here is the shopping list from todays card … just click on any item and it will take your right to my store.

Dainty Delight Makes the Perfect Gift Card Holder …

Hello Stampin’ Friends ~

Today I’m going to show you what I did with the last piece of the Dainty Flowers designer paper to create the Perfect Gift Card Holder. Great for Birthdays, Graduations, Thank You’s and more. Isn’t this just the cutest?

You start with a half sheet of cardstock measuring 11″ x 8-1/2″ … score at 2″ and 5-1/2″. The 5-1/2″ score it to fold your card in half, the 2″ section gets a piece punched out of it and then it’s tucked under to create the pocket for your Gift Card. I used Tear & Tape Adhesive along the edges to secure it.

I used a piece of 5-1/4″ x 4″ piece of Dainty Flowers for the inside … the right side will be exposed when the card is closed. The Label Me Lovely Punched was used to punch the piece out of the pocket and for my sentiment.

I created an area for you to write in … the Basic White measures 3″ x 4″ and the Mango Melody mat is 3-1/8″ x 4-1/8″…. and you won’t be able to see it while the front is closed so your message is safe! lol

The front Mango Melody piece used to mat the designer paper measures3-3/8″ x 4-1/8″, making the Dainty Flowers designer paper 3-1/2″ x 4″. I used Framed Florets for my sentiment on the front and punched it with the Label Me Lovely punch. The Mango was punched and then cut in half and then adhered to the top half and bottom half (see the split on this back view).

Those pretty flowers sure can make an adorable card to wish someone a happy birthday and tuck a little something in there for them to treat themselves.

Thanks for stopping by today, I hope these sharing these cards with the beautiful Dainty Flowers Designer papers has inspired you pick a pack up for yourself.

Have a wonderful Monday ~

Here is a list of supplies used for today’s card …

Simply Sunday: Simply Gorgeous Dainty Flowers Card

Hello Stampin’ Friends ~

Happy Sunday! Today I’m sharing a super simple card that is Simply Gorgeous using the Dainty Flowers Designer paper you can get FREE during Sale-a-bration.

For those who don’t know what Sale-a-bration is, it’s Stampin’ Up!s most anticipated time of year because YOU can earn FREE “exclusive” products now through February 28th. Yes, sometimes the freebies sell out, so I don’t hesitate to get the ones I love first! Click HERE to learn more about Sale-a-bration.

Early in the week I shared a cutting technique using the Dainty Flowers (CLICK HERE to see post) and now I want to share what I did with some of the left overs! This piece is 12″ x 6″ – it’s simply cut in half, so you have another sheet just like this one (and a full one too!).

These will show the left over pieces from my first card (they are marked on the paper). Now I’d like to share my finished card and give you the simple instructions to create your own card ….

If you take a look at the layout of the Dainty Flowers paper I have “marked” … the pattern piece I chose for today’s card is on the right. My colors were chosen to highlight the daisies of Mango Melody with Early Espresso centers. The third color I used was Old Olive to bring in my greens from the designer paper.

The Early Espresso card base is 8-1/2″ x 5-1/2″ and is scored and folded at 4-1/4″ (basic A-2 size). I had to trim the top off my designer paper from 6″ to 5-1/2″ to match my card base. The Mango Melody mat behind the Dainty Flowers designer paper is 5-1/2″ x 3-3/4″. Simple measurements for this simply beautiful card (the designer paper does all the work)

Speaking of this designer paper, I had to share a close up so you could see the “look” of texture that it has. We don’t have to do anything … it’s already there for us. It adds such a warm and natural look with these beautiful flowers. And the flowers, well … I have fallen in love with the “watercolor” look. It truly is a work of art, and to share this masterpiece …. just add cardstock.

And a sentiment, which comes from the Dainty Delights stamp set. I suggest the bundle so you don’t have to “fussy cut” any flowers, the dies will do that for you! I’ll share more of that with you as well. Today the sentiment was punched using the Double Oval Punch.

Just so you know, when you purchase the Dainty Delights bundle, you can chose the Dainty Flowers Designer paper for FREE! It’s a perfect pairing. I will also be hosting a Dainty Delights Class in February.

I thank you for taking time out of your Sunday and sharing it with me.

Have a beautiful day ~

Here is a list of supplies used for today’s card. You can click on any image to learn more about it, or to begin shopping with me. Thank you!!

Dainty Flowers Thank You Card …

Hello Stampin’ Friends ~

Today I have a great Thank You card for you created with the Dainty Flowers Designer Series paper. This was just one of the cards that my Stamp Club members made this month. I wanted to highlight the lovely paper you can choose for FREE during Sale-a-bration with a purchase of $50 or more … and if you love this paper, you will want the Dainty Delight bundle. You can find it on page 55 of the NEW Jan – April Mini Catalog.

I choose the pattern with the oval flowers, you can do so many different things with these, today I’m sharing a quick and simple way ….

I started with a Blushing Bride card base and then chose one of the floral stamps from the Dainty Delight stamp set and stamped the front with Blushing Bride ink. This technique adds the look of texture/ and dimension, and I just like the way it looked!! lol

Once the designer paper was trimmed down, I added an Old Olive mat to the paper. This pulls the greens out of the paper and compliments the Blushing Bride. You can pop this up with Stampin’ Dimensionals but I did not. I saved that dimension for my greeting ….

The greeting comes from the Dainty Delight stamp set and was stamped in Old Olive. Then I cut it out with the largest banner from the Stylish Shapes dies. I then cut another banner from Blushing Bride to use as my mat … I cut that in half horizontally and attached it so then ends showing on opposite ends. Then I popped it up using Stampin’ Dimensionals.

Take a close look at the paper … see the texture? This is “actually” in the paper! It appears to have been run though an embossing folder but it was not. Amazing!!

Such a pretty card, and it’s because of this beautiful paper. I’ll have more cards to share with you tomorrow so stop back, or better yet … Click on the “Follow My Blog” tab in the upper right hand area of this blog.

Thank you for joining me today, I hope it’s a good one for you!

Here is a list of supplies used to make today’s card …

Fun Folds & Dainty Flowers

Hello Stampin’ Friends ~ Today I’m sharing the video replay of last nights Facebook LIVE. I’m demonstrating step by stop how to create the Front Flip Fun Fold Card … it’s quite simple and a lot of fun to create.

DIMENSIONS:

Card Base 8-1/2″ x 5-1/2 scored and folded at 4-1/4″. Cut at 1-1/4″ from edge to score line, flip over and cut 1-1/4″ to score line. Secure the 1-1/4″ flaps to card base.

Designer Paper / Cut 2 – 1″ x 4″ pieces for outer pieces and 2-3/4″ x 4″ for center. Also cut a 2-3/4″ x 4″ piece of white for inside.

Let’s take a look at the video …

Here is the Dainty Flowers designer paper and the cutting pattern I used for the Front Flip Fun Fold card ….

This will give you a little more clarity of the directions … a picture is worth a thousand words! I even added the “hint” for the two pieces you can create another 2 cards with.

Now we can take a look at the completed card ….

My greeting comes from the Dainty Delight bundle and was punched out using the Double Oval punch … the Old Olive paper behind the greeting is actually the back of the designer paper!

And I couldn’t forget to decorate the inside ….

The little flower on the inside is actually a sprig from the oval wreaths that I fussy cut and glued inside. The sentiment comes from the Framed Florets stamp set and works beautifully with the Dainty Delight bundle.

I hope you enjoyed the glimpse of the Enjoy the Adventure cards as well, this truly is a “FUN” Fold!!

Thank you for hanging out with me today, hope your day is a good one!

Here is the list of supplies used to create today’s card ….

Simply Sunday: Dainty Flowers

Good Morning Stampin’ Friends ~

Welcome to my Simply Sunday post of Dainty Flowers. You will find this beautiful paper in the Sale-a-bration catalog, and is FREE with a qualifying purchase of $50. Today kicks of several days of beautiful cards created using the Dainty Flowers Designer paper and the Dainty Delight Bundle.

Today the main focus is on the Dainty Flowers Designer Paper ….

I went a little darker than the Old Olive by using the Mossy Meadow which really highlights our floral Blushing Bride pattern. The flowers on our background paper mimics the floral piece in which we highlighted here.

This pretty patterned paper was cut from the center of the sheet that also has the floral oval designs. This paper was not embossed, the texture you see on it, is part of the paper design.

This floral piece measures 5″ x 3-3/4″ with a mat slightly larger. The greeting was stamped with Mossy Meadow and comes from the Dainty Delight bundle. I simply trimmed off the edges with my scissors at an angle. I used dimensionals on the right side of the piece.

I embellished the card with my Opaque Adhesive Backed Gems to add some drama… or should I say texture! lol It’s so easy to make beautiful cards using this gorgeous designer paper.

Thank you so very much for spending part of your Sunday with me. Enjoy your day!

Here is a list of the supplies used to create today’s card ….