Today I thought we’d take a look through some of our Halloween inspiration …
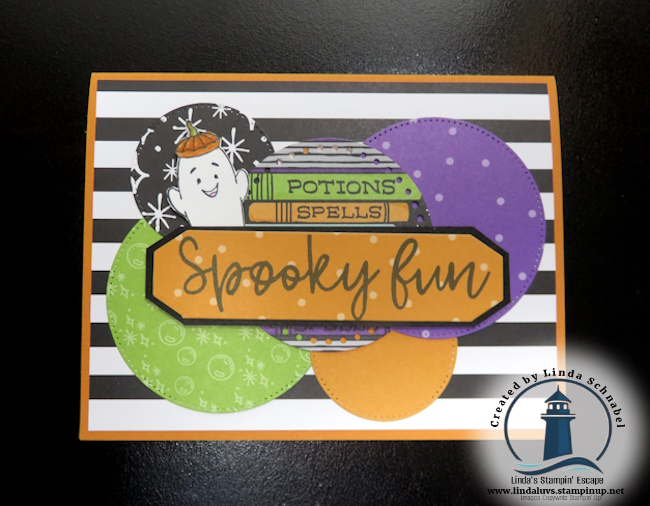
I’ve summoned not one, but four hauntingly amazing products to create this wickedly wonderful design: the Halloween Spells Designer Paper, the Playful Ghosts stamp set, the Halloween Memories stamp set, and the versatile Take a Bow Dies.
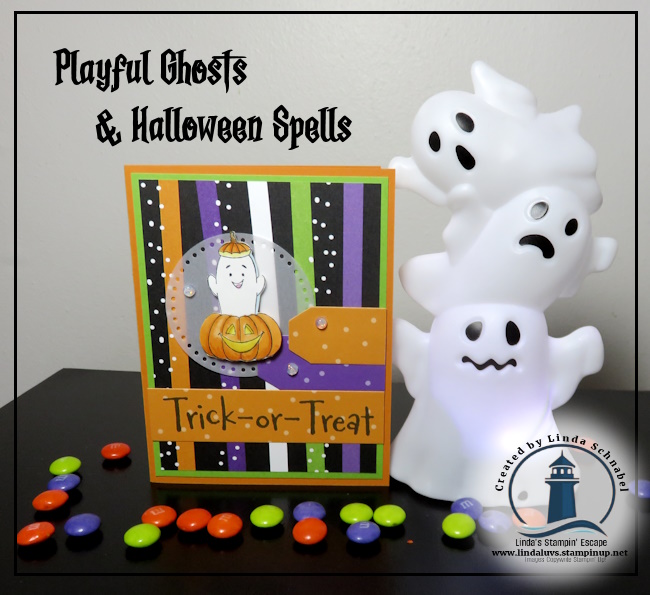
For this hauntingly cute card, we’re showcasing the eerie charm of the Halloween Memories Scrapbooking Kit and its oh-so-versatile two-tone cardstock. One side is the full-strength color, while the flip side is a lighter, spookier version—perfect for creating dimensional depth. I chose to use the “tearing” technique to give this card an extra ghostly touch by revealing the white core of the cardstock.
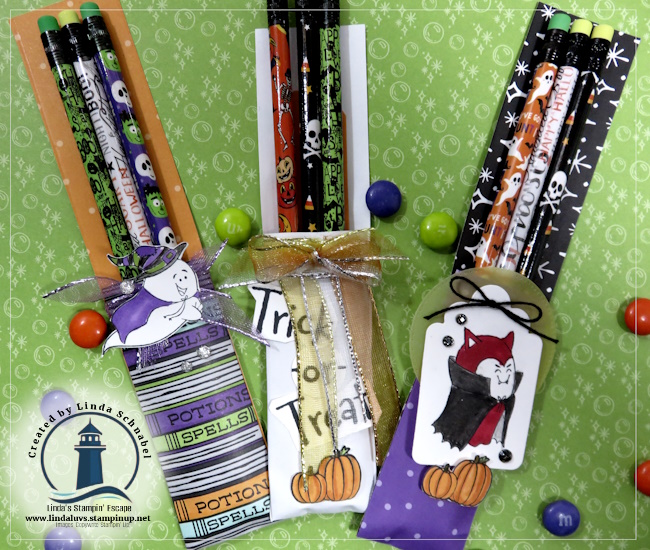
My pencil holders are a bewitching way to share the fun of Halloween without adding more sugar to the night. Created with the hauntingly beautiful Halloween Spells Designer Paper, these cute little pouches are a cinch to make. Whether you tuck in three Halloween-themed pencils or a ghoulishly delightful pen, these treats are sure to cast a spell on whoever receives them!
These cards have it all: spooky fun, creative techniques, and of course, lots of Halloween spirit. Whether you’re crafting for a party or just want to send a frightfully fun greeting, these projects are sure to cast a spell on your recipients!
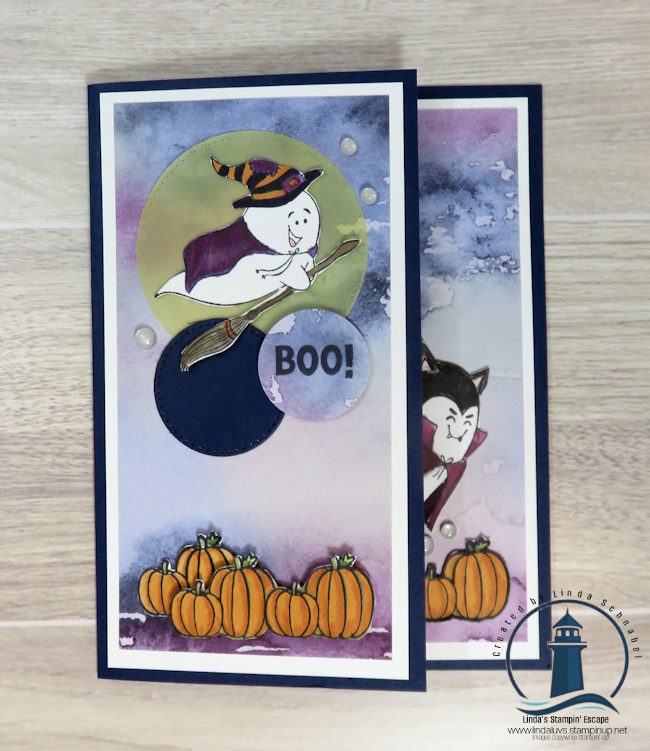
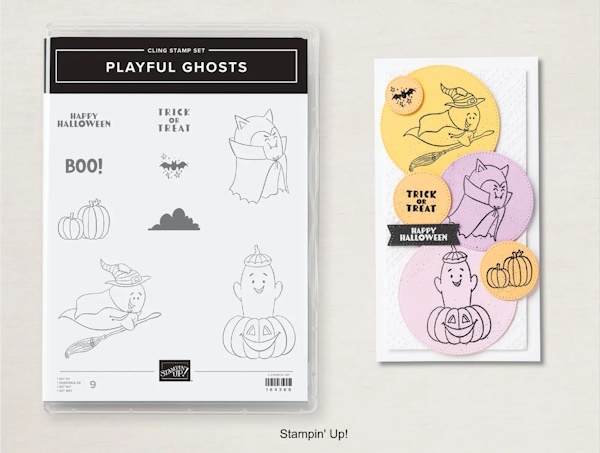
Yesterday, I shared a delightful Fun Fold Card and Video featuring the gorgeous Perennial Lavender designer paper. Today, I’m thrilled to show you how you can take that same fun fold layout and brew up some Halloween magic using the Playful Ghosts stamp set from our Online Exclusives.
To start, I switched up the designer paper, using the Thoughtful Journey collection as my background. You might think of this paper for travel-themed projects, but guess what? It works perfectly as a spooky backdrop too! The watercolor design gives just the right eerie touch to set the scene for some Halloween fun.
Next, I stamped my pumpkins, flying ghost, and Dracula ghost, bringing them to life with our vibrant Stampin’ Blends. These markers make it so easy to add depth and dimension to your images. I even used them to color in the moon, which I die cut with the Everyday Details Dies. Creating layers, I die cut a smaller Night of Navy circle for that extra pop of color.
For the sentiment, I went with a simple yet bold “BOO,” stamped directly onto the designer paper and then punched out. This little detail adds just the right amount of Halloween flair without overpowering the rest of the card.
I thought it would be cute to have the Dracula Ghost peeking out from the inside of the card. And to finish up, I embellished with some spooky little orbs, also known as Transparent Adhesive Backed Dots. These subtle, glossy dots add a perfect hint of mystery and shine to your card.
The Playful Ghosts stamp set is such a joy to work with. Whether you’re creating cards, treat bags, or other Halloween projects, this set is full of possibilities. And who knew that the Thoughtful Journey designer paper could be so versatile? Using it as a spooky background showcases the simplicity and creativity that makes crafting so much fun.
I hope this card inspires you to pick up the Playful Ghosts stamp set and create a Halloween masterpiece of your own. The possibilities are endless, and I can’t wait to see what you come up with!
Yesterday’s “Stamp with Me” video and card layout featuring the Joy of Christmas Suite/Collection were an absolute delight, weren’t they? It’s always a pleasure to explore new creative avenues and share our crafting joys.
The clean and straightforward card layout demonstrated in the video is not only visually appealing but also easy to recreate. It allows room for creativity and personalization, making it a go-to design for card makers. You don’t need “what I have” … use the measurements with the goodies YOU have.
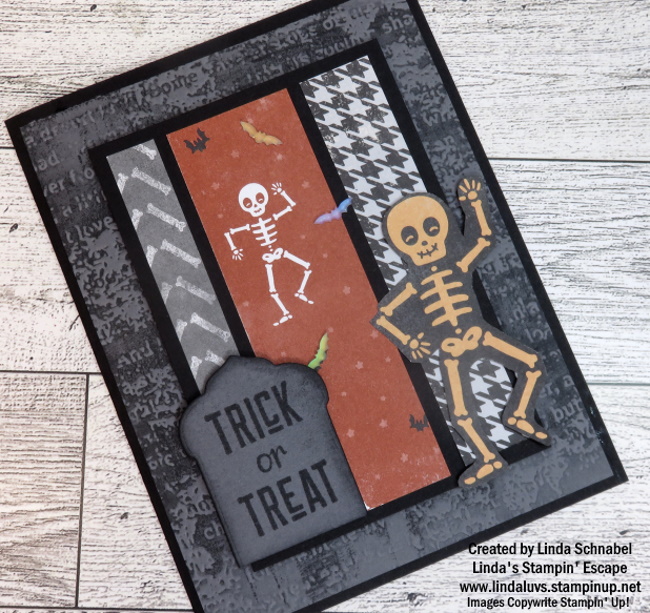
But today, we’re shifting gears and getting into the Halloween spirit! We’re all set to embark on a spine-tingling crafting adventure with the “Them Bones” Designer Paper and the “Tricks and Treats” bundle. Get ready for some frightful fun!
The “Them Bones” Designer Paper is a spooktacular choice for crafting during the Halloween season. With its hauntingly fun skeletons, bats, and other creepy critters, this paper pack is bound to add an extra dose of Halloween spirit to your creations.
Pair this paper with the “Tricks and Treats” bundle, and you’re in for a wickedly good time. This bundle offers a delightful stamp set and coordinating dies, perfect for crafting spooky cards, treat bags, and more.
I used the Timeworn Typed Embossing Folder to create the look of an old headstone to add an added touch of spookiness… on that note, I created a headstone from the die which highlights our greeting. We’ve got skeletons dancing in the graveyard with our Glow in Dark bats lighting up the way!
Stay tuned for more exciting crafting adventures, and remember, it’s not just about the destination; it’s the joy we find in the journey.
Happy crafting, and have a spine-tingling Halloween season!
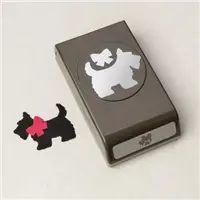
Hello Stampin’ Friends ~ Today I wanted to share a few of my favorite items from the Clearance Rack. I’ve already shown you the All Together Designer Paper, so lets see what else is on my list!
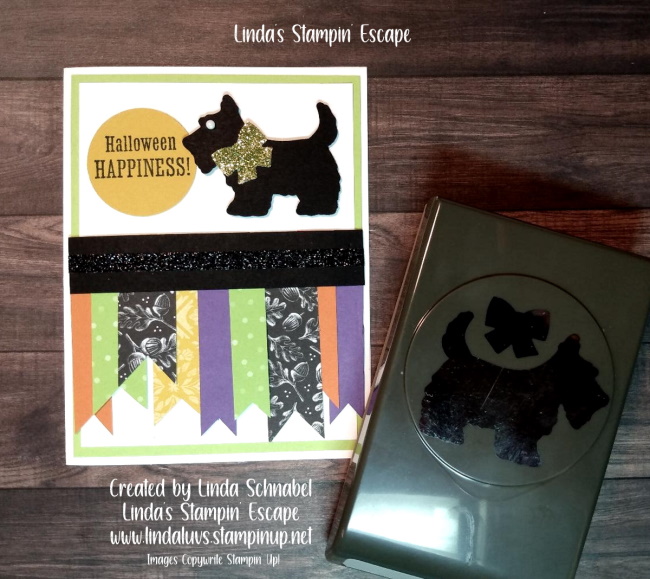
First up …. I had to pick the cute little Scottie Dog Punch
Here’s a cute Christmas card using the Scottie Dog punch ….
If you would like to see how I created the holiday pattern on this card CLICK HERE. I have another card sample for you … Halloween and using up some of my scrap designer paper.
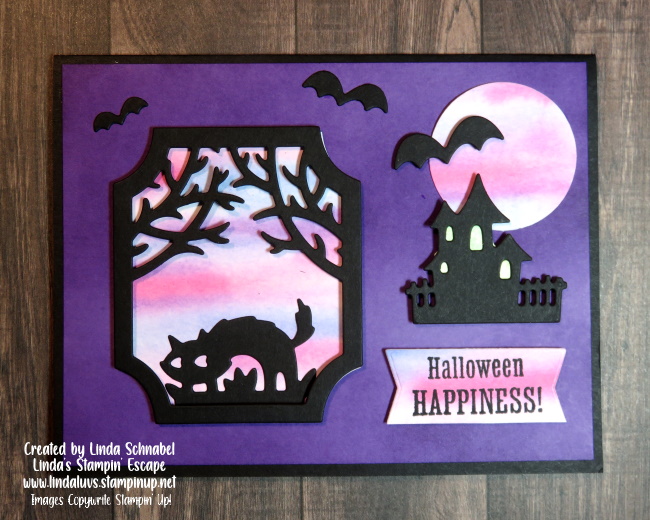
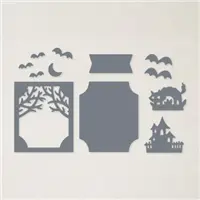
Since we’re talking Halloween, let’s look at the Scary Silhouettes Dies ….
Here is a fun card that I created with these dies and a watercolor wash background ….
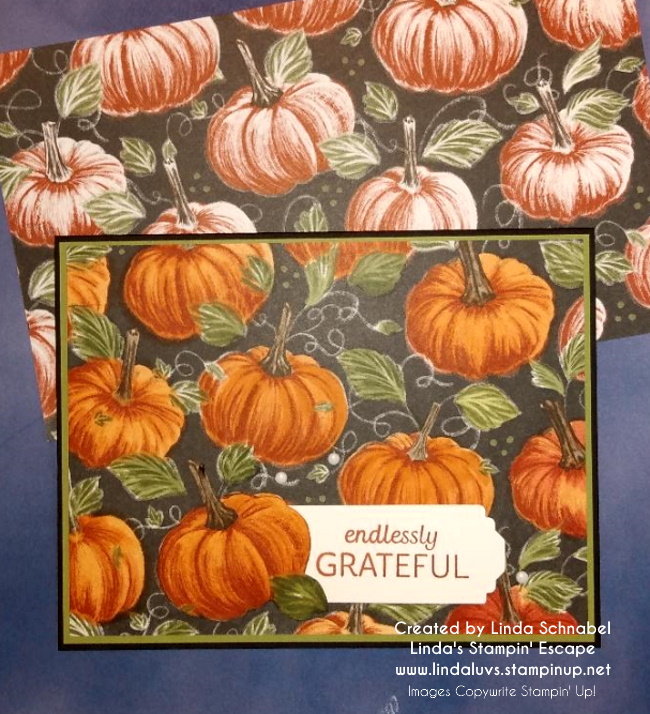
I have one more product to show you today along with several card samples; the Rustic Harvest Designer Series paper ….
You will notice that these sheets have colorful designs on one side, and black and white on the other. If you look back at my Halloween Scottie Dog you will find some of these patterns on that card too!
My first card uses the black and white for the background, then with my blending brushes, just added some color!
The next card shows how you can bring the color level up a notch (or leave it just the way it is) I used the Stampin’ Blends because the work so well on designer paper too ….
And the last card highlighting the Rustic Harvest Designer paper, shares the before and after using the Stampin’ Blends on the Dahlia’s ….
So many uses for this paper …. take it beyond Harvest time and use the black & white for any occasion … grab some ink or markers and discover the possibilities!
These are just three of the great finds you will discover while shopping the clearance rack … I noticed that my favorite “Glitter Washi Tape” had already sold out! I will be tomorrow with a few more that I just loved using!
Check out this little cutie direct from Stampin’ Up ….
We know Halloween is on the way, but don’t be “afraid” to stray from a traditional color scheme. Combine our Cutest Halloween Bundle with soft, subtle shades for a happy and light-hearted Halloween card!This is so adorable!
I will be demonstrating “Halloween” tonight on my Facebook page LIVE!! Come join me – I begin at 6:30 pm Central. CLICK HERE FOR THE LINK
Thanks for stopping by today! I’ll see you tonight at 6:30
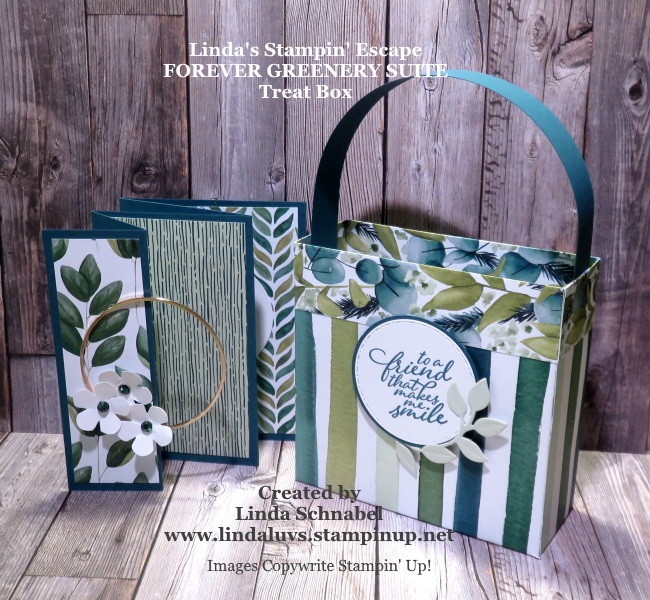
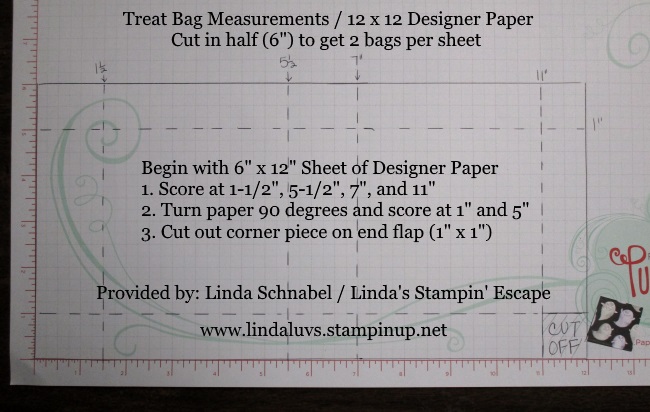
Today I’m sharing some cute treat / gift boxes that are super easy to make! These boxes will be celebrating Halloween, Christmas and a time for friends. One 12 x 12 sheet of designer paper will make 2 boxes. Once you start making these boxes … you’re going to want more paper!
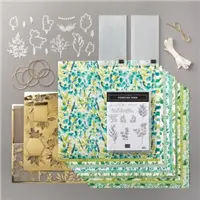
This very first box was created with the Forever Greenery Product Suite. The cute little stitched circle die cut comes from the Heartwarming Hugs bundle and the leaves were cut directly from a wreath cut using the Arrange a Wreath Bundle.
Grab a cup of your favorite beverage and join me while I take you step by step creating this simple box …
So easy right? I will also be sharing the dimensions with you, as promised in the video. I thought it would be fun to share the box made in this video along with the card I made in last weeks video. You can find all my videos on my Linda’s Stampin’ Escape YouTube Channel … please subscribe while you are there 🙂
The next little treat box celebrates Christmas … I used the Heartwarming Hugs Product Suite. With so many amazing papers in this package, it was hard to choose one … hope you like it!
The “For You” badge was fun to make … first I stamped it in Real Red on Whisper White and die cut it with this die that cuts out the center as well. The cool die that mats the circle is a fun shape to work with. The tree was stamped in Mossy Meadow on Pear Pizzazz.
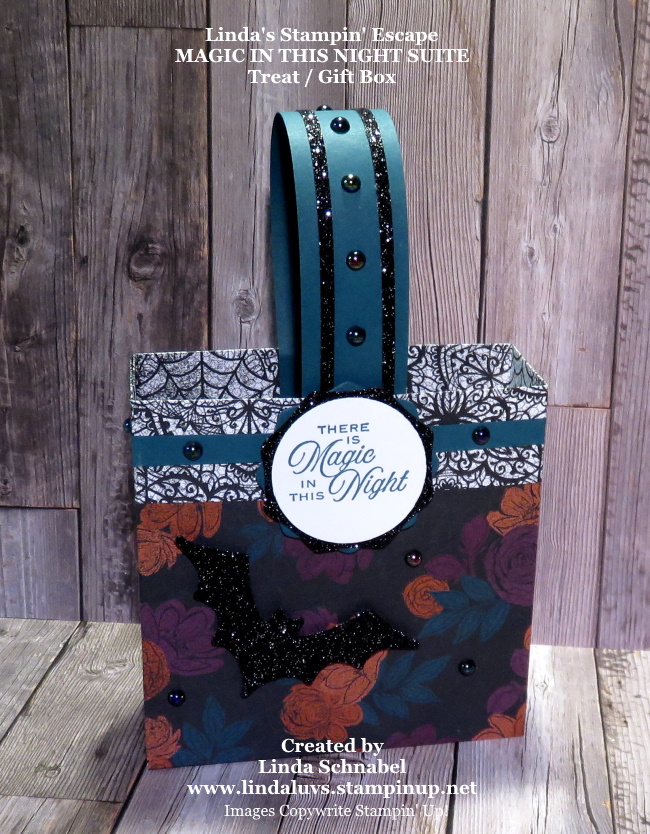
I wrapped a ribbon around the top and tied a bow on … you don’t always need a handle!The next treat box I want to share is my Halloween one …
My Oh My … I had fun with this one!! I wrapped the top and created the handle with Pretty Peacock cardstock … along with a piece die cut with the fun shape from the Heartwarming Hugs! Using that die I also cut a piece from the Black Glitter paper… together they make a fun design behind the greeting.
I blinged out the handle with more of the Black Glitter paper and those lovely Iridescent Pearls. The next treat box was created with the same Magic in this Night suite … No handle!
This one was created with the help of the September 2020 Paper Pumpkin. The greeting, the hat, the flower and the mini doily are all from the Paper Pumpkin kit! I’ll be sharing more about the upcoming Paper Pumpkin soon.
Here are the dimensions for our treat / gift box ….
I hope you have enjoyed today’s project share … they were really fun to make. I wasn’t kidding when I said that once you start making them that you’ll want more paper ….
Don’t forget that 15 of our designer papers are 15% Off until the 31st of this month. The deadline is coming up soon. Let me know if you need any help placing your order.
Thank you for joining me today …
Have a wonderful day!
TODAY’S STAMPIN’ SUPPLY LIST … If you liked the products used in today’s projects, I have links for you below. Just click on the item you would like more information on, or to begin your shopping. It will take you directly to my website. Thank you ♥
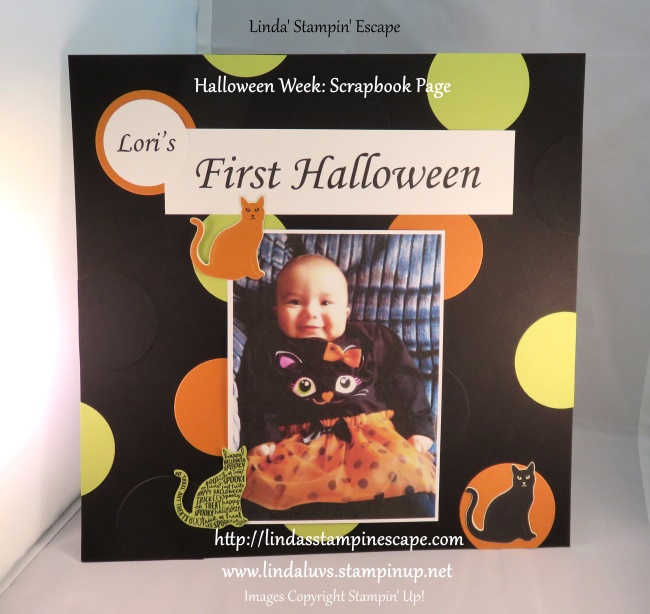
Today I’m going to share with you a quick -n- easy scrapbook page that was created out of scraps!
Our clubs had created a card where we were punched out colors of cardstock with our 2″ Circle punch so we ended up with a whole bunch of left over circles. Not wanting anything to go to waste, I used the circles to create the background for today’s scrapbook page. I simply just glued the circles on using the Tombo Multi-Glue.
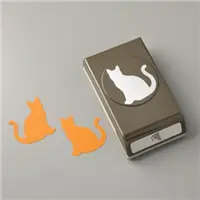
The title was created from my computer, the kitty’s were created from the retired “Spooky Night” Designer Series paper… but our cat punch is still available to punch kitties for your page. I thought it was appropriate since she was dressed as a little kitty cat!
Don’t ever pass up the chance to use up your scraps … this was fun and easy to create!
Still time to join me and your fellow stampers for a Stamp Club …
Thanks for checking out my blog today.
Hope you day is a beautiful one!
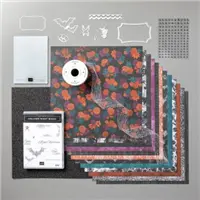
Today’s Supplies used to create the scrapbook page …
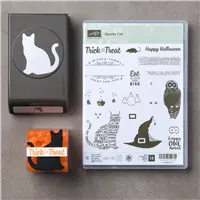
Today I’m going to share with you a quick -n- easy scrapbook page that was created out of scraps! Last year our Stamp Club made a Halloween card using the Seasonal Chums bundle … No longer a bundle but the stamp set and dies are still available.
And I used the cut out circles to create the background for today’s scrapbook page. I simply just glued the circles on using the Tombo Multi-Glue.
The title was created from my computer, the kitty’s were created from the “Spooky Cat” bundle and “Spooky Night” Designer Series paper … also from last year (sorry … but we have to use up that paper sometimes!). I thought it was appropriate since she was dressed as a little kitty cat!
I wish all my scrapbooking would go this quick -n- easy! I need to remind myself to “Keep it Simple” because the photo is your reason for scrapbooking in the first place 🙂
Thanks for checking out my blog today.
Hope you day is a beautiful one!
Today’s Supplies used to create the scrapbook page …
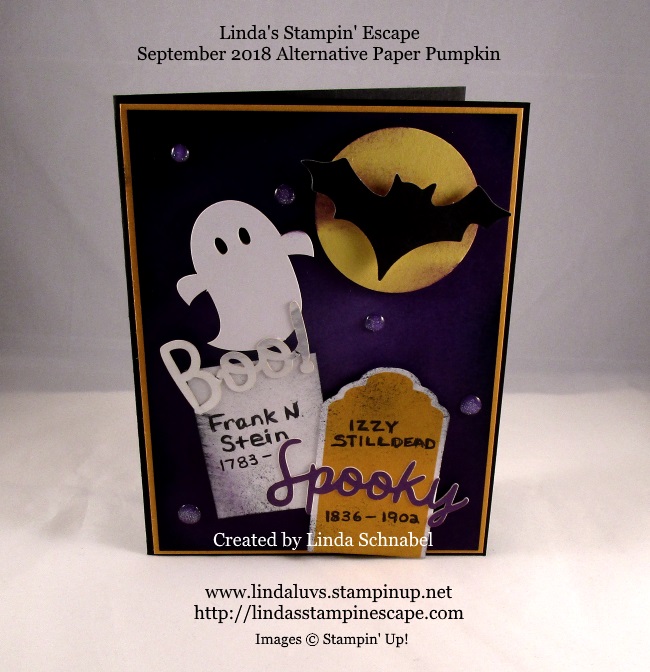
Today I have my alternative Paper Pumpkin project to share with you … I may have gotten a bit carried away with the spooky side of things – lol
So I took the tags and cut them down to turn them into headstones and created a graveyard! The cute little ghost and the bat along with the greetings were all included in the Paper Pumpkin kit …
Since I sponged my background, I added a little sponging on my gravestones to age them a bit. Not included in the kit was the moon which I just punched with the 1-1/2″ Circle punch. Oh yes … and I had to add a few orbs in the grave yard … the cute little Glitter Dots really did the trick.
Hope you enjoyed taking a haunted hike with me today through my spooooky graveyard, thanks for joining me.
Today I’m going to share with you a quick -n- easy scrapbook page that was created out of scraps! A couple of weeks ago our Stamp Club made a Halloween card …
And I used the cut out circles to create the background for today’s scrapbook page. I simply just glued the circles on using the Tombo Multi-Glue.
The title was created from my computer, the kitty’s were created from the “Spooky Cat” bundle and “Spooky Night” Designer Series paper. I thought it was appropriate since she was dressed as a little kitty cat!
You won’t want to miss out tomorrow … I’m using the Graveyard Gate Bundle. It’s been a HOT search on Pinterest!
Thanks for checking out my blog today.
Hope you day is a beautiful one!
Today’s Supplies used to create the scrapbook page …