Yesterday I shared the “I Believe” card (shown below) and today I’d like to share another card that I made during World Cardmaking Day using the same simple design.
I began with a Whisper White card base and 4″ x 6″ sheet of the Heartwarming Hugs Designer paper. I scored the designer paper at 5-1/4″ and folded the pretty polka dot side over onto the top of my plaid paper… No cutting!
Instead of using a piece of cardstock, I used another piece of the Heartwarming Hugs designer paper …
These fun designer papers look so great together and add such a fun core to the card. I’ve added the Silver Edge Ribbon to add a touch of bling to the card.
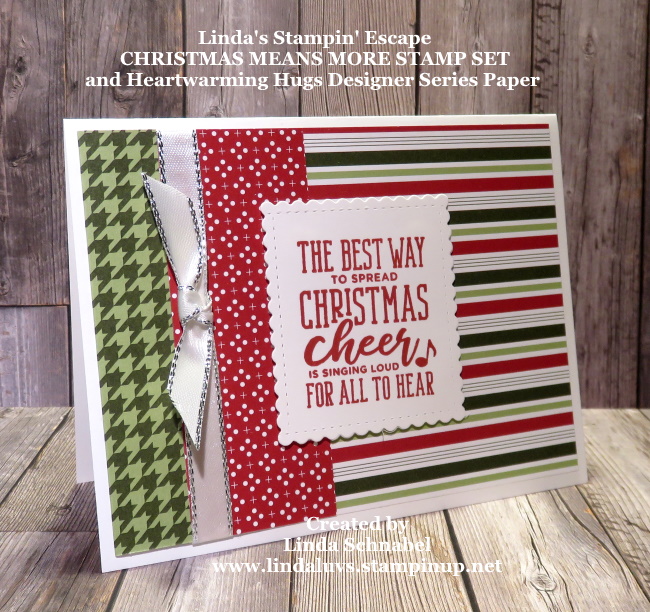
The focal point of my card is the Christmas Means More stamp set …
This is such a fun stamp set and really works well with any of our Holiday Designer Papers.
I did not get my video made yesterday but I will share it with you as soon as it’s done… and I’ll demonstrate how easy the cutting and embellishing the card is.
Thanks for coming back today … I’ll be back tomorrow this another pretty card.
TODAY’S STAMPIN’ SUPPLY LIST … If you liked the products used in today’s projects, I have links for you below. Just click on the item you would like more information on, or to begin your shopping. It will take you directly to my website. Thank you ♥
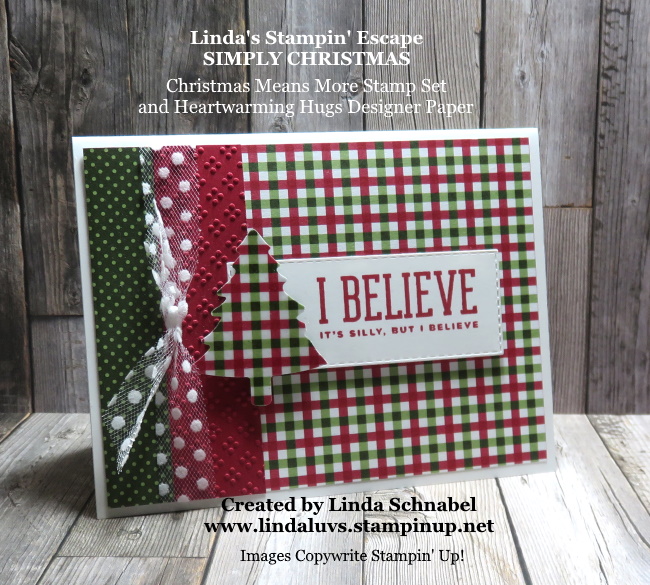
Today I’d like to share a sweet -n- simple card that I made during World Cardmaking Day last weekend. It’s simple design makes it easy to create multiple cards … and with Christmas coming, that’s a good thing!
I began with a Whisper White card base and 4″ x 6″ sheet of the Heartwarming Hugs Designer paper. I scored the designer paper at 5-1/4″ and folded the pretty polka dot side over onto the top of my plaid paper… No cutting!
I found a piece of scrap in Real Red so I used the Wrapped in Texture embossing folder with the dots… I then added the Tulle Polka Dot Ribbon … it adds some fun and dimension to the card.
I used the Pine Tree Punch to punch out my Christmas tree … this piece was “Heat Embossed” with clear embossing powder from a demonstration I did LIVE for my Technique Tuesday on Facebook. Don’t want to waste anything and with the embossed tree, it really highlighted the designer paper on my card.
The greeting comes from the Christmas Means More stamp set. This stamp set was a must have on my Wish List. I BELIEVE … do you?
I hope you enjoyed today’s Simply Sunday card, I will be demonstrating this SIMPLE cardmaking technique tomorrow with yet another version of this card.
Thank you for joining me this Sunday, and I look forward to hanging out with you tomorrow.
TODAY’S STAMPIN’ SUPPLY LIST … If you liked the products used in today’s projects, I have links for you below. Just click on the item you would like more information on, or to begin your shopping. It will take you directly to my website. Thank you ♥
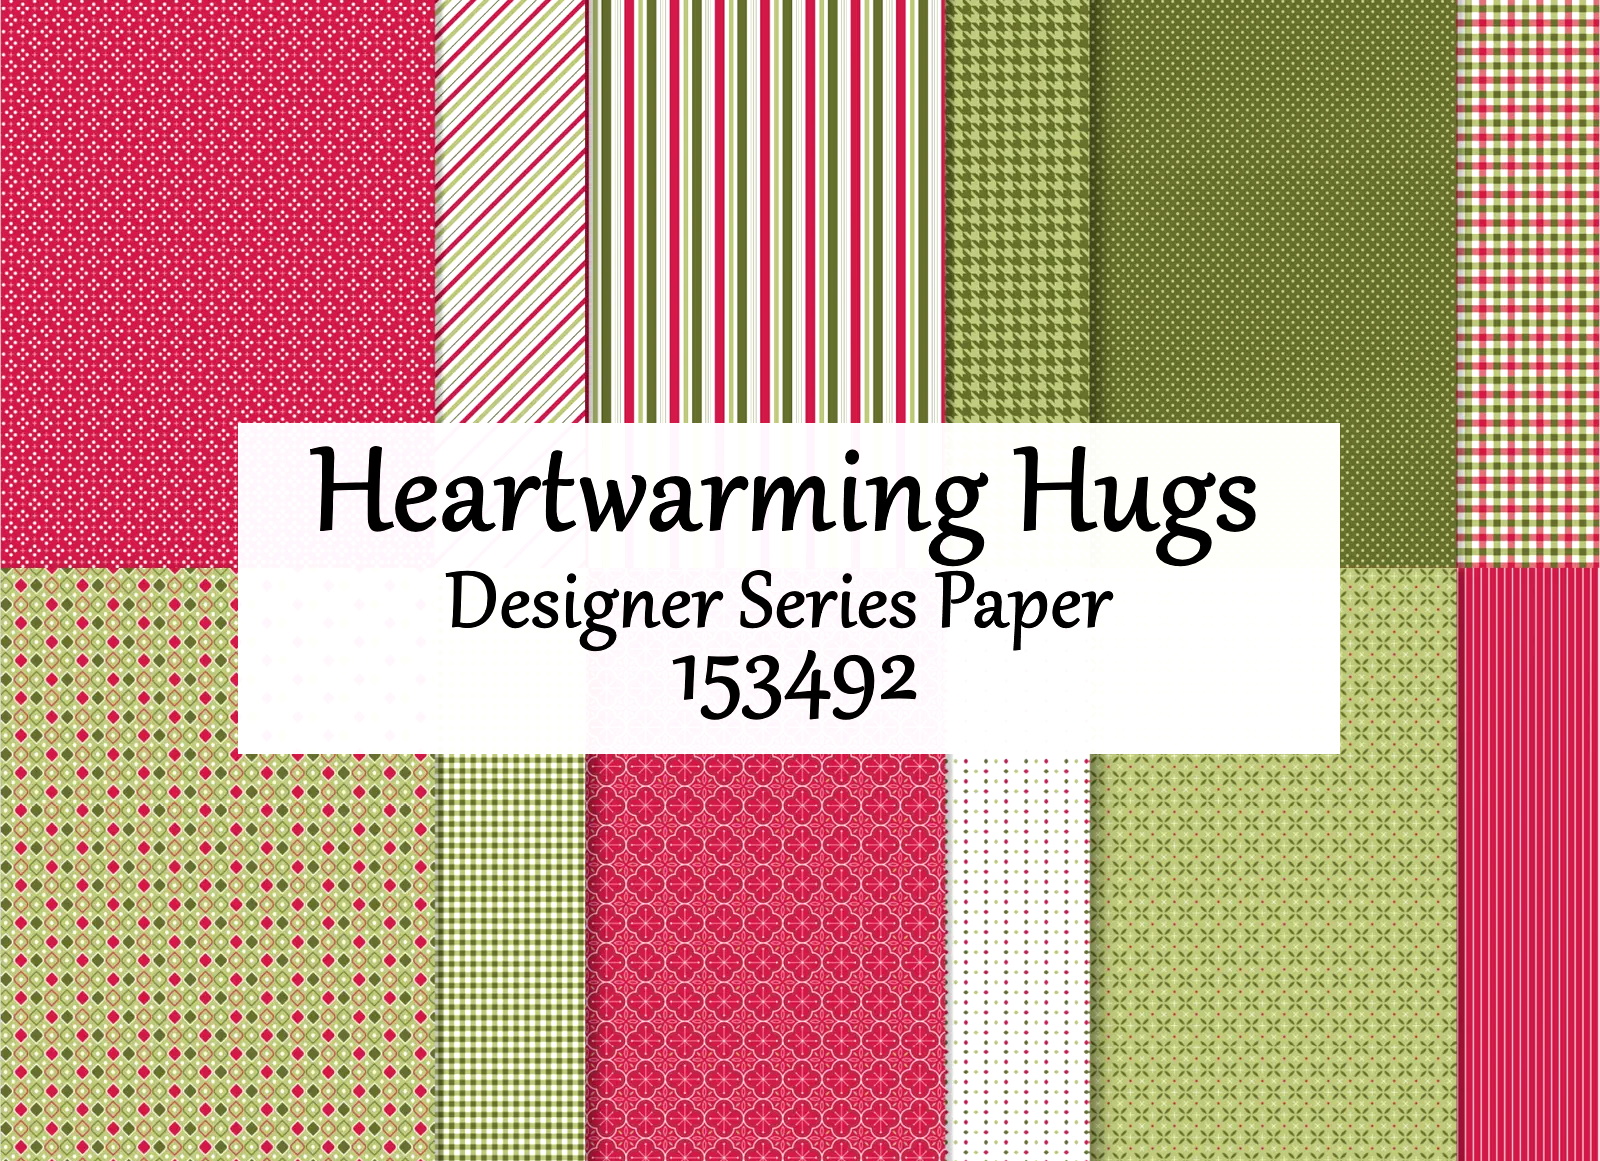
Today I’m going to share a parade of cards designed with the beautiful Heartwarming Hugs Designer Series paper. This is one of many that are currently On Sale …
I’d like to begin with one of the pretty patterns that I used as my background on this card. I teamed up the Heartwarming Hugs with the Festive Corners stamp set. Click Here to check out the entire blog post!
This is just one of the pretty patterns included in this amazing collection of designer papers. You’ll find the perfect pattern for your holiday needs along with patterns you can use for everyday occasions.
My quilt pattern card showcases another 4 patterns for this package. This simple layout is perfectly suited for using up those scrap ends you have left over from your cardmaking.
And talk about using your scraps … The Pinwheel card is perfect for those smaller scraps, and besides … It’s cute!! Read more about the Pinwheel card HERE and get the template.
One more card I’d like to share is just another way to use up those scraps!! This little cutie is easy to make and is so colorful … one nice thing about a designer series package is they all coordinate.
You and I both know that there is so many more things to do with designer paper and the Heartwarming Hugs is part of a product suite that will knock your socks off…. the Heartwarming Hugs Suite! Check out this project ….
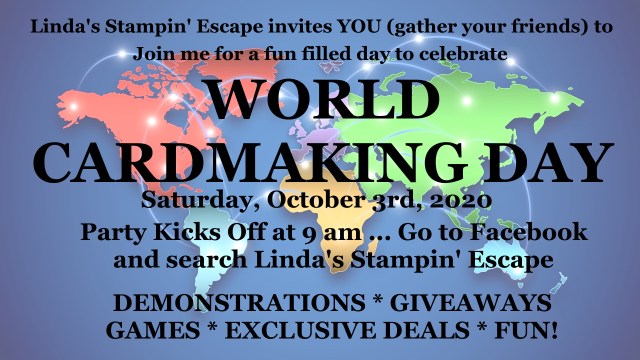
The Heartwarming Hugs designer paper elevates this gift to the next level. If you’d like to see more of this product suite, join me on October 3rd for my WORLD CARDMAKING DAY Party!! Hop on over to my Linda’s Stampin’ Escape Facebook page … Kick Off begins at 9 am.
Thank you for hanging out with me today, and I hope that you join me on Saturday … Gather with your friends and tune in!! I’m planning a fun filled day.
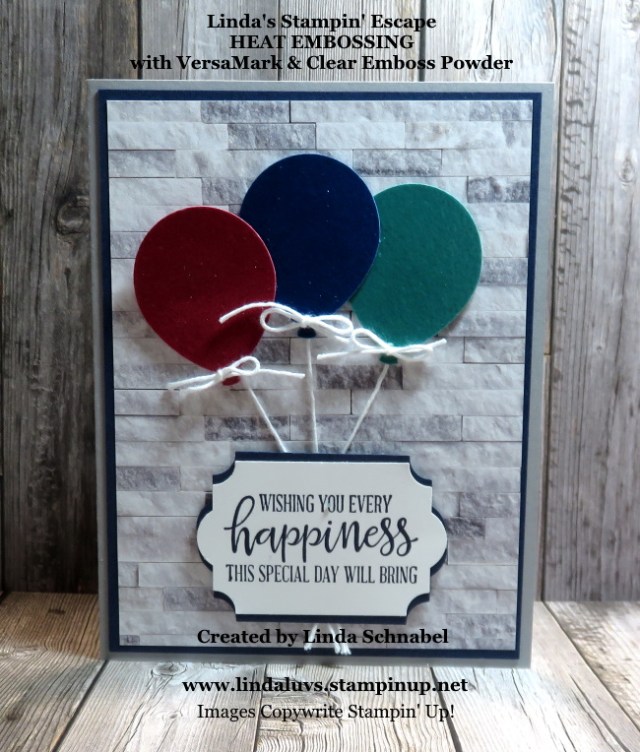
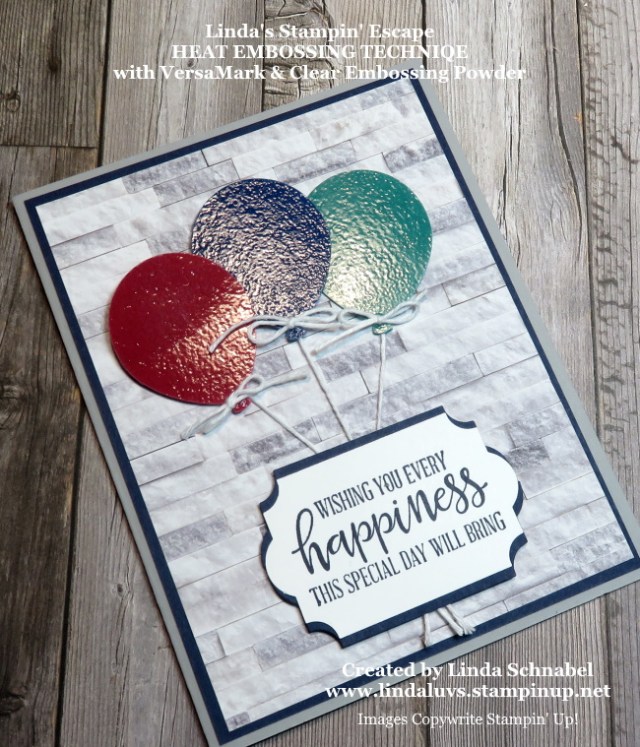
Today I’ll be sharing my short video on the Magic of Heat Embossing … this simple technique probably dates back many years. I’ve been stamping and a demonstrator (Yes, I was not a cardmaker before I signed up!!) for 20 years, and heat embossing is what caught my attention!
I will be showing you how amazing a VersaMark pad and Clear embossing power is in transforming your projects. Grab your favorite beverage and sit back for a short video as I show you three (3) different items to emboss …
I must admit … not my best presentation but I hope you saw the magic in the technique. Here’s the the first card that I made on the video …
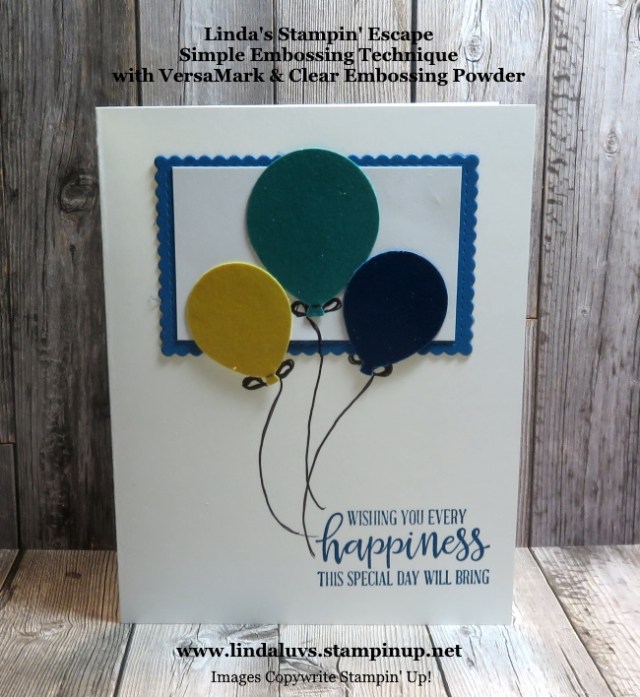
but I’ll also be sharing the two cards that I promised. Lets begin with the balloons ….
The balloons were created as shown in the video. In the video I said I prefer the “strings” on my balloons versed the hand drawn strings so I found some Bakers Twine and added them to my balloons.
Since we I shared the upcoming Designer Paper Sale with you, I thought I would use one of them for a background. I’m using the “In Good Taste” Designer Series paper on this card …
In fact, I have been using the “In Good Taste” Designer Series paper as my backgrounds for all my photo shoots for posting my cards right here!! All of those beautiful wood patterns, brick and tiles all come from this package, including this rustic wood which is probably my favorite!
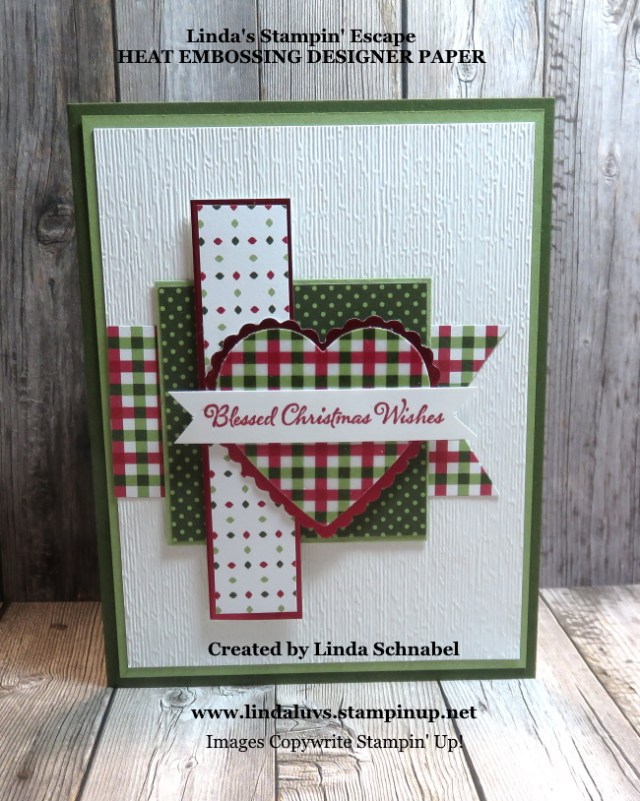
Let’s move on to the Heartfelt Hugs designer series paper we embossed …
I love the look of the Heartwarming Hugs Designer paper, and embossing it created a stunning new look. When I punched it out with the heart (Heartwarming Hugs paper … get it! lol) I knew exactly where I was going with this card. Create layers of this designer paper to highlight the heart.
In the video you can see how lovely the designer paper is embossed so I decided to mat the heart with the new Red Foil from the Mini Catalog. The shine on both of these creates an amazing focal point to the card …
The only thing I would add to this card is “Red Rhinestones” … might add a little balance on the right side. BUT … I still love the way this card turned out.
Hope you enjoyed the video and the final cards created with this simple and fun technique … there truly is magic in heat embossing!
Here is a list of the Designer Papers on Sale starting tomorrow …
Thank you for joining me today, I’ll be back tomorrow to share the “Sunflower” card with you!! Till then …
Have an amazing day ~
TODAY’S STAMPIN’ SUPPLY LIST … If you liked the products used in todays projects, I have links for you below. Just click on the item you would like more information on, or to begin your shopping. It will take you directly to my website. Thank you ♥
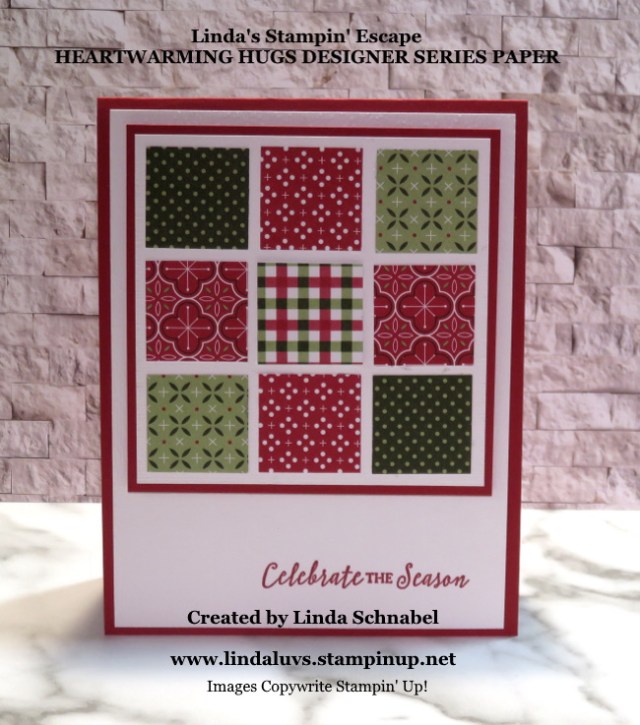
Yesterday I share two card layouts with you that are perfect for using up your scraps of designer paper!! Our first layout uses 9 – 1″ squares ….
The Whisper White piece that holds these 9 designer paper pieces measures 3-1/2″ x 3-1/2″ and the Real Red mat behind it is 3-3/4″ x 3-3/4″.
The card base is Real Red and measures 4-1/4″ x 11″ and the Whisper White measures 4″ x 5-1/4″ … both white pieces were embossed with the Subtles Embossing Folder. Before embossing it, the greeting was stamped from the Itty Bitty Christmas stamp set.
OK … Here’s the fun part. I’m sharing they layouts and I would like to see what you come up with!! You can post them on my Linda’s Stampin’ Escape Facebook page … we’ll have a contest!!
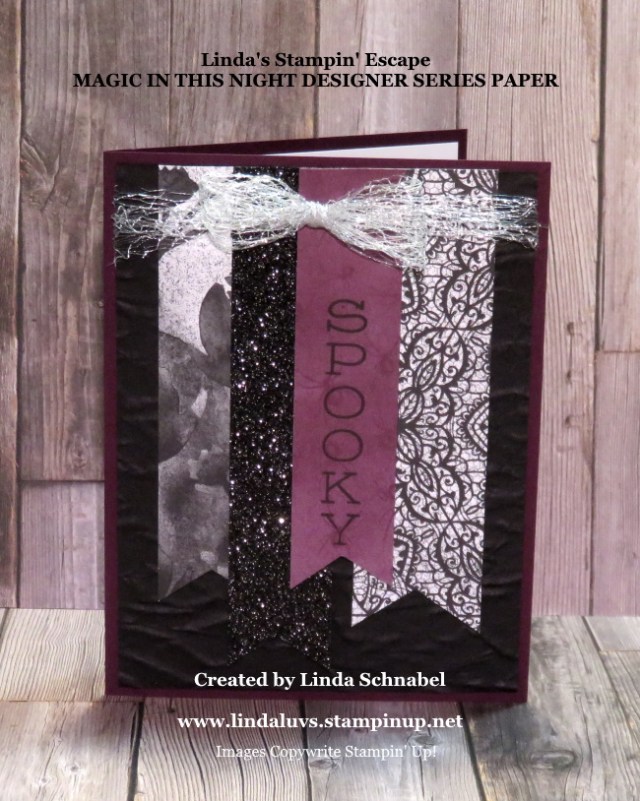
Our second layout …
Strips of Designer Paper and a bow is all you need to create with this layout, but I did add a little more! The base of the card is Blackberry Bliss and the Basic Black mat was embossed with the Old World 3-D Embossing Folder.
The strips of designer paper come from the Magic in this Night Designer Series paper and a strip of the Black Glitter Paper. I did stamp my greeting directly onto the Blackberry designer paper … it comes from the Festive Corners stamp set.
I’ll post a notice on my Facebook page and then make sure you share cards. We’ll do a SPIN 2 WIN on all the entries. Let’s have some FUN this Friday!
TODAY’S STAMPIN’ SUPPLY LIST … If you liked the products used in today’s projects, I have links for you below. Just click on the item you would like more information on, or to begin your shopping. It will take you directly to my website. Thank you ♥
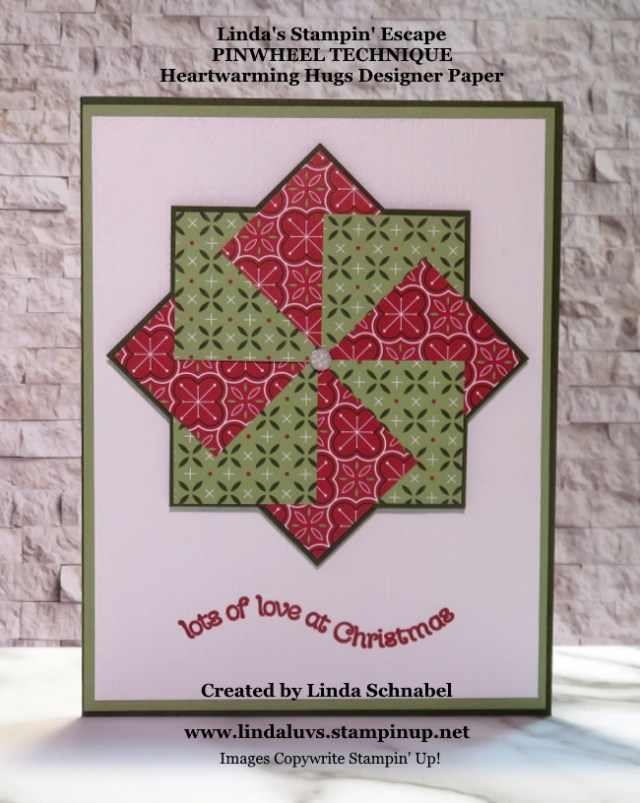
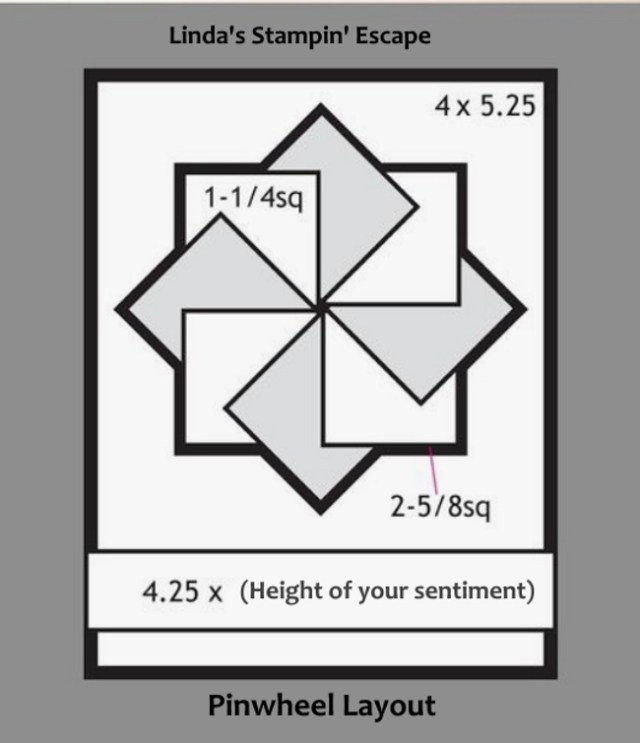
Today I have two cute cards for you created with the Heartwarming Hugs Designer Series paper and the Pinwheel Technique. This technique is a great way to use up your designer and / or paper scraps!
This paper crafting technique is much, much easier than it looks … quite simple in fact, and I’d like to show you today …
How did you enjoy the demonstration and do you think it’s as easy to make as I said it would be? I think this technique is one of those timeless cards that we can keep bringing back!!
This first card is the one I demonstrated and includes the Heartwarming Hugs designer series as a background and the Light Me Home stamp set used for the greeting. I also tipped the Pinwheel to look a little more like a star.
The second card …
This was designed for those stampers who like the “less is more” look … a clean, crisp look. The Pinwheel really stands out against the white background.
The greeting comes from the “Itty Bitty Christmas” stamp set, and with the aid of my Stamparatus … I could stamp it 3 times to get it bold and bright. Once stamped, I embossed it with the Subtle 3-D embossing folder.
Here is the template with dimension for the Pinwheel card …
I hope the card samples inspire you and the layout helps you picture your next card! As promised in the video, I have a PDF File attached that you can download and print.
Thank you so much for joining me today. Stop back tomorrow as I will be sharing an alternative layout to the Pinwheel card.
Have an amazing day ~
TODAY’S STAMPIN’ SUPPLY LIST … If you liked the products used in today’s projects, I have links for you below. Just click on the item you would like more information on, or to begin your shopping. It will take you directly to my website. Thank you ♥
Today’s card is fun and easy to create and it’s done with our stunning designer series paper. Yesterday I talked about layouts and patterns, and how we can utilize them to help us create …
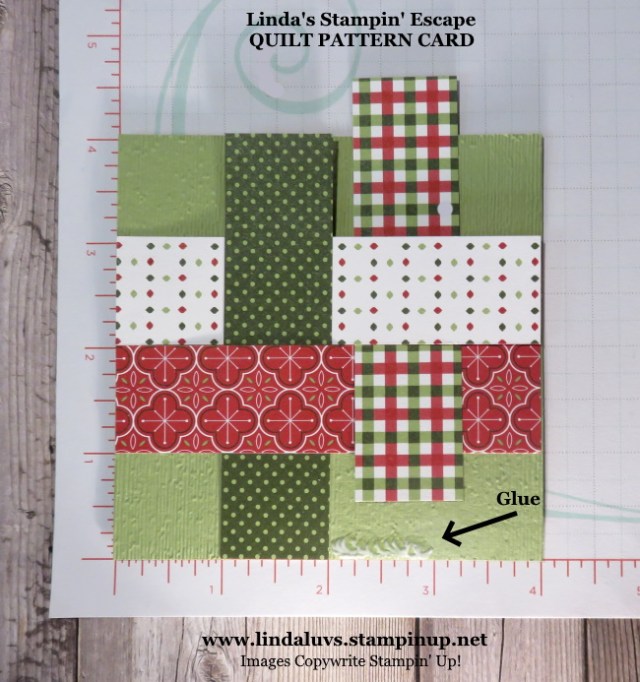
Well, I had saved a “Quilt” piece on my Pinterest page and was surprised to see how many times this simple design had been saved. I saved it as inspiration for a card …
Simple … right? But there is something about this simple pattern that catches your eye. Is it the colors or the pattern, not sure but I’ve taken the pattern and used it for today’s card.
I decided I wanted to make a Christmas card with the beautiful Heartwarming Hugs designer series paper ….
My designer paper strips are cut 4″ x 1″ and matted the woven pieces onto a 4″ x 4″ block. Now I know that Quilters have cut these into different sizes but it is “Simply Sunday”! You really have to respect the artistry and work that goes into a quilt.
I used my grid paper (available in catalog) to help me align my designer paper strips. Just added a touch of glue within the 1″ block and adhered my strip. The glue allows you a little more movement.
Once you have woven the pieces together and glued the ends down, you can finish gluing the pieces down. I then attached the entire 4″ x 4″ piece onto a piece of Whisper White measuring 4″ x 5-1/4.
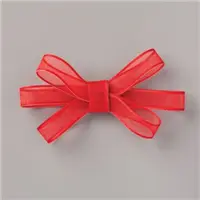
The greeting was stamped with Mossy Meadow ink … it came from the “Light Me Home” stamp set. I finished off my card with a bow created with the Real Red Sheer ribbon … oh my, this ribbon is beautiful, and comes from the Poinsettia Place suite.
With a little help from your grid paper, this sweet Christmas card is easy to make and reflects the old age craft of Quilting. Use any pretty paper and you could create cards for all Occasions!
Thank you for sharing a part of your Sunday with me. Enjoy the rest of your weekend.
TODAY’S STAMPIN’ SUPPLY LIST … If you liked the products used in today’s projects, I have links for you below. Just click on the item you would like more information on, or to begin your shopping. It will take you directly to my website. Thank you ♥