Discover the Magic of the Seaside Wishes Bundle

Hello Stampin’ Friends ~

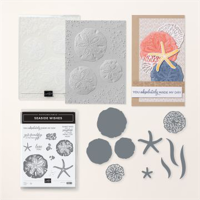
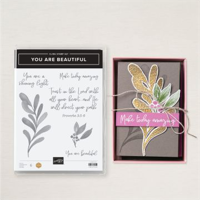
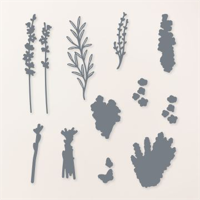
Summer is here, and there’s no better way to capture the essence of the beach than with Stampin’ Up!’s Seaside Wishes bundle. This stunning collection features exquisite sand dollar and starfish images, complete with coordinating dies to bring your seaside creations to life. And the best part? For a limited time, you can get an additional 10% off this already discounted bundle through the end of June.

The Seaside Wishes bundle is designed to inspire and elevate your card-making and scrapbooking projects. The detailed sand dollar and starfish stamps provide a beautiful, textured effect that adds depth and dimension to any project. Paired with the precise, matching dies, you can easily cut out these intricate designs, making your crafting process smooth and enjoyable.

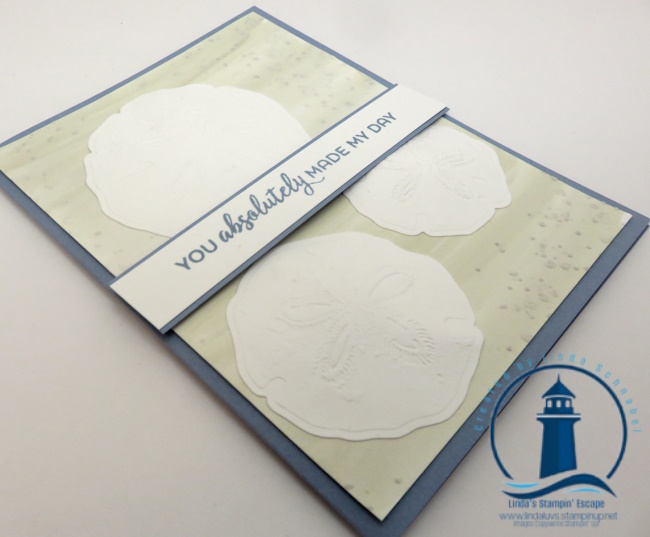
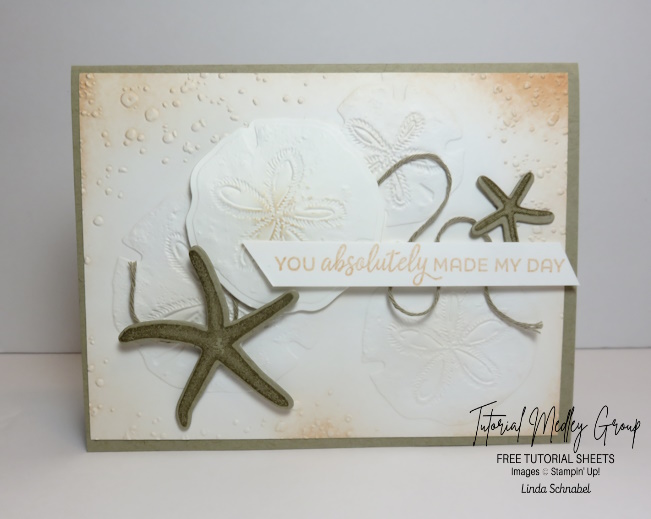
On the card above, I cut 2 pieces of white cardstock at 4″ x 5 1/4″ and embossed both of them with the coordinating Hybrid Embossing folder. I then used a Watercolor wash technique to create my background on one of them, you simply use the Water Painters and Crumb Cake re-inker. The second embossed piece was die cut … I popped up the center and glued the edges to create a realistic sand dollar.

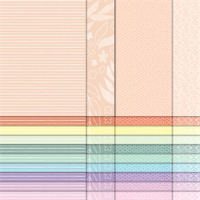
On my second card I used the Thoughtful Journey patterned paper as my background …

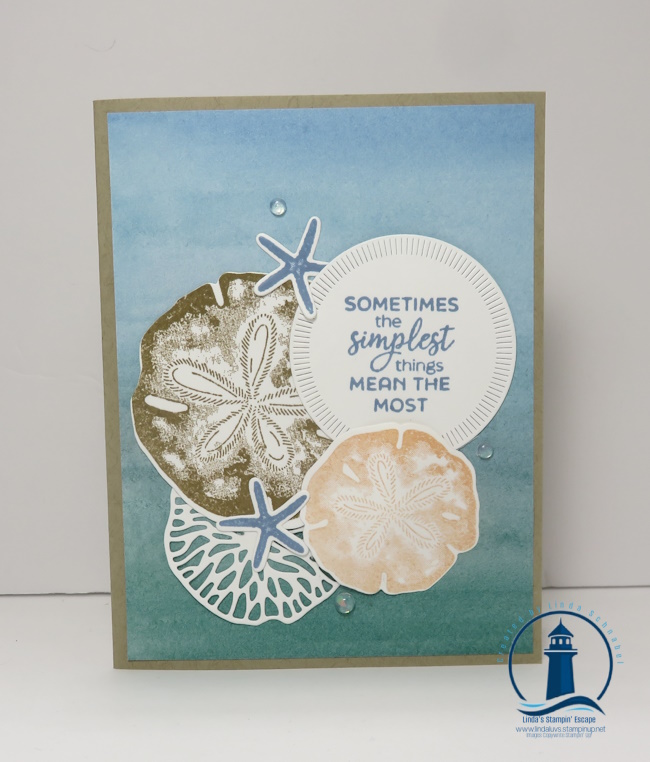
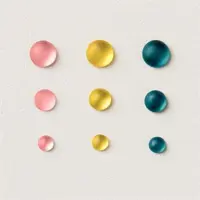
Images were stamped in Petal Pink, Crumb Cake and Boho Blue and then die cut. You can arrange your die cut images as you please. Our greeting was stamped in Boho Blue and die cut with the Spotlight on Nature dies! To complete the card, I embellished it with Iridescent Foil Gems.

I have a Tutorial for this card, and another … one of my favorites. Just head over to my Online Store and purchase this bundle, and you will receive the PDF for both cards!!

Remember, the additional 10% discount on the Seaside Wishes bundle is only available through the end of June. This is your chance to enhance your crafting collection with these versatile and beautiful stamps and dies at an unbeatable price. Whether you’re creating cards, scrapbook pages, or home decor, the Seaside Wishes bundle is sure to bring a touch of coastal charm to your projects.

Head over to My Online Store now to take advantage of this fantastic offer and let your creativity set sail with the Seaside Wishes bundle.

Thanks for joining me today & Happy crafting!

Charming Duck Pond Bundle Card Tutorial

Hello Stampin’ Friends,

Welcome to today’s crafting inspiration post! I’m thrilled to introduce you to the Charming Duck Pond Bundle, a delightful set that will bring a touch of nature’s charm to your projects. This bundle includes the versatile Charming Duck Pond Stamp Set and the coordinating Charming Duck Pond Dies, making it easier than ever to create enchanting wetland scenes.

Imagine crafting a serene pond, complete with adorable ducks, playful ducklings, lively frogs, elegant cattails, and lush marsh plants. The possibilities are endless with this bundle. You can customize each element by stamping the images in various colors, or for even more precision and creativity, use Stampin’ Write Markers or your favorite coloring tools. The stamps and dies are designed to work seamlessly together, allowing you to layer and build a dynamic, three-dimensional scene.

One of the standout features of the Charming Duck Pond Bundle is its collection of cheerful sentiments. These thoughtful messages are perfect for birthdays, celebrating friendship, or simply letting someone know they’re on your mind. Whether you’re crafting a heartfelt card or a whimsical scrapbook page, these sentiments will add the perfect finishing touch.

I’m also excited to have a special guest stamper Kay, from our Tutorial Design group joining us today. I know her creativity will surely inspire you to make the most out of this charming bundle. We’ll be sharing a step-by-step tutorial on creating a beautiful card featuring the frogs and cattails, and highlighting the designer paper for a playful effect.

Measurements:

  • Pretty Peacock Base:  5 ½” x 8 ½” score at 4 1/4”
  • Lily Pond Lane Designer Series Paper: 5 3/8” x 4 1/8” (koi fish pattern)
  • Pretty Peacock: 4” x 4”
  • Lily Pond Lane Designer Series Paper: 3 ¾” x 3 ¾” (Lost Lagoon with white polka dot pattern)
  • Basic White: 3 5/8” x 3 5/8”
  • Scrap of Peach Pie, Pretty In Pink, Pretty Peacock and Basic White for die cutting
  • Basic White inside: 5 ¼” x 4”

Instructions:

  • Run Designer Paper polka dot square through Emboss Machine with Charming Duck Pond Dies
  • Place over Basic White square and stamp sentiment as shown with Pretty Peacock ink
  • Adhere Basic White square to back of Designer Paper with Tear & Tape
  • Adhere Designer Paper to card base with Stampin’ Seal
  • Tie Pretty Ink Pink Ribbon around Pretty Peacock Square in a bow as shown and cut with Paper Snips
  • Adhere square to card base with Stampin’ Dimensionals
  • Cut Peach Pie cattails, Pretty Ink Pink flowers and Pretty Peacock Lily Pads with Charming Duck Ponds Bundle
  • Stamp frog onto Basic White Cardstock using Memento Black ink and cut with Charming Duck Pond Dies
  • Color with Stampin’ Blends: Peach Pie lily pad, Pretty Peacock edge of frog, Lost Lagoon inner area of frog
  • Adhere lily pads to card with Stampin’ Dimensionals
  • Adhere flowers to card with Multipurpose Liquid Glue
  • Adhere cattails to card with Multipurpose Liquid Glue
  • Adhere frog to card with Stampin’ Dimensionals
  • Adhere Shimmer Dots as shown with Take Your Pick Tool
  • Adhere Basic White layer inside card

__________________________

In addition to the creative inspiration, there’s another great reason to love the Charming Duck Pond Bundle: savings! When you purchase the bundle, you automatically save 10% compared to buying the stamp set and dies separately. And for an extra special treat, during the month of June, you’ll receive an additional 10% off. This means you can enjoy a total savings of 20%, making it the perfect time to add this bundle to your crafting collection.

I hope today’s post inspires you to explore the possibilities of the Charming Duck Pond Bundle. Whether you’re an experienced stamper or new to the craft, this bundle offers something for everyone.

Happy crafting, and don’t forget this sale ends soon!

Irresistible Blooms: Crafting Magic ….

Hello Stampin’ Friends ~

Today I’d like to share with you one of my favorites that have been in our On-Line Exclusive Collection for some time … The Irresistible Blooms Bundle.

Today I’d like to share two cards that I created … I will include the cutting pattern for these two cards below. I used one of the 6″ x 6″ sheets of designer paper from the Hello, Irresistible paper and cut it to create my cards.

PLEASE NOTE: The beloved Irresistible Blooms designer paper may be out of stock, but fear not! Our online exclusives offer stunning substitutes that are sure to elevate your card-making game. These new designs maintain the charm and elegance of the original, ensuring that your creations remain as captivating as ever.

You will be able to CLICK on this photo and download the pattern for your personal use.

I used the 5-1/4″ x 4″ piece of designer paper to create my first card. This layout I’m sharing is very easy yet the designer paper makes your card look stunning ….

the Irresistible Blooms bundle is still available for order. By purchasing the bundle in June, you not only save the original 10% but also enjoy an additional 10% discount, making it a fantastic deal for any avid stamper. This bundle includes everything you need to create gorgeous, all-occasion cards that will bring smiles to the faces of friends and family. Each piece is thoughtfully designed to help you produce cards that are as unique and beautiful as the blooms that inspire them.

I used the Daffodil Delight Loose Frosted Dots … HINT: they really pop when you put them over “white”. I’m really liking these dots!

The second card uses the 5-1/4″ x 2″ piece … remember the 3/8″ strips are to be used on the inside of the card.

The second half of the Flirty Flamingo cardstock was used to this card base as well. I used Timeworn Type embossing folder to add texture behind our designer paper, there is also a pop of color – I used So Saffron cardstock behind it.

Now is the perfect time to refresh your stamp collection and take advantage of these incredible savings. Dive into the world of Irresistible Blooms and watch your cards come to life. Your handmade cards will not only stand out but also become treasured keepsakes. Let your creativity flourish and make every occasion a little more special with the magic of Irresistible Blooms.

Have a great day!

Citrus Blooms Card Tutorial

Hello Stampin’ Friends ~

I’m back (internet went down) and ready to share! Today’s card comes from the Citrus Blooms bundle by Stampin’ Up! It’s an exquisite collection designed to infuse your paper crafts with the vibrant charm of sun-ripened fruits. It’s is ideal for adding a sweet, fruity touch to your projects, featuring speckled citrus stamps that can be brought to life with your favorite coloring techniques.

It’s teamed up with the coordinating Mediterranean Blooms Designer Series Paper. This 12″ x 12″ collection transports you to a world of sun-soaked citrus, hand-painted ceramics, and enchanting greenery. Inspired by the captivating beauty of the Mediterranean, the paper features intricate designs and vibrant hues that perfectly enhance the fruity motifs of the stamp set.

Measurements:

  • Night of Navy: 11” x 4 ¼”, 4 ¼” x 3”
  • Mediterranean Blooms: 5 ¼” x 4”, Cut out lemons from DSP
  • Basic White: 4” x 2 ¾”

Instructions:

  • Score and fold the card base in half as you would if you were making a normal card.
  • Glue the DSP to the Night of Navy card base.
  • From the DSP with the large lemons, fussy cut one of the images.
  • Stamp the sentiment using the Tuxedo Black Memento ink on the lower right corner of the Basic White cardstock.
  • Glue the Basic White cardstock to the Night of Navy cardstock, then glue this piece to the DSP on the card base.
  • Glue the fussy cut lemon image to the Basic White cardstock, making sure to not cover up the stamped sentiment.
  • Add 3 of the Night of Navy Opal Rounds to the front of the card.

Together, these products offer a harmonious blend of sweet, fruity imagery and picturesque Mediterranean elegance, making your crafting experience both enjoyable and inspiring.

I hope this adorable card inspires you today …

Explore the Wonders of the Watercolor World Stamp Set

Welcome back, stampin’ friends!

Today, we embark on a journey through the vibrant realm of watercolors, highlighting the Watercolor World stamp set. This stamp can handle a treasure trove of possibilities, inviting us to unleash our creativity. Today I’ll share just four unique stamping techniques. Alongside, I’m pairing it with complementary stamp sets to elevate our creations to new heights with the right sentiments.

Grab a coffee, tea or whatever you like and join me for a short video that brings these magical techniques to life. This is a replay of my Facebook LIVE last Tuesday. Just click on the image to view …

The Watercolor World stamp set invites us to embark on a journey of boundless creativity, where every brushstroke tells a story and every impression leaves a lasting impression. From heat embossing to emboss resist, each technique offers a glimpse into the endless possibilities that lie within our grasp. 

Let’s take a closer look at our cards ….

Let’s delve into our basic stamping and embossing, accompanied by the Thoughtful Expressions Bundle. This technique marries simplicity with refinement, as we create timeless masterpieces with ease. Combined with embossing folders, the Watercolor World stamps transform into captivating works of art, ready to adorn any occasion.

Ready to immerse yourself in the magic of direct-to-rubber stamping technique? Then enhanced by the Sending Smiles stamp set which dances across the continents! This technique introduces a delightful twist to traditional stamping, infusing your creations with a watercolor-inspired allure. The Stitched with Whimsy dies also creates not only texture, but the feeling you are traveling with them.

Our third technique, emboss resist, is a testament to the versatility of the Watercolor World stamp set. Paired with the He’s All That stamp set, we embark on a journey of exploration and experimentation. As we apply layers of color over our heat embossing, intricate designs emerge, unveiling a world of possibilities. Witness as the stunning effects of emboss resist unveil intricate patterns (our continents) and textures, captivating the eye and igniting the imagination. So fun and so easy to do.

Our final technique is a blend of elegance and charm. With the Perennial Postage Bundle by our side, we’ll embark on a journey of heat embossing on designer paper. This method infuses sophistication into our projects, adding depth and dimension effortlessly. Watch as the intricate designs of the Watercolor World stamp set come to life against a backdrop of luxurious patterns. 

As we pair these techniques with complementary stamp sets, we unlock new dimensions of inspiration and innovation, transforming simple materials into works of art that delight the senses and nourish the soul. So, gather your supplies, unleash your imagination, and let the Watercolor World stamp set be your guide on a voyage of discovery and delight. 

Thank you for hanging out with me today. And remember … I’ll be going LIVE again tonight with a beautiful FUN FOLD Card you won’t want to miss. Join me on my Facebook page.

Happiest Day Card Tutorial

Hello Stampin’ Friends,

As I hit the road with my granddaughter for a fun little getaway to Door County, I’m excited to share a delightful card with you, created by the talented Trayce Bauer from my Design/ Tutorial group. This charming card showcases the “Happiest Day” stamp set, perfectly complemented by the Countryside Inn Designer Series Paper. It’s a beautiful combination that is sure to bring joy to anyone who receives it.

Here are the dimensions and step-by-step instructions to create this lovely card:

Measurements:

  • Boho Blue: 5 ½” x 8 ½” card base
  • Misty Moonlight: 2 ¼” x 5 ¼”
  • Basic White: 4” x 4”
  • Countryside Inn: 2” x 5”

Instructions:

  • Score your card base on the long side at 4 ¼” and fold.
  • Adhere the Designer Paper layer and the Misty Moonlight layer together and attach to the card front using Stampin’ SEAL as shown.
  • Stamp your sentiment using Misty Moonlight ink on the Basic White piece and die cut using the Perennial Postage dies. Then, stamp three dragonflies on the same Basic White cardstock piece using Misty Moonlight.
  • Stamp the dragonfly wings using Calypso Coral ink stamping off on scrap paper first for the bottom wings to get a lighter shade.
  • Hand cut the 3 dragonflies using your paper snips.
  • Attach the sentiment to the card front using Stampin’ Dimensionals.
  • Attach the 3 dragonflies to the card front using Stampin’ Dimensionals.
  • Add 3 Iridescent Foil Gems to the card front and Wink of Stella to the wings of the dragonflies.

Thank you for stopping by!

Discover the Joy of Creativity with the July Paper Pumpkin Kit: Painted Petals

Hello Stampin’ Friends ~

Are you ready to embark on a creative adventure that combines the beauty of watercolor designs with the fun of crafting? Introducing the new July Paper Pumpkin Kit: Painted Petals, a delightful surprise waiting to enhance your crafting experience. This month’s kit promises to bring a splash of color and joy to your projects, allowing you to create stunning cards with unique watercolor designs and pretty layers that will impress your friends and family.

Paper Pumpkin is your gateway to monthly crafting joy, delivering all-inclusive kits straight to your door. Each month, subscribers receive a delightful box filled with everything needed to complete exclusive paper craft projects. The Painted Petals kit is no exception, offering a photopolymer stamp set, a Classic Stampin’ Spot, and step-by-step instructions to guide you through each project. Whether you’re a seasoned crafter or just starting, the easy-to-follow instructions ensure a satisfying and creative experience.

Imagine opening your Painted Petals kit to find beautifully designed components that inspire your artistic side. The watercolor elements in this kit are perfect for creating cards that stand out. With layers that add depth and interest, your handmade cards will be as beautiful as they are meaningful. This kit isn’t just about making cards; it’s about indulging in the joy of creating something unique and heartfelt.

SNEAK PEEK …. July, August and September

Subscribing to Paper Pumpkin is simple and rewarding. Whether you’re looking to spend some quality time crafting solo or wanting to share the joy with friends and family, the July Paper Pumpkin Kit: Painted Petals is the perfect choice. Subscribe today and let your creativity bloom with every card you create! CLICK HERE

Your Ultimate Crafting Adventure Awaits!

Hello Stampin’ Friends ~

The Stampin’ Up! Bundle Sale is here, and it’s bringing an extra dose of excitement for crafters everywhere! For the entire month of June, not only will you receive the standard 10% discount on already bundled items, but Stampin’ Up! is giving you an additional 10% off. This double discount makes it the perfect time to save on your favorite bundles and stock up on high-quality crafting supplies.

Imagine all the beautiful projects you can create with a fully stocked crafting arsenal. From intricate cards and scrapbook pages to unique home décor items, the possibilities are endless. The best part? You don’t have to waste time searching for the perfect bundle because I have compiled them all here for you. With just a click, you can explore a variety of bundles tailored to different themes and occasions, ensuring that you find exactly what you need to fuel your creativity.

Don’t miss out on this fantastic opportunity to expand your crafting supplies while saving money. Head over to the Stampin’ Up! Bundle Sale today, and let your imagination run wild with all the possibilities. Happy crafting!

Sale: $36.75

Price: $41.25

Sale: $42.25

Price: $47.50

Sale: $48.75

Price: $54.75

Sale: $48.00

Price: $54.00

Simply Sunday: Thoughtful Journey Designer Paper Card

Hello Stampin’ Friends ~

Welcome to another Simply Sunday, where we celebrate the beauty of simplicity in crafting. Today, I’m thrilled to showcase the Thoughtful Journey 6 x 6 designer paper, a collection that will elevate your cardmaking with its exquisite watercolor aesthetics. This paper set is a treasure trove of artistic potential, with each sheet presenting eye-catching imagery and stunning detail.

he Thoughtful Journey paper is crafted with a delicate watercolor look, evoking the charm and tranquility of hand-painted art. Each sheet in this collection can serve as a perfect backdrop or focal point for your creations. The versatility of these papers is remarkable, as they effortlessly transition from serene watercolor backgrounds to breathtaking landscape designs. Whether you are aiming for a soft, dreamy card or a vibrant, nature-inspired scene, this designer paper has you covered.

For today’s project, I paired the Thoughtful Journey paper with a die-cut birthday greeting from the Garden Meadow stamp set. The intricate details of the die-cut adds some texture, as does the Peach Pie Ribbon I tucked underneath the greeting. Our ribbon pulls out the orange tones from our designer paper. Coordinating our ribbon is the In-Color Shimmer Gems in Peach Pie!

Cardmaking doesn’t have to be hard to produce something beautiful. With the right materials, you can create stunning cards with minimal effort. The Thoughtful Journey 6 x 6 designer paper and Garden Meadow stamp set, along with our embellishments are perfect examples of how thoughtful design can simplify the crafting process. By combining these elements, you can effortlessly craft cards that are both visually appealing and deeply meaningful.

As you embark on your crafting journey today, remember that the essence of Simply Sunday is to embrace the simplicity and joy of creation. Let the Thoughtful Journey designer paper inspire you to create something truly special, and enjoy the process of bringing your artistic vision to life.

Happy crafting!

Product Update: The Thoughtful Journey Designer Paper is on the “LOW” Inventory List.

Create the Magic of Nature with In the Grove Cards

Hello Stampin’ Friends ~

Do you find joy in creating intricate scenes inspired by the beauty of nature? If so, the new In the Grove Bundle is just what you need to elevate your crafting projects. This exclusive bundle includes the In the Grove Stamp Set and the In the Grove Dies, meticulously designed to help you craft stunning mountain, forest, and wildlife card fronts that will captivate any recipient.

The In the Grove Dies are a must-have for any nature enthusiast. They offer builder pieces for creating layered landscapes featuring mountains and forests, as well as charming small animals that bring your scenes to life. Whether you’re a seasoned cardmaker or a beginner, these versatile dies will add a touch of wilderness wonder to your creations.

To showcase the full potential of the In the Grove Bundle, I’m sharing two beautiful cards using the exquisite Thoughtful Journey Designer Paper. This 6″ x 6″ paper pack is renowned for its watercolored wonders, providing a perfect backdrop for your nature-inspired scenes. Imagine the awe on your recipients’ faces when they see the harmonious blend of vibrant landscapes and delicate wildlife crafted with care and creativity.

My first card done in basic white beautifully captures a natural vibe. Stamped with “Happy Birthday” from So Sincere conveys your message without getting in the way! I love vertical stamps.

My second card allows the designer paper to seep out beyond the borders of the frame to create a soft flowing unique look. I also created a sunset by sponging on some yellow. The greeting comes from the Unbounded Love stamp set (can be purchased as a bundle) and die cut with the Perennial Postage dies.

To see “HOW” I created these cards, I invite you to watch this short video. We got cut off in the middle so you’ll see my technical difficulties … LIVE! All is good … I still ended up with to finished cards I’d be proud to send to anyone.

CLICK HERE TO VIEW VIDEO

There’s more exciting news! All bundles are currently on sale. While you always enjoy a 10% discount for bundling, during June, we’re offering an additional 10% off! This is a fantastic opportunity to stock up on your favorite crafting supplies and explore new creative horizons with the In the Grove Bundle.

Don’t miss out on this great savings event and the chance to bring the serene beauty of nature into your cardmaking. Add the In the Grove Bundle to your collection today and wow your card and paper craft recipients with the breathtaking artistry that only you can create.

Happy crafting!

Exploring “Color Theory” & the You Are Beautiful Stamp Set

Hello Stampin’ Friends ~

Today, I am thrilled to share with you a beautiful way to send love, support, faith, and encouragement through handmade cards. The “You Are Beautiful” Stamp Set is an exquisite collection that features positive sentiments in a contemporary font, perfect for uplifting those around you. With three unique cards and an engaging video tutorial, I’m excited to showcase the versatility and elegance of this stamp set.

The “You Are Beautiful” Stamp Set isn’t just any stamp set; it’s designed to make a statement. The sentiments are heartfelt and motivating, ideal for any occasion where you want to make someone feel special. The set includes a variety of uplifting messages, from “You Are Beautiful” to “You Are a Shining Light,” making it perfect for creating cards that convey your heartfelt emotions. The modern and stylish font ensures your cards look professional and trendy, adding a touch of elegance to your handmade creations.

This stamp set features a special texture that adds depth and dimension to your stamped images. With Distinktive stamps, you can achieve photo-realistic images with just one stamp, making your cards stand out effortlessly. Additionally, the greenery sprig stamp adds a pop of color and a natural element to your cards, complementing the sentiments beautifully and adding a fresh, vibrant touch.

For the first card, I chose the simplest of the Color Theory – Monochromatic. Just basic stamping … Shaded Spruce on white.

The second card also highlights the Monochromatic color theory. I love the look of “color on color” … it just adds so much dimension without layering! Again, I am using Shaded Spruce cardstock and ink.

My third and last card highlights the Analogous style in the color theory … taking 3 colors that are side-by-side on the color wheel. I choose Shy Shamrock, Pretty Peacock and Lost Lagoon. Oh my … I think it turned out so pretty and I used it as my background. I stamped the greeting in Shy Shamrock and highlighted it with the Rhinestones.

I’m also excited to share a video tutorial where you can watch these cards come to life. In the video, I’ll walk you through the process of creating each card, from selecting the right colors to stamping the perfect image. Whether you’re a seasoned crafter or new to stamping, this tutorial will provide you with tips and inspiration to make your own stunning cards using the “You Are Beautiful” Stamp Set.

CLICK HERE TO WATCH VIDEO

The “You Are Beautiful” Stamp Set is more than just a tool for card-making; it’s a way to connect with others and share positivity. Whether you’re creating cards for friends, family, or even yourself, this stamp set helps you craft messages that are heartfelt and sincere. I hope these cards and the accompanying video inspire you to spread love, support, faith, and encouragement with your handmade creations.

Thank you for joining me today! Happy crafting, and remember, you are beautiful!

Embrace the Elegance of Perennial Lavender Designer Paper

Hello Stampin’ Friends ~

Welcome back, crafting enthusiasts! Today, I am thrilled to spotlight a true gem from our collection that has gracefully carried over from the Mini Catalog and remains a cherished favorite: the Perennial Lavender Designer Series Paper. This exquisite 12″ x 12″ paper brings the timeless beauty of lavender fields directly to your creative space.

A Glimpse into Perennial Lavender Designer Paper

The Perennial Lavender Designer Series Paper is a delightful homage to the serene and enchanting fields of wild lavender. Each sheet is adorned with hand-painted designs, capturing the essence of lavender and the vibrant wildflowers that flourish beside it. The intricate patterns and calming hues make this paper an absolute must-have for any paper crafting project.

I am excited to share two stunning cards created by our talented Spring Stamping Retreat Attendee Swap participants. These cards showcase the elegance and versatility of the Perennial Lavender Designer Series Paper in truly inspiring ways.

Card 1: Hello Lavender

This card exudes tranquility with its soothing lavender tones. The background is a beautiful sheet from the Perennial Lavender collection, perfectly complementing the intricate die-cuts. The layers give the card a beautiful flow, and the die cut greeting adds some textures. The pretty Purple Fine Shimmer Gems add the finishing touch.

Card 2: Wildflower Whimsy

The second card is a burst of wildflower joy. Utilizing the bolder, more colorful patterns from the Perennial Lavender paper, this card captures the vibrant spirit of a meadow in full bloom. Layering the paper with a playful arrangement and a couple embellishments, create depth and interest, making this card a standout piece.

Why I Love it … And You’ll Love It too:

  1. Artistry in Every Sheet: The designs are hand-painted, offering a unique and artistic touch to your projects. Each sheet feels like a miniature work of art, ensuring that your creations are both beautiful and unique.
  2. Versatility: Whether you’re crafting cards, scrapbooking, or creating home décor, the Perennial Lavender paper provides endless possibilities. Its versatile design makes it perfect for a variety of themes and occasions.
  3. High-Quality: As with all our designer series papers, the Perennial Lavender paper is of premium quality. It’s sturdy and easy to work with, ensuring that your projects not only look good but last long too.

Ready to bring the beauty of lavender to your paper crafts? The Perennial Lavender Designer Series Paper is available now, and it’s the perfect addition to your crafting supplies. Don’t miss out on this versatile and enchanting paper. Let your creativity blossom with Perennial Lavender!

Happy crafting, and may your projects always be as beautiful as a field of wild lavender.

#stampingretreat #gueststamper

Exciting News for All Crafters: Stamp & Die Bundle Sale!

Hello Stampin’ Friends ~

I have some thrilling news that’s sure to get your creative juices flowing. Whether you’re a seasoned crafter or just starting out, the Stampin’ Up! Stamp & Die Bundle Sale is the perfect opportunity to stock up on your favorite crafting essentials and save big! And it starts today!!

What’s the Big Deal?

From June 5th to June 30th, not only can you enjoy the incredible 10% discount on stamp and die bundles, but we’re taking another 10% off for extra savings! This is the perfect time to expand your crafting arsenal with high-quality tools and supplies that will elevate your projects to new heights.

The Perfect Crafting Companions

But wait, there’s more! During this sale, you can also save 10% on the essential Stampin’ Cut & Emboss Machine and the Mini Stampin’ Cut & Emboss Machine, (Mini available in both classic white and the charming Boho Blue). These machines are designed to work seamlessly with stamp and die bundles, making them the ideal addition to your crafting toolkit. With these machines, you can cut and emboss with ease, bringing a professional finish to your projects every time.

Why You Don’t Want to Miss This

Everyone loves a good deal, and this sale is no exception. By taking advantage of these discounts, you can save both time and money while enhancing your crafting experience. Imagine all the stunning cards, scrapbooks, and decorations you can create with your new supplies!

Stay Connected

For more updates and exciting offers, be sure to follow me on social media / Facebook and subscribe to my newsletter. Join the vibrant crafting community online. Happy crafting!

Creating Irresistible Treats with the Ice Cream Swirl Stamp Set

Hello Stampin’ Friends ~

If you’re looking to add a touch of sweetness and a sprinkle of creativity to your card-making projects, look no further than the Ice Cream Swirl Stamp Set and coordinating dies. With this set, you can craft delightful ice cream treats that look good enough to eat, perfect for any occasion. Today’s card was created by one of my Spring Stamping Retreat Attendee’s Vicki for our annual card swap!

The Ice Cream Swirl Stamp Set offers endless possibilities. Start by pairing the ice cream top with a cone for a classic treat as Vicki did, or get creative by masking off the bottom of the cone to create an ice cream sundae in a bowl. Don’t forget to stamp the cherry on top for that finishing touch! With various colors at your disposal, you can change up the ice cream “flavor” to match your mood or the recipient’s favorite.

One of the most versatile features of this set is the cone die. It cuts a two-sided piece that folds at the top, allowing you to create a cone that opens. This can be used to craft an adorable shaped card or a charming gift tag that adds a personal touch to any present. For an extra dash of creativity, try cutting the ice cream swirl from different colors of paper, or use your favorite coloring techniques to create unique “flavors” that will make your projects stand out.

Adding a playful sentiment from this set, or mixing in phrases from other stamp sets in your collection, brings an extra layer of fun to your creations. Whether it’s a birthday card, a thank you note, or a just-because greeting, the Ice Cream Swirl Stamp Set helps you craft cards that will bring a smile to anyone’s face. Don’t you love the way Vicki extended the “ice cream” beyond the card base … so cute!

Found on page 77 of your annual catalog, the Ice Cream Swirl Stamp Set is a must-have for any card-making enthusiast. It’s perfect for crafting during summer or anytime you want to bring a bit of sweetness into someone’s life. So why wait? Everyone wants ice cream, and you’ll be screaming to get your hands on this delightful set. I’ve added the links before for your convenience!

Start creating your own ice cream treats today and watch as your cards and gift tags become the talk of the town!

Class Announcement: Doin’ Beachy with the Seaside Wishes Class!

Hello Stampin’ Friends,

I’m excited to announce my upcoming Seaside Wishes Class, where we’ll embark on a creative ocean adventure with the Seaside Wishes Bundle! Whether you’re a seasoned crafter or just beginning your crafting journey, this class is perfect for you. The Seaside Wishes Bundle is packed with everything you need to create stunning, ocean-themed projects, including the Seaside Wishes Stamp Set and the Seaside Wishes Hybrid Embossing Folder. With the stamp set, you can add heartfelt greetings and intricate nautical designs to your creations, while the hybrid embossing folder allows you to create beautiful textured backgrounds, detailed ocean scenes, layered sand dollars, and elevated starfish die cuts.

Join me on Wednesday, June 12, for one of two sessions tailored to fit your schedule. You can choose to attend either the morning session at 9:30 am or the evening session at 6:30 pm. The cost for the class is $20, and this includes all the materials needed to make your projects—just bring your favorite adhesive. Envelopes are included as well!

This class offers a fantastic opportunity for creative exploration, where you’ll learn to use the Seaside Wishes Bundle to its full potential, making projects that are both beautiful and unique. You’ll get hands-on experience with guidance and tips for making textured backgrounds, layered sand dollars, and detailed starfish. Plus, it’s a wonderful chance to meet fellow crafters, share ideas, and enjoy a fun, relaxed atmosphere.

To ensure we have enough materials for everyone, please RSVP by Saturday, June 8. You can reserve your spot by calling 262-334-1009 / or email me at lindaluvs2stamp@aol.com. Don’t miss out on this opportunity to bring a touch of the sea to your crafting projects. I look forward to seeing you there and creating something magical together!

Happy crafting,

P.S. Feel free to share this announcement with friends who might be interested. The more, the merrier!