Lovely Friend …

Hello Stampin’ Friends ~

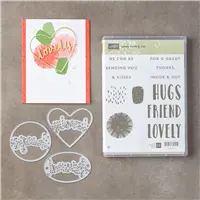
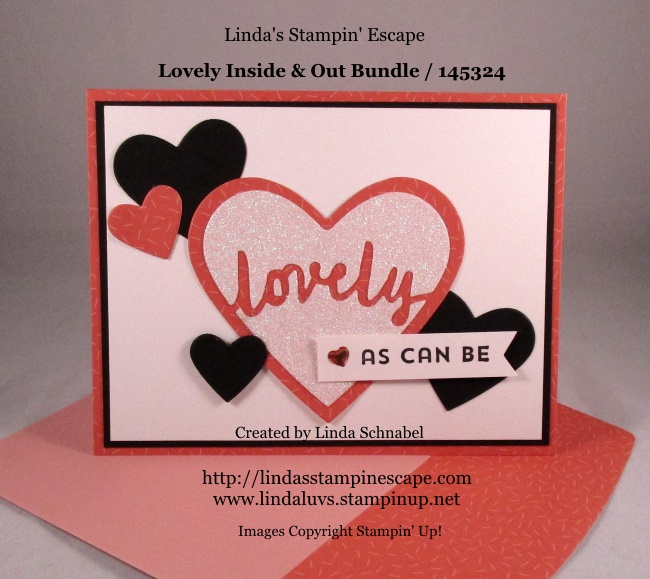
I’m back today with my third card share from the Lovely Inside & Out Bundle!  These little dies are fun to play with … you are going to LOVE the simplicity of this next card.

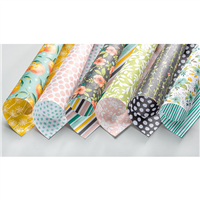
I’m using the Pool Party card & coordinating envelope from the 2018 Sale-A-Bration item: Tutti-Frutti Cards & Envelopes.  Don’t forget this is an exclusive FREE item with a qualifying purchase.


When cutting the oval “friend” out the way I did here, you will leave your card “open” … the way it is packed, line up the die on the front. Because this front & back are identical you could get even more cards out of this pack … Stop back tomorrow and I’ll show you how!!

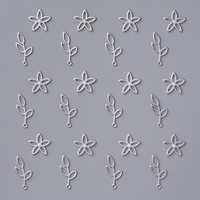
I used the Daisy Punch to create an accent and a little dimension to the card.

I punched two daisies out of Whisper White, put a dimensional between them, then stamped a small circle out of Pool Party.  I used the Fine Tip Glue Pen (138309) and covered the circle with glue then sprinkled it with Dazzling Diamonds Glitter (133751).


Thanks so much for stopping back … don’t forget to check back tomorrow to see another version of this card that will double your card count!

Have a wonderful week ~

TODAY’S STAMPIN’ SUPPLY LIST …


Lovely As Can Be …

Hello Stampin’ Friends ~

Hope you are having a good day so far … a bit chilly again! Cold never bothered my much before but I’m ready for some 50’s … 60’s …. anything!

Yesterday I share a quick -n- easy card that I created with the Lovely Inside & Out Bundle and I paired it with the Tutti-Frutti Cards -n- Envelopes packet from the Sale-a-bration Catalog! Comes with 16 cards (4 each of 4 colors) with coordinating envelopes!!

Well … I could not let the cut out from yesterday’s card go to waste, especially since I cut it out of the Dazzling Diamonds Glimmer Paper!  So I came up with this card …

The left over pieces were glued onto a heart that I cut out from the Tutti-Frutti paper … with that I cut out a few extra hearts (some in Basic Black cardstock).

I cut out a little banner and stamped it with one of the greetings from the stamp set included in the bundle.  The little heart comes from the Metallic Enamel Shapes (141678) and colored it with the Calypso Coral Stampin’ Blend!

Using the framelits to cut around the words is only one way to use these dies, but don’t throw away the left overs … you can always use them!

Thank you for stopping back today  … don’t forget to check back daily to see what else I’ve come up with using this bundle.

So my Two for Tuesday come from the same die cut!!


Have a great day ~

TODAY’S STAMPIN’ SUPPLY LIST … 


Lovely Inside & Out …

Hello Stampin’ Friends ~

I hope you had a wonderful weekend! We had a very snowy one here in Wisconsin … about 6 inches were we live (actually I think it’s the most we had all season, pretty lucky so far).

I was hoping to make it through this winter without a snowblower, but yea … I ended up paying people to clear out my driveway! I have to protect my stampin’ hands! lol

Today I am going to share with you a card I created with the Lovely Inside & Out Bundle … in fact, for the next few days I will be showing you cute creations from this bundle … it will be like attending one of my classes!

You will learn how I made them and some great tips as well. I hope you stop back each day to see them all, and if you like them, please take a second to click the LIKE button on the bottom of my post.

Our “lovely” was cut from the Dazzling Diamonds Glimmer Paper and you can purchase that either from it’s own pack (12 x 12) or in the Myths & Magic Glimmer paper (6 x 6).

When cutting the heart out the way I did here, you will need one of the hearts from the Sweet & Sassy Framelits Dies. You will notice throughout the week that the Lovely Words Framelits coordinate with the hearts, Ovals & Circle Framelits.

Using the framelits to cut around the words is only one way to use these dies, I will show you more in the upcoming days.


The stamped words come from the Lovely Inside & Out Stamp set. I created the little tag with the Triple Banner punch and by omitting the word “great” because I only needed the “For a” to go with my “lovely” and then I hand stamped the “friend”.

I added the little flower from the “Petal Passions” embellishments to balance out my card. The banner made  it a bit top heavy, so the addition of the flower added dimension and balance.

So … you must be wondering “What is that cardstock Linda’s using”??  Well, it’s the cute little Tutti-Frutti Cards -n- Envelopes packet from the Sale-a-bration Catalog! Comes with 16 cards (4 each of 4 colors) with coordinating envelopes… 32 pieces in all!!

Thanks so much for sharing you Monday with me … don’t forget to check back daily to see what else I’ve come up with using this bundle.

Have a wonderful week ~

TODAY’S STAMPIN’ SUPPLY LIST …


Let me tempt you with more Designer papers …

Hello Stampin’ Friends ~

Yesterday I shared 3 birthday cards with three different designer papers … today I have 3 more cards for you, some featuring the same Designer Papers I showed you yesterday!

Just like yesterday, my first card features the Wood Textures Designer Series paper and the Happy Birthday Thinlits dies on page 77 of the Annual Catalog.

 This card uses the designer paper as a background and is teamed up with the Daisy Punch! The background really makes the daisy’s POP!!


My next card features the Color Theory Designer Series paper and the Black Rhinestones for that touch of bling!

Can you see where I used the designer paper??  I used it to cut out the Adirondack Chair!!

We made this card in our Technique Club last year … the background was created by coloring a block with the marker, spritzing it with water and then stamping on the background!


My last card features the Birthday Memories Designer Series paper and this fabulous paper also has an entire product suite … Stamp set … coordinating dies bundle, and more! 

This fun birthday card comes from one of my classes … the background was created by repeatedly stamping the “surprise” from the stamp set that is included in the bundle.

The bear was actually cut out of the designer paper!!  However, there are designs in the paper that have coordinating dies!

I hope you have enjoyed this full week of designer paper and the many cards featured to show you how much fun using these fabulous papers can be.

Don’t forget … while your shopping there is a Sale-A-Bration going on, and for each $50 – you qualify for an exclusive Sale-A-Bration item!

I want to Thank You for joining me today.

Enjoy your Sunday!


Happy Birthday… Happy Birthday… Happy Birthday!!

Hello Stampin’ Friends ~

My cards today are all created with a simple layout and three (3) of our Designer Series papers …

My first card features the Wood Textures Designer Series paper and the Happy Birthday Thinlits dies on page 77 of the Annual Catalog.

Each card will feature the Happy Birthday Thilits Die… the next card features the Color Theory Designer Series paper and the Black Rhinestones for that touch of bling!


My last card features the Delightful Daisy Designer Series paper and a touch of vellum cardstock that helps to highlight the Happy Birthday Thinlits die.

All 3 cards are quick -n- easy to make and can be created for a special birthdaye just by changing out the designer paper.

Thank you for stopping by my blog today!


Today’s Stampin’ Supply List …


Valentine Love …

Hello Stampin’ Friends ~

Hope you enjoyed the Two for Tuesday post where I shared two “blank” layouts and the cards created using those layouts. Today I’m sharing a Valentine card the uses a similar layout to a card our clubs did in January.

Here is our January card …

You can see the entire post for this card by CLICKING HERE!  For today’s card I used the second folder from the Petal Pair Embossing Folder and changed from a vertical layout to a horizontal layout! I also decided to use the “Whole Lot of Lovely” Designer paper again!!

So you can see by just tipping the card sideways … you have another layout!

Both cards have a piece of Whisper White embossed with the Petal Pair Embossing Folders … floral on the first and the vines on the second.  The vines are what inspired me to use the beautiful floral vines in the designer paper.  The ribbon is the same on both cards!!

To create the “Valentine” I used one of the hearts from the Sweet & Sassy Framelits Dies cut in our 2017-2019 In-Color: Powder Pink! Then I added a little LOVE from the Sunshine Wishes Thinlits! This is the same thinlits set that the heart on our first card comes from.

I wanted to highlight the heart just a little more so I added the cute little dots from the Glitter Enamel Dots found on page 196 in our Annual Catalog… and that completes my card.

I hope you have been inspired to try some of these layouts and designer papers when creating your cards.

Thank you for checking back in …

Have yourself a “Lovely” day!

TODAY’S STAMPIN’ SUPPLY LIST …


Two for Tuesday: Layouts & Designer Papers!

Hello Stampin’ Friends ~

Today I have two different layouts for you that will showcase the designer paper! We’re going to start with the ever so popular “Banner” card layout …


I decided to use the “Whole Lot of Lovely” Designer Series paper … it is soooo pretty, and I can’t believe I have not used this one yet!! The patterns in this package work so nicely together for our banner layout.

I added the “Tranquil Tide” ribbon for my bow. I also used the Tranquil Tide cardstock to cut out my “amazing” from the exclusive 2018 Sale-A-Bration “Celebrate You Thinlits Dies” and “Amazing You” Stamp Set!

Our next template is fun and simple, and can be more fun or have a touch of elegance depending on the designer paper and accessories you choose…

For my second card, I’ve decided to have go with a more elegant card and use the same “Whole Lot of Lovely” Designer Series paper!

Simplicity at it’s finest … the core of your card is a 4″ x 5-1/4″ sheet of designer paper. My greeting comes for the beautiful “Charming Café” stamp set found in our Occasions catalog and punched out using the 2″ Circle Punch.

Again … our bow was created by using the Tranquil Tide Ribbon.  Your card making can be so easy if you use simple layouts and use our designer papers to create with.

Hope you enjoyed today’s “”Whole Lot of Lovely” Designer Series paper used on two simple layouts.


Thanks so much for joining me today. Enjoy!


Birthday Party: Cue the Confetti …

Hello Stampin’ Friends ~

Today we are going to get another look at our beautiful designer series paper … or FUN designs!! We are kickin’ off this day with the Picture Perfect Party Designer Paper and coordinating products.

Take a good look because today’s layout is very similar to yesterdays layout!

I cut my Picture Perfect Party designer paper smaller (4-1/2 x 3-1/4) than I did yesterday so my base created a larger border … then I stamped to created a fun but subtle background.  Again … I’m using the banner to highlight my greeting from the Picture Perfect Birthday Stamp Set.

I created my banner today (and yesterday) with the Triple Banner Punch… then cut up some of the Myths & Magic Washi Tape to create some confetti!!

To make sure this card really kicks off the party … I cut out the Noise Maker or what some call “BlowOuts” but it’s cute and fun, fun, fun at the party!

What a difference the designer paper makes even when using similar layouts! Tomorrow I’ll have two different layouts for you for our Two for Tuesday blog post.

Thanks for stopping by today …

Hope your Monday is full of fun!

TODAY’S STAMPIN’ SUPPLY LIST …


Simply Sunday: Amazing You

 Hello Stampin’ Friends ~

I quick post today for a Simple but elegant card! Today I’m using the Delightful Daisy Designer Series paper … If you’re like me, you buy it … use it for the projects you were shown and then you tuck it away and kind of forget about it!

Well this week I’m going to showcase all kinds of our beautiful designer series paper along with some great template to use! Let’s begin with today …

We’ve had some beautiful days here in Wisconsin – about 50 degrees  (amazing for January!) So I was really in the mood for spring flower …. Delightful Daisy Designer Series Paper!

Banner are hot right now, and are great for making quick -n- easy cards. The “amazing you” die cuts come from the Celebrate You Thinlits dies in the Sale-A-Bration catalog … You can get this exclusive item FREE with a $100 purchase!! I used the Myths & Magic Glimmer paper for the “amazing”.

 I borrowed some items from my Myths & Magic product suite … the “amazing” was cut from the glimmer paper (comes in 3 colors) and if you look above the banner you will see the coordinating Washi Tape.  This is be BEST washi tape we’ve ever had … at least I think so 🙂

So head down to your stamp room and start creating with your designer paper … this simple layout is a great place to start, and depending on what paper you use – each card will have a different look.

Thanks for checking back with me today, and hang in there this week for a great line up of “Designer Series” Paper cards & layouts!

Have a great day!

Today’s Stampin’ Supply List ….

http://

Two for Tuesday: Petal Passion Suite

Hello Stampin’ Friends ~

Today I have two beautiful cards I would like to share with you from the Petal Passion Product suite found on pages 22 and 23 of your Occasions Catalog. These are the two cards that my January Clubs made …. we focused on using all the elements of the Petal Passion product suite and it’s versatility.

First I would like to share our Valentines Card which could also be used as a wedding card with the addition of another heart …

The simple yet beautiful card showcases most of the product suite: the Petal Passion Designer Series Paper, one of the folders in the Petal Pair Textured Impressions Embossing Folders, the Whisper White 1/4″ Organza Ribbon, and the Petal Palette Stamp Set and Petals & More Thinlits Dies.

The heart cut from Real Red Cardstock comes from the Sunshine Wishes Thinlits Dies and adds a finishing touch to our card. We used the Rhinestones which can be colored with your Stampin’ Blends Markers.

Our second card is even more beautiful! I chose a simple yet beautiful color pallet of Basic Gray and Pink Pirouette with a Whisper White base and a splash of Silver …

My celebrate card highlights more of the dies on this card and the use of the BigShot. Let’s begin with our beautiful background … the New Layered Leaves 3D Dynamic embossing folder leaves a stunning impression … WOW!

Our hand stamped bird was cut out with the coordinating die from our Petal Passion Bundle as were the delicate branch and what I call the “lattice” piece … Love that!!

The “Celebrate” is cut from our Silver Foil and comes from our Level 2 Sale-A-Bration Catalog … an exclusive item you can get FREE with a purchase of $100 (before ship & hdlg) This is the first year that Stampin’ Up! is offering 2 Levels of FREE Rewards with your purchases during Sale-A-Bration … it’s so cool.

Let me know if you have any questions about any of the products listed or about our Sale-a-bration!

Thank you for stopping back and checking out my blog post today. I think you will enjoy this product suite as much as we did playing with it.

Have a great day ~

TODAY’S STAMPIN’ SUPPLY LIST …


Happy Wedding Day Mini Treat Bag

Hello Stampin’ Friends ~

I know you just received your Occasions and Sale-a-bration catalogs however we still have some great stamp sets and accessories in our Annual catalog, so today I want to share with you a cute project that is on my website’s Idea Page!!

Let me introduce you to the Beautiful Bouquet stamp set …

Bundle and save! Buy these two coordinating products and save 10%.  When Stampin’ Up! names a stamp set “Beautiful Bouquet,” you’d better believe they mean it! With sentiments for any occasion and countless ways to combine the floral images, this set will help you create beautiful bouquets that live on forever.

Stampin’ Up! teamed up this fabulous bundle with a familiar product – the Mini Treat bag to create this cute little project …

Recognize the Designer Paper? It’s one of the patterns from the Delightful Daisy package. I know many of you already have this designer paper! And who doesn’t love these cute little treat bags … so much FUN!!  What a great combination 🙂

I love going through the new catalogs, so many great items and ideas but lets not forget how awesome our annual catalog is too.  I will try to incorporate some of the past goodies with the awesome new stuff … can’t go wrong creating with that plan!

I thank you for dropping in on me today to check out my blog.  I’ll be working on some new creations for you.

Have yourself an awesome day ~


Two for Tuesday: Picture Perfect Party

Hello Stampin’ Friends ~

Today I’m back with 2 super cute, super easy cards that you can create with the new Picture Perfect Party Designer Series Paper stack! I made this easy peasy card with the candle pattern and the Happy Birthday Thinlet …

I used Bermuda Bay and Basic Black cardstock to create the big bold birthday wish on this card. I glued the two pieces together but “off set” them so you get the shadow effect which really makes the greeting pop!

My second card I used the designer paper with the circles on it. I really wanted to make this a FUN card so I used the Lemon Lime Twist Cardstock and Ribbon …

I also used a touch of black cardstock to mat my designer paper and to cut the “celebrate” greeting. The “YOU” is cut with the Silver Foil paper to create the focal point, and it coordinates with a couple of the dots on the designer paper.

The die cut greetings are an exclusive item that you can get FREE with a qualifying purchase. The Celebrate You thinlets dies are in our Sale-a-bration catalog and it’s our biggest and most fun promotion of the year… Seriously, who doesn’t like FREE stamps and / or accessories … and NOW Thinlets!!

Hope you enjoyed todays Birthday cards … we can never have too many of those.

Thank you for spending a part of your day with me, it’s always nice to hang out with a friend.

Have a great day!

TODAY’S STAMPIN’ SUPPLY LIST …


A Few of My Favorite Things …

Hello Stampin’ Friends ~

Christmas is almost here and our Holiday Catalog is full of wonderful stamp sets, however I cannot forget the Annual Catalog and the beautiful holiday stamp sets that are still available …

Here are a few of my favorite stamp sets in the Annual Catalog …

The most beautiful stamp set … greetings and dies that I could not pass up last year! So glad the “Star of Light” carried over into the annual catalog.

Another stamp set and die that I just had to add to my collection was “Santa’s Sleigh” … who doesn’t want this jolly ‘ol soul in upon their roof!

Another great stamp set is “Holly Berry Happiness” … I’m a big fan of Holly !and you’ll see it all over my home! It’s just Christmas to me, and the greetings and messages include in the set are perfect …

And if you are one who loves tradition then I’m sure you’ll love “Hang Your Stocking” as much as I do. These cute little stockings work well on tags and on cards … or both as you see below!

I have one more to share with you … “Father Christmas”. It just wouldn’t be Christmas without Santa Claus. This set will work great with all the coloring techniques available … the new Stampin’ Blends or Watercolor Pencils are my top favorites!

Hope you enjoyed this flashback to the Annual Catalog! Our seasonal catalogs are awesome and I love to combine them with the great sets in our annual catalog as well.

Have a great start to your week ~

Stampin’ Supply List …


Sneak Peek #2 … Beautiful Day

Hello Stampin’ Friends ~

Hope your week is going well … we only have one more day until the weekend, so I think today is a good day for a Beautiful Day!

I’d like to introduce you to the Beautiful Day stamp set and the NEW Brusho Crystal Colour! I wish the camera had the ability to capture what our eyes see because the color of this card is much more stunning in person!

We embossed the butterfly from the Beautiful Day stamp set in black on Watercolor paper. Then we used the Aqua Painter to wet the watercolor paper inside the butterfly …

Next (after poking a small hole in the cover) we tapped some of the yellow Brusho color crystals into the center of the butterfly. The water mixed with the powder creates a beautiful flow of color. Then we tapped green Brusho around the outer edges, we could blend the color with the Aqua Painter. Don’t worry … I will be holding classes on this spectacular new product!

OK … if that wasn’t pretty enough, I added Wink of Stella to add a touch of sparkle to my card, and it looked great with the Glitter Enamel Dots found in the Annual Catalog! I love how it all coordinates 🙂

I hope you enjoyed today’s card … I can’t wait to gather with you and show you in person how amazing and fun this new coloring medium is!

Thank you for stopping by.

Have a beautiful day ~

Two for Tuesday: Carols of Christmas

Hello Stampin’ Friends ~

Happy Tuesday to you! Today I have double the “Carols of Christmas” from the Merry Little Christmas Product Suite, one of which is the winner from our 2017 Holiday Stampin’ Retreat.

Let’s start with the card that I cased from Dawn Olchefske (a fellow demonstrator who does beautiful cards). I was drawn to Dawn’s card right away by the beautiful simplicity of the card …

The “Merry Little Christmas” Designer Series paper is the backdrop to this card. The focal point is created by cutting the trees from the “Card Front Builder” Thinlits Dies out of Dazzling Diamonds Glimmer Paper … the deer in black to coordinate with the rest of the card.

Next, I’d like to share with you the Winner of our Attendee Swap at our Holiday Retreat this year … Guest Stamper: Cindy P.

Our retreat attendee’s vote for the swap cards they like best and the winner receives a Gift Certificate from me to do a little extra Christmas Shopping from the catalog.

Cindy used the “Carols of Christmas” bundle from our Holiday Catalog … stunning! I love the Night of Navy tree’s behind the Silver Glimmer trees, it appears as a shadow and really makes the silver pop!

If you can’t get enough of the Merry Little Christmas product suite which includes the Carols of Christmas bundle … head on over to my website to see more samples! CLICK HERE TO VIEW

Thank you for stopping by today, hope your day is double the fun!