Category Archives: Product Wow
Peek-a-boo Bigz Die Card…
Hello my Stampin’ Friends,
How are you this fine Wednesday? I am excited to share a fun card with you today. Yesterday I showed you the Weekly Deals, and one of the items on the list was the “Peek-a-Boo Die” – so I want to show you what I came up with last night….
Do you recognize the designer paper? Well actually, it’s the “Good as Gold” Sale-a-bration Card Kit. I used it because it’s a bit thicker than the designer paper and because I love the gold dots in the design!
I chose the frame I wanted to use on my card and then ran the “Good as Gold” through the BigShot. Now I have my frame with a Peek-a-boo Window! Did you know … You can use the window as a pull down or pull up … how fun is that! It just depends on how you place it onto your card.
I then cut a piece of Whisper White cardstock slightly larger than my frame (2-1/4″ x 2-1/4″). I stamped the “You can never have too much happy” verse from the stamp set “Yippee Skippee!” Before attaching my frame, added some texture by using the xxxx’s from the “Needlepoint Border” Embossing folder. I wanted to bring in a bit more white onto the card so I colored the xxxx’s with our White Stampin’ Chalk Marker. Now I could attach my frame.
I also wanted to add a bit more color to the card front so I added some of the extra paper, and I sliced off a piece of the gold envelope liner! While I was add it … I punched out the “Elegant Butterfly” out of gold. Then I layered the smaller “Bitty Butterfly” from my left over embossed designer paper from yesterday’s project! Waste not, want not! LOL
Finally, to finish off the card … I added the Basic Pearls and then popped up the butterfly with the dimensionals.
Here are the items I used to create this project … Click on the photo to view details / purchase. Please note that the “Peek-a-boo Bigz Die” is on sale for $24.71 and will reflect that when you purchase it during the “Weekly Deals” which ends on the 17th of March.
Thank you so much for stopping by my blog today, I hope you enjoyed today’s card share.
Sale-a-bration inspiration …
Hello Stampin’ Friends,
Some more to share from our “Get Inspired” blogs about Sale-a-bration…
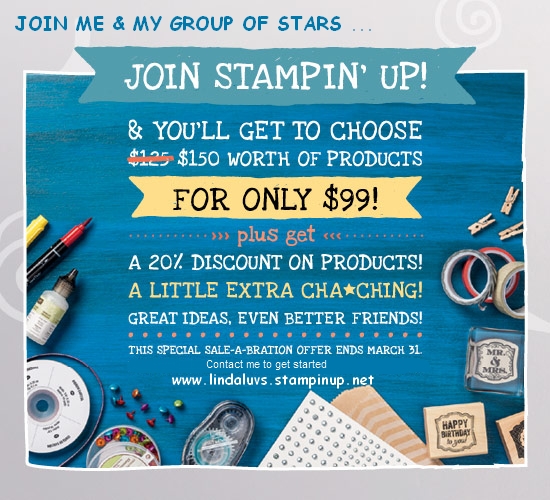
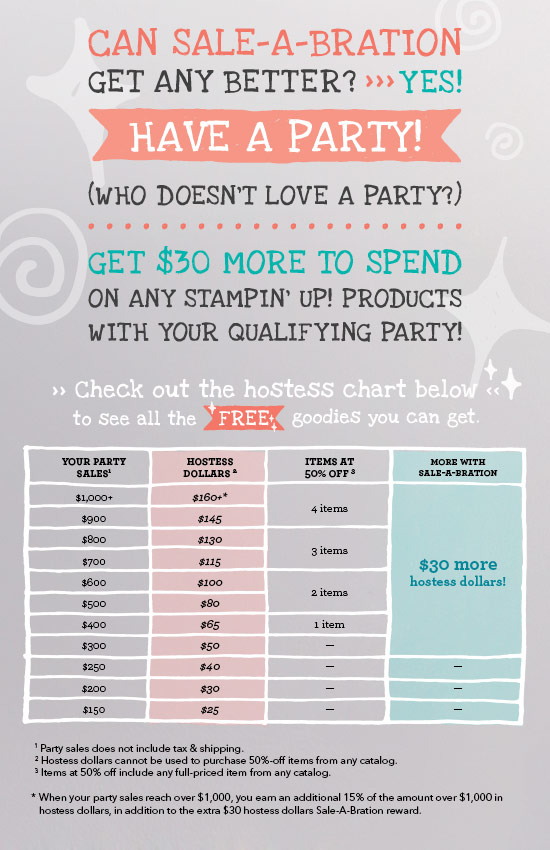
Earn a Free Sale-A-Bration Item (Part 1)
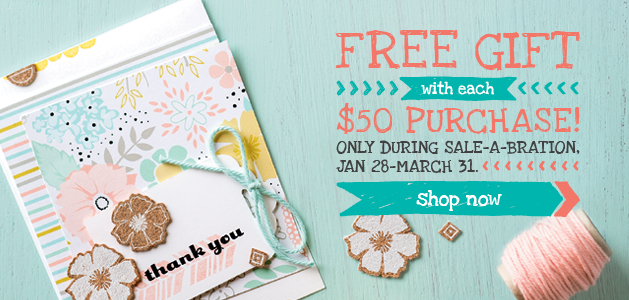
During Sale-A-Bration, when you spend $50, you earn a free, exclusive product. To make it easier to get to $50, we’re suggesting bundles of products that work well together and will help you earn a free item. Enjoy!


Cards, Cards, Cards! Bundle
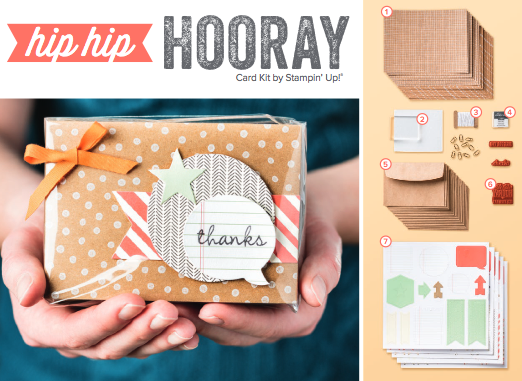
134998 Hip Hip Hooray Card Kit
131373 On Its Way Simply Sent Kit x 2
131459 Thanks & Hello Stamp Set
You’ll get 36 card bases with envelopes, five stamps, an assortment of clips and Baker’s Twine, a Classic Stampin’ Spot, stickers, Stampin’ Dimensionals, etc.
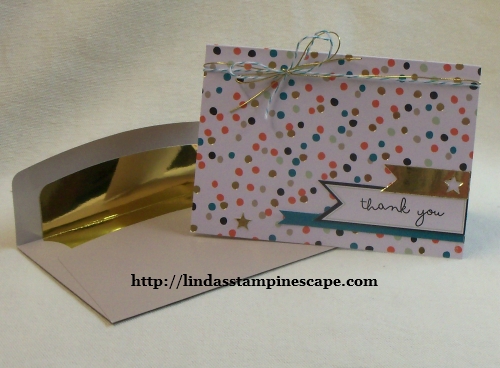
I recommend selecting the Good as Gold Kit (133512) as your free Sale-A-Bration item. You’ll add eight more cards and envelopes to your stash! That’s 44 cards and envelopes—and you’ll really enjoy mixing and matching all of the pieces to make them your own.
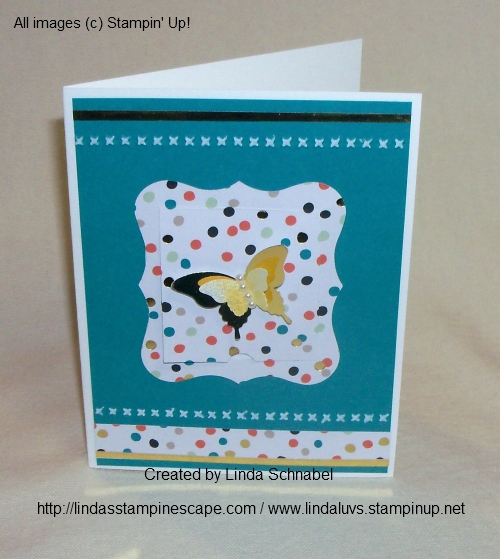
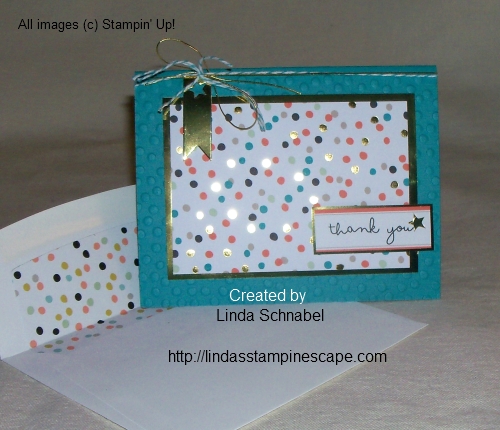
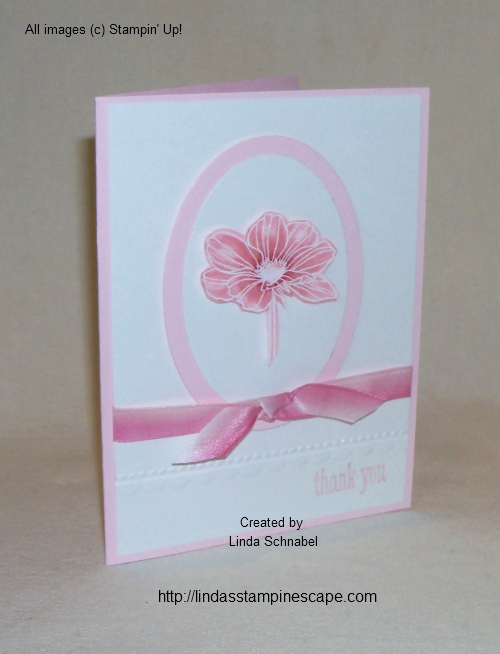
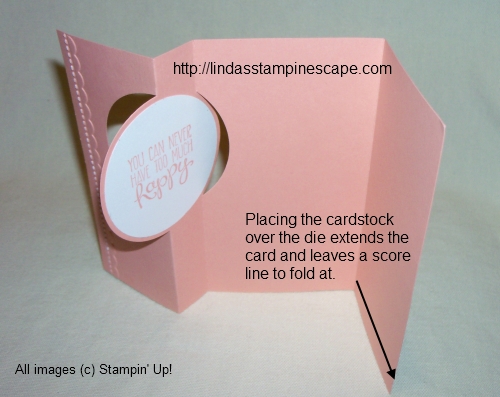
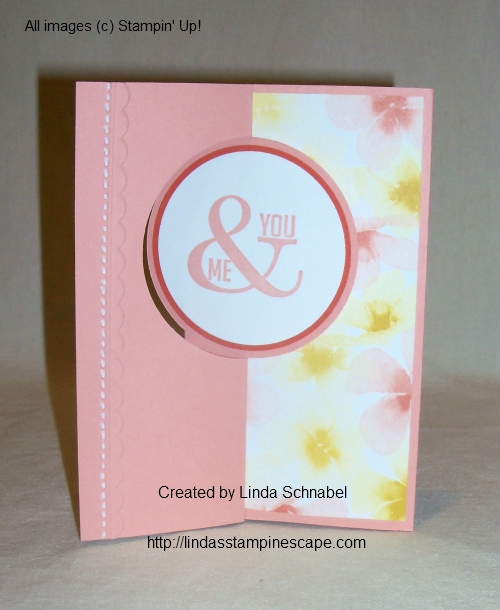
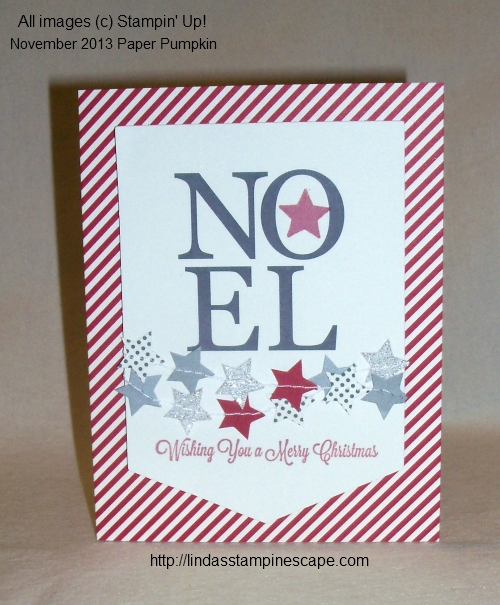
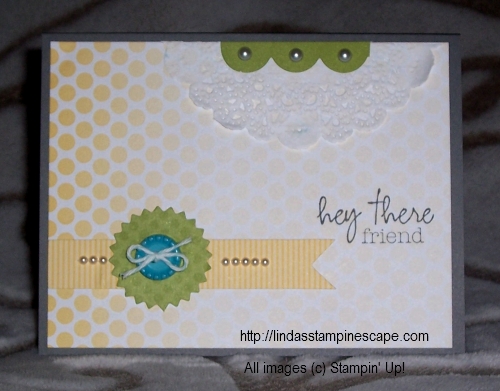
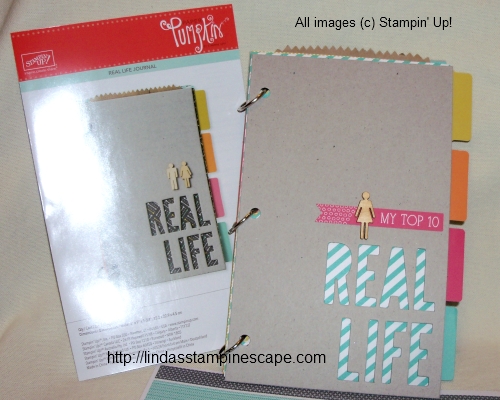
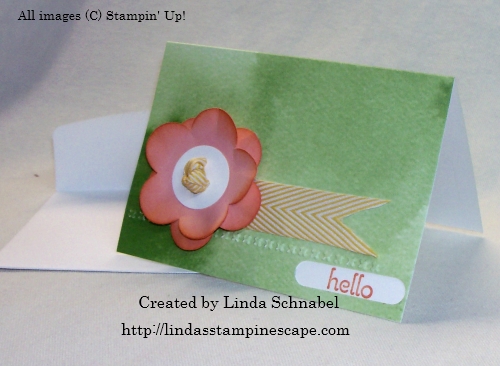
Here are a few of my cards that I made with the Good as Gold Sale-a-bration kit …
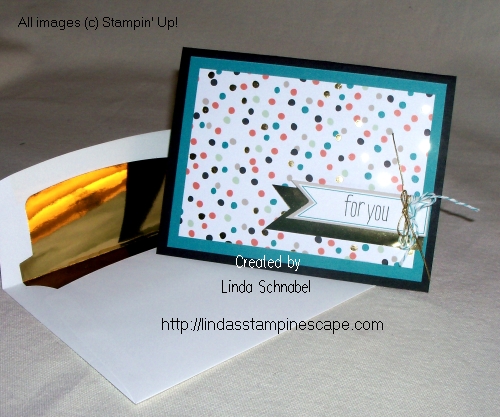
I have added cardstock and product to these cards.
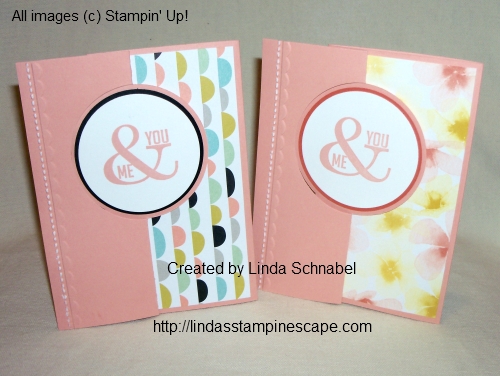
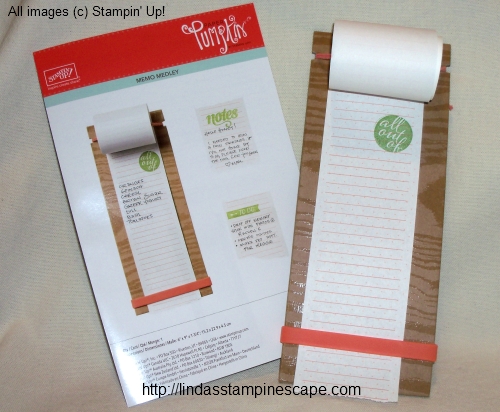
Here is what the cards in the kit look like … pretty!
Hope you have enjoyed them, and I hope you get yours for FREE too!
Just click on the product descriptions to view kits and begin to shop. Thanks for stopping by.
Have a nice day ~
Faux Dipping Technique + Mono Chromatic Coloring = Beautiful!
Hello Stampin’ Friends,
I am really excited to share my card with you today! You didn’t think I was going to show you a technique without following it up with a card did you? I thought the way Stampin’ Up! colored the ribbon was really cool … so I had to try it out.
I didn’t have the ribbon they used, so I used the Taffeta Ribbon in Whisper White. I then ran my markers across the length of the ribbon (as Stampin’ Up! did) starting with the lightest color … Pink Pirouette and finishing with Melon Mambo.
I did however change up the next step… I laid my ribbon across a layer of paper toweling and spritzed it with water. You can find the Stampin’ Spritzers on page 164 of the Idea Book & Catalog. It blended nicely! Once the water absorbed into the ribbon, and excess in the paper towel, I moved the ribbon off to the side to dry. I love the way it looks! I’ll be trying out some additional color combinations this weekend.
I tried to do the same technique on paper, but it did not work the same as it did on the ribbon. You can however create the watercolor look with the Shimmery White paper and the Aqua Pens … but that’s another day, and another card.
For my flower, I tried a technique that I will be showing my Technique clubs in the upcoming month. It is embossed in white embossing powder, and colored in with the Stampin’ Write marker. Both my card stock and my marker are Pink Pirouette. It is unbelievable that you can get that much variation … using the same color marker!
To get the darker color, you simply keep coloring over the same area. To create the light / highlighting … leave it blank or only go over that area once. I did however add a touch of Melon Mambo right around the center of the flower so it matched the ribbon better.
The white card stock you see, is the Shimmery White … it’s so pretty! I wish my camera would capture it better. I embossed the bottom area with the “Needlepoint Border” embossing folder.
The flower was cut out, popped up with Stampin’ Dimensionals, and framed with the “Oval Collection” framelits.
I hope you enjoyed seeing the “Faux Dipping” technique on today’s card share. I’d like to hear from you, are you going to try this technique??
Have a wonderful weekend ~
Here is the list of ingredients I used today …
|
Peaceful Petals Stamp Set – Wood / $28.95 |
|
|
Peaceful Petals Stamp Set – Clear / $20.95 |
|
|
Taffeta Ribbon – Whisper White / $6.95 |
|
|
Stampin’ Spritzer / $2.95 – Set of 2 |
|
|
Shimmery White Cardstock / $7.95 |
|
|
Needlepoint Border Embossing Folder / $7.95 |
|
|
Ovals Collection Framelits / $26.95 |
You may view or purchase any of these items just by clicking on the item number. It will take you directly to my stampin’ store. Shop 24/7 – 365 … Thank you.
YAY FOR CARDS… Sale-a-bration!
Hello Stampin’ Friends,
Yesterday morning I was packing up my customer orders and came upon a fantastic item, it’s the new “Yay for Cards!” Bundle.
First, let me start at the beginning, with our Sale-a-bration catalog. We’ve all noticed that the seasonal catalogs are a bit different, they start by showing us samples of the products showcased in the catalog.
The Sale-a-bration catalog begins by stating how you can earn FREE gifts! It then moves into “bundles” … bundles that are a bit different than what we are used to. These bundles are product suggestions “bungled” to help you achieve that FREE gift! I think that is awesome! There is something for everyone.
The “Yah for Cards” Kit makes 23 cards and includes everything … I mean everything!
• Happenings Simply Created Card Kit (makes 15 cards; envelopes included)
• On Its Way Simply Sent Kit (makes 8 cards; envelopes included)
• Thanks & Hello Wood-Mount Stamp Set
• Smoky Slate and Strawberry Slush Classic Stampin’ Pads
• Mini Glue Dots
One item included in the kit that I want to point out is the “Happenings Simply Created Card Kit” …
Looks easy … and FUN! The kit also includes the “On Its Way” Card Kit. The “Yay for Cards” Bundle is perfect if you’re the kind of person who never has enough cards on hand but never has enough time to make a bunch, don’t despair! Our Yay for Cards bundle pulls together what you need to create loads of cards without spending loads of time. CLICK HERE to view or purchase …Don’t forget to order your FREE Sale-a-bration gift too!
You have a great day ~
Fun is “Good as Gold”
Hello Stampin’ Friends,
Today is all about FUN!! My card share stems from playin’ around with my FREE Sale-a-bration items. On December 16th, I introduced you to the “Good as Gold” card kit. It’s so cute … not to mention quick and easy to assemble and send!
Here is the original card – based on the packet instructions…

The kit includes:
* 8 card bases (3-1/2″ x”)
* 8 envelope liners
* 1 sheet gold foil tags
* 1 sheet printed die-cut tags
* 8 pieces of gold elastic cord
* 8 pieces of Bermuda Bay Backers Twine
So … ready for some fun!! I know that some of my stampers are die-hard “regular card size” stampers, so I thought that it would be fun to use the supplies in the kit to create some “regular” size cards … our 5-1/2″ x 4-1/4″.
I began by cutting the “Good as Gold” card in half, then adding it to a black base and a Bermuda Bay mat. Still quick -n- easy.
I cut 1″ off the bottom of the gold envelope liner and used it to create a banner. The greeting comes with the kit. Instead of tying the bows at the top, I wrapped it around the greeting for a different look.
Next, I took the second half of the card … both sides have the dotted pattern and trimmed it to fit the mat I created from the gold envelope liner.
Now … I did not use my Bigshot on the first card, so you know I was going to bring it out for this one! Because there is more of the base card exposed on this card … I embossed it with the “Decorative Dots” embossing folder. It coordinates with these cards and it’s FREE too!
I trimmed the greeting down and matted it with the left over gold envelope liner, and popped it up on the card with the stampin’ dimensionals. The bows were tied at the top and the little banner was added. Again, simple and easy.
Oh … by the way, I used the “Sweet Sorbet” designer series paper (same design as our cards) to line the envelope. This time I have to use the envelope framelit dies to cut it out. The liners included in the kit are pre-cut for you!
I hope these cards inspire you to use your products in some different ways. Just have fun with it.
* * * * * * * * * * * * *
TUESDAY’S UPDATES:
Here’s what’s coming up this week
- New Personalized Name Stamp: We have a brand new personalized name stamp for you. It’s available in photopolymer only, and can be viewed and ordered online! I’ll post more information tomorrow.
- New Photopolymer Stamp: We’ll have a new photopolymer stamp set available tomorrow. Check back then for the new flyer!
Thanks for stopping by my blog today …
Have a terrific Tuesday!
Truly Heartfelt … FREE Banner Kit
Hello my Stampin’ Friends,
It’s amazing what you can do with FREE stuff! I had the “Heartfelt Banner Kit” from the new Sale-a-bration catalog and thought I would give it a try. I was amazed at the length of the project and all the goodies in the kit … even a needle!
The kit was easy to assemble … There are holes in the banners, and the needle easily goes through those fun little pom poms! This would be a great project to do with your kids, in fact, after Shayla (my granddaughter) saw what I did, she wants one for her room too!
My next thought was …. what pictures should I put on here? My last trip? Hmmmmmmmmm … then it came to me! Why not use pictures of my last 14 years with Stampin’ Up!!! My stampin’ friends, my downline, fellow demonstrators, incentive trips, convention and more!
A free gift from Sale-a-bration to celebrate what stamping has brought into my life. The fun, the friends, confidence I didn’t have before, (can you believe I use to be shy?), recognition for a job well done, travel, the ability to schedule when you want to work … and yes, the opportunity to earn money doing something so fun.
I did have a little difficulty finding pictures of when I first began, I never thought in my wildest dreams that I would still be a demonstrator 14 years later. Heck … I wasn’t going to do parties, I only started for the discount! I did a party for my sister-in-law and actually earned money … who knew!! So then I gathered a group of friends and family and started my first club.
I was really having fun by then, and others started booking parties! Before I knew it I was just shy of earning my first cruise … Alaska! Well I made it, thanks to all my stampin’ friends & family. Love you guys! This is where my banner begins.
I believe that some of my stampin’ friends have become as close as family. We’ve gone through some wonderful times, and some rough times together … we laughed and we cried. And to think, this was all because of what some have called “my little stamping job”. It is sooooooo much more than that. It’s priceless!
My little stampin’ job (LOL) has outlasted 3 manufacturing jobs … for those that don’t know, I have been working in the Quality field for almost 25 years. In that time, none of those jobs has ever sent me on a cruise, walked me across a stage for my accomplishments, or even given me the recognition or bonuses that I have received from my “little stampin’ job! I love Stampin’ Up!
But it’s still the friendships that I have built in the past 14 years with stamping that keeps me stamping. Sorry, but I can’t help but talk about what a wonderful 14 years it has been. I hope you can capture that feeling from my banner. I can’t wait for my stampin’ groups to see it up close.
If you have ever … I mean ever, considered what it would be like to be a Stampin’ Up! demonstrator, or just want the discount, contact me (lindaluvs2stamp@aol.com) I would love to hear your thoughts. There is no obligation … and we have an amazing opportunity right now.
Also … Stampin’ Up! is allowing all new demonstrators to register for Convention 2014 for FREE! That is a $295 value!! Think about it … join me & my Star’s group. Click HERE to learn more. Or contact me … lindaluvs2stamp@aol.com
Thanks to all my stampin’ friends for giving me some of the most amazing experiences in my life!
Thank you all for stopping by a hangin’ around to here my story.
Have yourself a wonderful week ~
The Heartfelt Banner Kit is FREE with a qualifying purchase during or Sale-a-bration period.
CLICK DIRECTLY ON THE IMAGE TO SHOP NOW
* * OR * *
If you would like to host a stampin’ party with your friends and family … I would love to show you some of the fabulous product we carry! Don’t have space? Use my Stampin’ Studio to host your party … You bring the treats … I’ll supply the stamps & the fun! You get FREE goodies!
HIP HIP HOORAY …
Hello Stampin’ Friends,
Today I would like to share with you a new product that Stampin’ Up! has introduced. This amazing card kit contains everything you need to create 20 cards (except the scissors).
Why shop for cards when you can create your own hand stamped cards in minutes! This fun kit is also a great gift for that creative person in your life.
-
Card stock for 20 cards
-
Clear stamp block and Stampin’ Dimensionals
-
Twine and clips
-
Basic Gray Stampin’ Spot (mini stamp pad)
-
Envelopes
-
3-piece stamp set
-
Adhesive die-cut embellishments
-
and a full-color instructional brochure (not shown in the image above)
They’re thoughtful, they’re beautiful, they’re handmade, and they take just minutes.
Here’s what they look like assembled…
CLICK HERE TO DOWNLOAD THE FLYER
So … why go to the store when you can have these precious cards at your fingertips (20 cards for $19.95) … get one for your friend too!
Don’t forget that with a purchase of $50 (before shipping & taxes) you will also recieve a FREE Sale-a-bration item!
CLICK HERE TO PURCHASE YOUR “HIP HIP HOORAY” CARD KIT
Here is a look at the FREE SALE-A-BRATION items you can choose from …
Please let me know if you have any questions. Contact me at: lindaluvs2stamp@aol.com
Thanks so much for stopping by.
Have an wonderful weekend !
Grab some popcorn …
Hello my Stampin’ Friends ~
Since we’re under winter storm warnings again, I thought it was time to stay home, sit back and relax! I have some great Stampin’ Up! videos that will introduce you to some items in the new Occasions catalog and more.
Here is our “Celebrations Entertaining Kits” …
One of my favorites … the “Perfect Pennants and Banner Dies“
Oh … here is our new “Tag Topper Punches“. Too cute and so much fun!
Wasn’t that fun!? Keep coming back … as I will be sharing more ideas using these fabulous products. And to my Club Members … I’ve got some special projects coming up for you too!
You can click on any of the links (highlighted in pink) to view the product and / or purchase any of these items.
Stay warm my fellow mid-westerners and everyone have a great day.
Thanks for stopping by.
Extending the fun … Technique!
Hello Stampin’ Friends,
Hope you enjoyed your weekend… yesterday was filled with sunshine! Just what our endorphins needed.
Today I would like to share with you a project that I did with my Technique Clubs this month. They learned a sweet tip on how to extend the card length when using the Thinlit Dies.
I will also share two different Designer Series Paper and how they can change the look of a card. My first card was done with the Sweet Sorbet Designer Series Paper – a FREE product that can get with a Sale-a-bration purchase of $50 or more. (Sale-a-bration begins January 28th). Now that’s YUMMY!
I love how the “Needlepoint Border” folder matches the designer paper. I highlighted the stitching by dragging the “White Stampin’ Chalk Marker” over the top of it. It really completes the card.
I used “Crisp Cantaloupe” cardstock, but the photo is making it look a bit “pinky” …. sorry!
Stampin’ Tip to Extend Card Length …
Slide cardstock underneath the circle area of the die – leaving the other side of cardstock “above” the die (See Photo)
When you have the cardstock over the top of the die, it will not cut… however, it leaves a nice score line for you to fold the extended card over. It will fit into the envelope perfectly.
Here is a shot of both of the cards. I promised the ladies I would post them both because some classes used the “Sweet Sorbet” and the other class used the “Watercolor Wonder”. Both look amazing, but still very different.
I think you could put the “Watercolor Wonder” Designer Series Paper on any card and make it look good. Here I just replaced the Basic Black punched circle with the “Tangerine Tango” … a suggestion from Richella. I love the way it looks! Thanks for the help Richella!
You will find the Watercolor Wonder Designer Series Paper along with the “Perfect Pennants” Stamp Set in the Occasions Catalog. I have listed supplies to create the cards at the bottom of the blog.
I hope you can now extended the fun on your cards by using this little stampin’ tip. It gives you much more room to write (or stamp on)!
Have a great day!
Here is a list of supplies used for today’s card …
|
ITEM |
PRICE |
DESCRIPTION |
|
$29.95 |
Perfect Pennants Stamp Set – WOOD |
|
|
$21.95 |
Perfect Pennants Stamp Set – CLEAR |
|
|
$32.95 |
Circle Card Thinlets Die |
|
|
$7.95 |
Needlepoint Border Embossing Folders |
|
|
$26.95 |
Circle Collection Framelit Dies |
|
|
$26.95 |
2-1/2” Circle Punch |
|
|
$39.95 |
Magnetic Plateform |
|
|
$10.95 |
Watercolor Wonder Designer Series Paper |
Clicking on the item number will link you to my on-line store.
A Few Favorites …
Hello Stampin’ Friends,
Today I’m going to share with you a post from Stampin’ Up! Concept artist Jen C.
I have already shared a few of “my” favorites, but when I saw Jen’s projects … I just had to share. She created some really cute projects! Just take a look …
A Few Favorites
I am so excited that it’s 2014 and we can finally share projects using new Stampin’ Up! products. It’s so fun to use new stamps and accessories. It reignites my creativity.
In the 2014 occasions catalog, there are so many things to get excited about. I wanted to share just a few of my very favorite things.
- Kaleidoscope Designer Series Paper
- Simply Celebrate Stamp Set
- Angled Tag Topper Punch, Scalloped Tag Topper Punch
- Essentials Wooden Elements
- Gold Sequin Trim
- Make Note This and That Rotary Stamp

I made a few different projects to showcase my faves. On the Hello card, I spritzed part of the Designer Series Paper to create a fun background. And I love the stamped greeting on the Designer Series Paper, as well.

Next, I made a box using the Envelope Punch Board. (By adding a second score line to each side, you can add sides to your envelope and create a box.) The black and white stripe is my favorite sheet in this Designer Series Paper pack. I also love the little greeting stamped on the wooden flag using the rotary stamp.

On the Thank You card, I used a Stamp-a-ma-jig and a few different ink colors to create a fun diagonal stripe of thank you’s. Every cute card needs a coordinating envelope . . . and the Envelope Punch Board makes creating custom envelopes a cinch.

Last, I wanted to use the Enjoy stamp from the Simply Celebrate set to package a little treat. I’ve stamped “Enjoy” on an acetate box using White StāzOn ink. Then, I’ve embellished it with Kaleidoscope Designer Series Paper and a small length of Gold Sequin Trim.
What do you love most in the new occasions catalog?
Jen C.
Concept Artist
So what do you think? She’s pretty awesome … and I thank her for sharing. Click here for the link.
Thanks for stopping by today, and let’s all thank Jen for sharing her fabulous projects with us.
From Christmas to Valentine’s Day …
Hi Stampin’ Friends,
Woo Hoo … this will be a quick post today, I have the pleasure of shoveling out about 5 – 6 inches of snow … Yippee!
Enough about that white stuff, I wanted to share with you a Paper Pumpkin project that I did just the other day. With this fabulous opportunity to get FREE Markers when you sign up, I just wanted you to get a good feel of these fun stampin’ projects.
This was the November project that was delivered to my door (well … mailbox)
Ohhhh so pretty. I love it because I don’t have a sewing machine, so the only way anyone is going to see something sewn from me is on a card from Paper Pumpkin – LOL!
I’m not sure if I mentioned this yesterday … but Stampin’ Up! also puts out a video that coordinates with your Paper Pumpkin! They’re short, cute, and give you a quick view on how to make the project. Remember, they give you full color directions in your kit too.
OK … so I was playing around with my November Paper Pumpkin and came up with this …
What do you think? All I did was take one of those left over hearts from another project and added it to the card! And a greeting.
I really would like to hear what you think of the Paper Pumpkin projects that I have shown you so far. If you would like to sign up … here is the link again.
My Paper Pumpkin / Sign Up Now
Have yourself an awesome day!
Stampin’ Kits at your door …
Hello Stampin’ Friends,
How many of you know what “Paper Pumpkin” is? OK, a few of you … well, for those of you who don’t know, it is simply a stampin’ kit that comes delivered to you each month. How sweet is that!
I will be sharing with you what to expect, what your first kit looks like, and some of the past kits that have been sent to those of us who are subscribers (it’s like subscribing to a magazine, but you get to make cool stuff … and you can unsubscribe at any time).
Here is how your “Paper Pumpkin” arrives … packaged nicely in this bright orange box.
Yes, it really does say “You’re moments away from your escape … Now you know why “I” love these, I’m all about the Stampin’ Escape!
Now open it …. Ooooooooooh the suspense!
YEAH!! … this is the kit you will get when you first sign up. It is our starter kit, named that because it comes with the clear block you will use for future kits.
The kit comes with everything seen here …
All you really need is your favorite adhesive and a few minutes. The directions (in color) are included in each Paper Pumpkin.
Here is a sample of what I did with one of the cards inside … I decided to play around a bit, just to show you that you can change it up, if you want to. Yes, you can embellish them more … and it’s fun!
I changed to position of my card from portrait, to landscape. Then I added one of our doilies and some pearls. I think it’s so cute.
Here are some of the other kits that I have done …
This cut little message board works great … in fact, I’ve been thinking about taking it to work with me. I need one place to right down our supplies, instead of a pile of loose notes!
The idea of sweet little book is to put snap shots and notes in for your everyday life … not over whelming for those who never scrap booked. But when I saw the “Top 10” flag, I knew I was going to put in my top 10 – my grandchildren! So look out kids, next sleep over – the camera will be out. Besides … I can’t wait to use the rest of those cute little wooden people – LOL!
I love getting these kits every month, a fun project to do with my granddaughters (sometimes my grandsons) It’s a great way to spend time with family or a friend … just get together.
If getting a package of a fabulous stampin’ kit each month wasn’t enough …. Stampin’ Up! will be adding a FREE set of the 2012-14 In-color Markers with your kit when you sign up before February 10th!!
AND if I get 10 NEW subscribers … I will send “ALL” my Paper Pumpkin subscribers a stack of matching cardstock! Yes, that includes my current subscribers, so tell your friends to sign up too.
You must subscribe through me (Linda Schnabel) and I must have 10 or more for ALL of you to receive the added coordinating cardstock. We can do it!!
I just think they are so much fun to do …
CLICK HERE TO SIGN UP NOW
Contact me if you have any questions. I’m here to help.
Thanks so much for taking time today to check out my blog and this awesome special.
A Sneak Peek “Hello” with deals included …
Hello Stampin’ Friends,
Hard to believe we’re coming up on the weekend already! I hope you have a nice relaxing weekend planned.
So yesterday I told you that I would incorporate some of the items from the “Weekly Deals” into my card, well I am excited to say I did that, and included another Sneak Peek (yes, I spelled it correctly today) Why is it that you never see the mistake until “after” you post / send your message. lol
Today’s card share will show you another design from the “Watercolor Wonder Designer Note Cards” … I really love these! They are so easy and fun to work with …. and they make us look like artists!
The “Weekly Deals” that I have incorporated are the “Needlepoint Border Embossing Folders”, the “Crushed Curry Chevron Ribbon” and the “Fancy Flower XL Punch”. Three on one card … not bad!
I began with the Needlepoint Embossing Folder, and used that as the anchor to my card (the one item that ties everything together).
Next, I punched out 2 flowers from the “Fancy Flower Punch” in the “Crisp Cantaloupe” and then sponged the edges with “Tangerine Tango” ink. I chose the color pallet based on the colors that were included in the new “Watercolor Wonder” Designer Series Paper … I’ll show you that tomorrow!
I wanted a center to my flower, so I tied a knot in the “Crushed Curry Chevron Ribbon” and pulled it through the flower. Then I added a ribbon banner to pull the color into the card.
I added the 1″ circle of vanilla … after I smeared my greeting and had to punch it out and add the “hello” on vanilla! You know what I say … there are no mistakes in stamping, just opportunities to change the card!
Hope you enjoyed today’s card. Don’t forget to check out the new items added to the “Clearance Rack Blitz”… just click on the link to check it out.
Thanks so much for stopping by.
Have a “Fantastic Friday!”
Here is the ingredient list for the card. Be sure to keep scrolling down so you can see the weekly deals.
|
ITEM |
PRICE |
DESCRIPTION |
|
$26.95 |
A Dozen Thoughts Stamp Set – WOOD |
|
|
$18.95 |
A Dozen Thougths Stamp Set – CLEAR |
|
|
NOW $12.71 |
Fancy Flower XL Punch (Was $16.95) |
|
|
NOW $6.71 |
Crushed Curry Chevron Ribbon (Was $ 8.95) |
|
|
NOW $5.96 |
Needlepoint Border Embossing Folder (Was $7.95) |
|
|
$10.95 |
Sponge Daubers |
|
|
Available January 3 |
12.95 |
Watercolor Wonder Designer Note Cards |
Clicking on the item number will link you to my on-line store.


