Heaven Has a New Angel …

Hello Stampin’ Friends ~

First, let me say THANK YOU to the sweet souls who return each day to my blog ❤

On Wednesday morning our good Lord took my sister Eileen home, no more pain, no more struggles … she is free.  I am blessed for having such an amazing sweet soul for a sister, and honored to have called her my best friend.  We parted with no words unspoken, no stone left unturned and we enjoyed so may amazing events (birthdays, babies, road trips, travels) and more “together”.

I thank her loving family for allowing me to “steal her away” from them so much!  Sometimes they laughed because we just saw each other and could still spend 3 hours talking on the phone! Those moments can’t be replaced but are stored in my heart until we meet again.

Right now my tears fall like rain, but I know she is still here with me and when I have finished my chores that the Lord has chosen for me, we will be together again.  She’s safe with my Mom and my sister Ruthie and the rest of our loved ones we have missed dearly.

Thank you for patiently waiting, I will be making cards again soon and sharing them with you because that was one thing that we did together and brought us closer than either of us could have imaged ❤ Another of Gods little blessings.

Sharing a piece of my heart …

Hello Stampin’ Friends ~

Just a quick post to let you know about the Sale-A-Bration Second Release …

I’ll be honest, I’m having a hard time keeping up with my blog posts. Yesterday we moved my sister Eileen into Hospice, it’s been a long hard fight.  She fought her cancer even as we lost our Mom only a year ago.  I have no words except that I have been blessed to have such a loving and amazing sister. When it comes to my stamping business … she is the wind beneath my wings.  We did everything together.

Eileen is on left … sisters by birth, best friends by choice ❤ We are on our patio here relaxing a bit on the Mexican Riviera Incentive trip. I’ve never noticed till now that we were “twinning” in our “Pool Party” colored shirts.  I am off of work today so I can sit with her… she was always there for me.

She loved making cards, and we both agree that the catalogs just keep getting better and better.  Here is one of the beautiful new stamp sets in the second release Sale-a-bration catalog …


The All Adorned Photopolymer Stamp Set … it’s perfect for creating backgrounds, focal points and more with these graceful designs. Here is another sample created with the All Adorned stamp set.


Thank you for joining me today and for letting me share a little part of what has kept me a Stampin’ Up! demonstrator for almost 19 years.  We have beautiful memories of all the amazing places we’ve gone to, and all the beautiful people we have met.  It’s an wonderful journey and I am so blessed and grateful to have shared this with my sister Eileen.

Have a wonderful day … and call your best friend ❤

Hawaii 2008 Stampin’ Up! Incentive Trip


Sweet, Sweet, Baby!

Hello Stampin’ Friends ~

Happy Valentine’s Day!! ❤

Have you noticed there are certain things you can count on always needing cards for: birthdays, thank you, and babies. Today I have the cutest cards created by our Stampin’ Up! offices. The first is Perfectly Paired from the Occasions Catalog … This caught my eye right away because of I a collection of all things Noah’s Ark.  This would make a perfect picture hanging in a child’s room!!

Also perfect for those of you who love to color … break out the Stampin’ Blends because this stamp set is perfect for them.  If you don’t have your blends yet, the watercolor pencils would be quick -n- easy and give you a totally different look.

The cute little gift bag is made with the Little Twinkle stamp set from the big Annual Catalog and coordinates with the Twinkle, Twinkle Designer Series paper!  This is a very versatile stamp set and I have it in my collection … along with the designer paper (I use it for many occasions!).   It also coordinates with the Twinkle Builder punch, Twinkle, Twinkle Cardstock pack and Twinkle Adhesive backed sequins!!

Here are a few more projects the “just twinkle” …

The cute little “Written in the Stars” gift card in the upper left hand corner and the “Love you More than the Star’s” in the lower right hand corner would be perfect for Valentines Day or a birthday.  I think birthdays are the perfect time to say “I Love You” …. heck, that’s everyday!

I wish you a warm and wonderful day today!

Be Happy ~


Guess Who’s Turning Six with a FREE Gift for YOU!

Hello Stampin’ Friends ~

Today’s post is going to introduce you to a upcoming card kit designed with “Birthdays” in mind … and a bonus FREE Stamp set included. What!??

It’s our birthday, and Paper Pumpkin is celebrating with an adorable kit filled with eight festive birthday cards that are sure to “pop!” You’ll love the cool party packaging. And for extra birthday fun, we’re sending our subscribers TWO stamp sets instead of one.

Oh, yes. You read that right. In March, you will receive TWO stamp sets with your Paper Pumpkin kit. Because it’s our birthday, we decided to create a kit that is perfect for making birthday cards!  Here’s a little hint …

  • The March kit features eight full-sized, mailable cards
  • Coordinating colors are Basic Black, Bermuda Bay, Daffodil Delight, Flirty Flamingo, and Poppy Parade
  • This kit has an element that is sure to “pop”!
  • The FREE stamp set is even bigger and better than your typical Paper Pumpkin stamp set and can be used on a variety of crafting projects.

You’ll love the cool party packaging. And don’t forget, we’re sending our subscribers TWO stamp sets instead of one.  Not a Paper Pumpkin subscriber?  Take it out for a test drive and discover the fun of a monthly stamping kits that includes everything you need to create adorable projects.

Sign up today

You can also purchase directly from me … Remember that the 3 month, 6 month, and yearly subscriptions qualify for Sale-a-bration FREE items!!

Let me know if you have any questions or concerns, and thank you for stopping by my blog today.  I will be back tomorrow with a “sweet” card!!

Have a good day ~

Annual Spring Stamping Retreat …

Hello Stampin’ Friends ~

When was the last time you got to escape and do something for yourself?
I have exactly what you need …
a Stamping Retreat designed from top to bottom to put you at ease
from the demands of the outside world and recharge your creativity.

I would like to personally invite you to join me at my Annual Spring Stamping Retreat!

You’ll enjoy your stay in a stunning 1930’s English Tudor Home on the shores of beautiful Green Lake. The surroundings offer a carefree setting for nurturing you and your creativity, allow you time for relaxation, and building new friendships.

Our retreat is ALL INCLUSIVE … Your lodging, all meals and your stamping projects are all included in one low price, so you can enjoy your stay and enjoy a true relaxing getaway.

Join us and let the stress of the work week drift away with the tide.

Our Stamping Sessions … 

are held in a spacious, light filled meeting room and includes everything you need (cut and prepared for you) to create exceptional cards and projects in a relaxed, stress free environment

Your Retreat Room … christian writing center bedroom

is inviting, clean & comfortable. We are NOT “dorm style” so you and your friends can enjoy some well deserved “girl” time together in the comfort of a home (not hotel room). You’ll also find little surprises each night.

Your Weekend Meals …

Sit back and relax while enjoying wonderful home-cooked meals, desserts and snacks during your entire stay. Five full meals are included… and so is the chocolate!!  Coffee, tea, and bottled water are also provided throughout your stay.

You’ll find our All Inclusive Stamping Retreats affordable and private, spacious and splendid … you will enjoy this relaxing getaway and come away with fabulous completed projects, new ideas, stamping tips, and new friendships.


RETREAT DATE: May 3rd – 5th, 2019

COST: $250 Early Bird /RSVP & Payment due by Feb.23rd

After Early Bird Special / Cost = $275 & Paid by March 31st.

RSVP at 262-334-1009

Our retreats are based on a first come, first serve basis.  Only payment reserves your spot.

Once received … Registration will be confirmed, and details will be sent to you; including directions, Swap Information, & More.


Hope you are able to take some time out for yourself, relax, meet new people and have a fun weekend creating fabulous stamping projects! The work is done for you … Call your friend, bring your sister or have a mother/daughter weekend.  You’ll be making much more than cards, you’ll be making memories ❤ 

My information is listed below …


  Linda’s Stampin’ Retreat
Linda Schnabel | 262-334-1009
Email: lindaluvs2stamp@aol.com
Website: http://www.lindaluvs.stampinup.net
BLOG: http://lindasstampinescape.com

Kindness Matters

Hello Stampin’ Friends ~

I hope you had the chance to check out my post from yesterday where I introduced the Notes of Kindness Card Kit and shared an alternative project to those shown in the kit.  Today I have 2 more alternative projects to share with you.  Here are the four original designs …

Today I am going to feature the card with the leaf background … it’s in the upper right-hand corner above and my alternative is below ~

I used the same flower that was used in the kit layout but instead of adding the big die cut “Thank You” … I added a few of the die cut strips to add some color and then I stamped my greeting directly on the pink one.  This is truly a quick and simple card to make.  I did add the pretty “Share What You Love” Artesian Pearls.

My next card is the last of the four backgrounds … the color wash (I love it)!!

Who said you cannot say Thank You in any language … and why not French, it’s so pretty.  On this card I decided to use the die cut “Merci” as my greeting … it actually highlights the floral arrangement.

I began my arrangement by looping the pretty cord behind my flower.  The cord is secured with dimensionals and then attached to the pink and white die cut strip.  Although this strip has adhesive on the back … I wanted it raised, so I added 1/2 of the leaves sheet and then popped it up with Dimensionals.

I finished off the card with a few pearls … quite easy to make and oh so pretty.

Thanks for joining me this Monday! I hope it is a good day for you.

TODAY’S STAMPIN’ SUPPLY LIST …


SIMPLY SUNDAY: Notes of Kindness

Hello Stampin’ Friends ~

Sorry for the late post today … I had family obligations the needed my attention.  This is one of the benefits of this business … I can put it on hold for a short time if needed.

Today I’d like to share with you two cards that I have created with the All-Inclusive Card Kit; Notes of Kindness.  This card kit is perfect to have on hand if you need to make a quick card here and there, it also makes the perfect gift! You can gift it just the way it is, if your friend or family member is somewhat familiar or new to stamping, or you can create all the cards and tuck them into this pretty box. Everything you need is included!

As you can see … the cards, envelopes, embellishments, stamps, block and ink spot are all included, and it come with instructions on how to build your cards.  Just assemble and go!  Today I’ll be showing you one of the four (4) different cards and then an alternative card that I created using the products in the card kit.

Let’s start with one of the designs from the kit …

The card base comes with the lines on it … the banner is pre-cut and has adhesive on the back so you just place it on the card front and it’s set.  The leaves can be applied with your adhesive or you can use the dimensionals which are also included in the kit.

The square piece just pops out and has the stitched edges that are so popular.  The greeting is one of 6 stamps included in the set and the black ink is also included.

Now lets take a look at the alternative project that I made using the supplies from only this kit …

On this card, our leaves are on the background … the colors give it the illusion of depth.  The strips of cardstock are pre-cut and also have adhesive on the back, but I trimmed them down to fit onto this layout of the card.  I will use the leftovers on another card design.  The Thank You is also included and really pops when I place them on top of the colored strips.

The pretty little pearls are also included in this card kit and work well at drawing your eye towards the greeting!  Did I mention the all-inclusive card kit also contains coordination envelopes? Well … it does!!

Again, this is the perfect card kit to give as a gift or to keep on hand when you need a quick yet beautiful card. One more awesome thing about our kit is … It’s REFILLABLE!! How cool is that.

Thank you so much for stopping back today. Tomorrow will share 2 more samples 🙂

Have a wonderful rest of your day ~

STAMPING SUPPLY LIST …


Spring Butterflies …

Hello Stampin’ Friends ~

Are you ready for spring?  With all this snow and below zero temperatures, I a sooooo ready for spring.  Warm sunny days, flowers and butterflies! Today I have some cute samples of butterflies for you … I think our Sale-a-bration Butterfly Elements are just Grand!


The pretty little butterflies are our Butterfly Wooden Elements that you can get for FREE during our Sale-a-bration period.  The spectacular greeting comes from our “Life is Grand” stamp set which is found in our Occasions Catalog on page 17.

Grand words for you to add grandeur where it is needed. This Distinktive stamp set makes it easy to create eye-catching projects.

The next grouping of card samples comes from the Butterfly Gala stamp set and accompanied with our Butterfly Elements again …

I

I hope

I hope that these cute card samples warmed your day … I’m sure they will warm someone’s heart when you copy any of these samples and send them to a friend or family member.  Cold days are great days to get some stamping done …

Enjoy your Saturday and thank you for checking in on me today.

I’ll be back tomorrow with my Simply Sunday series of cards.

Sprinkled with Love …

Hello Stampin’ Friends ~

You’ve seen some cute samples from our Sale-a-bration catalog … Well, I’ve got more for you today!!

I don’t know about you but the Hello Cupcake is a fun and easy way to say Happy Birthday, and with the release of the coordinating Thinlits dies in March, it just adds the cherry on top!!

The banner on the top card gives some great dimension while the sequins adds some texture and a touch of bling.

Those dies are going to come in handy if you want to recreate our center card and celebrate the day.  I love the technique of creating your background by stamping the greeting and then using the Vellum Cardstock to highlight your cupcakes.

Our last of the cupcakes also uses the Vellum Cardstock but showcases the “Sweet Wishes” by stamping right on it while still allowing your cupcake to peek through.  And the candle embellishments really add a nice touch to this gift card.

The next card is teasing you with the new “All Adorned” stamp set which is part of the Second Release to our Sale-a-bration catalog.  This is perfect timing for my “Sweetheart of a Deal” because using the Stamperatus with this set will give you perfect placement of your corner images.


main image

Here is my Sweetheart of a Deal … remember the second release items become active on the 15th of February.

Thank you for stopping by my blog today. Let me know if you have any questions with it’s contents.

Have a fabulous Friday ~

Our favorite party just got better …

Hello Stampin’ Friends ~

I’ve got two great announcements for you today and a few more card samples!! First, lets start with an addition of new products coming out in a few days to celebrate our Sale-a-bration.  The NEW items will be available February 15th!!

Sale-A-Bration Second Release …

So lets take a look at these goodies … there is a peek in the photo above!


These cute cards were created with the NEW Painted Seasons Bundle.  This bundle can be yours with a $100 purchase and includes not only the 7 piece stamp set but the Designer Series Paper which showcases hand-painted imagery for each of the seasons. 12″ x 12″. Acid free, lignin free, with 12 sheets: 3 each of 4 double-sided designs.  Perfect for you stampers who keep going all year long!

Our second announcement is NEW to Sale-a-bration!! Our favorite party just got better …

Stampin’ Up! has announced a Sale-A-Bration Coordination … these are exclusive products that coordinate with our current Sale-A-Bration items.  These are going to rock your world.  If you looked closely at my cards yesterday, you would have seen the dies that coordinate with the Hello Cupcake Stamp set, and there is more …

They have created coordinating dies to pair with the Lasting Lilly and Oh So Happy Stamp sets.  Not only that … they have introduced a new stamp set “More than Words” that will coordinate with all the stamp sets. It’s a great set to add to your stamp collection.

Here are the items from Sale-A-Bration Coordination that will be available to purchase on March 1st, 2019. 

So … What do you think? Awesome Right. I love the introduction of not only new Sale-A-Bration items but the Sale-A-Bration Coordination where you can purchase the die cuts to your favorite stamp sets.  I will be sharing more samples from the addition to our Sale-a-bration catalog!

Want to know something really cool? When you purchase the coordinating products, you are qualifying for more FREE Sale-A-Bration items. Woo Hoo! Let me know if you have any questions about the products I’ve shown you today, or if you would like to schedule a stampin’ party.

Thanks for stopping by today ~

Have a wonderful Wednesday!


Everyone Loves Cupcakes!

Hello Stampin’ Friends ~

Today I’m featuring Hello Cupcake, Stampin’ Up! Sale-a-bration item of the week

Mmm . . . cupcakes. This Distinktive stamp set makes it easy to create projects that look good enough to eat. Top with sweet wishes, and your project’s complete. It comes with 10 photopolymer stamps in the set.  Here are the suggested clear blocks (sold separately): a, b, c

Hello Cupcake is too delicious to pass up. The whimsical shading in the cupcakes adds a fun element to birthday cards that your friends and family are sure to enjoy.

How cute … Create a coordinating gift bag with your card. Perfect for baby showers, birthdays and just to send a little cheer (with a cupcake of course).

Thank you for stopping by today ~

Hope your day is a good one.


Annual Spring Stamping Retreat …

Hello Stampin’ Friends ~

When was the last time you got to escape and do something for yourself?
I have exactly what you need …
a Stamping Retreat designed from top to bottom to put you at ease
from the demands of the outside world and recharge your creativity.

I would like to personally invite you to join me at my Annual Spring Stamping Retreat!

You’ll enjoy your stay in a stunning 1930’s English Tudor Home on the shores of beautiful Green Lake. The surroundings offer a carefree setting for nurturing you and your creativity, allow you time for relaxation, and building new friendships.

Our retreat is ALL INCLUSIVE … Your lodging, all meals and your stamping projects are all included in one low price, so you can enjoy your stay and enjoy a true relaxing getaway.

Join us and let the stress of the work week drift away with the tide.

Our Stamping Sessions … 

are held in a spacious, light filled meeting room and includes everything you need (cut and prepared for you) to create exceptional cards and projects in a relaxed, stress free environment

Your Retreat Room … christian writing center bedroom

is inviting, clean & comfortable. We are NOT “dorm style” so you and your friends can enjoy some well deserved “girl” time together in the comfort of a home (not hotel room). You’ll also find little surprises each night.

Your Weekend Meals …

Sit back and relax while enjoying wonderful home-cooked meals, desserts and snacks during your entire stay. Five full meals are included… and so is the chocolate!!  Coffee, tea, and bottled water are also provided throughout your stay.

You’ll find our All Inclusive Stamping Retreats affordable and private, spacious and splendid … you will enjoy this relaxing getaway and come away with fabulous completed projects, new ideas, stamping tips, and new friendships.


RETREAT DATE: May 3rd – 5th, 2019

COST: $250 Early Bird /RSVP & Payment due by Feb.23rd

After Early Bird Special / Cost = $275 & Paid by March 31st.

RSVP at 262-334-1009

Our retreats are based on a first come, first serve basis.  Only payment reserves your spot.

Once received … Registration will be confirmed, and details will be sent to you; including directions, Swap Information, & More.


Hope you are able to take some time out for yourself, relax, meet new people and have a fun weekend creating fabulous stamping projects! The work is done for you … Call your friend, bring your sister or have a mother/daughter weekend.  You’ll be making much more than cards, you’ll be making memories ❤ 

My information is listed below …


  Linda’s Stampin’ Retreat
Linda Schnabel | 262-334-1009
Email: lindaluvs2stamp@aol.com
Website: http://www.lindaluvs.stampinup.net
BLOG: http://lindasstampinescape.com

Simply Sunday: Hand Delivered

Hello Stampin’ Friends ~

Today I’d like to share yet another card that I created with the help of the Stamparatus and the Oh so cute “Hand Delivered” Hostess stamp set!  Yes, this is one of our exclusive stamp sets for those who host a stampin’ party or purchase enough to qualify as a hostess.  You can also have a book party too … just pass the catalog and let your friends & family pick out what they need … Remember, it’s Sale-A-Bration so each $50 (before S&H) purchase qualifys for a FREE Sale-A-Bration item.

This is such a cute stamp set and contains 7 different greetings!  Besides the poster you can put the greetings on, there is also a cake, balloons and books.  Take a look at the stamp set …

Get Well cards are requested all the times, and this stamp set is so sweet.  When deciding how I was going to create my card, I decided to “send” flowers with it, in the form of our designer paper … the stunning Petal Promenade Designer Paper.  The pattern I used had a lot of the Blackberry Bliss in it.  I did the “Happy Dance” when Stampin’ Up! brought this back!

When I cut my designer paper, I cut it in 4″ x 6″ pieces and use it for card fronts … I just cut off 3/4″ off the 6″ edge so I end up with a 4″ x 5-1/4″ … think I printed that wrong on my photo!!  But you can see I tucked it in the inside to decorate that too.

The coloring and the greeting were all done in Blackberry Bliss and I couldn’t resist using the new Petal Pink Rhinestone Gems … the compliment the Blackberry Bliss so beautifully.

Don’t forget that when you are working with a Photopolymer stamp set on the Stamparatus, you will need to use the foam mat this is included with the Stamparatus.  I always have my Silicone mat underneath … just always have it there!

Here are a few more samples that were created with the Hand Delivered stamp set ….

The Hand Delivered stamp set just stole my heart, and I hope that you enjoyed the samples shared today.  This maybe an exclusive Hostess stamp set but just by passing the catalog around, hosting a stamping party of purchasing enough to qualify as a hostess, it can be yours too.

Thanks for hanging out until I got my blog posted today … I appreciate your loyalty and patience.

Have an awesome day ~

Today’s Stampin’ Supply List …


Stamparatus “Sweetheart” of a Deal Bundle …

Hello Stampin’ Friends ~

My, my, my … it’s about 70° warmer today than it was 3 days ago!!  Even 20° felt warm yesterday!! lol   Speaking of yesterday, I hope you enjoyed my Mirror Image card. It was fun and easy to make with the Stamparatus!

Today I’d like to share more cards that were created using the Stamparatus!!   You can use your Stamparatus to create “ANY” card … it’s especially useful you are making repetitive cards such as Birthday invitations, Save the Date cards or your Christmas cards.

It also creates the fun techniques like the Mirror Image above or the “Hinge Technique” below …

The Hinge Technique is unique to our stamp positioning tool (the Stamparatus) because of the removeable plates!  The hinges allow you space your stamping equally each time. So pretty!

I think this is perfect for our craftin’ sisters (or brothers) who are NEW to Stamping.  It helps in the placement of the stamped images and if it doesn’t stamp the best the first time … just re-ink and stamp!  Walla … perfection!  Next is a simple card that is a great example of stamp placement ….

If you’re new to stamping I will show you how easy it is to place your stamps on the Stamparatus to ensure repeatable perfection.   If you’re ready to try your hand at the magic of the Stamparatus, let me sweeten the deal for you ….

First, we are in our Sale-A-Bration celebration so with a $50 purchase you can choose a FREE Sale-A-Bration item … You will also get a Virtual Rewards Point from me AND I will send you a tutorial for “each” of the three techniques shown here today.  You will receive a PDF file showing you how to do the Basic Set up, the Mirror Image and the Hinge Technique during the month of February.  This offer will end on February 28th, 2019.

Here is my suggestion to hit your $50 goal …

Supply List

You can click on the images to learn more about the products … you will need the Silicone Craft sheet to do the Mirror Image technique, however, I use it all the time … it just gives the “pad” that’s included a little lift for stamping images close to the hinges.
Please let me know if you have any questions.  One More Thing … I will be sending you a Special Gift and Hand Stamped Card when you purchase my Stamparatus “Sweetheart of a Deal” Bundle.


Stamparatus MIRROR IMAGE Technique …

Hello Stampin’ Friends ~

Yesterday I shared a video with some great tips while using the Stamparatus, today I’ve got a cute card for you that features a fun technique by using the Stamparatus!!  I’m going to show you how easy the “Mirror Image” technique is … and with the precision stamping of the Stamparatus, it makes it super simple!!

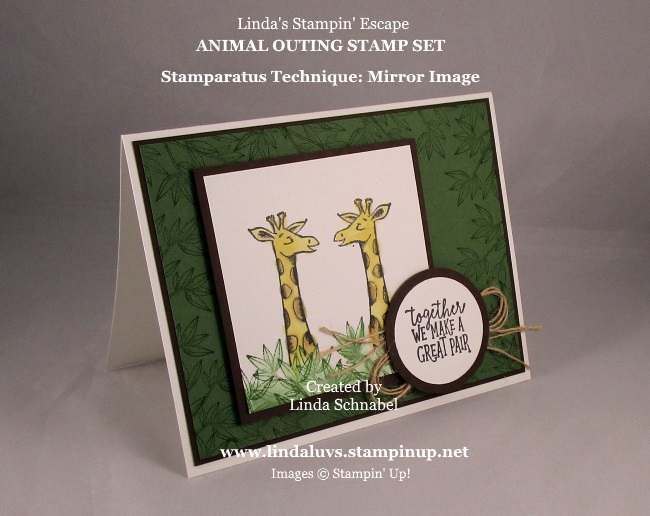
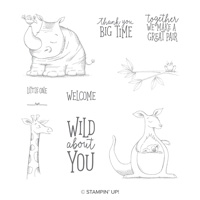
This is the card that I used to teach the Mirror Image Technique during my Stamparatus Class.  The stamp set is the Animal Outing set found in our Annual Catalog.  I will give you Step by Step instructions along with photos …

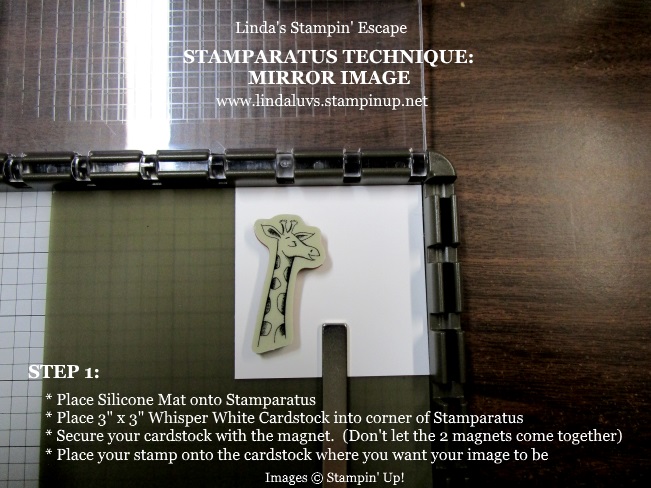
The first thing you want to do is set up your placement of the stamp.  You will place your stamp on your piece of cardstock “where” you want the stamped image.  Once it’s placed properly, bring your plate (you can see it above our stamp) over the stamp and press firmly to pick it up.  You do this just as you would on your blocks.

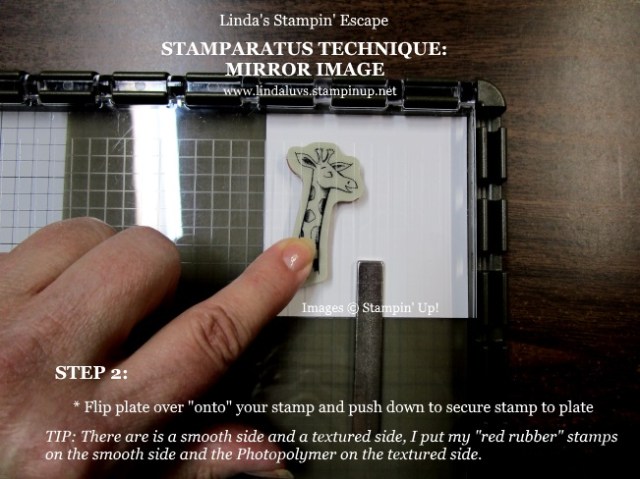
Here you can see that I brought the plate down over the stamp and with my finger I put a little pressure on the plate to pick up the stamp.  Once  you have picked up the stamp … you will flip the plate back up and ink up the stamp with Momento ink.  Do not use StazOn … it’s permanent ink and will remain on your silicone pad.

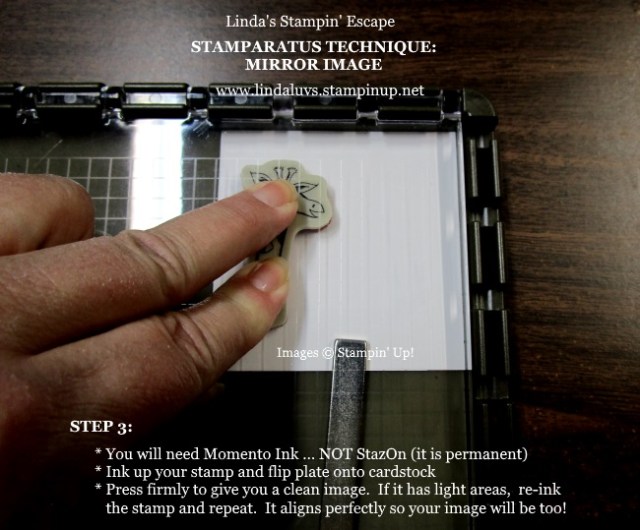
I always give my stamp a firm little push to make sure the paper is picking up the ink.  You can always re-ink and re-stamp … because the Stamparatus is a stamp positioner, it will stamp directly in the same spot (as long as you are not moving your cardstock).

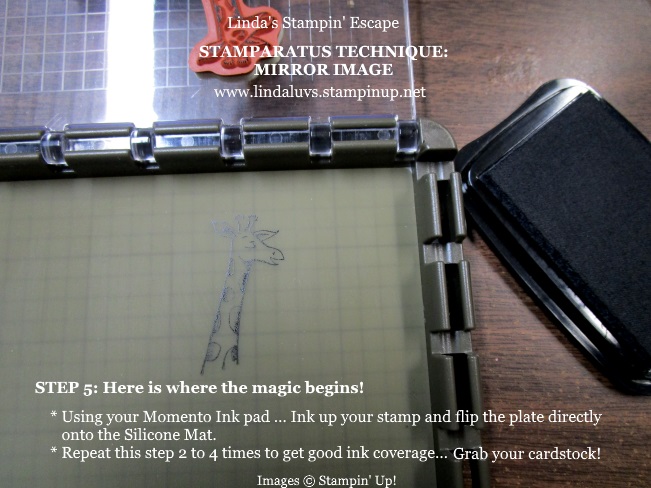
Once you’ve stamped your image to your liking … It’s time to remove your cardstock.  Get your Momento ink and ink up your stamp again and stamp directly onto your Silicone mat.

You will want to ink up the stamp and stamp the Silicone pad several times so you have “good” ink coverage.  When you have a nice layer of ink on your Silicone pad … get your cardstock again.

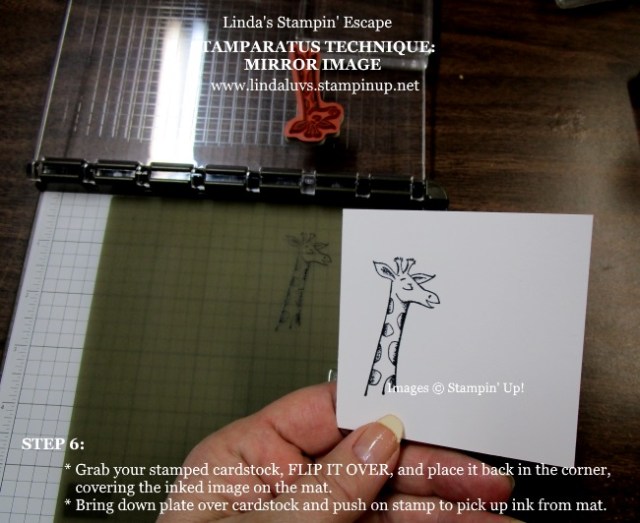
FLIP OVER THE CARDSTOCK so the image is placed against the silicone pad … you should not see any stamping on your cardstock.  Tuck the cardstock back into the corner of your Stamparatus, then bring the plate over your cardstock and apply pressure to the stamp so you pick up the ink on the silicone pad.  The picture would look exactly like STEP 3.

Now it’s time to pick up your cardstock and see the magic …

If you look closely you can see a very light image left on the silicone pad … most of the ink is now on your cardstock and you have created a mirror image!  Wasn’t that easy!!

I have a few more tips to show you how I finished the card.  We stamped our own background on our Garden Green cardstock using Garden Green ink …

Because there is a little froggie sitting at the end of our branch, we simply inked only the leaves.  These were stamped on the Garden Green to create the background, and then again as foliage around our giraffes.

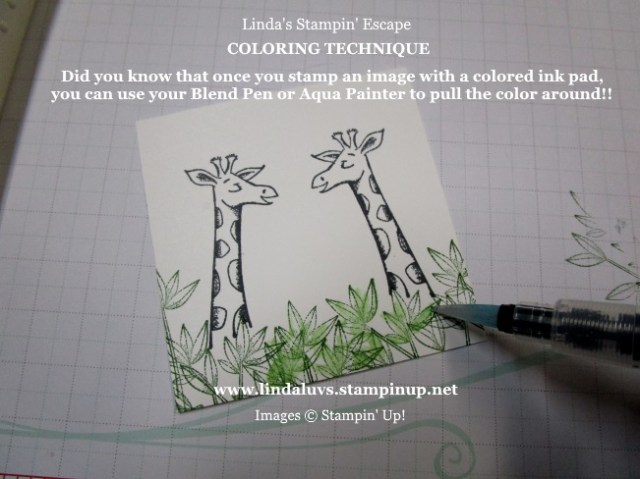
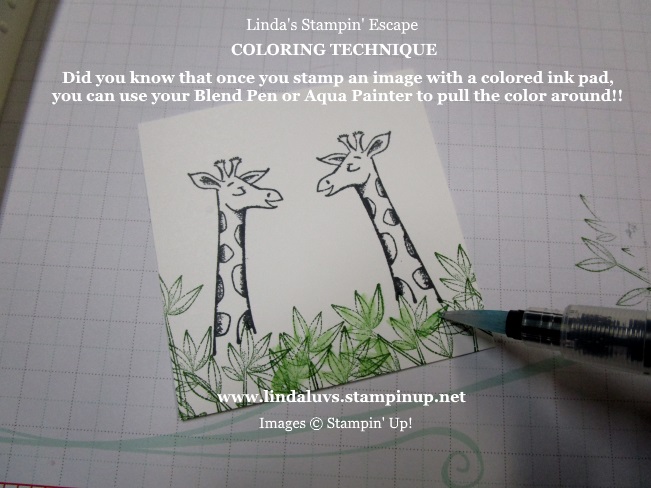
After we stamped the leaves around our giraffe, we used the Aqua Painters to pull the color from the stamped image to color itself … isn’t that cool!!

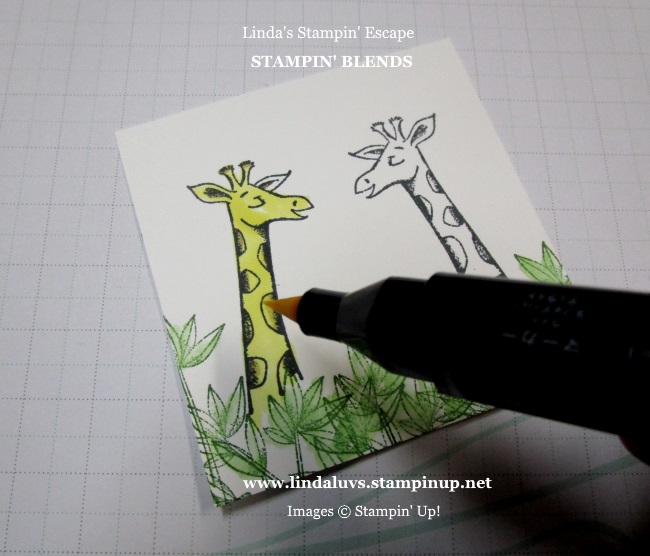
We used the Stampin’ Blends to color our giraffe … the Light Daffodil Delight and the Light Crumb Cake for the spots.  You’ll see this better on the finished card.

Here you can see the Crumb Cake on the spots and the leaves stamped to create the background.  I did that technique a lot before Stampin’ Up! gave us so many amazing designer papers.

The greeting also comes from the stamp set and was punched out with our circle punches.  All of our stamped cardstock was backed with Early Espresso cardstock. I finished off the card with strings pulled from the Burlap ribbon.

I just adore this card, and we had a great time making it … because it was so easy to do.  The ladies were pleasantly surprised and oh so happy that they could create this card with ease.  Hope you enjoyed it as much as we did.

Thank you for joining me today. Please message me if you have any questions about the Stamparatus or the Mirror Image Technique.

If you like the card you saw today, I have the items listed below. You can click on any item to learn more about the product or to begin your shopping.  Remember, for each $50 you spend, you may choose a FREE Sale-A-Bration item and get a Virtual Rewards point from me!!

TODAY’S STAMPING SUPPLY LIST … 

http://