Sweet Music …

Hello Stampin’ Friends,

Today is a quick and simple post for a quick and simple card.  Inspired by the group of ladies who participated in my “Timeless Talk” class, I’m sharing another card using the paper design they suggested.

000_0105

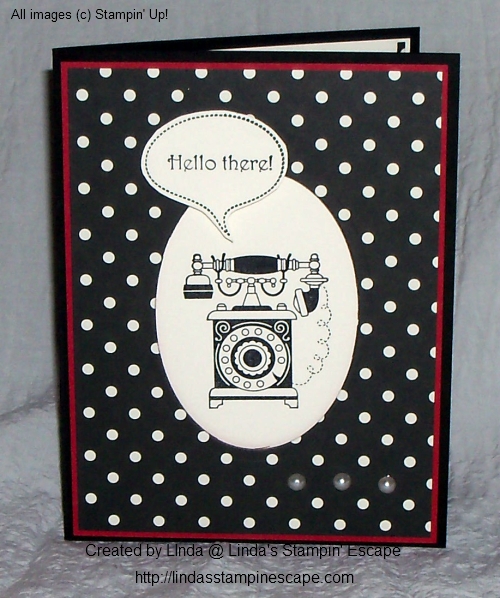
They thought that this pattern from the Modern Medley Designer Series paper would work great with this stamp set … so here it is.  I think they are right, don’t you?

With a little help from my BigShot and the Circle Collection Frame-lits, I highlighted the phonograph.  This sweet but simple card would work nicely for a birthday or just to “send a note” to your friend.

I added a few banners from scrap pieces of the Modern Medley paper and tied it all together with the beautiful “Crochet Trim”.  Everything you need to make this card can be found in our current catalog.

Here is the list of ingredients to make the card:  You may click on the item numbers and it will take you to the catalog page.

126605

Timeless Talk Stamp Set – Wood / $22.95

126607

Timeless Talk Stamp Set – Clear / $16.95

126926

Modern Medley Designer Series Paper / $10.95
118481 Crochet Trim / $6.95
113439  BigShot Die Cutting Machine / $99.95
130911  Circles Collection Frame-lits / $26.95

Have a great day and I’ll see you tomorrow!

blog closing-small

Sweet and Simple Birthday …

Hello my stampin’ friends,

How are you today!  I wanted to take a step back from the Holiday catalog and create a simple birthday card for you.

I love our Designer Series paper, you have seen it on many of my cards recently.  It’s because it can make card making so easy.  Our birthday card today showcases the “Birthday Basics” designer paper.  I think I’ll use this paper again this week so you can really see how perfect the patterns are for your celebration creations!

130145L

I chose the “Bermuda Bay” from the designer paper for my coordinating cardstock, it’s fun and bright.

The stamp set I’m using is “Bring on the Cake” from our catalog – page 14.  It’s a great birthday set to have, all of the different fonts will work well with the many styles of birthday cards we need to make (from young to … well, not so young).  I’m in that … not so young group, and lovin’ every minute of it.

128490L

Oh ………………. would you like to see the card!

I’m such a tease, my club members are used to me describing or showing them how to do the card, before they actually get to see it!  I guess I just like to build up to that excitement.  Drum roll please!

Remember, I did say it was simple …

000_0100

It is simple, but it is sweet.  I love using the framed punch technique, so easy to create but it really has a bit of a “WOW” factor.  Gotta’ love that “Dotted Scallop Ribbon Border” punch.

Here are the steps to make your punched frame…

Begin with a 3″ x 3″ square.   Slide your cardstock into the punch and CENTER the cardstock for each side before punching.  That’s it … simple.  It’s the 3″ x 3″ that makes it work so easily.

The cardstock for your greeting (if you want a bit of a border around the edge like I do) cut your cardstock to 1-7/8″ x 1-7/8″ or for more of a border … 1-3/4″ x 1-3/4″.

I have here the list of ingredients for you.  You may click on the item numbers for your shopping ease if you are from the US.  (I would like to send a shout out “HELLO” to my friends from Canada, Australia, New Zealand, the United Kingdom, and India for visiting my site this past couple weeks!  Thank you)

128490

Bring on the Cake Stamp Set – Wood / $38.95

121958

Bring on the Cake Stamp Set – Clear / $27.95

130145

Birthday Basics Designer Series Paper / $10.95
119247 Pearls – Basic Jewels / $4.95
119275  Dotted Scallop Ribbon Border Punch / $15.95

I must admit, I had a bit of a struggle not adding more to the card but I had a request to keep it simple.  Isn’t that how we want life?

I also want to thank all my many US friends who follow my blog.  I am truly honored that “all” of you take time out of your day to visit my blog.  Let me know if there is something “you” would like me to share.

Enjoy the day and thank you again for stopping by.

blog closing-small

It’s All About the Candy!

Hello Stampin’ Friends,

It’s Monday again… and we start another week.  I spent the entire weekend creating and cutting Christmas cards for my upcoming Stamp Camp.  I know, it sounds crazy but now is the perfect time to get a sneak peek and your hands on all the new Christmas sets and accessories in the Holiday catalog.

In keeping with the Holiday catalog, I created a cute card for you today.  It is not “Christmas” but yet another fun holiday …. Halloween!  I just have to share another Halloween idea, I enjoy it too much.

000_0095

Today’s card uses the stamp set “Halloween Hello” and the “Witches Brew” Designer Series Paper.  Love the paper … I think I’m going to frame this sheet and take it down to the candy store with me!  What do you think about that idea!

000_0098

I really was thinking about the candy shop when I was creating this card.  I just completed my first two weeks there.  The card was really simple to create, something that many of my stampin’ friends (customers) appreciate.  Everyone is so busy, quick and simple is always a good thing.  Don’t worry … I’ll share some “embellished” card samples too.

The color pallet came from the Witches Brew designer paper shown below: Summer Starfruit, Pumpkin Pie, Basic Black and I switched it from Very Vanilla to the Whisper White.  I wanted my candy to “pop”.134925LI have to share with you a fun technique that I love to do… “color” my rhinestones!  As long as you have a “Sharpie” … you can have any color rhinestones you want.  I must say, I really do like black rhinestones!  It’s a fun, inexpensive embellishment.  You can also color the pearls too!   I’m telling you – you will fall in love with this technique.

000_0097

Here is a list of the ingredients used for the card.  To make ordering easier, you can just click on the item number and it will take you to that page.  Or you may contact me, I would be happy to help you with your stampin’ needs.

131718

Halloween Hello Stamp Set – Wood / $18.95

131721

Halloween Hello Stamp Set – Clear / $14.95

132185

Witches Brew Designer Series Paper / $10.95
119246 Rhinestones – Basic Jewels / $4.95
119253 1/8” Taffeta Ribbon –  Pumpkin Pie / $5.95
119261 1/8” Taffeta Ribbon – Basic Black / $5.95
122344  Postage Stamp Punch / $15.95

Hope you had a wonderful weekend.  I’ll see you back here tomorrow for another fun card!

Have an awesome Monday!

blog closing-small

Great new product announcements …

Hello stampin’ friends,

Happy Sunday to you …

I am really excited to share with you the release of the new “Stampin’ Trimmer Rotary Addition and blades”.  You can find them on page 176 and 177 of the Idea book and Catalog or the Holiday catalog – pg. 24.

I watched the demonstration of the rotary additions at convention and new right then and there that I just had to have these … remember that “deckle” scissors we used to have, well the “tiny wave” cutting blade will be just as much fun, and easier!!

I have included the Stampin’ Up! training video for you to watch.  You’ll not only hear about the new rotary additions, but a few reasons why the new trimmer is a must have tool for your stampin’ and scrappin’ collection.

I have included the order numbers along with the descriptions.  To make your ordering easier … you can click on the order number in the table below to order these items or CLICK HERE to go to the Stampin’ Trimmer page of my on-line store.

129407

Stampin’ Trimmer Rotary Addition / $12.95
* Includes rotary track and handle and a straight-edge blade

129408 Straight Stampin’ Trimmer Rotary Cutting Blades / $5.95
129409 Tiny Wave Stampin’ Trimmer Rotary Cutting Blade / $3.95
129410 Small Scallop Stampin’ Trimmer Rotary Cutting Blade / $3.95
131375 Stampin’ Trimmer Replacement Cutting Mat / $3.95
132788

Perforating Stampin’ Trimmer Rotary Cutting Blade / $3.95

Yesterday I posted the adorable “Halloween Banner”… today I am sharing the Stampin’ Up! video showing you how you can make the banner.  It includes great tips (like the Silicone pad) for hot gluing your project.  I love the Silicone pad – I use it when I’m adhering thin strips of cardstock or ribbon to my projects, it keeps the “snail” off my workstation.

I have included the order numbers for the banner to make your ordering easier.  FYI … they also have a Christmas banner!

133507

Build a Banner Simply Created Kit / $19.95
132698 Halloween Banner Simply Created Accessory Kit / $9.95
132699  Banner Simply Created (Refill) Kit / $9.95

To view both kits and the accessory kits … CLICK HERE and it will take you directly to the page.  Thank you.

I hope you enjoyed today’s video tutorials and new product release.  There’s so much more to show you … keep coming back, I have more for you.

Have a great day!

blog closing-small

Cute Halloween Projects …

Hello Stampin’ Friends,

Today I’d like to share with you some fun Halloween projects that I have done in the past and a cute new project Stampin’ Up! has in our Holiday catalog.

With Halloween fast approaching, I thought today’s post would be fun.  Halloween is the second most celebrated holiday … well at least in the “decorations”!  I think it’s because we all get to be kids again … it’s so much fun and you don’t have the stresses the seem to come along with Christmas.

So, my first little project is “Frankenstein” … we made him at a downline retreat.  “Downline” are the people who have joined Stampin’ Up! under me.  I used several punched scalloped circles and layered them together to create the spider.  If you would like to know more… post your comment and I’ll share the tutorial.

Not much stampin’ on this one, but he is so cute and the kids used him for their “trick or treat” bucket!  You can also create mummmies, and pumpkins in the same fashion.

000_0196

My next project share is this cute little gum packet … what a fun surprise for when you give this to your co-workers, friends or your favorite teacher.  It’s easy!  Just wrap your gum packet with the desired color cardstock and secure in the back.  To create the front stamped panel: cut your cardstock slightly smaller than the front of the package.  A little measuring is required, but still so easy to do.  Then just stamp any images you want to create a fun gift.

October 04 009

This cute card was made by my sister and downline member Eileen.  We did a Halloween swap for one of our meetings… it was a hit!  She began by creating a template for the coffin, put the top edge to the “fold” on your cardstock and cut, this will give you a coffin that opens.  The face was created with circle punches.  To create the hair simply use the scallop punch to punch out the hair line on a black circle.  The mouth is done with punching a partial piece out of the initial circle and then cutting it in two pieces … spacing the mouth gives you the appearance of teeth!  Cool … right!Eileen

And for my final project share …. this beautiful Halloween banner!  Stampin’ Up! has put together a kit … yes, a kit, so you can create this hand made project in no time at all.  You will need the “Build a Banner Kit” (133507) which also works with the Christmas banner, and the “Halloween Banner Accessory Kit (132698).  How cool is that!

CM1468B

132698S

If you click on this picture, it will take you to the catalog page to view.

Below are the contents to the “Halloween Banner Kit” … you will also need the Build a banner kit.  Again, by clicking on the photo above, it will take you to the catalog page so you may view the kits together.

Halloween Banner Simply Created Accessory Kit

132698

Price: $9.95

Make accents for a Halloween banner: paper and centers for 4 rosettes, 3 glittered die-cut accents, 2 18″-pieces of Basic Black 1/8″ Taffeta Ribbon, 2 18″-pieces of Basic Black/Basic Gray 1/2″ Striped Satin Ribbon, 36″ Pumpkin Pie 1/2″ Seam Binding Ribbon, 5 Black Vintage Faceted Designer Buttons (exclusive to this kit), 5 Summer Starfruit Designer Buttons. Coordinates with the Banner and Build a Banner Simply Created Kits.

SIMPLY TIMELESS …

Hello Stampin’ Friends!

I can’t believe it’s Friday already, however I am sure there are some of you who are sayings … “It’s Finally Friday”.   Time seems to be flying by, which brings me to today’s post.

Last night I hosted a stamp class using my favorite new stamp set in the Idea Book and Catalog… Timeless Talk.  I love the nostalgic look of this set and have probably said so a million times.  The class was based upon 3 simple ingredients.

000_0087

First and foremost is the “Timeless Talk” stamp set (Wood – 126605 / Clear – 126607) found on page 19 of the catalog.  Second is the “Modern Medley” Designer Series Paper (126926) that is on page 164.  And the last ingredient to the class was the Basic Pearls (119247) on page 171.

I held true to the coordinating colors of the “Modern Medley” Designer Series Paper … Basic Black and Very Vanilla.  I also added a splash of Real Red on a couple of the cards.  On this card I added the “Real Red” (119247) Stitched Ribbon.  This card really reminds me of yesteryear… when days were calmer, and more relaxed.

000_0091

We had a nice time in the class and talked about how this precious stamp set brings back memories.  We also had a good laugh as we discussed “party lines” …  something kids now days would not understand.   And phone numbers were not as long as your social security number.  Our old number was 4-7725! THE GOOD OL’ DAYS!

If you are interested, I would be available to host this class for you and your friends … just contact me ( lindaluvs2stamp@aol.com ).

Enjoy your day  … and remember, the weekend is almost here!

blog closing-small

JOYFUL CHRISTMAS …

Hello Stampin’ Friends,

Today I am “joyful” and I’m sharing with you another Christmas card.  I know many of my stampin’ friends are already planning their cards, so here’s another sample from the beautiful “Joyful Christmas” stamp set (Wood – 131802 / Clear – 131805) … and you can find that in our Holiday catalog on page 27.

000_0085

I have been dying to use my new “Stylish Stripes” Folder (132174) also in the holiday catalog on page 22, and it became the focus on the card.  My decision to use the poinsettia came later.  I saw a card from fellow demonstrator  LeeAnn Greff, who used strips of designer series paper between the lines from the folder… loved the idea!  So, inspired by her card, I used the new “Season of Style” Washi tape (132155) on page 25.

000_0086

The washi tape fit nicely inside the lines when I flipped the embossed cardstock over (you can use it either way), then I matted it with Old Olive cardstock.  Next I embossed the Cherry Cobbler and lined up the two pieces together (if you want to do this quickly … cut your cardstock larger than needed and cut it down to fit together).  I love the way the two embossed pieces flow together when using this layering technique.

Next I stamped my poinsettia with Cherry Cobbler ink (twice) and cut out both the overall image and then the small flower inside the large, so I could create extra dimension.  To give it the soft look … I just sponged the edges, however the flower came alive when I spritzed (Smooch Spritz – 118772 / pg.165) both pieces of the poinsettia.  It blended the sponging so nicely and the shine just made it pop.  (Funny how lighting and camera angles can change the look… you barely saw the shimmer on the first card shown)

000_0082

To finish off the flower, I added the cute new “Candy Dots” (130933) from the Soft Subtles collection on page 147.  Then I used my marker to ink up the word “joyful” from the greeting (included in stamp set) to finish off the card.

Are you getting ready for your Christmas cardmaking?  Let me know when you get started.

Have an awesome day!

blog closing-small

Autumn-Inspired Downloads

Hello stampin’ friends,

Today I’m going to share some of the new Autumn Inspired Downloads from My Digital Studio… Stampin’ Up! is committed to bringing you fresh, exciting digital content each and every week.

For those of you who know me, you know that fall is my favorite season!  It may be the end of summer, but I enjoy the warm days and cool nights.  Fall to me is an explosion of color!  And besides … there’s Halloween to celebrate!!

On that note, here is my first pick of the new downloads…

134925L

Witches Brew Designer Series Paper – Digital Download

134925

Price: $4.95

Download includes:
* 12 Designer Series PapersFeatures:
* Based on the Witches’ Brew Designer Series Paper traditional productColors:
Basic Black, Basic Gray, Pumpkin Pie, Summer Starfruit, Very Vanilla

The next of the new downloads I want to share is the fun digital stamp set “Halloween Bash” …

134923L

Halloween Bash Stamp Brush Set – Digital Download

134923

Price: $3.95

Download includes:
* 5-piece SVG stamp brush set

And last of the downloads that I am sharing today was chosen for those of you who are not yet ready to give up that summer!  Or … if you’re like me, you have a vacation you need to scrapbook yet!  Hmmmm…. after seeing this beautiful layout, I think I am going to use this for my Hawaii trip.  Done and done!

134843L

Awesome!  You can either just drop your pictures in and journal where they have journaling lines for you, or you can manipulate the pages, move them around, or add images from other downloads.  The templates are very easy to use.

You can view all today’s new downloads and more by clicking right here!

Have a great day today …

blog closing-small

Birthday Fishes (Wishes)…

Hello Stampin’ Friends,

Today I would like to share with you a card that we did at a past stamp camp.  Masculine cards are always a hit and much needed.

The stamp set I used is “By the Tide” (Wood – 131910 / Clear – 129120).  When I saw this stamp set in the Spring Catalog I knew I had to have it.   Imagine the possibilities … I think this stamp set is so versatile.

129120L

I will admit, it was the fish that attracted me to the “By the Tide” stamp set, as I used to fish with my grandpa, my dad, and even with my mom.  Fishing was always something I did as a kid (unfortunately, not much anymore).

You will be using the “power of the VersaMark” (102283) on this card… watermarks and heat embossing are two techniques used to create the depth of underwater life!

000_1375

We begin with our heat embossing … I inked up the first (what I call sea weed for this card) with VersaMark™ and the fish in Chocolate Chip – then use clear emboss powder and heat.

You will also ink the birthday greeting (From the stamp set “Blue Ribbon” (Wood – 131964 / Clear – 125981)) in Chocolate Chip and emboss.  The new formula ink pads work great for embossing!

Now that your embossing is done, you will stamp (with VersaMark) the remaining sea weed… this will create the illusion of the sea weed being “behind” the fish!  We also stamped it on the base of the card, just for fun!

Once you have completed your stamping… you can color in your fish and sponge the edges for just a bit more depth and color.

So…  I mentioned how versatile this stamp set is, and I think you can create any style of card with this set.  From manly to whimsical (I would use the seahorse for that) to anything in between.  Here is another sample …

000_1377

I love the clean and simple look of this card, and so totally different from the fish card.  The greeting comes from the stamp set “Sweet Essentials” (Wood – 132085 / Clear – 126457) found on page 41 of the catalog.

I believe both of these cards were done at the same stamp camp… to show the versatility of this stamp set.

Speaking of stamp camps … I have my “Christmas in July … Oops August” Stamp Camp on Monday the 26th.  There is still time to RSVP.  You will be making 10 fabulous Christmas Cards (with envelopes) that will showcase our Holiday Mini Catalog.  You won’t want to miss this … it’s a great way to get a “hands-on ” approach to your Christmas cards!

Remember… if you see a word or phrase highlighted, it will take you to that link when you click on it.  For example … the Christmas in July will take you to my calendar of events.

Thank you for stopping by today!  And a “Thank You” to Ann-Marie for her comment yesterday and many other posts … I will be sending you a package of our beautiful “Rhinestones” for being an active participant to my blog!

I have all sorts of surprises coming, both here on by blog and for my club and class members!

Have an awesome day!!

blog closing-small

Reverse Spotlighting Wow’s …

Hello Stampin’ Friends,

I hope you had a wonderful weekend.  A bit dreary here in south eastern Wisconsin but I love that everything is still so green around here.  Usually at this time of year, everything is dried out and brown.

On Saturday I posted the “Reverse Spotlighting” technique instructions, and promised to post a couple of cards to showcase this technique.  So after taking Sunday off, I have two beautiful cards to share with you today.

First, I would like to start with a card that was created per the instructions that I gave to you on Saturday.  My color combination is Pink Pirouette and Early Espresso.  I love those two colors together.

The stamp set I used is “Betsy’s Blossoms” (Wood – 131955 / Clear – 126006) found on page 87 of the Idea Book & catalog…. the big one.

000_0070

Just as the instructions stated, you stamp your imaged onto the cardstock … I did the pink onto Whisper White, then punched out sections of my flowers with the 1-1/4″ Circle Punch (119861) found on page 182.

Then I stamped three flowers using Pink Pirouette ink onto Pink Pirouette cardstock and cut them out.  Now you just line up the images and secure, and then assemble the rest of the card.

The greeting “get better” is from the stamp set “A Dozen Thoughts” (Wood – 131056 / Clear – 131059) in the Idea Book & Catalog on page 59.  You can use a marker to eliminate the first “better” or just use the stamp pad to ink the area you want to use.  The entire greeting is … “Better get better”.

I used the “Word Window Punch” (119857) on page 180 and the “Modern Label” (119849) punch on page 181.  And to finish it off … I used the pretty “medium” size pearls ( 119247).

On the second card I wanted to give the classic “Reverse Spotlighting” technique a bit of a twist!  Instead of using punches … I used the “Framelits” – Oval framelits (129381) to be exact!   You will find these on page 186 of the catalog, along with the other framelits.

You follow the same concept, but you won’t have to do as much cutting … and who doesn’t love that!

I decided since I was going to give this technique a new twist, I would use a new stamp set.  My choice was the beautiful poinsettia from the stamp set “Joyful Christmas” (Wood – 131802 / Clear – 131805) and you will find it on page 27 of the Holiday Catalog.  If you need one … let me know.

I can’t wait any longer to show you …. I JUST LOVE THE WAY THIS CARD TURNED OUT!!

000_0074

I kept the color pallet on this card very simple … Cherry Cobbler and Whisper White, with the Silver Glimmer paper (124005) to give it that “WOW”.  The “Rhinestones” (119246) accent nicely with the glimmer paper and still keep the overall feel – clean and simple.

Again, I stamped the Cherry Cobbler ink onto both the Whisper White and Cherry Cobbler cardstock.

The white cardstock is actually “popped up” and away from the glimmer paper to give it more dimension.

I hope you enjoyed today’s cards … and I would love to hear your thoughts, so please feel free to comment.

Have a wonderful week …

blog closing-small

Reverse Spotlighting Technique

Hello Stampin’ Friends,

Ahhh … the weekend has begun!  If you are bored this weekend, I have a fun technique I’d like to share with you.  I’ll keep it quick and simple so you can get to stamping.

Directions:

1) Stamp your chosen images on card stock.

ADV_ST_reverse_spot_fig2

2) Randomly punch out desired shapes. Be sure to overlap parts of your stamped images.

ADV_ST_reverse_spot_fig3

3) Stamp and cut out the same images on a separate piece of card stock. Color as desired.

ADV_ST_reverse_spot_fig4

4) Line up and adhere images behind punched holes.

ADV_ST_reverse_spot_fig5

5) Mount piece to card and finish project.

Tomorrow I will post a couple of cards using this technique … so don’t forget to stop back!

Have an awesome day!

blog closing-small

Get your motor running ….

Head out on the highway!

Happy Friday stampers … Hope you are all ready for an awesome weekend.

It is suppose to be a beautiful weekend here in Wisconsin … warm and sunny.  I’ll be in a meeting on Saturday and creating cards for my upcoming classes on Sunday, but I’ll have my windows open!  Sounds like a win – win for me.

For those of you heading out … I got the bike for you!  I could say this is a “MAN” card but I have some of my girl friends who ride too.  They don’t hop on the back of their husbands Harley – they ride their own.  So here’s to all my friends who ride… just be careful!

000_0061

Notice that the stamping is not straight … that was actually planned (lol).  I just hope you don’t mind that my bike can drive over oceans!  The fun Designer Series paper I’m using is from “I Am Me” (130138) found on page 151 of the big catalog.  That is actually some very versatile paper… great for scrapbooks if your traveling, I love the diagonal lines, and who doesn’t love polka dots!  Check it out.

The stamp set I used is “Rev Up the Fun!” (Wood – 130520 / Clear – 130523) and is found on page 51 of the big catalog.  It is so cute and fun to use.   Great car for the race fan in your family, or gear head (do they still call them that?)  You know … guys who love cars!

130523L

If you haven’t noticed the glare … that is coming from the “Foil Sheets” (132178 – Silver / 132622 – Gold) found on page 28 of the Holiday Catalog.  I wanted to replicate “chrome” and I love the way it turned out.  So, just because you find something in the Holiday catalog … doesn’t mean you have to use it for just your holiday stamping.  You want to find as many uses for your stampin’ supplies as possible, so I’m happy to share this tip.

000_0066

So I hope you enjoyed the ride today!  Be safe.

Have a fabulous weekend.

Oh Hello …

Hello Stampin’ Friends,

I was looking through some of my photos and found some really cute projects that I had not shared from the Oh Hello stamp set.

My club members did a card similar to this one last year, but as you know in the stampin’ world, we all share and case ideas.

WEB-100_6099

I received the stamp set along with all these other goodies at Leadership this past January.  Leadership is training, stampin’ and fun for demonstrators that hold the title Senior Supervisor and above.

WEB-000_1330

Managers and above were invited for a fun filled night at Universal Studios and the Wizardly World of Harry Potter.  Oh my gosh… was that a blast!  We were the only people there and were totally spoiled.

I have another cute little project that I got a photo of.  This cute little box could so easily be turned into a card or scrapbook page.  How easy … just stamp the words in different colors… nice effect!

WEB-Oh Hello Box

Just a quick post today … hope you enjoyed.

blog closing-small

Hello there!

Hello there stampers …

Today I want to share a card with you that I whipped together so I could announce an upcoming class!  It is my favorite new stamp set in the catalog … Timeless Talk.

000_0053

I love the nostalgic look of this stamp set.  I’ve always loved the old phonographs, my grandma and grandpa actually had a Victrola.  Oh memories (hmmm… might have to do a scrapbook page too).

126607S

My “TIMELESS TALK” class will be held at my Stampin’ Studio on Thursday, August 15th at 6pm.  I have the details listed on my calendar, and will be sending out the “Upcoming Class” list to those on my e-mail list.  Click on the “my calendar” to view.

The picture of the card does not show the dimensions (layering) of the actual card.  The “Modern Medley” (126926) Designer Series paper and the Real Red mat behind it, were cut out with the “Ovals Collection (129381) Framelits, then popped up with the Stampin’ Dimensionals to frame that cute phone!

Don’t you miss those kind of phones?  I had to laugh… someone had just told me the other day they wished they had the old style phones because you can’t slam down the receiver of a cell phone!  I just smiled … I didn’t ask.  But, it’s true! lol

000_0053

For the greeting, I cut that out and then added the stampin’ dimensionals to pop that up too.  It just gives it so much dimension.  And you know me, I couldn’t stop there … I just had to embellish it a bit further with the pearls.  They are always a nice touch and so inexpensive to use.

Last but not least, I added a scrap piece of the designer paper inside the card to match the front … why let it go to waste!  I often use the scraps to coordinate the envelopes (that’s cute).  Just make sure you adhere it down well so it doesn’t get caught in those automated sorters at the post office.

Pretty simple card to make, but it is so cute.  Sure to bring a smile to someone’s face.  And isn’t that why we make cards.

I hope you enjoyed today’s card, and that you can make it to my class … I know you are just going to fall in love with those cards.

Have a great day and share a “hello” with someone!

blog closing-small

Guest Stamper … Eileen S.

Hello Stampin’ Friends,

Today I’m going to share another card from my downline meeting on Saturday.  I didn’t post this with the Halloween themed cards is because it just didn’t quite fit in …

It’s a wonderful “man” card from the stamp set “Wetlands” (Wood – 126695 / Clear – 126697) found on page 69 of the big catalog.

000_0052

The card was made by my sister and downline member, Eileen.  I think her color choice suits a masculine card well… Night of Navy and Soft Suede.  Love the look!

To add dimension, Eileen used the “Window Frames Collection” framelits (129021).  You can find those on page 186 of the big catalog.  Do you have a catalog?  If not, let me know and if you are one of my customers I would love to get that to you right away.

You get added dimension by stamping the color on color like Eileen did with the wheat background.

Eileen added a fun design element by “Paper Piercing”.  It is an age old technique made easy with the coordinating “Paper Piercing Pack – Festive” (127857 / page 179).  Don’t you think that it adds that special touch to the card, and yet keeps it “masculine”.  Who doesn’t need man cards!

Would you like to be a “Guest Stamper”?  I would love to share your work … just please use Stampin’ Up! supplies.  Contact me for the address.

Thanks for stopping by today.

blog closing-small