Hugs, Kisses & Valentine Wishes …

Hello Stampin’ Friends,

This weekend I shared with you our January Paper Pumpkin and an alternative project you can make with the kit. So what happens when you use up all the contents of your kit? Well … one of the best things about the kit is the stamps!! You can use them over & over & over!

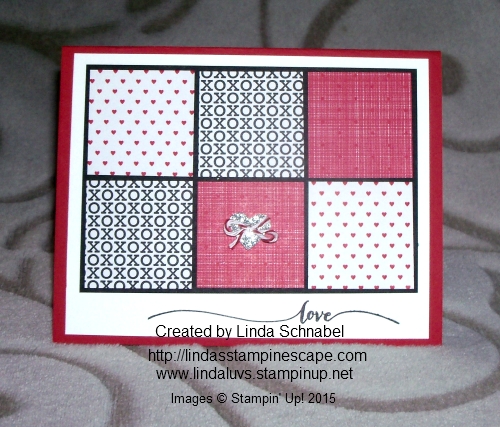
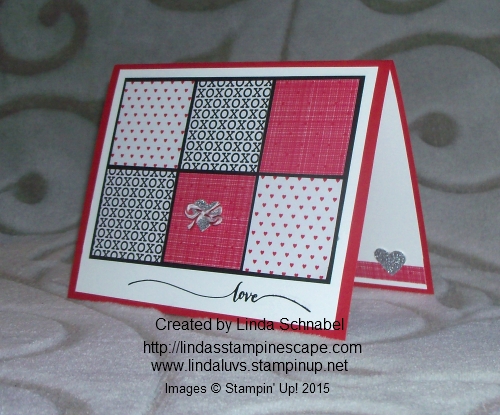
Today’s card is using the stamps and fun stuff you have in your stamp room. Let’s begin with the “Red Glimmer paper”, left over from Christmas and our “Stacked with Love” designer paper that we used earlier this month.

000_1959

I picked the XOXOXO paper because of the greeting I was using from the kit, and the Basic Black cardstock was the obvious choice for the base. It ties in beautifully with the designer paper and really makes our red glimmer paper pop.

I wanted to use the “Postage Stamp” punch because I thought it would be “fun” when “sending” hugs & kisses. I trimmed the center out of the glimmer paper that is behind the designer paper and used it to back my postage stamp.

I punched the center of the postage stamp so you could see more of the glimmer paper and it’s cute!

000_1963

I took my left over designer paper and added it to the inside along with the hearts … stamped in red, from the kit. This picture also gives you a great shot of how I “popped up” the postage stamp punch and greeting.

I hope you enjoyed today’s card … remember, just because the rest of the items in the kit have been used, doesn’t mean you have nothing left to play with! Your stamps will last forever πŸ™‚

Hugs & Kisses to my Granddaughter Cassie and sister Ruthie … today is their birthday! Love you both β™₯

Thanks for coming by and …

Have a marvelous Monday!
blog-closing-small

You Have My Heart Valentine

Hello Stampin’ Friends,

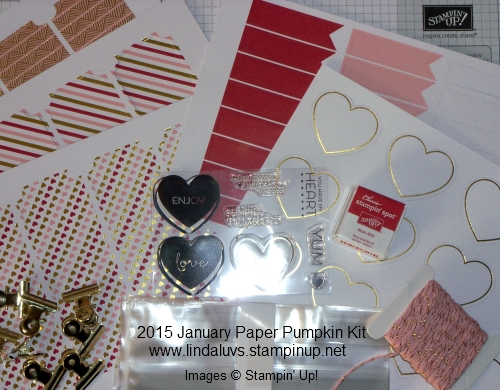
Today’s Simply Sunday is a card I created using the 2015 January Paper Pumpkin Kit! It was super simple to put together as all these fabulous components are found in the kit …

000_1957

All I added to my Valentine’s card is cardstock! Whisper White is my base and makes the the focal point (the heart) really stand out. The Real Red was embossed with the “Happy Heart” textured embossing folder from the occasions catalog.

000_1945

The tag, clip, bakers twine, heart, banners, stamps and even the ink are included. To join in on all the fun … you just need to sign up for Paper Pumpkin. As a subscriber, you receive a pretty package packed with fun every month. You can put it on hold while your away, or just subscribe for a determined length of time.

CLICK HERE to View the Options

Don’t forget … The 3-month subscription is ON SALE and it qualifies you for a FREE Sale-a-bration item! I have the link below (To view the Sale-a-bration catalog Click Here)

You can always contact me: lindaluvs2stamp@aol.com to answer any questions you may have.

Thanks for stopping back, and be sure to come back again tomorrow … I have another Valentine’s Day project from my Paper Pumpkin kit!

Have a wonderful day ~

blog-closing-small

Sweet Valentine Treats …

Hello Stampin’ Friends,

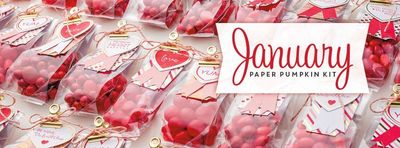
I am really excited to share this sweet Valentine treat with you. It’s a treat bag embellished with the cutest tags and more! It comes in a kit … all you need to do is assemble, add candy, and you’re the hit of the party!

These sweet treats are sent directly to you … delivered by your fairy stamp-mother (as known as Paper Pumpkin!)

6a00d8354941d869e201bb07df7c3c970d-400wi

Grab a cup of coffee and sit back and watch this fun video on how easy these cute treat bags are to put together.

Now really …. how cute and how easy! I am going to make some grandbabies very happy this Valentine’s Day! Treat a special friend, or your co-workers … just think of the fun you could have with these!

My fingers are crossed that Stampin’ Up! will add this awesome kit on their “past kits” page. This is where you can purchase past kits or refills!! It is for Paper Pumpkin subscribers only …

If you are not a subscriber and would like to be, you can CLICK HERE.Β  You will receive a cute crafting kit in your mailbox each month for only $19.95 which includes tax and shipping!!Β  OR Save by subscribing for 3 months – see below…

header_PP_SAB_demo_ENG

Order a 3 month subscription here at a discount & pick out a

FREE Sale-a-bration item!

(view the Sale a Bration Catalog – free items – HERE online or ask me for a copy in the mail)


Let me know if you have any questions about My Paper Pumpkin. I’d love to have you join me and my Pumpkin Pals πŸ™‚

Thanks for stopping by today, and be sure to come back tomorrow …

I will be showing you another cute project that you can do with your Paper Pumpkin Valentine kit!

Have a wonderful day ~

blog-closing-small

Spotlight: Lotus Blossom Stamp Set

Hello Stampin’ Friends,
I am thrilled with Sale-A-Bration catalog this year, and I hope you are too! With so many exclusive items for you to earn for free, Stampin’ Up! thought it would be fun to give each one a turn in the spotlight.

Throughout Sale-A-Bration, they will feature a Product of the Week! This week’s product is the Lotus Blossom Stamp Set. This gorgeous stamp set makes anyone feel like an artist in three quick steps.


It creates a beautiful flower that looks painted, but it is amazingly easy. The individual stamps have a tab at the top to help you align them, and the tabs are numbered so you will know which part of the flower to stamp first, second, and third.

This beautiful card was designed by Sarah Klass. She has inspired me to pull out my stamp set and start creating!

Try playing around using one ink pad with the stamping off technique, or multiple different ink pads to create many different looks.

Thanks you for stopping by ….

Enjoy the day and have a wonderful weekend.


blog-closing-small


Lovin’ that Valentine Designer Paper!

Hello Stampin’ Friends,

Today I’m going to share another Valentine Card with you. I figured since I had all my supplies on the table yet, I could show you another way to use them!

If you are like me ….Β  you have a hard time throwing those left over pieces of cardstock and designer paper away!Β  Well thank goodness you didn’t, because look at what you can do with leftovers!

000_1931

I cut yesterday’s scrap pieces down into 1-1/2″ squares and arranged them on a piece of black cardstock. WOW … how simple can you get! I added a heart, punched out of the Silver Glimmer paper and topped it off with a cute little bow made out of the Cherry Cobbler Bakers Twine.

Our greeting comes from the “Hello Life” stamp set that I used yesterday. I really like this stamp set. When you look at it in the catalog, just be aware the the pictures on the right side are only shown at 50%, the real size is what you see on my card and I think is a perfect size!!

000_1935

As you can see from this peek inside the card that I used a few more left over pieces to embellish the inside. Nothing wrong with showin’ some more love.

Thank you for checking out my blog today … I hope you enjoyed the card.

Have a great day … it’s almost Friday!

blog-closing-small

My Stampin’ Supply List …


I Love You Valentine …

Hello Stampin’ Friends,

Today I have the Valentine card as promised. A sweet and simple card that gets right to the point “I Freakin’ Love You”. The sentiment comes from our Yippee Skippee stamp set found in the main catalog … click on the right side of the screen directly on the catalog to view it.

000_1929

Our sweet little hearts come from the Hello Life stamp set in the new Occasions catalog. I really love this stamp set because it can be used for so many occasions. I chose the polka dot heart to coordinate with the polka dots in our designer paper. The designer paper comes from the “Stacked with Love” paper stack on page 5 of the Occasions Catalog.

I masked the red heart and stamped the simple outlined heart so it appears to be behind the red. I then added a touch of glitter into it.

Thanks for stopping back today.

Have a wonderful Wednesday ~

blog-closing-small

TODAY’S STAMPIN’ SUPPLY LIST …


Weekly Deals …

Hello Stampin’ Friends,

It’s Tuesday and it’s time for Weekly Deals … All I can say is “WOW”

Weekly Deals

Hope you enjoy this week’s Weekly Deals!

Stampin' Write 2013-2015 In Color Stampin’ Write Markers Item # 131260
Regular Price: $14.95
Discounted Price: $11.21
In Color 2014-2016 In Color Stampin’ Write Markers Item # 133654
Regular Price: $14.95
Discounted Price: $11.21
Stampin’ Blendabilitiesβ„’ Markers Skin Tone Assortment Item # 129370
Regular Price: $22.95
Discounted Price: $17.21
2014-2016 In Color Printed Clothespins Item # 133630
Regular Price: $5.95
Discounted Price: $4.46
Basic Gray Baker’S Twine Item # 134587
Regular Price: $2.95
Discounted Price: $2.21
Bermuda Bay Baker’S Twine Item # 134575
Regular Price: $2.95
Discounted Price: $2.21 US/$2.96 CAN
Crushed Curry Baker’S Twine Item # 134586
Regular Price: $2.95
Discounted Price: $2.21
Box Of Chocolates Kit – Digital Download Item # 133024
Regular Price: $9.95
Discounted Price: $5.97


I love the markers!! And if you have projects in mind, the clothespins are just too cute.

Have yourself a terrific Tuesday and I hope you see you tomorrow! I have a cute Valentine card to share with you!

blog-closing-small

Sending Wishes Your Way …

Hello Stampin’ Friends,

How are you today? Ready to kick off a new week?

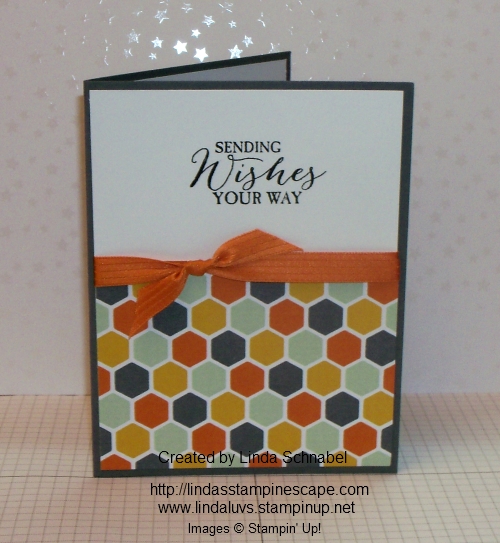
I’m here to kick off your week with a new card, a birthday card, sending wishes your way. The greeting comes from the stamp set “Butterfly Basics” in the Occasions Catalog.

000_1921

I paired it up with a fun pattern from the “Confetti Celebration” designer series paper. Here’s another series of papers that can be easily used for gender neutral cards.

I tied it together with the beautiful “3/8″ stitched satin ribbon” in Tangelo Twist.

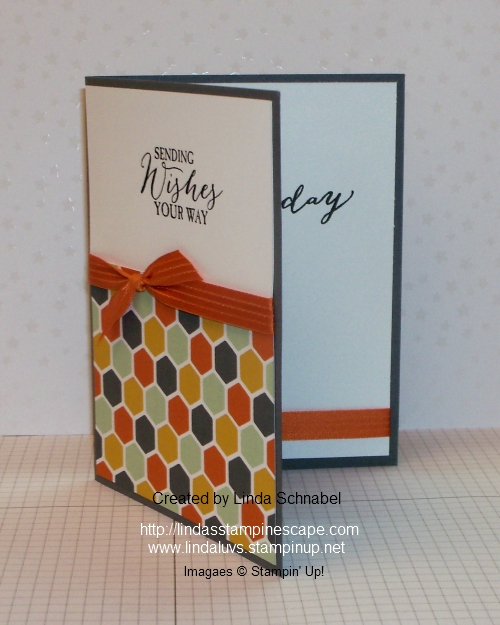
000_1924

I carried the ribbon to the inside as well to add a pop of color and texture. The “Happy Birthday” also comes from the “Butterfly Basics” stamp set. Did you know that the Butterfly Basics stamp set is available in Wood, Clear and Photopolymer!

Hope you enjoyed today’s card share, another quick and easy card to add to your collection.

Thank you for stopping by today.

Have a great week!

blog-closing-small

TODAY’S STAMPIN’ SUPPLY LIST …


Simply Sunday Birthday Card …

Hello Stampin’ Friends,

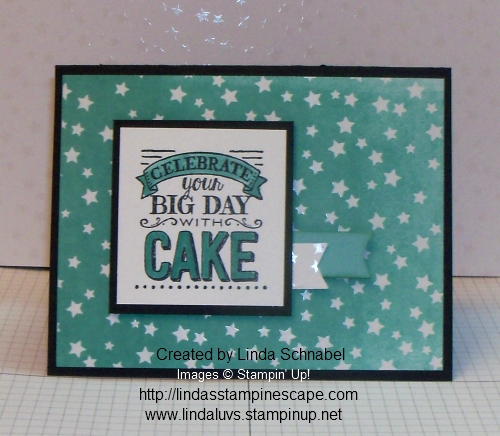
Today it’s time to Celebrate your Big Day with Cake! And while we’re celebrating … let’s Sale-a-brate with FREE specialty paper! Today I’m sharing another technique that can be used on our “Irresistibly Yours” designer paper… Brayering over the stars!

I combined it with the “Ombre” technique: a color scheme that transitions from a lighter to darker shade. I only used the Coastal Cabana so the shading is very subtle. I brayered one layer over the entire card and then working from the left side, I added more color until I got the desired effect.

000_1918

Once you are done with the brayering, wipe off the excess ink from the card (the star’s will not absorb the color) and watch them pop!

I teamed my specialty paper with the “Big Day” stamp set … both are from our Sale-a-bration catalog and you can get them free. During Sale-a-bration you can chose exclusive items with each $50 you purchase. Gather your friends and have a party, or pass the book and do it on-line, or take those tax refunds and place your own order (I have many who do this during Sale-a-bration!)

I have a great tip for you today too … You can extend your banners by simply cutting a piece of cardstock that will slide through the punch (as shown below) and then pull to desired length. How sweet is that!

000_1914

Did you notice that the little white banner has been punched with the “Irresistibly Yours” designer paper. The banner punch is in our big catalog and can be found on page 223.

000_1915

A great birthday card for anyone at any age! Those are the best cards to have on hand.

Thanks for stopping by today!

Enjoy your day ~Β 

blog-closing-small


Spotlighting Sympathy cards …

Hello Stampin’ Friends,

Yesterday I shared a “Wedding Card” with you, today I share a “Sympathy Card” … two stages of life that we go through and make cards to show our friends and loved ones that we care.

I wanted to create something simple because I find it very difficult to sit down and stamp a sympathy card when I need one, so I tend to turn to my designer paper. With all the beautiful designer papers we have, it’s not hard to find one that fits the occasion we need.

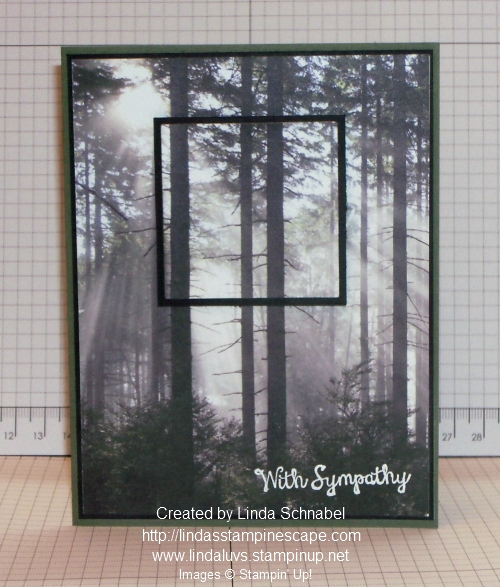
I chose the new “Adventure Bound” Designer Series Paper Stack found in the Occasions Catalog. Last time I used this paper I simply stamped my image directly onto the paper and mounted it onto the cardstock, however today I wanted to take it up a notch so I decided to do a “Spotlight”.

To create a “Spotlight” on my card I used the “Square Framelit Die” and I lined it up to the corner of the sun on my paper …

000_1908

Once I cut out my square, I mounted it onto a piece of Basic Black cardstock. Now I was ready to mount my spotlight onto the base of my card. The card base is Almost Artichoke and I used some black cardstock behind the paper to make it stand out more.

000_1909

The spotlight was mounted using the Stampin’ Dimensionals to add dimension too …

000_1910

I then stamped my salutation of “With Sympathy” from the “Bloom with Hope” stamp set. Please note that this is a Hostess stamp set and is not for sale but available as an exclusive stamp set when you place or host a qualifying stamping order or party. Contact me with any questions you may have.

I used Whisper White craft ink and the White embossing powder for my greeting … the combination of the two really makes it stand out so much more.

I took the piece of paper that I cut off of my designer paper and placed it on the inside to create a feeling of harmony on the card. The inside words also come from “Bloom with Hope” and were stamped with Black StazOnβ„’ … my favorite black ink! I love that it’s a true black.

000_1912

Hope you enjoyed today’s card and take some time to create a few “Spotlight” cards of your own. I have always liked this technique when stamping, now I love that it works so well using these fabulous designer papers too. I didn’t have the heart to cover this one up with anything.

000_1910

Thanks for coming by today …

Have a great Saturday!

blog-closing-small

Today’s Stampin’ Supply List … Click on image for more details

Wedding Wishes in White …

Hello Stampin’ Friends,

Yesterday I said I would share with you a wedding card, a bit nontraditional but I think you will like it. I’ve been using the butterfly a lot lately and today you will see how I incorporated it into my card.

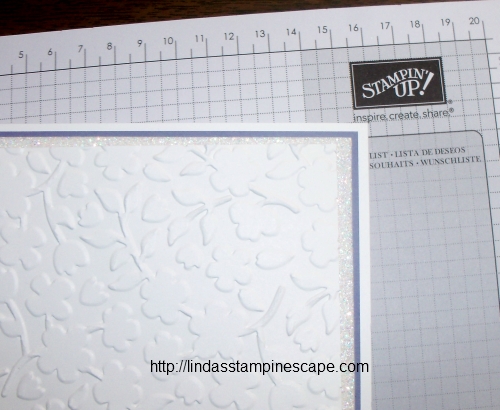
When we think of weddings, we think of white … with a touch of color. Well that is exactly what my thoughts were on my card to. My base is Whisper White with a hint of Wisteria Wonder, and then I added a touch of sparkle with the Dazzling Diamonds Glimmer Paper.

000_1899

You can see my layers and then I topped that off with a final piece of Whisper White that was embossed with our new “Spring Flowers” embossing folder.

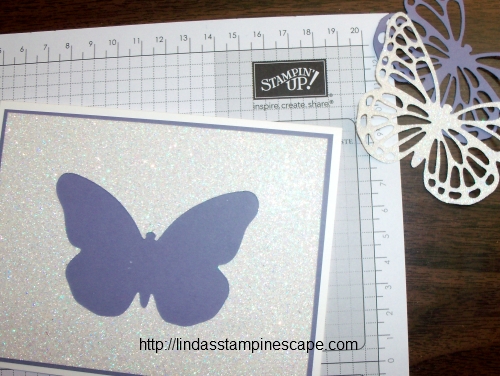
Now it was time for my butterfly in Whisper White … no, Dazzling Diamonds Glimmer Paper! For a more cost effective approach … I cut my butterfly out of the glimmer paper that I used for my mat …

000_1901

then simply placed the embossed piece of white over it and popped it up with Stampin’ Dimensionals to give it more character. (I should have cut my Wisteria butterfly from the mat too!)

Here is the card fully assembled … The Wisteria butterfly behind the Dazzling Diamonds butterfly gives it a bit of a shadow effect, quite stunning!

000_1904

A simple “Congratulations” is all it needed and I got that from the Itty Bitty Banners stamp set, and used the Bitty Banners framelit to cut it out. Simple yet elegant, and it is prettier in person.

I think this would also make the perfect birthday card. My Mom loves butterflies so I’ll just switch out the greeting and have the perfect card to give her.

I hope you enjoyed today’s card share, and I thank you for stopping by.

Have a wonderful weekend ~

blog-closing-small

TODAY’S STAMPIN’ SUPPLY LIST …

000_1905

Technique Share from an Artisan Team member …

Hello Stampin’ Friends,

Today I want to share with you a blog post from Allison Okamitsu, one of our Stampin’ Up! Artisan team members. I share the entire blog and video with you because I could not say it any better than Allison. Her work is simply beautiful and very creative … I will be trying this technique myself!

FAUX RUSTED METAL EMBELLISHMENTS

faux-rusted-metal-1

I love all things shabby and vintage, and although this passion doesn’t surface much in my papercrafting projects, it’s always fun to play. A little while ago I visited an absolutely fabulous salvage yard where I found loads of rusted metal filing cabinets, signage, and almost anything else you could think of. My mind was spinning! How could I translate these beautiful, rusty, and worn pieces into my papercrafting? Well, after a little bit of thinking and a lot of playing in my stamp studio, I’m ready to show you how you can transform a simple piece of paper into ultra-fab, faux rusted metal embellishments. And, of course, what better way to show you than with a video tutorial?

faux-rusted-metal-2

For the faux rusted embellishment on this card I used the Sweetheart Punch and punched out six hearts from Basic Gray Cardstock. I then glued them one on top of another to create a thick embellishment that would look more like a real chunk of metal.

faux-rusted-metal-3

When creating a faux rusted embellishment that has some dimension (like this fabulous 3D star!) make sure you do all of your scoring and folding before you begin applying the layers of ink and embossing powder.

faux-rusted-metal-4

Want to create a faux rusted metal stamped image? Easy! Stamp on top of faux rusted metal using the Jet Black StāzOn Ink Pad. Now you can create faux rusted metal images with all of your favorite Stampin’ Up! stamps! Oooh . . . I need to try flowers next!

I hope you’ll give this technique a try!

Allison Okamitsu
2014–2015 Artisan Design Team

Again, I want to give the credit for today’s post to Allison and her beautiful projects, and a big “Thank You” for sharing her creativity on the Stampin’ Up! blog “Get Inspired”.

Stop back tomorrow … I will be sharing a beautiful wedding card with you.

Have a wonderful day !

blog-closing-small

Stamp Happy with a New Technique!

Hello Stampin’ Friends,

Yesterday I told you that I would have a card to share with you that utilized one or more of the products from our Weekly Deals, so today I’m going to highlight the Starburst Framelits!

Starburst Framelits Die

Starburst Framelits Die 132967
Price: $26.95 $20.21
Cut your stamped images, create layers and frames! 5 layering dies. Largest image: 4-11/16″ diam. Coordinates with Baby and Starburst Sayings Stamp Set

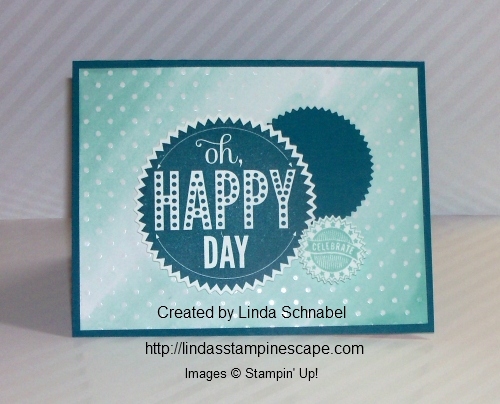
I chose the coordinating stamp set; Starburst Sayings to create my card. My color pallet is Island Indigo and Pool Party … a favorite of many!

BUT … before I put these all together I thought I would share with you a technique that you can use on the NEW “Irresistibly Yours” specialty paper. This paper cannot be bought … but you can get it for FREE in our Sale-a-bration catalog with a $50 order! (before shipping & handling)

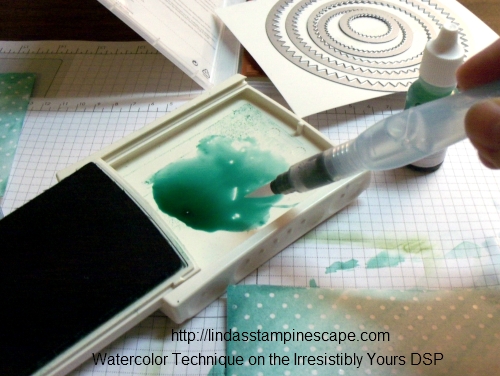
The technique I want to show you is watercoloring with your Aqua Painter …. super simple. I will tell you that the paper absorbs the water quickly and that I watered down my ink before I applied it to the paper. (Remember to clean out your ink from the stamp case (as shown) because you have added water and you do not want that on your ink pad)

000_1890

My favorite thing about this technique is that you control the variation of color! I always tell my stampers “less is more … because you can always add more, but it it difficult to take away”. So start light and then add more color where you want it.

000_1891

Don’t you love how the dots pop through the watercoloring! The paper is pre-embossed for you and acts like the “resist” technique. My technique clubs are learning additional techniques in coloring this awesome paper.

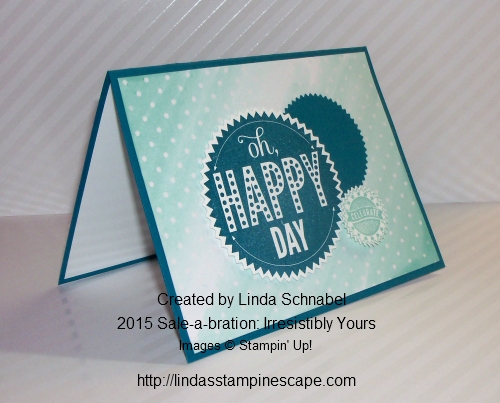
You can see why I chose the polka dot pattern (1 of 6 designs) because that too coordinates with our stamp set! The Happy Day is stamped in Island Indigo and the Celebrate in Pool Party.

All three pieces were cut with the Starburst Framelit Die. Here’s a little tip … You can align the framelit to your image easier if you keep the numbers that are printed on the framelit to the top! Take a look at your framelits, most have numbers printed on them and many times I use this when aligning with my stamped image.

000_1894

I popped up the Happy Day with our Stampin’ Dimensionals and then “doubled” the dimensionals on the celebrate to create a lot of dimension.

I hope you enjoyed the use of the framelits from the “Weekly Deals” and learning what you can do with our new Designer Paper; Irresistibly Yours. It’s a must see πŸ™‚ and it’s FREE!

Thanks for stopping by, I’d love to hear what you think of today’s project.

Have a wonderful day ~

blog-closing-small

TODAY’S STAMPIN’ SUPPLY LIST …

Just click on a product image to learn more about it, or to begin shopping. Thank you.

So Many Stampin’ Goodies …

Hello Stampin’ Friends,

Today is Tuesday so I have the weekly deals for you, but first I want to show you this cute new stamp set designed for our Angel Policy.

Our Angel Policy stamps are used on any items that you or I create and “sell”. * Stampin’ Up!’s images are copyrighted, which means that they cannot be copied without permission. To help protect that copyright, all items for sale using our images must be marked with an official Stampin’ Up! Limited License stamp set. Click hereΒ for more information about Stampin’ Up!’s Angel Policy.

Here is the new “Better than E-Mail” photopolymer stamp set. Item # 140463. And to be honest … isn’t a hand stamp card in the mail “better than e-mail?” I think so,

140463G

Although this set was designed with the Angel Policy in mind, it can also be used in a variety of other ways. The images are so versatile! Check out the samples below to get your innovative juices flowing.

140463O1


Main_weeklydeals_olo_10.7-31.2014_SP_UK

Hope you enjoy this week’s Weekly Deals!Β  You can click on any items description for more information about the product and / or to begin shopping.

Angled Tag Topper Punch Angled Tag Topper Punch Item # 133323
Regular Price: $22.95
Discounted Price: $17.21
Little Pieces Embosslits Die Item # 133733
Regular Price: $11.95
Discounted Price: $8.96
Starburst Framelits Die Item # 132967
Regular Price: $26.95
Discounted Price: $20.21
Itty Bitty Accents Punch Pack Item # 133787
Regular Price: $16.95
Discounted Price: $12.71
Tangelo Twist 3/8″ Satin Stitched Ribbon Item # 133669
Regular Price: $8.95
Discounted Price: $6.71
Hello Honey 3/8″ Satin Stitched Ribbon Item # 133671
Regular Price: $8.95
Discounted Price: $6.71
Blackberry Bliss 3/8″ Satin Stitched Ribbon Item # 133668
Regular Price: $8.95
Discounted Price: $6.71
Watercolored Winter Kit – Digital Download Item # 136678
Regular Price: $9.95
Discounted Price: $5.97


So what do you think? I think these deals are smokin’ hot! I love, love, love this ribbon and Oh My Gosh it’s in Blackberry Bliss (perfect for the beautiful “Painted Blooms” designer series paper we’ve all been raving about!

Tomorrow I will incorporate some of these products for you in my card share … You’re going to love it!

Thanks for checking out my blog today … see you tomorrow.

Have an terrific Tuesday ~

blog-closing-small

All Shook Up …

Hello Stampin’ Friends,

Our last Paper Pumpkin kits was such a fun one. Shaker cards are really hot right now. If you don’t currently subscribe to Paper Pumpkin, you can learn more about it here! My Paper Pumpkin

Great News ….During Sale-A-Bration, you can get a 3-month Paper Pumpkin Prepaid Subscription for just $54.85. Save $5 and instantly qualify for a Sale-A-Bration reward?Β  Yes please! To start … just click the link “My Paper Pumpkin” either at the top of my post or at the end.

Try it out … If you like it you can switch to the month to month or purchase another PrePaid subscription. These make great gifts too!

For those who do subscribe and received the last kit, I wanted to share a few alternate ways to use the stamps and products from your kit.

1. Inside Out

I love white card bases. To get a different look, simply fold your card with the gray on the inside. I also used the reverse side of the frame and stamped the hello background on it. The flag was cut from the confetti stars cardstock sheetβ€”since this piece of scrap paper wasn’t being used, anyway.

PP_Inside-Out


2. Go for the Gold

To change the look of the die cut words, I embossed them in gold. I used a Sponge Dauber to add Versamark ink to the β€œhello,” then added Gold Stampin’ Emboss Powder. It’s easier to do this while the die cut is still attached to the sheet. For the background heart, I stamped the hello background on a Window Sheet using White StazOn ink, then cut the heart shape to layer behind the β€œhello.”

PP_Gold-Hello


3.Β  Make the Most of Your Stamps

One of the best things about having a Paper Pumpkin subscription is having access to exclusive stamps. This kit has six stamps that can be used for much more than the nine cards included in the kit. Here’s a simple card that can be made with just note cards and a little sequin embellishment.

PP_Simple-Notecard

Paper Pumpkin is fun whether you follow the project instructions exactly or decide to shake things up a bit and infuse your own creativity. There’s no wrong way as long as it’s fun!

The cards/post are from Jen C… our Concept Artist at Stampin’ Up! I just love her cards and wanted to share them with you.

You can sign up for My Paper Pumpkin at anytime, but before the 10th of each month is the cut off for that months kit. So … if you sign up today, you will receive the February kit. Let me know if you have any questions.

Thanks for stopping by and …

Have an awesome day!

blog-closing-small