Hello Stampin’ Friends ~
With all the struggles in the world today, have you ever felt like you needed to do something? Be a part of something bigger than yourself to help others? Let me share how we can make a difference … Craft for a Cause with the Nourish & Flourish Kit

Help us make a difference with the Nourish & Flourish Kit! Food scarcity is an issue facing communities across the globe. And with your help, we hope to make a difference. With every Nourish & Flourish kit purchased by you, we’re donating $3 to organizations fighting to end food scarcity.
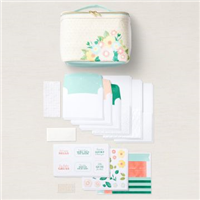
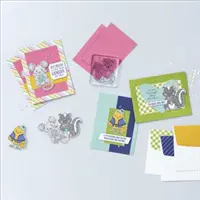
The Nourish & Flourish Kit is made of your spring picnic dreams. With a deliciously bright color palette you’ll love creating the springtime cards while knowing your crafting is making a difference! Here is what is included in this kit ….
- Kit includes 9 embossed card bases—3 each in 3 designs—and 9 coordinating envelopes
- Includes sticker sheets, die cuts, and die-cut labels
- Includes an insulated 9″ x 6-1/2″ x 6-1/4″ lunch bag
- Finished card size: 5-1/2″ x 4-1/4″
- Coordinating colors: Calypso Coral, Daffodil Delight, Old Olive, Petal Pink, Pool Party, Shaded Spruce

Food scarcity is an issue facing communities across the globe. Each year, Stampin’ Up! supports a designated cause through special limited-edition products or promotions. This Year we have chosen to support organizations that are working to end food insecurity by releasing a special Nourish and Flourish Kit (item 160230).
We all know that Making a Difference by helping others makes us feel good. And we know you will want to get behind this great cause. Click HERE to get your kit now. This kit is available July 1, 2022 through the 4th of January … but don’t wait, good things don’t last forever. This kit would make a beautiful Birthday, Graduation or Christmas gift for the crafters in your family … even beginning crafters!

I’ll be honest … I love how Stampin’ Up! tied in the “fighting food scarcity” with a beautiful insulated lunch bag, a sweet reminder that we have helped in making a difference in the lives of others.
I am putting the link below for you to make it easy for you to join in the cause and to help in making a difference.
Thank you for hanging out with me and for helping out.