We have our Winner! 🎉 Branching Out Bundle

Hello Stampin’ Friends ~

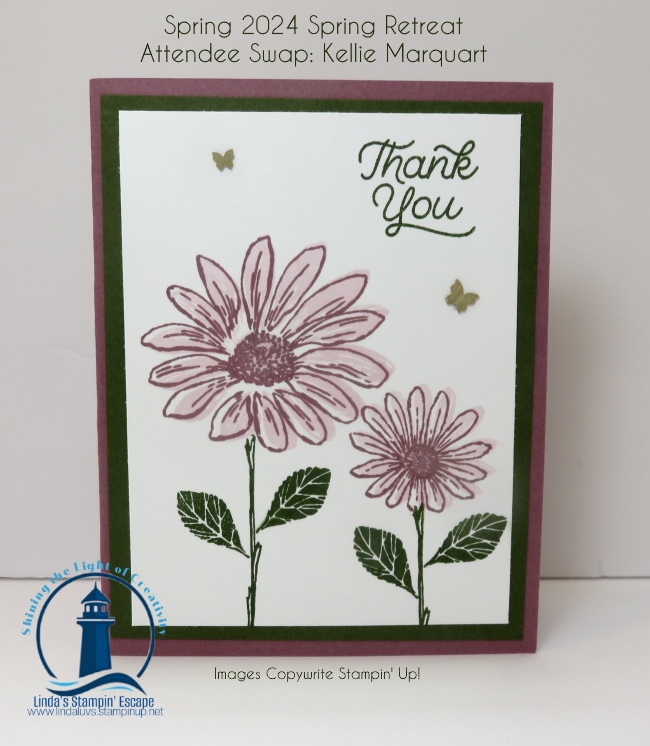
I’m so excited to share that the winning card from our Fall/Holiday Stamping Retreat Attendee Swap was created by the talented Kellie Marquart! Her beautiful card stole the show with its elegance, detail, and creativity — all featuring the Branching Out Bundle.

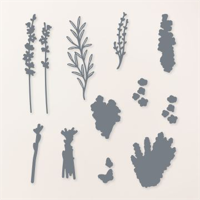
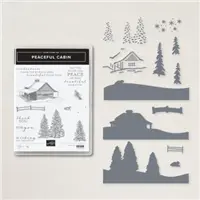
This bundle is a true gem for nature lovers and those who enjoy crafting projects with warmth and meaning. The Branching Out Stamp Set lets you build lifelike pine branches by layering delicate images of needles, berries, and pinecones — or use them individually for a more subtle look. Whether you’re creating a cozy Christmas card, celebrating friendship, or simply sharing love and gratitude, this set delivers timeless beauty and versatility.

Kellie’s design perfectly showcased the bundle’s potential — and what made it even more special was how she turned this Christmas-themed set into a delightful Birthday card! With natural tones, subtle textures, and a heartfelt sentiment, she proved that a little creativity can stretch your seasonal sets far beyond the holidays. Her card truly captured the spirit of the season and the joy of handmade giving.

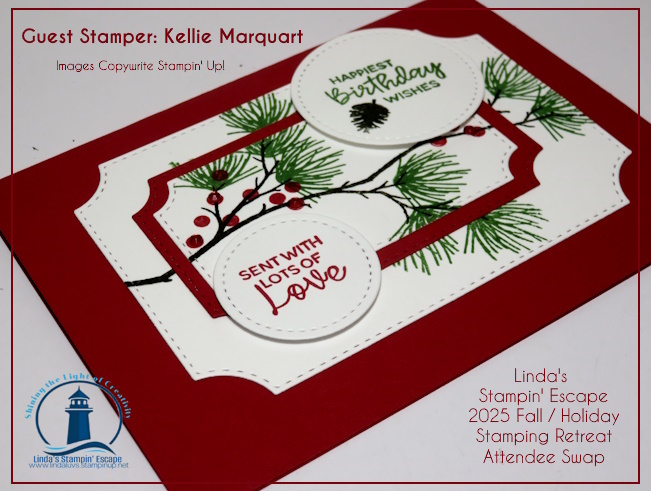
Congratulations, Kellie, on a well-deserved win! 🌿✨ Your card was a true work of art.

If you love seeing (and creating!) beautiful cards like Kellie’s, be sure to join us for our next Stamping Retreat! You’ll enjoy creative inspiration, hands-on projects, and the chance to connect with fellow crafters who share your passion — plus, you might even be our next card swap winner! 🌟

Thank you all for joining me today!

Embrace the Elegance of Perennial Lavender Designer Paper

Hello Stampin’ Friends ~

Welcome back, crafting enthusiasts! Today, I am thrilled to spotlight a true gem from our collection that has gracefully carried over from the Mini Catalog and remains a cherished favorite: the Perennial Lavender Designer Series Paper. This exquisite 12″ x 12″ paper brings the timeless beauty of lavender fields directly to your creative space.

A Glimpse into Perennial Lavender Designer Paper

The Perennial Lavender Designer Series Paper is a delightful homage to the serene and enchanting fields of wild lavender. Each sheet is adorned with hand-painted designs, capturing the essence of lavender and the vibrant wildflowers that flourish beside it. The intricate patterns and calming hues make this paper an absolute must-have for any paper crafting project.

I am excited to share two adorable cards created by our talented Spring Stamping Retreat Attendee Swap participants. These cards showcase the elegance and versatility of the Perennial Lavender Designer Series Paper in truly inspiring ways.

Card 1: Hello Lavender

This card exudes tranquility with its soothing lavender tones. The background is a beautiful sheet from the Perennial Lavender collection, perfectly complementing the intricate die-cuts. The layers give the card a beautiful flow, and the die cut greeting adds some textures. The pretty Purple Fine Shimmer Gems add the finishing touch.

Card 2: Wildflower Whimsy

The second card is a burst of wildflower joy. Utilizing the bolder, more colorful patterns from the Perennial Lavender paper, this card captures the vibrant spirit of a meadow in full bloom. Layering the paper with a playful arrangement and a couple embellishments, create depth and interest, making this card a standout piece.

Why I Love it … And You’ll Love It too:

  1. Artistry in Every Sheet: The designs are hand-painted, offering a unique and artistic touch to your projects. Each sheet feels like a miniature work of art, ensuring that your creations are both beautiful and unique.
  2. Versatility: Whether you’re crafting cards, scrapbooking, or creating home décor, the Perennial Lavender paper provides endless possibilities. Its versatile design makes it perfect for a variety of themes and occasions.
  3. High-Quality: As with all our designer series papers, the Perennial Lavender paper is of premium quality. It’s sturdy and easy to work with, ensuring that your projects not only look good but last long too.

Ready to bring the beauty of lavender to your paper crafts? The Perennial Lavender Designer Series Paper is available now, and it’s the perfect addition to your crafting supplies. Don’t miss out on this versatile and enchanting paper. Let your creativity blossom with Perennial Lavender!

The adorable cards shared today were from our Spring Retreat Swap …. Imagine a weekend dedicated entirely to your creative passion—no distractions, just you, your stamps, and endless inspiration. At my Fall/Holiday Stamping Retreat, you’ll experience a blend of relaxation, learning, and creative fun that will leave you refreshed and brimming with new ideas. Whether you’re a seasoned stamper or just getting started, this retreat is designed to spark your creativity and connect you with a community of like-minded crafters. Take this time for yourself, because you’re worth it.

Happy crafting, and may your projects always be as beautiful as a field of wild lavender.

#stampingretreat #gueststamper

Latte Love Bundle: A Delightful Card by Guest Stamper Lisa

Hello Stampin’ Friends,

Today, I’m thrilled to share a stunning card created by our talented guest stamper, Lisa Brown, using the fabulous Latte Love Bundle. This delightful bundle includes the charming Latte Love Stamp Set and the versatile Latte Love Dies, designed to help you spread love and gratitude through fun, coffee-themed imagery and heartfelt sentiments.

About the Latte Love Bundle

The Latte Love Stamp Set features an array of adorable coffee cups, mugs, and steaming brews, perfect for crafting cards that warm the heart. With phrases like “Hello There, let’s catch up” and “Your the best part of my day” you’ll have the perfect sentiment for any occasion. The coordinating Latte Love Dies make it easy to cut out these delightful images, adding dimension and interest to your projects.

Lisa Brown’s Beautiful Card

Lisa’s card showcases the endless possibilities of the Latte Love Bundle. She began with the rich, Early Espresso card base, layering it with a patterned paper that evokes the cozy atmosphere of your favorite coffee shop. Using the Latte Love Dies, Lisa cut out a couple of coffee cups, each from the stamp set. She then added a touch of color to each cup, giving them a lively and inviting look.

Why You’ll Love the Latte Love Bundle

Whether you’re a coffee enthusiast or just love charming, versatile stamps and dies, the Latte Love Bundle is a must-have for your crafting collection. It’s perfect for creating cards, tags, and scrapbook pages that express warmth and appreciation. The combination of fun images and heartfelt sentiments makes it easy to create projects that will bring a smile to anyone’s face.

Ready to see more inspiring projects using the Latte Love Bundle? CLICK HERE for additional samples and ideas that will ignite your creativity and show you just how versatile this bundle can be.

Happy crafting, and remember to savor every moment with the Latte Love Bundle! Link to grab yours is below. Thanks for stopping by!

Sweeten Your Crafts with the Magnolia Mood Stamp Set

Hello Stampin’ Friends ~

Flowers have an unparalleled ability to add a touch of sweetness and elegance to any project. If you’re looking to elevate your card-making and paper crafts, the Stampin’ Up! Magnolia Mood Stamp Set is your perfect companion.

This stunning set features the beloved magnolia, a flower known for its timeless beauty and charm. But what truly sets the Magnolia Mood Stamp Set apart is its Distinktive design. With this special texture, each stamp offers added depth and dimension in just one step, creating photo-realistic images that bring your crafts to life.

Measurements:

  • Basic White Cardstock:  5 ½” x 8 ½” scored @ 4 ¼”
  • Blackberry Bliss Cardstock: 4” x 5 ¼”
  • Thoughtful Journey DSP: 3” x 4”
  • Fresh Freesia Cardstock: 3 ½” x ¾”
  • Thoughtful Journey DSP: 1” x 5 ¼”
  • Scraps: Fresh Freesia (detailed die-cut flower), Basic White (stamped flower, inside die-cut flower)

Instructions:

  • Fold your card base on the scoreline and burnish.
  • Adhere your DSP to the Blackberry Bliss layer then emboss with Distressed Tile 3D Embossing Folder.
  • Adhere to card base with Multipurpose Liquid Glue.
  • Die-cut the detailed flower die-cut from scraps of Fresh Freesia Cardstock. Using Multipurpose Liquid Glue, adhere to the top of the card.
  • Stamp the Magnolia flower in Blackberry Bliss Ink to the scrap of Basic White Cardstock, die-cut, and adhere to detailed flower die with Stampin’ Dimensionals and Mini Stampin’ Dimensionals.
  • Using a Sponge Dauber and Fresh Freesia Ink color the detailed die and stamped flower as much or as little as you wish. Use photos for reference.
  • Stamp the “Happy Birthday” sentiment on the Fresh Freesia Cardstock and banner the ends with your Paper Snips. Adhere to the card front with Stampin’ Dimensionals.
  • On the inside of the card adhere the strip of DSP to the right side. Use photos for reference.
  • Using Sponge Dauber and Fresh Freesia Ink, color the small flower die-cut for the inside of the card. Use photos for reference. Adhere to inside of card.
  • Lastly, Adhere the pink Adhesive -Backed Sequins Trio to the card. Use photos for reference.

Imagine the joy on a friend’s face when they receive a handmade card adorned with lifelike magnolia blossoms, or the pride you’ll feel when showcasing your meticulously crafted scrapbook page. The Magnolia Mood Stamp Set not only adds beauty to your projects but also simplifies the process, allowing you to achieve professional results effortlessly. Thanks to Kelli McCankey for sharing her artwork with us today.

Sweeten your cards, scrapbooks, and paper crafts with the Magnolia Mood Stamp Set and experience the magic of Distinktive stamping. With each impression, you’ll find yourself falling more in love with the art of crafting.

Thanks for stopping by ~

Picking the Country Flowers Bundle …

Hello Stampin’ Friends,

Today I’m excited to highlight the Country Flowers Bundle from the enchanting Country Woods Suite. Just yesterday, I delved into the charming Country Birdhouse Bundle, and now it’s time to explore the equally captivating Country Flowers Bundle. Remember, today is the last day to take advantage of the extra 10% off the already discounted price!

The Country Flowers Bundle includes the Country Flowers Stamp Set and the Country Flowers Dies. What’s not to love about this bundle? With beautiful bunches of flowers, cute flowerpots, and fun details, you can create stunning floral scenes worth every bloom. The stamps feature intricate flower designs that capture the beauty of nature, perfect for any card or scrapbook project. The coordinating dies add a whole new level of creativity, allowing you to cut out bold flowers and arrange them into one of the many containers, or simply create elegant floral arrangements on their own.

Today I’m happy to share two cards that were created by my friend Lisa Brown …

This bundle is a must-have for anyone who loves crafting with floral themes. Whether you’re an experienced crafter or just starting, the Country Flowers Bundle makes it easy to create breathtaking projects. You can keep things simple with a lovely stamped flower arrangement or go all out with layered, die-cut blossoms that turn your creations into showstopping centerpieces. The versatility and beauty of this bundle make it an excellent addition to your crafting supplies.

Don’t miss out on this fantastic opportunity to add the Country Flowers Bundle to your collection at an unbeatable price.

Happy crafting, and may your projects bloom beautifully!

Charming Duck Pond Bundle Card Tutorial

Hello Stampin’ Friends,

Welcome to today’s crafting inspiration post! I’m thrilled to introduce you to the Charming Duck Pond Bundle, a delightful set that will bring a touch of nature’s charm to your projects. This bundle includes the versatile Charming Duck Pond Stamp Set and the coordinating Charming Duck Pond Dies, making it easier than ever to create enchanting wetland scenes.

Imagine crafting a serene pond, complete with adorable ducks, playful ducklings, lively frogs, elegant cattails, and lush marsh plants. The possibilities are endless with this bundle. You can customize each element by stamping the images in various colors, or for even more precision and creativity, use Stampin’ Write Markers or your favorite coloring tools. The stamps and dies are designed to work seamlessly together, allowing you to layer and build a dynamic, three-dimensional scene.

One of the standout features of the Charming Duck Pond Bundle is its collection of cheerful sentiments. These thoughtful messages are perfect for birthdays, celebrating friendship, or simply letting someone know they’re on your mind. Whether you’re crafting a heartfelt card or a whimsical scrapbook page, these sentiments will add the perfect finishing touch.

I’m also excited to have a special guest stamper Kay, from our Tutorial Design group joining us today. I know her creativity will surely inspire you to make the most out of this charming bundle. We’ll be sharing a step-by-step tutorial on creating a beautiful card featuring the frogs and cattails, and highlighting the designer paper for a playful effect.

Measurements:

  • Pretty Peacock Base:  5 ½” x 8 ½” score at 4 1/4”
  • Lily Pond Lane Designer Series Paper: 5 3/8” x 4 1/8” (koi fish pattern)
  • Pretty Peacock: 4” x 4”
  • Lily Pond Lane Designer Series Paper: 3 ¾” x 3 ¾” (Lost Lagoon with white polka dot pattern)
  • Basic White: 3 5/8” x 3 5/8”
  • Scrap of Peach Pie, Pretty In Pink, Pretty Peacock and Basic White for die cutting
  • Basic White inside: 5 ¼” x 4”

Instructions:

  • Run Designer Paper polka dot square through Emboss Machine with Charming Duck Pond Dies
  • Place over Basic White square and stamp sentiment as shown with Pretty Peacock ink
  • Adhere Basic White square to back of Designer Paper with Tear & Tape
  • Adhere Designer Paper to card base with Stampin’ Seal
  • Tie Pretty Ink Pink Ribbon around Pretty Peacock Square in a bow as shown and cut with Paper Snips
  • Adhere square to card base with Stampin’ Dimensionals
  • Cut Peach Pie cattails, Pretty Ink Pink flowers and Pretty Peacock Lily Pads with Charming Duck Ponds Bundle
  • Stamp frog onto Basic White Cardstock using Memento Black ink and cut with Charming Duck Pond Dies
  • Color with Stampin’ Blends: Peach Pie lily pad, Pretty Peacock edge of frog, Lost Lagoon inner area of frog
  • Adhere lily pads to card with Stampin’ Dimensionals
  • Adhere flowers to card with Multipurpose Liquid Glue
  • Adhere cattails to card with Multipurpose Liquid Glue
  • Adhere frog to card with Stampin’ Dimensionals
  • Adhere Shimmer Dots as shown with Take Your Pick Tool
  • Adhere Basic White layer inside card

__________________________

In addition to the creative inspiration, there’s another great reason to love the Charming Duck Pond Bundle: savings! When you purchase the bundle, you automatically save 10% compared to buying the stamp set and dies separately. And for an extra special treat, during the month of June, you’ll receive an additional 10% off. This means you can enjoy a total savings of 20%, making it the perfect time to add this bundle to your crafting collection.

I hope today’s post inspires you to explore the possibilities of the Charming Duck Pond Bundle. Whether you’re an experienced stamper or new to the craft, this bundle offers something for everyone.

Happy crafting, and don’t forget this sale ends soon!

Citrus Blooms Card Tutorial

Hello Stampin’ Friends ~

I’m back (internet went down) and ready to share! Today’s card comes from the Citrus Blooms bundle by Stampin’ Up! It’s an exquisite collection designed to infuse your paper crafts with the vibrant charm of sun-ripened fruits. It’s is ideal for adding a sweet, fruity touch to your projects, featuring speckled citrus stamps that can be brought to life with your favorite coloring techniques.

It’s teamed up with the coordinating Mediterranean Blooms Designer Series Paper. This 12″ x 12″ collection transports you to a world of sun-soaked citrus, hand-painted ceramics, and enchanting greenery. Inspired by the captivating beauty of the Mediterranean, the paper features intricate designs and vibrant hues that perfectly enhance the fruity motifs of the stamp set.

Measurements:

  • Night of Navy: 11” x 4 ¼”, 4 ¼” x 3”
  • Mediterranean Blooms: 5 ¼” x 4”, Cut out lemons from DSP
  • Basic White: 4” x 2 ¾”

Instructions:

  • Score and fold the card base in half as you would if you were making a normal card.
  • Glue the DSP to the Night of Navy card base.
  • From the DSP with the large lemons, fussy cut one of the images.
  • Stamp the sentiment using the Tuxedo Black Memento ink on the lower right corner of the Basic White cardstock.
  • Glue the Basic White cardstock to the Night of Navy cardstock, then glue this piece to the DSP on the card base.
  • Glue the fussy cut lemon image to the Basic White cardstock, making sure to not cover up the stamped sentiment.
  • Add 3 of the Night of Navy Opal Rounds to the front of the card.

Together, these products offer a harmonious blend of sweet, fruity imagery and picturesque Mediterranean elegance, making your crafting experience both enjoyable and inspiring.

I hope this adorable card inspires you today …

Happiest Day Card Tutorial

Hello Stampin’ Friends,

As I hit the road with my granddaughter for a fun little getaway to Door County, I’m excited to share a delightful card with you, created by the talented Trayce Bauer from my Design/ Tutorial group. This charming card showcases the “Happiest Day” stamp set, perfectly complemented by the Countryside Inn Designer Series Paper. It’s a beautiful combination that is sure to bring joy to anyone who receives it.

Here are the dimensions and step-by-step instructions to create this lovely card:

Measurements:

  • Boho Blue: 5 ½” x 8 ½” card base
  • Misty Moonlight: 2 ¼” x 5 ¼”
  • Basic White: 4” x 4”
  • Countryside Inn: 2” x 5”

Instructions:

  • Score your card base on the long side at 4 ¼” and fold.
  • Adhere the Designer Paper layer and the Misty Moonlight layer together and attach to the card front using Stampin’ SEAL as shown.
  • Stamp your sentiment using Misty Moonlight ink on the Basic White piece and die cut using the Perennial Postage dies. Then, stamp three dragonflies on the same Basic White cardstock piece using Misty Moonlight.
  • Stamp the dragonfly wings using Calypso Coral ink stamping off on scrap paper first for the bottom wings to get a lighter shade.
  • Hand cut the 3 dragonflies using your paper snips.
  • Attach the sentiment to the card front using Stampin’ Dimensionals.
  • Attach the 3 dragonflies to the card front using Stampin’ Dimensionals.
  • Add 3 Iridescent Foil Gems to the card front and Wink of Stella to the wings of the dragonflies.

Thank you for stopping by!

Embrace the Elegance of Perennial Lavender Designer Paper

Hello Stampin’ Friends ~

Welcome back, crafting enthusiasts! Today, I am thrilled to spotlight a true gem from our collection that has gracefully carried over from the Mini Catalog and remains a cherished favorite: the Perennial Lavender Designer Series Paper. This exquisite 12″ x 12″ paper brings the timeless beauty of lavender fields directly to your creative space.

A Glimpse into Perennial Lavender Designer Paper

The Perennial Lavender Designer Series Paper is a delightful homage to the serene and enchanting fields of wild lavender. Each sheet is adorned with hand-painted designs, capturing the essence of lavender and the vibrant wildflowers that flourish beside it. The intricate patterns and calming hues make this paper an absolute must-have for any paper crafting project.

I am excited to share two stunning cards created by our talented Spring Stamping Retreat Attendee Swap participants. These cards showcase the elegance and versatility of the Perennial Lavender Designer Series Paper in truly inspiring ways.

Card 1: Hello Lavender

This card exudes tranquility with its soothing lavender tones. The background is a beautiful sheet from the Perennial Lavender collection, perfectly complementing the intricate die-cuts. The layers give the card a beautiful flow, and the die cut greeting adds some textures. The pretty Purple Fine Shimmer Gems add the finishing touch.

Card 2: Wildflower Whimsy

The second card is a burst of wildflower joy. Utilizing the bolder, more colorful patterns from the Perennial Lavender paper, this card captures the vibrant spirit of a meadow in full bloom. Layering the paper with a playful arrangement and a couple embellishments, create depth and interest, making this card a standout piece.

Why I Love it … And You’ll Love It too:

  1. Artistry in Every Sheet: The designs are hand-painted, offering a unique and artistic touch to your projects. Each sheet feels like a miniature work of art, ensuring that your creations are both beautiful and unique.
  2. Versatility: Whether you’re crafting cards, scrapbooking, or creating home décor, the Perennial Lavender paper provides endless possibilities. Its versatile design makes it perfect for a variety of themes and occasions.
  3. High-Quality: As with all our designer series papers, the Perennial Lavender paper is of premium quality. It’s sturdy and easy to work with, ensuring that your projects not only look good but last long too.

Ready to bring the beauty of lavender to your paper crafts? The Perennial Lavender Designer Series Paper is available now, and it’s the perfect addition to your crafting supplies. Don’t miss out on this versatile and enchanting paper. Let your creativity blossom with Perennial Lavender!

Happy crafting, and may your projects always be as beautiful as a field of wild lavender.

#stampingretreat #gueststamper

Spring Stamping Retreat Card Showcase

Hello Stampin’ Friends ~

Today I’m thrilled to share three great cards from our recent Spring Stamping Retreat Attendee Card Swap. Our talented attendees have truly outdone themselves, creating beautiful designs that highlight the artistry and versatility of our favorite stamping products. Let’s dive into the details and celebrate their amazing work.

Card 1: Cheerful Daisies Card

The star of this card is undoubtedly the daisies, stamped in soft, cheerful hues of Moody Mauve, Bubble Bath and Mossy Meadow that evoke the freshness of a spring garden. The intricate detailing of the stamps brings each daisy to life, showcasing the versatility of the set.

Kellie attendee used a the “Two-Step” stamping technique to add depth and dimension to the daisies, seamlessly transitioning between pink and mauve. This technique enhances the realism of the flowers and adds a dynamic feel to the card.

Card 2: Layered Florals Embossing Folder Card

Next, we have a stunning creation featuring the Layered Florals Embossing Folder. This card showcases the elegance and sophistication that embossing can bring to any project.

To accentuate the embossed details, Karie used a coloring technique, lightly coloring over the raised areas with the Stampin’ Blends markers. This not only highlights the intricate floral patterns but also adds a soft, vintage touch.

A simple, elegant sentiment is stamped and placed delicately at the top of the card. This minimalist approach allows the embossed florals to remain the focal point, creating a harmonious balance between the elements.

Card 3: Simply Zinnia Bundle and Embossing Folder Card

This card captures the essence of zinnias in full bloom, bursting with color and texture. This bundle includes both stamps and dies, allowing for beautifully stamped and precisely cut zinnias. Sandy then used a combination of bold, bright colors to reflect the natural beauty of zinnias, resulting in a card that is both eye-catching and joyful.

The coordinating embossing folder provides a detailed backdrop that complements the stamped and die-cut zinnias. The embossed background adds texture and interest without overwhelming the main floral elements. Sandy added a touch of bling with the 2024-2026 In Color Glimmer paper.

This was the WINNING card for our attendee Swap!! They all get to vote for their top 3 favorites … then the votes are tallied and a winner announced. Our Winner receives a Gift Certificates for … Stampin’ Up! products!!

I hope these beautiful creations inspire you to experiment with your stamping and embossing techniques. Our Spring Stamping Retreat attendees have truly showcased their talent and creativity, demonstrating how versatile and impactful these products can be. Whether you’re new to stamping or a seasoned pro, there’s always something new to discover and create. Happy stamping!

Simply Sunday: Retreat Card Parade!

Hello Stampin’ Friends ~

I thought it would be fun to share more cards from our Retreat Attendee Card Swap! My guests are so talented and I love seeing all the different styles.

Enjoy ….

Love this card …. It was made by Carol who used the Cottage Wreath Bundle. This is also a fun fold card … The white piece opens to the right and exposed the greeting.

This stunning card was created by Meg … She used the “Timming the Tree” set from the Annual Catalog. Don’t you just love the multiple colors of green she layered on her tree?

If you are a fan of the more whimsical Christmas Cards, then Lynne’s is right up your ally. This is the “North Pole Mischief” Stamp set found on page 37 of the Mini Catalog.

I saved this last card because it brings me memories of my grandparents ….

Although grandpa and grandma did not have a sleigh, memories of being on the farm with my grandparents was priceless. A winter wonderland is how I always pictured Christmas with them. Someday … I’m going on a sleigh ride!!

Thank you for joining me today and I hope you enjoyed the Swap Cards as much as we all did!

Have a great day ~

Here are the stamps sets and bundles used on today’s cards ….

Woo Hoo … Congratulations Card

Hello Stampin’ Friends ~

How are YOU today? I’m excited … let’s call this terrific Tuesday, because I have the cutest Congratulations card to share with you, best of all … it can be used for any one of any age!! This card was made by one of my talented design team members and I can’t wait to share it with you, so here it is!

OK … isn’t this just the cutest?! So bright and colorful – this card will put a smile on anyone’s face.

Let’s begin … you can use this as a little treat card for someone who just graduated potty training, or how about graduating kindergarten, or middle school, or college. How about a promotion at work, or you just got the job you were dreaming of … see where I’m going with this? You can use this simply amazing card for so many different occasions.

She used the Amazing Phrases stamp set from the Sale-a-bration Catalog along with the thick Basic White and Pacific Point cardstocks. The inks used to stamp the sentiments are Mango Melody, Pacific Point, Granny Apple Green, Real Red, Gorgeous Grape and Tuxedo Black Memento Ink.

She used the Granny Apple Green Stampin’ Blend on the Crinkled White Ribbon to dye it. The sentiment is die cut with the Stylish Shapes dies and then backed with some Vellum cardstock … makes that pop nicely, don’t you think? I just love this card! It’s so bright and fun.

Thank you for joining me today, I hope it’s a good one.

Here is a list of ingredients used in the creation of this card …

Peaceful Cabin / Guest Stamper: Kathy Cz.

Hello Stampin’ Friends ~

How many of you have the Peaceful Cabin bundle? Many of my friends do … it’s so versatile. Today I’d like to share with you a beautiful card that I received from one of my friends Kathy C. Kathy is also one of my Stars Team members and loves to share her passion for stamping!

Kathy used the Peaceful Place Designer paper (sold out) along with the Peaceful Cabin bundle and then accented it with the Evening Evergreen cardstock. (Looks bluish from the light). It’s a simple layout but with the glimmer paper tucked underneath the die cut cabin … it really pops.

I think anyone would enjoy receiving this card, I know I sure did. I would love to spend a few days here in this Peaceful Cabin.

I want to thank you for checking out my blog today…. enjoy today.

TODAY’S STAMPIN’ SUPPLY LIST … If you liked the products used in todays projects, I have links for you below. Just click on the item you would like more information on, or to begin your shopping. It will take you directly to my website. Thank you

Thanksgiving Guest Stamper: Kathie D.

Happy Thanksgiving Stampin’ Friends ~

Today I have a very special card to share with you, one that was sent to me for this very occasion … It touched my heart.

Kathie’s beautiful card was created with the Colorful Season stamp set and coordinating dies (retired). I couldn’t resist sharing Kathie’s card with all of you …

I can’t express enough the gratitude that I have in my heart for you, my stampin’ friends … for the past 20 years we have grown to know each other better and have shared the ups and downs that life presents us. You have made it easier to get through the rough times and brightened even my best days … I thank you.

Although we many not be gathering as we normally do … My wish for you on this day is peace and the joy spent with family and/ or friends.

God Bless, Linda

Seasons Greetings / Guest Stamper: Cindy P.

Hello Stampin’ Friends ~

I have another beautiful card today from our Annual Holiday Stamping Retreat using the remarkable Feels Like Frost product suite. Cindy Plzak made this card for our Attendee Card Swap and it is stunning!

You can create custom winter and Christmas die-cut frames in record time using the Frosted Frames Dies, and Cindy did just that in Night of Navy cardstock and highlighted it with the Sparkle Glimmer paper.  It frames one of the beautiful scenes from the Feels Like Frost 6″ x 6″ Specialty Designer Series Paper.

The greeting comes from the Still Scenes Bundle. The Still Scenes Bundle includes the Still Scenes Cling Stamp Set and the Snow Globe Scenes Dies… the proud buck posing in the wintery scene is also included in this die set.

Cindy’s card is a beautiful representation of how Stampin’ Up! stamp sets/bundles coordinate with each other. This takes our card creations to a whole new level … as seen by Cindy’s swap card. So, so pretty!

Thanks for sharing part of your day with Cindy and I today … it is appreciated. I hope you enjoyed Cindy’s card as much as I did. All of the attendee swap cards were beautiful!

I’ll meet you back here tomorrow, till then … Have an awesome day.

TODAY’S STAMPIN’ SUPPLY LIST … If you liked the products used in todays card, I have links for you below. Just click on the item you would like more information on, or to begin your shopping. It will take you directly to my website. Thank you

Thank you for choosing me as your demonstrator!