I’m Here for You Card …

Hello Stampin’ Friends,

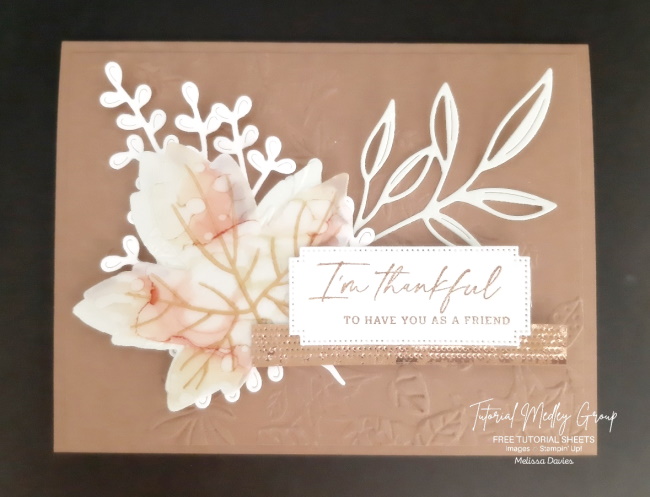
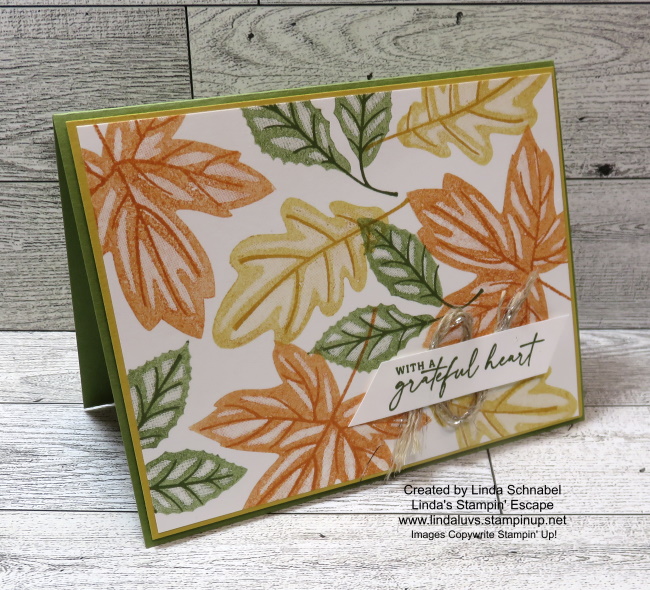
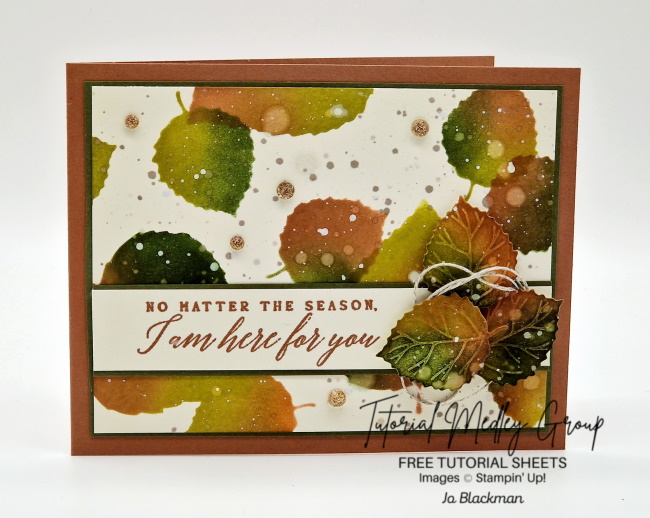
Today I have another beautiful card shared from one of the talented artistic in the Tutorial Design group I belong to. This gorgeous card just seemed fitting somehow. I will list the ingredients, the measurements and then step by step instructions ….

Supplies:

  • Stamp Set/Bundle: Perched in a Tree (159791), Aspen Tree Dies (159798)
  • Cardstock: Very Vanilla (101650), Pebbled Path (161722), Pecan Pie (161717)
  • Ink: Mossy Meadow (147111), Pecan Pie (161665), Wild Wheat (161725), White Craft Stampin’ Ink Refill (101780)
  • Other: Blending Brushes (153611), Linen Thread (104199), Water Painter (151298), Adhesive Backed Sparkle Gems (161288)
  • Tools & Accessories: Stampin’ Cut & Emboss Machine (149653), Take Your Pick (144107), Bone Folder (102300), Paper Trimmer (152392), Paper Snips (103579)
  • Adhesives: Multipurpose Liquid Glue (110755), Stampin’ Dimensionals (104430), Mini Glue Dots (103683)

Measurements:

  • Pecan Pie Cardstock:  11” x 4 ¼” (scored at 5 ½”)
  • Pebbled Path Cardstock: 5” x 3 ¾”
  • Pebbled Path Cardstock: 1” x 3 5/8”
  • Very Vanilla Cardstock: 4 7/8” x 3 5/8”
  • Very Vanilla Cardstock: 7/8” x 3 5/8”
  • Very Vanilla Cardstock: Scrap for leaves

Instructions:

  • Cut a template from a piece of scrap paper of the two size leaves from the Aspen Tree Dies.
  • Using this template and blending brushes, blend the inks through the leaves, overlapping as you go until you are happy with the coverage.
  • Using some fresh water, flick some droplets over the background.  Mix some Pebbled Path ink with a little water and flick some droplets over the background and repeat with the Craft White Ink.  Set aside to dry.
  • Stamp the sentiment on to the Very Vanilla strip.
  • Die cut three small leaves and using the blending brushes, add ink to the leaves.
  • Glue the leaf background to the Pebbled Path layer and glue to the card front.
  • Glue the sentiment strip to the Pebbled Path strip and attach to the card front using Stampin’ Dimensionals.
  • Add a length of Linen Thread to the right hand of the sentiment and add the leaves using glue and Stampin’ Dimensionals.
  • Add a few gems to complete.

hank you for spending some time here today. Enjoy your day.

Thankful for Friends Card ….

Hello Stampin’ Friends ~

Today’s beautiful card comes from one of my fellow Tutorial Team members because with a little help from my friends, I can continue to share with you. This soft and stunning fall card was created by Melissa Davies ….

Supplies:

  • Stamp Set/Bundle: Autumn Leaves bundle (162719)
  • Cardstock: Basic White (159276), Pecan Pie (161717), Soft Seafoam (146988), Vellum (101856)
  • Ink: Saddle Brown Stazon (151508)
  • Designer Series Paper: Oxidized Copper (162190)
  • Tools & Accessories: Stampin’ Cut & Emboss Machine (149653), Bone Folder (102300), Paper Trimmer (152392), Paper Snips (103579), Gorgeously Made dies (161202), Leaf Fall embossing folder (159847), Water painters (151298)
  • Stampin’ Blends: Soft Seafoam (154902), Calypso Coral (154881), Wild Wheat (161661)
  • Adhesives: Multipurpose Liquid Glue (110755), Stampin’ Dimensionals (104430)
  • Misc.: 91-99% Isopropyl Alcohol

Measurements:

  • Pecan Pie: 5 ½” x 8 ½”, 4” x 5 ¼”
  • Basic White: 4 ¼” x 5 ½”
  • Soft Seafoam: 4 ¼” x 5 ½”
  • Vellum 3 ¼” x 3 ¼”
  • Oxidized Copper: ½” x 3 ¼”

Instructions:

  • Cut a 5 ½” x 8 ½” Pecan Pie card base. Fold in half.
  • Cut a 4” x 5 ¼” Pecan Pie panel.
  • Emboss the panel using the Leaf Fall embossing folder.
  • Adhere the panel to the card front.
  • Cut a narrow label from Basic White cardstock.
  • Stamp the sentiment onto the label using Saddle Brown ink. Set aside.
  • Cut a branch from Basic White cardstock.
  • Cut the leaves from Soft Seafoam cardstock.
  • Cut a large maple leaf from Soft Seafoam cardstock.
  • Emboss the large Soft Seafoam maple leaf using the Leaf Fall embossing folder.
  • Cut a large maple leaf from Vellum cardstock.
  • Color the entire leaf randomly using Soft Seafoam, Calypso Coral, and Wild Wheat Stampin’ Blends.
  • Saturate the water painter brush with alcohol. Tap the brush to splatter alcohol drops onto the leaf. Let the colors bleed until desired look is achieved. Let dry completely.
  • Stamp the veining onto the maple leaf using Saddle Brown ink.
  • Adhere the maple leaf to the Soft Seafoam embossed leaf.
  • Adhere the leaves and branches to the card front.
  • Adhere the embossed maple leaf to the card front using Stampin’ Dimensionals.
  • Die cut a ½” x 3 ¼” Oxidized Copper strip.
  • Adhere the strip to the BACKSIDE of the label.
  • Adhere the label to the card front using Stampin’ Dimensionals.

Thank you for joining me today. I hope you enjoyed Melissa’s card as much as I do!

A Birthday Celebration / Celebration of Life …

Hello Stampin’ Friends ~

Today would have been Armani’s 4th birthday, as you know… he passed away unexpectedly last Friday from what they believe was a seizure. I’m sharing the Patchwork Pieces card that I created during a Facebook LIVE for him … he LOVES Orange!! This little guy had to come into my stamp room every time he was over and checked out the cards I have made … he’s was the sweetest little guy 🧡!!

Here is the video replay of my Facebook LIVE ….

Wasn’t that fun and easy to create? And by using the designer paper and cardstock, you have enough left over for a second card. Have some fun and die cut some black and turn it into a Halloween card … the possibilities are endless.

So … Do you think he will love this card? The last one he took had flowers, but it was ORANGE!! He even passed up the spaceship over those orange flowers …. told you he was a hoot!

Thank you for stopping by and checking out my blog post today. Have a great day ~

Halloween Graveyard with Them Bones

Hello Stampin’ Friends ~

Yesterday’s “Stamp with Me” video and card layout featuring the Joy of Christmas Suite/Collection were an absolute delight, weren’t they? It’s always a pleasure to explore new creative avenues and share our crafting joys.

The clean and straightforward card layout demonstrated in the video is not only visually appealing but also easy to recreate. It allows room for creativity and personalization, making it a go-to design for card makers. You don’t need “what I have” … use the measurements with the goodies YOU have.

But today, we’re shifting gears and getting into the Halloween spirit! We’re all set to embark on a spine-tingling crafting adventure with the “Them Bones” Designer Paper and the “Tricks and Treats” bundle. Get ready for some frightful fun!

The “Them Bones” Designer Paper is a spooktacular choice for crafting during the Halloween season. With its hauntingly fun skeletons, bats, and other creepy critters, this paper pack is bound to add an extra dose of Halloween spirit to your creations.

Pair this paper with the “Tricks and Treats” bundle, and you’re in for a wickedly good time. This bundle offers a delightful stamp set and coordinating dies, perfect for crafting spooky cards, treat bags, and more.

I used the Timeworn Typed Embossing Folder to create the look of an old headstone to add an added touch of spookiness… on that note, I created a headstone from the die which highlights our greeting. We’ve got skeletons dancing in the graveyard with our Glow in Dark bats lighting up the way!

Stay tuned for more exciting crafting adventures, and remember, it’s not just about the destination; it’s the joy we find in the journey.

Happy crafting, and have a spine-tingling Halloween season!

Last Nights Leftovers … Crafters Heaven!

Hello Stampin’ Friends,

If you’re like me, you’ve probably been busy creating beautiful holiday cards, and you might just have a pile of leftover die cuts from your previous projects. Well, fear not! Today, we’re going to embrace the Joy of Christmas suite of products and turn those remnants into a cute and quick Christmas card that will warm the hearts of your recipients.

The Joy of Christmas Suite: A Festive Wonderland

Before we dive into our crafting adventure, let’s talk about the Joy of Christmas suite of products. This collection is a true winter wonderland for crafters, featuring everything you need to create stunning holiday cards and decorations. With its rich colors, whimsical designs, and versatile elements, the Joy of Christmas suite is sure to make your crafting sessions joyful and memorable.

The suite typically includes:

  1. Christmas-themed Paper: High-quality, double-sided paper with charming holiday patterns.
  2. Stamps and Dies: Coordinating stamp sets and die cuts for easy card-making. (Save 10% when bundled)
  3. Embellishments: Currently Unavailable.

Now, let’s put those leftover die cuts to good use and create a delightful Christmas card!

All you need is your card base, I’m using Shaded Spruce, then my 4″x 5-1/4″ piece of Designer paper and then I took the left over piece from yesterday’s card and popped it onto a piece of Shaded Spruce designer paper …. And there you have it! In just a few easy steps, you’ve transformed your leftover die cuts into a cute and quick Christmas card that’s sure to bring a smile to someone’s face.

Remember, the Joy of Christmas suite of products is all about embracing the festive spirit and spreading joy through your creations. So, dig into your crafting supplies, unleash your creativity, and enjoy the magical process of making handmade Christmas cards. After all, there’s nothing quite like receiving a thoughtful and homemade card during the holiday season.

Happy crafting, and don’t forget to join me LIVE on Saturday for my World Cardmaking Day LIVE on Facebook…..

Twelve Weeks of Christmas: Week One

Hello Stampin’ Friends,

‘Tis the season to be merry, and last night’s Facebook LIVE session marked the exciting kickoff of my “12 Weeks of Christmas” series! With this week dedicated to the “Joy of Christmas,” we delved into the world of holiday card crafting, and it was an absolute delight… except maybe tying the bow! 😅 You’ll have to watch the video to catch that ….

I’m was thrilled to guide you on the first card of this creative journey. After all, what’s better than starting your Christmas preparations early and infusing a little extra joy into your holiday season? If you can’t wait till next week Tuesday, join me for my World Cardmaking Event this Saturday!!

Let’s get you set up to create today’s card with the dimensions you’ll need …

  • Cherry Cobbler: 11″ x 4-1/4″ Scored at 2-2/3″ x 5-1/2″ plus 2 – 3-1/4″ x 2-3/4″
  • Designer Paper/ Front: 4″ x 2-1/2″ Inside: 4″ x 5-1/4″
  • Basic White: 3″ x 2-1/2″ and 4″ x 2-1/2″
  • Gold Adhesive Backed Glimmer Paper: 3″ x 2-1/2″ plus 2-1/2″ x 2-1/2″ for Die Cut Noel

Christmas is not just about receiving, but also about giving from the heart. Handmade cards are a personal touch that can warm the hearts of friends and family.

Make sure to tune in next week for another dose of festive inspiration as we continue our “12 Weeks of Christmas.”

Let’s make this holiday season the most joyful and creative one ever! 🎄✨

Abracadabra, Halloween Lights Card

Hello Stampin’ Friends,

Happy October 1st! 🎃🧙‍♀️ Abracadabra! ✨ Get ready to add a spooktacular twist to the Merry & Bright Bundle! 💌🕸️ We’re conjuring up some Halloween magic to transform the Merry & Bright Bundle into the cutest Halloween card that your ghouls and goblins will adore. 🦇👻 And I have all the dimensions and instructions for you!!

Measurements:

  • Rich Razzleberry:  5 ½” x 8 ½”
  • Pumpkin Pie: 4” x 5 ¼”
  • Basic White: 3 ¾” x 5” 

Instructions:

  • Adhere the Pumpkin Pie cardstock to the folded card.
  • Place the Basic White in the Embossing Folder and roll it through the Cut & Emboss Machine.
  • Stamp the light bulbs on scrap Basic White cardstock using Pumpkin Pie and Rich Razzleberry ink. Cut out using the coordinating dies.
  • Optional: Color the left side of the bulb using the coordinating Watercolor Pencil to add a bit of dimension.
  • Cut out the Silver Foil using the appropriate dies. Adhere all pieces together, then adhere them all on the card.
  • Color the Glossy Dots using the Dark Rich Razzleberry and the Dark Pumpkin Pie Stampin’ Blends markers. Let dry and place on the light bulbs.
  • Stamp the letters on scrap Pumpkin Pie cardstock using the Rich Razzleberry ink pad then cut out each letter using the coordinating punch. Adhere them to the card.

It’s so exciting that you can create enchanting Halloween cards from the Merry & Bright Bundle made to sparkle and sprinkle the holiday cheer. 🌟🎃 Get the bundle today and let the crafting magic begin! 🌠🍁

Thank you for spending a bit of your Sunday with me!

Halloween Card Magic

Hello Stampin’ Friends ~

If you’re as batty about Halloween as I am, you’re in for a treat today. I recently had a fangtastic time at our Halloween class on Wednesday night, where we brewed up some spooky-cute fun with the Them Bones Designer Paper and the Tricks and Treats Bundle.

Today I’ll share my adorable Halloween card featuring candy corn die cuts and the spook-tacular Z-Fold … a super simple fun fold! Start with an 4-1/4″ x 11″ piece of cardstock then score at 2-3/4″ and 5-1/2″ … that simple.

Picture this: a room filled with fellow Halloween aficionados, a cauldron of stamping supplies, a dash of creativity, and a sprinkle of eerie ambiance. That’s exactly what our Halloween class was all about!

Our bewitching adventure began with the Them Bones Designer Paper. 🦇🦴This paper pack is a Halloween dream come true, featuring quirky skulls, spooky spiders, and haunted houses. It’s a perfect backdrop for all your Halloween crafting endeavors, and it set the mood for our ghoulishly delightful evening.

To cast our crafting spell, we enlisted the help of the Tricks and Treats Bundle. 🎃 This bundle is chock-full of charming Halloween-themed stamps and coordinating dies that make crafting a breeze. But the true star of the night? The candy corn die cuts!

So, as you prepare for Halloween this year, don’t forget the magic of crafting. The Them Bones Designer Paper and Tricks and Treats Bundle are your partners in Halloween crafting crime. Give it a try, and who knows, you might just conjure up some Halloween magic of your own!

Until next time, may your cauldron be bubbling and your Halloween crafting be absolutely spook-tacular! 🎃🕷️🌙

Explore Creative Possibilities with the “Enjoy the Adventure Memories and More” Card Pack!

Hello Stampin’ Friends ~

Are you ready to embark on a creative journey? Look no further than the “Enjoy the Adventure Memories and More” card pack, currently on sale in our clearance rack. This versatile card pack is not only perfect for scrapbooking but also for crafting quick and easy cards that will leave a lasting impression. Let’s dive into what makes this card pack a must-have for any crafting enthusiast.

My first card was the “Thank You” card … the simplest of the bunch. The base comes from the Cards & Envelopes which coordinate with the Memories & More Card Pack. I simply cut down the 4″ x 6″ Thank you card to 3-1/2″ x 5-1/2″ (so a 1/2″ off the top and 1/2″ off one side). I then colored in the THANK YOU with Mint Macaron and Petal Pink Stampin’ Blends. Super Simple!

On to the next card, we begin with the Mango Melody and Petal Pink card base. These are scored for you so they fold nicely …

I took a second card base and cut off the front, then I cut the front down to 3-1/4″ x 4-1/4″ (you’ll get 2 from the front piece). I then layered the “heart” card which measure 3″ x 4″ … not cutting needed.

The rest is easy as I used the die cut adhesive backed elements from the sticker sheet included in the Enjoy the Adventure Memories & More Card Pack. Each of the elements were popped up with Stampin’ Dimensionals and then brushed with Wink of Stella.

The next card also starts with the Mango Melody and Petal Pink card base…

This card is all about layers … the bottom two layers are actually 2 of the 3″ x 4″ cards from the card pack. The two smaller pieces; the Petal Pink is 4″ x 1-3/4″ and was attached vertically, then the Mango Melody piece 3-1/4″ x 3/4″ was layered vertically. Both of these smaller pieces were cut from the 1/2 front that was left over from the second card!

The Happy Birthday (popped up) and Stars are elements from the sticker sheet. You’ll have to substitute a coordinating color for your cardbase the the “cards & envelopes” have sold out.

Now … I have one more card to share with you. If the first card was a bit too simple for you, this card will show you how you can get the same look, but a little more jacked up …

The card begins exactly how our first card was created, except I took the left over pieces cut off and found a full “THANK YOU” to trim down and color … this will give us more dimension. Then I punched a scalloped heart from vellum to place behind the “Thank You” so it stands out more.

Don’t miss out on this fantastic opportunity to grab the “Enjoy the Adventure Memories and More” card pack at a discounted price from our clearance rack. Start your creative adventure today and enjoy the versatility and beauty that this card pack has to offer. Whether you’re a scrapbooking enthusiast or simply looking to make quick & easy cards, this pack has you covered. Hurry, because this offer won’t last forever!

Thank you for joining me today. Which one of these cards is your favorite??

Creating Magic with Water-Based Inks & Autumn Leaves …

Hello Stampin’ Friends,

It’s time to Create Magic with Water-Based Inks with some tips and techniques to help you in your cardmaking and scrapbooking! Previously I shared the differences between three of our most popular inks (Click Here to View) Whether you’re a seasoned crafter or just starting on your creative journey, water-based inks offer a world of possibilities to enhance your projects.

Today, we’ll explore the exciting world of water-based inks with share tips and a fun technique that will take your card making and scrapbooking to the next level.

Why Water-Based Inks?

Water-based inks are immensely popular in the crafting community for several reasons:

  1. Versatility: Water-based inks work on a variety of surfaces, including paper, cardstock, vellum, and even fabric. They’re also great for different crafting techniques, making them incredibly versatile.
  2. Ease of Use: These inks are beginner-friendly, forgiving, and easy to clean up. You don’t need specialized equipment or ventilation like you do with some other types of inks.
  3. Blendability: Water-based inks can be effortlessly blended to create beautiful gradients and backgrounds. This feature is especially handy for creating unique card backgrounds and scrapbook pages.
  4. Layering: You can layer multiple colors to achieve complex effects and depth in your projects. This allows for endless creative possibilities.

Today we’re going to start with the basics … Simple stamping with a hint of a fun technique called “Stamping Off”. You can use pre-folded cards or cut and fold your own from cardstock. My base is an A2 size card; 8-1/2″ x 5-1/2″ scored and folded at 4-1/4″. Decide on the card’s theme and the colors you want to use. This is where your creativity shines.

Today we are using the new Autumn Leaves Stamp Set along with the Crushed Curry, Old Olive and Pumpkin Pie water-based ink pads! The Autumn Leaves is a photopolymer stamp set so for best results I use the Stampin’ Pierce mat to stamp onto. (Use a scrap piece of paper over the top to keep it clean).

As for our technique to “stamp off” … you’ll ink up your image and then stamp it onto a scrap piece of paper before stamping it onto your cardstock. Position your inked stamp over the desired area on your card. Apply even pressure, pressing down firmly but not too hard. Hold the stamp in place for a moment to ensure the ink transfers. The veins for the leaves are inked up and then stamped directly over the stamped off leaf, giving it the look of dimension. It’s magical.

After use, clean your stamp with the Stampin’ Scrub or paper towel. I stay away from baby wipes, but if you use them, make sure they are alcohol, lotion and lint free… the last thing you want is to have on your stamps or ink pads is a foreign substance. This maintains the quality of your stamps.

I stamped the greeting onto a scrap piece of white cardstock using the Old Olive ink then trimmed it down. I added some of the Threaded Twine behind it after breaking it apart by pulling out a few threads. I used Stampin’ Dimensionals to pop it up. This was all layered onto a piece of 4-1/4″ x 5-5/8″ Crushed Curry mat.

Stamping cards with water-based inks is a fun and rewarding creative hobby. With practice and these tips, you’ll feel like a master card maker in no time. Each card you create will be a work of art, made with love and care…. and that is why we stamp! So, gather your materials, unleash your imagination, and start stamping your way to heartfelt greetings and beautiful cards!

Thank you for joining me today.

Gifts from Santa Claus …

Hello Stampin’ Friends,

Prepare to be charmed by the heartwarming holiday spirit embodied in this adorable Christmas card created with the “Gift of Giving” stamp set and “Shining Brightly Specialty Designer Series Paper” from Stampin’ Up!

The “Gift of Giving” stamp set features endearing images, perfect for conveying the warmest wishes of the season. Pairing it with the “Shining Brightly Specialty Designer Series Paper” adds a touch of festive elegance, with its rich colors and sparkling accents.

Measurements:

  • Very Vanilla Thick:  8 ½” x 5 1/2”, scored at 4 ¼”
  • Navy Star DSP: 5” x 3 ¾”
  • Vanilla Star DSP: Largest square and Second square from Stylish Shapes Dies
  • Vanilla: Scrap for Santa

Instructions:

  • Glue the Navy Star DSP to the card front.
  • Cut the two squares from the Vanilla Star DSP.
  • Pierce two holes into the smallest square, as shown.  Take a length (8”) of the Night of Navy & Gold Glitter Ribbon and cut it lengthways into 4 thin strips.  Thread one of the small strips through the holes from the back.  Take the other three strips and wrap them around your fingers.  Carefully remove the ribbon from your fingers and squash the centre to create two loops (held with tweezers).  Place the loops on to the square and tie in place with the ribbon ends on the square.  Arrange the bow as you wish and trim the ends.
  • Stamp Santa in Memento ink and colour using Stampin’ Blends.  Cut out.
  • Attach the two squares (parcels) on to the card front using Stampin’ Dimensionals.
  • Attach Santa to the card front using Stampin’ Dimensionals.
  • Add a few gems to complete your card.

Today’s card not only captures the joy of giving during the holidays but also adds a delightful dash of whimsy and style. It’s a true testament to the magic of handmade cards, where every detail conveys love and thoughtfulness. Share the joy of the season with a card that radiates warmth, created with the “Gift of Giving” stamp set and “Shining Brightly Specialty Designer Series Paper.”

Have a wonderful Sunday and thanks for stopping by ~

Delighting friends with the Joy to You stamps

Hello Stampin’ Friends,

Today I’m introducing the delightful “Joy to You” stamp set from Stampin’ Up!’s Mini Catalog, a delightful collection of holiday-themed stamps designed to spread joy and warmth. Paired with the exquisite “Snowflake Magic Specialty” paper, today’s card creation is nothing short of magical.

The “Joy to You” stamp set offers a versatile array of seasonal sentiments, perfect for sending your heartfelt holiday greetings. Meanwhile, the “Snowflake Magic Specialty” paper, with its intricate snowflake designs and shimmering accents, adds an extra layer of elegance and sophistication to your projects.

Measurements: 

  • Card Base: Lost Lagoon 4-1/4” x 11”, scored at 5-1/2”
  • Cardstock #1: Pretty Peacock 4” x 5-1/4”     
  • Cardstock #2: Lost Lagoon 3-7/8” x 5-1/8”
  • DSP: Snowflake Magic Specialty 2” x 5-1/8”
  • DSP: More Dazzle Specialty 1/2” x 5-1/8”
  • Cardstock #3: Basic White 3” x 3” for die-cut sentiment

Instructions:

  • Fold the Lost Lagoon card base in half at the score line and burnish the fold.
  • Emboss Lost Lagoon layer with Basics 3D Embossing Folder.
  • Adhere strip of More Dazzle Specialty Paper to left side of Embossed Lost Lagoon layer with Stampin’ SEAL.
  • Adhere Snowflake Magic Specialty Designer Paper to the Lost Lagoon layer with Stampin’ SEAL, slightly overlapping More Dazzle layer . Leave approximately a 1/8” border of More Dazzle paper visible.
  • Wrap a piece of Silver & White Sheer ribbon around embossed Lost Lagoon layer (approx 1-1/8” from bottom) and secure ends of ribbon on back with Stampin’ SEAL, or tape.
  • Adhere Lost Lagoon layer to Pretty Peacock layer with Stampin’ SEAL, then adhere to card base with Stampin’ SEAL.
  • Stamp sentiment on Basic White Cardstock in Pretty Peacock ink.
  • Die-cut sentiment with largest square in Stylish Shapes Dies.
  • Adhere the sentiment layer to card Stampin’ Dimensionals.
  • Tie a bow with Silver & White Sheer Ribbon and adhere to left side of die-cut square with a Mini Glue Dot.
  • Add (3) Festive Pearls to the card front, as shown.

Together, the “Joy to You” stamp set and “Snowflake Magic Specialty” paper create a harmonious blend of festivity and beauty, making your cards and crafts truly stand out this holiday season. Whether you’re sending wishes to friends and family or creating stunning holiday decor, the “Joy to You” stamp set and “Snowflake Magic Specialty” paper will undoubtedly make your creations sparkle with joy and charm.

Thank you for joining me today ~

Embrace the Beauty of the Season: Graceful Deer Stamp Set

Hello Stampin’ Friends ~

Today we embrace the beauty of the season with the Graceful Deer Stamp Set. The holidays are a time when we come together with our loved ones to create lasting memories and exchange heartfelt greetings. And what better way to convey your warm wishes and spread the festive spirit than with beautifully crafted, hand-stamped cards and projects?

The Graceful Deer stamp set is a masterpiece that captures the serene beauty of nature in the wintertime. This set is perfect for anyone who appreciates the elegance and grace of deer against a backdrop of snow-covered trees. Today’s card was created by one of my fellow Design Team members.

Measurements: 

  • Thick Very Vanilla: 8 ½” x 5 ½”, scored at 4 ¼”
  • Pool Party: 5 3/8” x 4 1/8” and 2 ½ x 1
  • Very Vanilla: 5 ¼” x 4” and scrap

Instructions:

  • Cut card base & fold at score line.
  • Glue Pool Party to card front.
  • Stamp Graceful Deer image on Very Vanilla piece using Pecan Pie ink. Color using Stampin’ Blends: Wild Wheat deer, Cherry Cobbler bird, Pool Party snow drifts, Crumb Cake Antlers, Petal Pink ears.
  • Add sparkle using Wink of Stella on the snow drifts.
  • Glue to Pool Party layer.
  • Stamp sentiment on Very Vanilla scrap using Wild Wheat ink then cut out using Countryside Corner Dies.  Glue to small Pool Party piece, then pop it up using Stampin’ Dimensionals.

The Stampin’ Up! Graceful Deer stamp set from the Holiday Mini Catalog is a must-have for anyone looking to add a touch of elegance and warmth to their holiday crafting. Whether you’re creating cards, gift tags, home decor, or heartfelt gifts, this versatile set will help you capture the beauty and grace of the season. So, embrace your creativity and let the Graceful Deer stamp set bring a touch of magic to your holiday projects this year.

Happy crafting!

A Spooktacular Halloween Treat Card

Hello Stampin’ Friends,

As the leaves change color and the air turns crisp, we know that Halloween is just around the corner. It’s that time of the year when creativity and spookiness collide to bring out the inner child in all of us. And what better way to celebrate the season than with the Stampin’ Up! Tricks and Treats Bundle?

This bewitching bundle brings together the magic of Halloween with timeless classic movie monsters; Dracula and Frankenstein, a friendly ghost, and a candy corn that will sweeten up your crafting projects. Whether you’re an avid paper crafter or just looking to add a touch of spookiness to your holiday decor, this bundle is sure to cast a spell on you.

Nothing says Halloween like a “Trick or Treat” greeting, and with the Stampin’ Up! Tricks and Treats Bundle, you can easily create your own. Using the Stylish Shapes Die makes crafting a breeze. Simply stamp your greeting, die cut it, and you’re ready to go. It’s a quick and easy way to add a festive touch to your projects.

What’s Halloween without a little “EEK!”? This bundle includes a fun and quirky “EEK” tag that adds a playful element to your creations. Use it as a tag on a treat bag, a spooky accent on your cards, or even as a cute decoration for your home. It’s these little details that make the Stampin’ Up! Tricks and Treats Bundle a must-have for Halloween crafting.

To truly elevate your Halloween projects, add in the Candycane Background Dies that are now in the Clearance Rack. These dies allow you to create intricate and eye-catching backgrounds that will make your creations stand out. With the Candycane Background Dies, there’s no shortage of dimension, texture, and fun. They’re perfect for adding a touch of spookiness to your cards, or any Halloween-themed project.

Time to grab your crafting supplies, embrace the Halloween spirit, and get ready to have a hauntingly good time with the Stampin’ Up! Tricks and Treats Bundle.

Happy crafting,

So Creative: Transform from Halloween to Birthday… Card!

Hello Stampin’ Friends,

I’m back with a pop of color, and I promised in my last video that I would show you exactly what you can do with the “leftovers”. Are you ready to take your card-making to the next level? If so, you’re in for a treat (no tricks here!) with our Candy Cane Dies from the clearance rack. These versatile dies offer endless possibilities, and today I’ll show you a simple yet creative way to use them to make a spooktacular Halloween birthday card.

The first step in our creative journey is to choose our cardbase / Basic Black and the I’m using Pumpkin Pie cardstock and will then modify the background die. So simple to trim down this die … just follow the lines and cut with your paper snips.

Now, let’s get creative with those leftover pieces from the tag die. Instead of letting them go to waste, we’re going to use them to create a playful polka dot background for your card. Simply adhere the tag die cutouts onto your cardstock in a random pattern. This will give your card a fun and festive polka dot look, perfect for Halloween.

To complete your Halloween birthday card, use the Wanted to Say Dies to add a birthday greeting. Place the greeting strategically on your card to balance the design, and I layered the greeting over some Vellum cardstock to really create a focal point.

Creating this Halloween birthday card using the Candy Cane Dies has been a blast, hasn’t it? The best part is that it was quick and easy to put together, thanks to these versatile dies.

So, the next time you’re in the mood for some creative crafting, don’t forget to check out the clearance rack for hidden gems like the Candy Cane Dies. With a little imagination, you can transform ordinary dies into extraordinary designs that will delight your friends and family.

Have fun, get creative, and enjoy making one-of-a-kind cards that will leave a lasting impression.

Happy crafting! 🎃🎂👻