Smile Flip Card …

Hello my Stampin’ Friends,

Hope you are having a nice weekend.  I have been working in my Stampin’ room, cleaning, purging, tossing … you know how things build up.  I came upon a packet of pre-cut cards, so I decided to use what was already cut to make my card share today.

000_0814

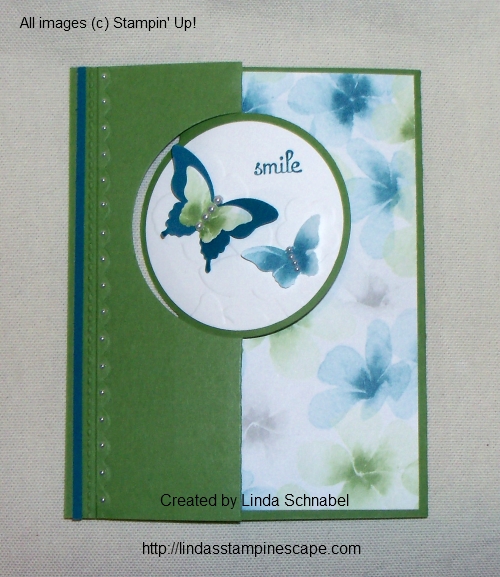
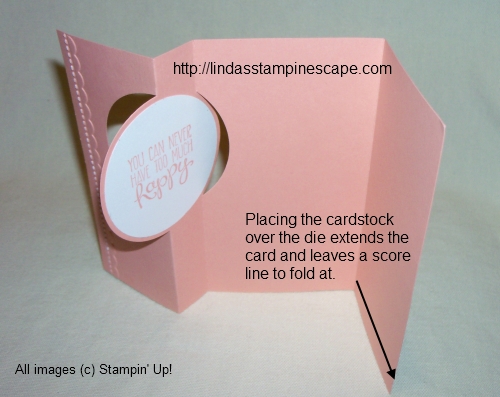
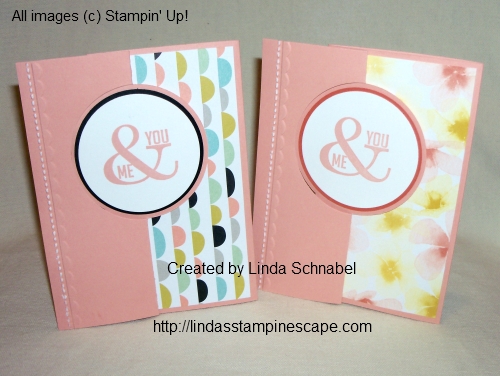
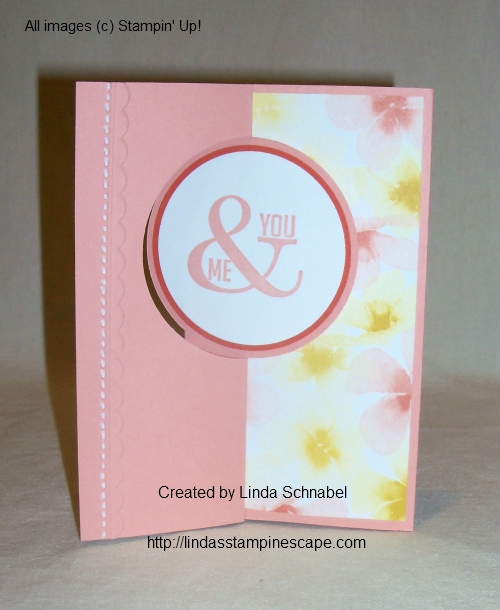
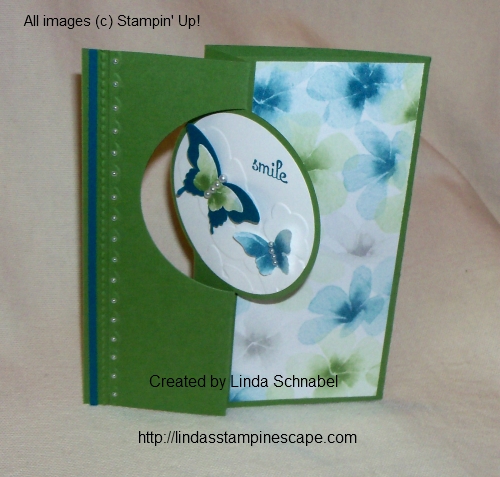
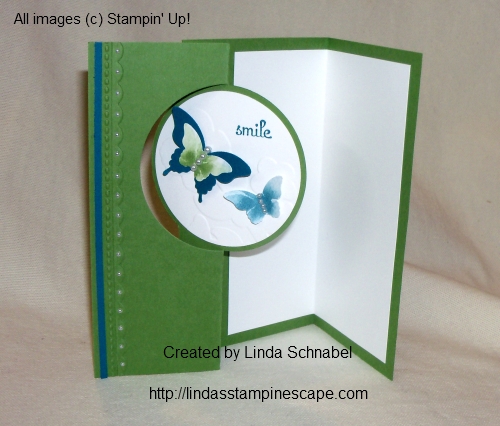
I began with a circle flip card that was cut out of Gumball Green.  It must have been left over from when I was experimenting with the “extending” of the card.  This is where you place the end of the cardstock over the end of the circle framelit so it does not cut it off.

000_0630

I like to use Designer Series Paper with the flip cards because it just adds a nice splash of color.  I chose the “Watercolor Wonder” because it has Gumball Green in it’s color pallet.  Next I wanted a contrast color in the circle flip area, tried “Smokey Slate, but ended up punching the 2-1/2” circle from the Whisper White because it just looked better.

000_0815

I wanted to have some added dimension to the card so I embossed the front with the “Needlepoint Border” folder and the white circle with the “Wildflower Meadow” folder.  I knew I was going to add butterflies and wanted it to look as if they were sitting on the flowers.

To create the butterflies I used “Island Indigo for the “Elegant Butterfly” which is the larger of the two, and then punched out the inner (smaller) butterfly “Bitty Butterfly” out of the gumball green area of the “Watercolor Wonder” designer paper.  I then punched another Bitty Butterfly out of the indigo on the Watercolor Wonder paper.

000_0817

I used the row of pearls for the body of the large butterfly and the smallest pearls to create the body of the smaller butterfly.

I embellished the card by placing the smallest pearls onto the scallop of the embossing.  I then added a fine strip of the island indigo to complete the card.  This brings the indigo color all throughout the card.

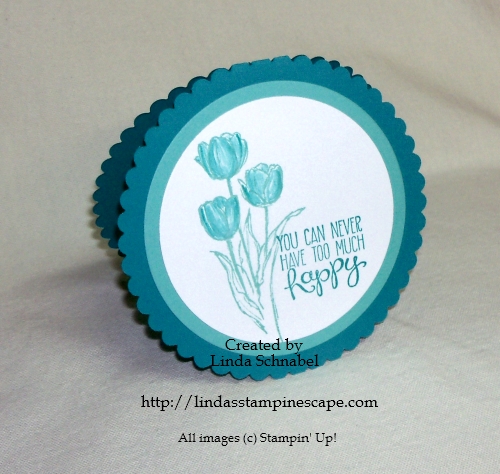
My greeting “smile” comes from the stamp set “Fabulous Phrases” … you can find that on page 70 of the idea book and catalog.  It’s a fabulous stamp set!  You can use it in small areas like I did here, or you can combine the words to make up a phrase!

000_0819

Hope you enjoyed the card share.  I think I will challenge myself to complete all the cards I have pre-cut … and if I can’t do them all, maybe I’ll sell them!  Like I said, it’s time to purge.  I’m getting prepared for a huge retired sale this summer.  Don’t worry … I will send out an invitation when the time comes.

Thank you so much for stopping by my blog.

Enjoy the day ~

blog-closing-small

Here is the list of ingredients I used today …

128577

 Fabulous Phrases Stamp Set – Wood / $37.95

120501

 Fabulous Phrases Stamp Set – Clear / $26.95

133480

 Circle Card Framelit Die – Whisper White / $32.95

120906

 2-1/2” Circle Punch / $16.95

132994

 Watercolor Wonder Designer Series Paper / $10.95

129383

 Needlepoint Border Embossing Folder / $7.95

129376

 Wildflower Meadow Embossing Folder / $7.95

You may view or purchase any of these items just by clicking on the item number.  It will take you directly to my stampin’ store.  Shop 24/7 – 365

Remember the purchase of $50 before shipping and taxes will get you a FREE Sale-a-bration item.  Thank you.

Faux Dipping Technique + Mono Chromatic Coloring = Beautiful!

Hello Stampin’ Friends,

I am really excited to share my card with you today!  You didn’t think I was going to show you a technique without following it up with a card did you?  I thought the way Stampin’ Up! colored the ribbon was really cool … so I had to try it out.

I didn’t have the ribbon they used, so I used the Taffeta Ribbon in Whisper White.  I then ran my markers across the length of the ribbon (as Stampin’ Up! did) starting with the lightest color … Pink Pirouette and finishing with Melon Mambo.

000_0808

I did however change up the next step… I laid my ribbon across a layer of paper toweling and spritzed it with water.  You can find the Stampin’ Spritzers on page 164 of the Idea Book & Catalog.  It blended nicely!  Once the water absorbed into the ribbon, and excess in the paper towel, I moved the ribbon off to the side to dry.  I love the way it looks!  I’ll be trying out some additional color combinations this weekend.

I tried to do the same technique on paper, but it did not work the same as it did on the ribbon.  You can however create the watercolor look with the Shimmery White paper and the Aqua Pens … but that’s another day, and another card.

For my flower, I tried a technique that I will be showing my Technique clubs in the upcoming month.  It is embossed in white embossing powder, and colored in with the Stampin’ Write marker.  Both my card stock and my marker are Pink Pirouette.  It is unbelievable that you can get that much variation … using the same color marker!

To get the darker color, you simply keep coloring over the same area.  To create the light / highlighting … leave it blank or only go over that area once.  I did however add a touch of Melon Mambo right around the center of the flower so it matched the ribbon better.

000_0812

The white card stock you see, is the Shimmery White … it’s so pretty!  I wish my camera would capture it better.  I embossed the bottom area with the “Needlepoint Border” embossing folder.

The flower was cut out, popped up with Stampin’ Dimensionals, and framed with the “Oval Collection” framelits.

I hope you enjoyed seeing the “Faux Dipping” technique on today’s card share.  I’d like to hear from you, are you going to try this technique??

Have a wonderful weekend ~

blog-closing-small

Here is the list of ingredients I used today …

133104

 Peaceful Petals Stamp Set – Wood / $28.95

133107

 Peaceful Petals Stamp Set – Clear / $20.95

109070

 Taffeta Ribbon – Whisper White / $6.95

126185

 Stampin’ Spritzer / $2.95 – Set of 2

101910

 Shimmery White Cardstock / $7.95

129383

 Needlepoint Border Embossing Folder / $7.95

129381

 Ovals Collection Framelits / $26.95

 You may view or purchase any of these items just by clicking on the item number.  It will take you directly to my stampin’ store.  Shop 24/7 – 365 … Thank you.

Stampin’ Technique Video & More …

Hello Stampin’ Friends,

Today I want to share with you a fun technique from Stampin’ Up …

This was one of the techniques that Stampin’ Up! showcased in our demonstrator magazine ” Stampin’ Success”.  It’s packed full of helpful stampin’ and business tips.  Just one of the many benefits of being a demonstrator.  Thinking about it??  Let’s talk.

I also want to share the video for February’s Paper Pumpkin …

Did you know that Stampin’ Up! extended the FREE MARKERS promotion when you sign up for Paper Pumpkin?

demoheader_paperpumpkin_demo_1.11-1.27.2014_US_CA

Afraid to make a monthly commitment … just try it for a month, you can cancel anytime, or just skip a month or two.   CLICK HERE FOR DETAILS

Have an awesome weekend ~

blog-closing-small

You make me HAPPY!

Hello Stampin’ Friends,

Yesterday I showed you a card using the watermark stamp from the “Happy Watercolor” Stamp set, and I will share another card with you today using that watermark!

I also included a few more stamps from the set to give you a better idea of what a versatile stamp set it is.  You can find the “Happy Watercolor” stamp set on page 22 of the Occasions Catalog or by clicking on the link.

Once I chose the flower, I picked the color I wanted to work with and I thought 2012-14 In-Color  “Primrose Petal” was just what I was looking for.  The “Primrose Petal” mat was cut to 4″ x 5-1/4″.

000_0798

Next I cut the Whisper White to 3-3/4″ x 5″ and ran it through the Bigshot using the “Flower Garden Embossing Folder”.  Because I wanted the flower pattern on the left side of my card, the pattern is indented instead of protruding (or sticking up).  Next I cut out a circle using the “Circle Collection Framelits”.  You now have a window for your flower.

The flower was stamped on a separate piece of Whisper White cardstock, using the Black StazOn ink … this is the best ink to use when coloring because it will not bleed.

I don’t color as much as I used to, and I don’t know why because it is so relaxing and fun to do.  I love layering the color to give the flower dimension.  I used the Primrose Petal ink from the ink pad and blender pen to do most of the coloring.  The center was done with the “Summer Starfruit” marker.  Both colors are found in the 2012-14 In-color Collection.  When competed, this was mounted onto the card front with the use of Stampin’ Dimensionals.

Since I had the marker close by, I decided to dye my Organza Ribbon.  Those ladies who stamp with me a lot, know that the white organza ribbon is one of my favorites, because all you need is a marker or an ink pad and you can color you ribbon to match your cardstocks!  How cool is that!!

Ok … now my ribbon is off to the side to dry, so I stamped my greeting onto the card with the Black StazOn (let dry… it does not take long) and then I inked up the watermark stamp in Primrose Petals and stamped directly over the greeting.  It gives balance to the card … they call it a 3 point card (3 points of interest, that draw your eye around the entire card).

000_0802

Before mounting the card front onto the mat I added my ribbon, first the long strip, and then tying the second ribbon around it, to create the bow.  I’m sure any one of your friends would love to get this card.

I also want to share with you the…

“WEEKLY DEALS”

3/16 Inch Corner Punch

Price: $6.95 $5.21
A Royal Day Ensemble -- Digital Download
A Royal Day Ensemble – Digital Download

Price: $14.95 $8.97
Etcetera Designer Series Paper

Price: $10.95 $8.21
Gold & Silver Stampin' Glitter
Gold & Silver Stampin’ Glitter

Price: $7.95 $5.96
In Color Dahlias
In Color Dahlias

Price: $7.95 $5.96
Label Insert Pop' n Cuts Die
Label Insert Pop’ N Cuts Die

Price: $21.95 $16.46
Petals-A-Plenty Textured Impressions Embossing Folder Die

Price: $7.95 $5.96
Silver Metallic Encore Pad

Price: $9.95 $7.46

Please let me know if you have any questions about the steps to make the card, or with the “Weekly Deals”.  I will also include a list of the ingredients for today’s card for you below.

Thank you so much for stopping by today.

Have a wonderful Wednesday!

blog-closing-small

Here is the list of ingredients I used today …

133188

 Happy Watercolor Stamp Set – Wood / $29.95

133191

 Happy Watercolor Stamp Set – Clear / $21.95

126858

 Primrose Petals Ink Pad / $5.95

126841

 Primrose Petals Cardstock / $6.95

126856

 2012-14 In-Color Markers / $14.95 (Set of 5)

102845

 Blender Pens / $9.95 (Set of 3)

123113

 Flower Garden Embossing Folder / $7.95

130911

 Circle Collection Framelits / $26.95

114319

 5/8” Organza Ribbon – Whisper White / $5.95

 You may view or purchase any of these items just by clicking on the item number.  It will take you directly to my stampin’ store.  Shop 24/7 – 365 … Thank you.

Lovely & Lace

Hello Stampin’ Friends,

Hope you have a “fab”ulous weekend!  Thanks so much for the comments and for sharing my blog!  Please … feel free to share with all your friends, that is what stamping is all about, a collection of fun, creative minds.

On January 29th, I introduced that stamp set “You’re Lovely”, from the Sale-a-bration catalog and said that it coordinates with the Deco Labels Collection Framelits (and that I would be ordering them).  Well … they have arrived and I got a chance to use them this weekend.  I don’t know how I got along without them – they work nicely with our circle punches too!

I used the same stamp as I did in January, but will be sure to make more for you with the others.  I then cut it out with the Deco Labels Framelit and also cut a mat from Basic Black.

000_0743

I wanted the pretty flowers to pop, so I used the Real Red ink pad and a Blender Pen to color them in.  I went over the greenery with the “Wild Wasabi” Stampin’ Write Marker.

Then I wanted to use some Designer Series Paper for my card and decided to use the “Modern Medley” … I think it suits this stamp nicely.

Next I wanted to add a touch of lace, but with the light background and the polka dots, it was a bit hard to see.  So, I decided to thread a pop of color in it.  There is a definite pattern in the lace ribbon so I used that for the spacing of the weave.

I used the needle from the “Heartfelt Banner Kit” – the end of the needle is not sharp but still goes through the lace.  Once you get the ribbon up to the lace, you just wiggle it through sideways.  It’s a bit tricky at first, but once you get the hang of it, it goes pretty good.  I also tied a bow (the fork bow) and attached it with Glue Dots.

To finish off my card, I felt I need something at the bottom … so I colored my Pearls with a Black Sharpie Marker (permanent marker) and added them to the bottom to balance out the card.  I also added 2 to the greeting to complete the look.  I love black pearls!  In fact, you can have whatever color you want … Sharpie makes a variety of colors.

000_0744

I have added my list of ingredients to the bottom of my post … You will notice that if you order the items shown here today – You will get the “You’re Lovely” Stamp set for FREE!

Thank you for stopping by my blog today.

Have a wonderful week ~

blog-closing-small

Here is the list of ingredients I used today …

133575

 You’re Lovely – Wood / FREE with $50 purchase

133578

 You’re Lovely – Clear / FREE with $50 purchase

126926

 Modern Medley Designer Series Paper / $10.95

130102

 Deco Labels Collection / $24.95

108481

 5/8” Crochet Trim / $6.95

119251

 1/8” Taffeta Ribbon – Real Red / $5.95

119247

 Pearls Basic Jewels / $4.95

Please note that these items were put together so you could receive the “You’re Lovely” stamp set for FREE.  If you click on the item number, it will take you directly to my Stampin’ Store on my Website or go to www.lindaluvs.stampinup.net

Thank you!

MainAd_SAB_OLO_Jan2814_US

Watercolor Technique Share …

Hello Stampin’ Friends,

Today I want to share with you, a beautiful “Watercolor Technique” that I teamed up with 2 of the spectacular products from our “Weekly Deals”.  I say that because I love both of these items … the “Flower Garden Texture Impressions Folder” and the Daffodil Delight Seam Binding.

Daffodil Delight 1/2″ Seam Binding Ribbon
Item # 125583
Regular Price: $6.95 US
Discounted Price: $5.21 US
Flower Garden Textured Impressions Embossing Folder Item # 123113
Regular Price: $7.95 US
Discounted Price: $5.96 US

I began with the “Shimmery White” cardstock… it works very well for this technique.  The Whisper White does not work, it absorbs the water too quickly.  You will also need re-inkers, paint brush and a spritzer.

000_0679

I ran the Shimmery White cardstock through the Bigshot using the Flower Garden Embossing Folder… then spritz!  Don’t over saturate your paper… remember, less is more.  You can always add more water.

I squeezed a few drops of ink out of the re-inker into something plastic, then dipped my Aqua Painter tip into the ink and “dotted” it into the flower.  The ink spreads quickly!

You can use a paint brush if you do not have a Aqua Painter yet, they work nice because you can add a bit of water when using them.

I did the flowers first, as the water absorbs into the cardstock, I added more ink to the area’s I wanted darker.  I did the green last … then spritzed a bit more to add to the watercolor look.

It may take a try or two the get the look your want, just keep in mind that “less is more” … too much spritzing with water could muddy your card.

You must let it dry, and I suggest using “Sticky Strip” as your adhesive because it will hold the card much better.  Because the cardstock is warped from the water, it has a tendency to pull away from your base card when using regular adhesive.

I added the Daffodil Delight seam binding to balance the card, and topped it off with a greeting from the “A Dozen Thoughts” stamp set, which anchors the card.

000_0680

It’s hard to see the “shimmer” from the photograph but it is stunning!  I really love working with this paper.  Hope you enjoyed today’s technique / card share.

Thank you for stopping by my blog today!

Have an wonderful day ~

blog-closing-small

Here is a list of supplies used for today’s card …

 ITEM

 PRICE

 DESCRIPTION

131056

$26.95

 A Dozen Thoughts Stamp Set – WOOD

131059

$18.95

 A Dozen Thoughts Stamp Set – CLEAR

101910

$7.95

 Shimmery White Cardstock

126185

$2.95

 Stampin’ Spritzer (2)

103954

$16.95

 Aqua Painters (2)

123113

$5.96

 Flower Garden Impressions Folder (ON SALE)

125583

$5.21

 Daffodil Seam Binding (ON SALE)

119851

$16.95

 Curly Label Punch

104294

$6.95

 Sticky Strip

Clicking on the item number will link you to my on-line store.  THANK YOU!

Extending the fun … Technique!

Hello Stampin’ Friends,

Hope you enjoyed your weekend… yesterday was filled with sunshine!  Just what our endorphins needed.

Today I would like to share with you a project that I did with my Technique Clubs this month.  They learned a sweet tip on how to extend the card length when using the Thinlit Dies.

I will also share two different Designer Series Paper and how they can change the look of a card.  My first card was done with the Sweet Sorbet Designer Series Paper – a FREE product that can get with a Sale-a-bration purchase of $50 or more.  (Sale-a-bration begins January 28th).  Now that’s YUMMY!

000_0627_0001

I love how the “Needlepoint Border” folder matches the designer paper.  I highlighted the stitching by dragging the “White Stampin’ Chalk Marker” over the top of it.  It really completes the card.

I used “Crisp Cantaloupe” cardstock, but the photo is making it look a bit “pinky” …. sorry!

Stampin’ Tip to Extend Card Length …

000_0630

Slide cardstock underneath the circle area of the die – leaving the other side of cardstock “above” the die (See Photo)

000_0626_0001

When you have the cardstock over the top of the die, it will not cut… however, it leaves a nice score line for you to fold the extended card over.  It will fit into the envelope perfectly.

Here is a shot of both of the cards.  I promised the ladies I would post them both because some classes used the “Sweet Sorbet” and the other class used the “Watercolor Wonder”.  Both look amazing, but still very different.

000_0625_0001

I think you could put the “Watercolor Wonder” Designer Series Paper on any card and make it look good.  Here I just replaced the Basic Black punched circle with the “Tangerine Tango” … a suggestion from Richella.  I love the way it looks!  Thanks for the help Richella!

You will find the Watercolor Wonder Designer Series Paper along with the “Perfect Pennants” Stamp Set in the Occasions Catalog.  I have listed supplies to create the cards at the bottom of the blog.

000_0570BB

I hope you can now extended the fun on your cards by using this little stampin’ tip.  It gives you much more room to write (or stamp on)!

Have a great day!

blog-closing-small

Here is a list of supplies used for today’s card …

 ITEM

 PRICE

 DESCRIPTION

133227

$29.95

 Perfect Pennants Stamp Set – WOOD

133230

$21.95

 Perfect Pennants Stamp Set – CLEAR

133480

$32.95

 Circle Card Thinlets Die

129383

$7.95

 Needlepoint Border Embossing Folders

130911

$26.95

 Circle Collection Framelit Dies

120906

$26.95

 2-1/2” Circle Punch

130685

$39.95

 Magnetic Plateform

132994

$10.95

 Watercolor Wonder Designer Series Paper

Clicking on the item number will link you to my on-line store.

Sending Love …

Hello Stampin’ Friends,

Today my card share is from one of the most requested card classes I receive… sympathy cards.   Usually when we go to our stamping spots to create, we are happy and make fun birthday cards for friends and family.

It seems to me that when you need a sympathy card, that is the last thing you want to do … so I am going to help out in 2 ways today.  First, my card share and then to invite you to an upcoming card class designed around those occasions when our hearts are just not into stamping … My “Open Hearts Class”.

Just remember, even though it’s a difficult time, the card you make to cheer someone up when they’re sick or comfort someone who’s lost a loved one – those cards forever touch their hearts.

000_0485

I began with the “Blessed Easter” stamps (comes in wood only) and just omitted the Easter greeting.  I did this by the “Direct to Rubber” technique, using markers to color the image.

The colors I chose were Elegant Eggplant and Wild Wasabi.  I then used the “Blender Pen” to pull color off my marker tip, and add it to the card, creating a watercolor look to the flower.

My salutation (greeting) comes from the “Love & Sympathy” stamp set found on page 68 of our catalog.  To add a touch of texture to the card, I used the “Flower Garden” embossing folder.  It’s very subtle but it added a nice touch to the card.

000_0482

Simplicity is key… for those making the card and those who receive it … just a heartfelt note to let them know you are thinking of them and that you care.

I will be posting my “Open Hearts Class” on my website www.lindaluvs.stampinup.net  I will post full details including class details and time.  Date for this class will be Monday, February 24th.  Mark your calendar and save the date!

Thanks so much for stopping by today!

blog closing-small

Circle me happy …

Hello Stampin’ Friends,

As I said yesterday … I would make you a card from some of the items listed in the “Weekly Deals.”

Today’s card will feature the “Circles Collection Framelits” and the “Bermuda Bay Ink Pad“.  You will also get a “Sneak Peek” from the the New “Blessed Easter” stamp set!  Available January 3rd … tomorrow!!

Circles Collection Framelits Dies

Circle Collection Framelits Dies
Item # 130911
Regular Price: $26.95
Discounted Price: $20.21

Bermuda Bay Classic Stampin' Pad

Bermuda Bay Classic Pad Item #131171
Regular Price: $5.95
Discounted Price: $4.46

I have always wanted to make a “Circle” card, and since I was featuring the Circle framelits, I thought… “no better time than the present!”  What do you think?

000_0565B

I used the Bermuda Bay and Coastal Cabana cardstock and inks.  To create the circle card, you begin with a “folded” piece of cardstock.  Align your circle die (here I used the largest, which is the scallop) above the fold.  This will give you a folded card.  If you place it under the fold… you will end up with 2 circles.  Next, I layered the colors by size so I would end up with the white center.

I then inked up the flower from the “Blessed Easter” stamp set (in the new Occasions catalog) with the Coastal Cabana ink … “omitting” the greeting.  The greeting on today’s card comes from the stamp set “Yippee Skipee” found on page 37 of the main catalog.

000_0566

To complete my card and add a bit of dimension, I used my blender pen and added some of the Bermuda Bay color into the tulips.

Thanks for stopping by today.

Have an awesome week!

blog closing-small

Here is a list of supplies used for today’s card …

 ITEM

 PRICE

 DESCRIPTION

130911

$20.21

 Circle Collection Framelits

131171

$4.46

 BermudaBay Ink Pad

131197

$6.95

 BermudaBay Cardstock

131341

$18.95

 Yippee Skippee Stamp Set – WOOD

131344

$14.95

 Yippee Skippee Stamp Set – CLEAR

102845

$9.95

 Blender Pens (Set of 3)

Clicking on the item number will link you to my on-line store.

More card shares …

Hello Stampin’ Friends,

Today I would like to share with you, three more cards that we made at our Star’s Christmas Party.  We did what we call a “shoebox swap” … each participant designs a card and then cuts, and brings everything needed to make that card, then everyone at the event gets to make each others cards … it’s fun!

Would you be interested in joining in on a shoebox swap?  Let me know, I’d love to host it.

I thought I would start with Connie’s card ….

101_2304

My technique groups should recognize this, we just did the “Stained Glass” technique.  Here is another wonderful card idea for you.

Connie used the “Joyful Christmas” stamp set from the Holiday Catalog (good through January 3rd) and the “Silver 1/8″ Ribbon“.  I love that Connie did her card with Silver embossing, we did ours in gold …. such a small change can make the entire card look different, and both cards are beautiful.

Next, is Ren’s card.  Ren is Connie’s daughter and has been stamping with us for quite a while.

101_2305

Don’t you just love it!  We all love a good “punch” card and this one is so cute!  Ren had all the pieces cut so we didn’t even have to cut the door … we just embossed it with the new “Stylish Stripes” embossing folder.

For the wreath, we used the 2-3/8″ Scallop Circle Punch and the 1-3/4″ Circle Punch.  The trick here is to punch out the circle first … then center the scallop punch over the circle to create the perfect wreath!  The punches along with the adorable “Glimmer Brad – Brights Collection ” are found in our main Idea Book & Catalog.

Now I’d like to share with you, Susan’s card… a Tri-fold Easel Card!

101_2311

If you’re looking to impress someone, this will do it!  This beautiful card showcases the “Modern Medley” Designer Series Paper.  Anyone who knows me, knows this is one of my favorite Designer Papers in the catalog …. I find it so versatile.

The greeting “Your Kindness means so much” comes from the stamp set “From My Heart” … also found in the main catalog.

I hope you enjoyed today’s card share … I loved making these beautiful cards with these wonderful ladies.  I can’t think of a better day, than stamping with my friends.

If you are interested in any of the items listed to make these cards, you can just click on the link (words highlighted in pink) to view or purchase.

Have an awesome day!

blog closing-small

Chalkboard Technique …

Hello Stampin’ Friends,

You don’t have to live in Wisconsin these days to feel the wrath of the weather … snow, freezing rain, and below zero temperatures are hitting over half our country!  WOW …

598439_677877612234577_1627976062_n

I thought this artwork was cute and it fits in with today’s card and technique share: Chalkboard Technique

What better way to say it’s cold outside than with snowflakes.  My club members will recognize this card because it is one of the two designs they made in November, when they learned the “Chalkboard” Technique.

000_0468

Besides the black cardstock seen here, I also used Soft Sky.  I wanted something blue, but I didn’t want to over power the white and black.

I will share with you the steps it takes to create this card. I’ve been know to break down techniques to the most basic level or recreate them so they are simpler, and keeping it more fun to do!

DIRECTIONS:
1) Swipe the embossing buddy across your black cardstock to prevent stray embossing powder from sticking to unstamped areas.

2) Arrange your stamps in a desired pattern and stamp in White Craft or Versamark ink

3) Sprinkle white embossing powder over stamped areas, shake off excess and heat with embossing gun.

4) Add details (such as a border or other doodles) with chalk marker.

5) Rub embossing buddy in the corners and around sentiments to resemble chalk dust.

000_0467

My clubs not only make 2 projects using the technique they’re learning, but create a “Technique Sheet!”  They are easily stored in a 6 x 6 scrapbook so they can refer to them when they want to recreate a technique.  It is my most popular club!  My members also receive the “hostess benefits” … free stamps and accessories!

If you and 5-7 of your friends want to get together and learn techniques … I will start one for you beginning in January.  Just email me at lindaluvs2stamp@aol.com

If you haven’t noticed … I want to point out that I have used the same two stamp sets that I used on yesterday’s card … the Festive Flurry and Joy to the World stamp sets.  It’s great how you get a totally different look even when using the same stamp sets!

I love showing you different ways to use your stamp sets and accessories…  it makes them more cost effective for you!

000_0469

Thanks so much for stopping by … I’ll have more for you tomorrow!

blog closing-small

Here is a list of supplies used for today’s card …

 ITEM

 PRICE

 DESCRIPTION

 131778

$39.95

 Festive Flurry Stamp Set – WOOD

 131781

$29.95

 Festive Flurry Stamp Set – CLEAR

 131796

$21.95

 Joy to the World Stamp Set – WOOD

 131799

$16.95

 Joy to the World Stamp Set – CLEAR

 103083

$5.95

 Embossing Buddy

 101731

$7.50

 Whisper White Craft Ink Pad

 129053

$29.95

 Heat Tool

 109132

$4.75

 White – Embossing Powder

 132133

$3.50

 White Stampin’ Chalk Marker

 119246

$4.95

 Rhinestones

Clicking on the item number will link you to my on-line store.

Sparkle with Joy …

Hello my Stampin’ Friends,

Hope you made it through “Black Friday” … that is my day to stay home and relax and begin to decorate for the upcoming Christmas holiday season.

For my card share today, I have decided to focus on the Holiday Catalog… there are so many fabulous items in there!

000_0420

The focal point of the card is the poinsettia from the “Joyful Christmas” stamp set.  Remember, when you click on the items highlighted – you will be able to view the product 🙂  I also want to let you know that “Joyful Christmas” is currently on sale too!!

I heat embossed 2 poinsettia’s in white onto vellum cardstock, and then cut them out.  They are adhered together with stampin’ dimensionals, then attached with the dimensionals to give them that “pop” on the card.

I have chosen the “Winter Frost Specialty” Designer Series Paper, I also have the paper pack, both are great additions to your Designer Paper collection.  I have used the Midnight Muse as my core color.  To accent, I used the “Silver 1/8″ Ribbon”.

I used the “Joy to the World” stamp from the “Joy to the World” Stamp set.  Because of it’s design, I chose to color it in, yet leave the rough edges.

000_0419

To finish it off … I added the smallest of the rhinestones to the designer paper.  Ok … so it’s not a card you would send to 100 people (not really cost effective) but if you were looking for that special card for someone who loves “sparkle” … this is the card you were looking for!

Have a fabulous weekend!

Thanks so much for stopping by.

blog closing-small

Here is a list of supplies used for today’s card …

 ITEM

 PRICE

 DESCRIPTION

 131802

$22.95

 Joyful Christmas Stamp Set – WOOD

 131805

$16.95

 Joyful Christmas Stamp Set – CLEAR

 131796

$21.95

 Joy to the World Stamp Set – WOOD

 131799

$16.95

 Joy to the World Stamp Set – CLEAR

 132341

$12.95

Winter Frost Specialty  Designer Series Paper

 132137

$4.95

 Silver 1/8” Ribbon

 119246

$4.95

 Rhinestones (Basic) Jewels

 110856

$6.50

 White Vellum Cardstock

Clicking on the item number will link you to my on-line store.

Hope is beautiful …

Hello Stampin’ Friends,

I hope you had a wonderful weekend.  Mine was good … I had one of my Technique Club groups this Saturday morning.  I was asked if I had the stamp set “Blooming with Kindness”, my response was … “why yes I do”.  So today’s card share is a card that I created using this beautiful stamp set.

000_1383

The card itself is quite simple to create.  I began by inking up the flower image with VersaMark™ and then heat embossing with “Clear” Embossing powder.  Once embossed, I inked up a sponge dauber with Pink Pirouette ink and applied it over the clear embossed flower.  The flower appears magically, and gives the card a soft glow.

I paired up the Pink Pirouette with Early Espresso … the stark contrast of colors blend so beautifully together.  I didn’t want to stamp on the Espresso but I thought that it still needed something.  That something was texture … so I used the Delicate Designs Embossing Folder and ran the lace scallop down the side.

The word “Hope” is part of the “Blooming with Kindness” stamp set, and is part of the reason I bought it.  I love the greetings and the font… so pretty.  I used the Large Oval punch for the greeting and the Scallop Oval to mat our greeting.

000_1383

This card was a Make -n- Take from one of my Star’s Meeting, I was showcasing embossing techniques.  This is a form of the “Emboss Resist” technique.

Sandy my friend… so this is the card I created with the stamp set, I hope you and the rest of my readers enjoyed it.

Thank you so much for stopping by.  Have a great week!

blog closing-small

Here is a list of supplies used for today’s card …

 ITEM

 PRICE

 DESCRIPTION

 131961

$19.95

 Blooming with Kindness – WOOD

 126422

$14.95

 Blooming with Kindness – CLEAR

 102892

$15.95

 Sponge Daubers

 127023

$11.95

 Delicate Designs Embossing Folder

 119855

$19.95

 Large Oval Punch

 119856

$26.95

 Scallop Oval Punch

Clicking on the item number will link you to my on-line store.

Window to the World …

Hello Stampin’ Friends,

How are you this fine Friday?  It’s warming up a bit and the sun is shining today, and you are ready this blog … so it’s a good day!  I’m glad you are here.

Today I want to share a card that I had made in one of my technique classes last year.  I don’t usually post items that were done in my clubs or classes … but, I’m having technical difficulties with my camera.  And – this is a really cool card!

There are actually 2 techniques used on this card, reverse spotlighting and stamping on window sheets ….

000_1244

Don’t you just love it!  We began by creating a “mask” with the 2-1/2″ circle punch.  Once we had our mask, I chose to use the colors of a sunrise, something soft yet would pull your eye directly into the card.  Before pulling off the mask, we stamped the birds with “Basic Grey”.  I wanted you to see the image, but not over power the sunrise.

Next, we positioned the “Window Sheet” over the card and stamped the tree image onto it using Black StazOn.  It really pops … doesn’t it!  Using the window sheet gives the card a totally unique dimension.

The card is finished off with the beautiful “Daffodil Delight” Seam binding.  I love how easy the seam binding is to use, and the yellow completes the card.

Here is a list of supplies used for today’s card …

 ITEM

 PRICE

 DESCRIPTION

 132073

$24.95

 Serene Silhouettes – WOOD

 127324

$17.95

 Serene Silhouettes – CLEAR

 114323

$4.95

 Window Sheets

 120906

$16.95

 2-1/2” Circle Punch

 101406

$7.95

 StazOn Ink Pad

 125583

$6.95

 Daffodil Delight Seam Binding

Clicking on the item number will link you to my on-line store.

Thanks so much for stopping by …

Have an awesome day.

blog closing-small

Naturally Amazing Specialty Paper …

Hello Stampin’ Friends,

Hope you had a wonderful weekend!

Today I’d like to share with you the amazing “Natural Composition Specialty Paper” … and 2 very different ways to use this versatile product.  The designer paper comes with 2 sheets each of 6 single sided designs – no need to chose between sides on this one!  The patterns on the “Natural Composition Specialty Paper” have raised, shiny images, as if they were embossed.

Our first card is a super simple card with just a little surprise.

000_0297

It’s time to take out your brayer again… you can actually brayer any color onto this specialty cardstock, we used the Cherry Cobbler, and because the pattern is a clear emboss, the natural background comes through.

We added a simple tag with the “Vintage Trinkets” and pinned it to the beautiful “Victoria Crochet Trim”.  Sometimes simplicity is more beautiful than all that layering.  This is a perfect card when you need something quick, but want a touch of elegance.

Our next card is equally simple … just stamp and emboss.  Yes, you can emboss on this wonderful cardstock.

000_0293

The flowers come from the “Serene Silhouettes” stamp set and are embossed in gold.  The birthday greeting comes from the stamp set “Perfectly Penned”.  I love the natural tone of the card.

If you don’t have your package of  “Natural Composition Specialty Paper” … you may want to stock up, because it can be used for so much more.  I just wanted to show you two of my favorite techniques on this paper.

Here is a list of supplies used for today’s card …

 ITEM

 PRICE

 DESCRIPTION

 126917

 $12.95

Natural Composition Specialty Paper

 132073

 $24.95

Serene Silhouettes – WOOD

 127324

 $17.95

Serene Silhouettes – CLEAR

 128703

 $16.95

Perfectly Penned – WOOD

 122892

 $12.95

Perfectly Penned – CLEAR

 109129

 $4.75

Gold Embossing Powder

 129053

 $29.95

Heat Gun

 102395

 $12.95

Brayer

 118764

 $5.95

Vintage Trinkets

 118481

 $6.95

Victoria Crochet Trim

Clicking on the item number will link you to my on-line store.

Thanks for stopping by …

Have a great week!

blog closing-small