Category Archives: Techniques
Reverse Spotlighting Wow’s …
Hello Stampin’ Friends,
I hope you had a wonderful weekend. A bit dreary here in south eastern Wisconsin but I love that everything is still so green around here. Usually at this time of year, everything is dried out and brown.
On Saturday I posted the “Reverse Spotlighting” technique instructions, and promised to post a couple of cards to showcase this technique. So after taking Sunday off, I have two beautiful cards to share with you today.
First, I would like to start with a card that was created per the instructions that I gave to you on Saturday. My color combination is Pink Pirouette and Early Espresso. I love those two colors together.
The stamp set I used is “Betsy’s Blossoms” (Wood – 131955 / Clear – 126006) found on page 87 of the Idea Book & catalog…. the big one.
Just as the instructions stated, you stamp your imaged onto the cardstock … I did the pink onto Whisper White, then punched out sections of my flowers with the 1-1/4″ Circle Punch (119861) found on page 182.
Then I stamped three flowers using Pink Pirouette ink onto Pink Pirouette cardstock and cut them out. Now you just line up the images and secure, and then assemble the rest of the card.
The greeting “get better” is from the stamp set “A Dozen Thoughts” (Wood – 131056 / Clear – 131059) in the Idea Book & Catalog on page 59. You can use a marker to eliminate the first “better” or just use the stamp pad to ink the area you want to use. The entire greeting is … “Better get better”.
I used the “Word Window Punch” (119857) on page 180 and the “Modern Label” (119849) punch on page 181. And to finish it off … I used the pretty “medium” size pearls ( 119247).
On the second card I wanted to give the classic “Reverse Spotlighting” technique a bit of a twist! Instead of using punches … I used the “Framelits” – Oval framelits (129381) to be exact! You will find these on page 186 of the catalog, along with the other framelits.
You follow the same concept, but you won’t have to do as much cutting … and who doesn’t love that!
I decided since I was going to give this technique a new twist, I would use a new stamp set. My choice was the beautiful poinsettia from the stamp set “Joyful Christmas” (Wood – 131802 / Clear – 131805) and you will find it on page 27 of the Holiday Catalog. If you need one … let me know.
I can’t wait any longer to show you …. I JUST LOVE THE WAY THIS CARD TURNED OUT!!
I kept the color pallet on this card very simple … Cherry Cobbler and Whisper White, with the Silver Glimmer paper (124005) to give it that “WOW”. The “Rhinestones” (119246) accent nicely with the glimmer paper and still keep the overall feel – clean and simple.
Again, I stamped the Cherry Cobbler ink onto both the Whisper White and Cherry Cobbler cardstock.
The white cardstock is actually “popped up” and away from the glimmer paper to give it more dimension.
I hope you enjoyed today’s cards … and I would love to hear your thoughts, so please feel free to comment.
Have a wonderful week …
Reverse Spotlighting Technique
Hello Stampin’ Friends,
Ahhh … the weekend has begun! If you are bored this weekend, I have a fun technique I’d like to share with you. I’ll keep it quick and simple so you can get to stamping.
Directions:
1) Stamp your chosen images on card stock.
2) Randomly punch out desired shapes. Be sure to overlap parts of your stamped images.
3) Stamp and cut out the same images on a separate piece of card stock. Color as desired.
4) Line up and adhere images behind punched holes.
5) Mount piece to card and finish project.
Tomorrow I will post a couple of cards using this technique … so don’t forget to stop back!
Have an awesome day!
Guest Stamper … Eileen S.
Hello Stampin’ Friends,
Today I’m going to share another card from my downline meeting on Saturday. I didn’t post this with the Halloween themed cards is because it just didn’t quite fit in …
It’s a wonderful “man” card from the stamp set “Wetlands” (Wood – 126695 / Clear – 126697) found on page 69 of the big catalog.
The card was made by my sister and downline member, Eileen. I think her color choice suits a masculine card well… Night of Navy and Soft Suede. Love the look!
To add dimension, Eileen used the “Window Frames Collection” framelits (129021). You can find those on page 186 of the big catalog. Do you have a catalog? If not, let me know and if you are one of my customers I would love to get that to you right away.
You get added dimension by stamping the color on color like Eileen did with the wheat background.
Eileen added a fun design element by “Paper Piercing”. It is an age old technique made easy with the coordinating “Paper Piercing Pack – Festive” (127857 / page 179). Don’t you think that it adds that special touch to the card, and yet keeps it “masculine”. Who doesn’t need man cards!
Would you like to be a “Guest Stamper”? I would love to share your work … just please use Stampin’ Up! supplies. Contact me for the address.
Thanks for stopping by today.
August Best of 25 Stamp Set & Card
Hello Stampin’ Friends!
I was excited, as you can image, when I saw the Best of 25 flyer for August… I’m a bit of a Halloween fanatic, but never really expected Stampin’ Up! to release the best of 25 Halloween! But here it is, and it has some of my favorites too!
I love the house and the tree in this set, so today I’m going to share with you a card I created using the tree.
CLICK ON THE IMAGE TO VIEW FLYER / PRINT
For our 25-year anniversary, Stampin’ Up! is bringing back some of their favorite stamp images from the last quarter century and combining them into 12 sets, which will release— one set per month—during 2013. Even better, along with some great classic images, each “Best of” set will also include a never-before-seen image!
Hang on to your 25-year proof of purchase sticker, and adhere it to your Stampin’ Up!® collectors card, which is included with each stamp set. If you don’t have one, let me know … I will get one to you right away!
For every six Best Of sets you buy, you can send in your collectors card for a FREE set of your choice valued up to $14.95! Must be redeemed by April 30, 2014
If you click on the “Shop Now” button, it will take you to the Halloween section.
When you get to the Halloween items, check out the banner … Isn’t that cool. I just may have to create that for the Halloween party this year.
I used the “masking” technique to create the moon…. then sponged the sky with Elegant Eggplant and Night of Navy ink. I stamped all images with the black StazOn.
The greeting is from the stamp set “Halloween Bash” found on page 21 of the Holiday Catalog. After stamping it, I cut off the “celebrate” then the “halloween” … leaving a bit of the “crawly” so I could adhere the “celebrate” over the top. Hope that made sense! lol
I don’t know what it is about Halloween, but I really do enjoy the holiday! Must be the spooky movies I watched as a kid. Feel free to share you thoughts about Halloween, or this card! Thanks.
Have a wonderful day ~
Using scraps to make something CUTE!
Happy Tuesday Stampers!
How are you this fine day. I have to tell you, I was a bit in a struggle with this post today. You know, one of those days when your creativity bulb doesn’t seem to be shining as bright as it usually does. So, here is what I did …
I went into my stash of cards and started looking for some inspiration. I know, I know, I can go on Pinterest or other spots to find inspiration … but I make it my mission to create something “NEW” for you everyday! I invite you to follow me on Pinterest … create a board and pin any or all of my samples for quick reference.
So here is the card I came across, and when I had it on display in my Stampin’ Studio, everyone was raving over it. It’s different, and it’s pretty easy, and … it uses up our scraps! One of the best “techniques” we should all know.
The designer series paper on this card has since retired but the stamp set is “Make a Cake” found on page 17, and the greeting is from the “Sweet Essentials” stamp set, both sets are found in the 2013-14 catalog.
Now … onto my “UPDATED” version. I think it is too cute!
Isn’t this the best way to use up scraps! Then top if off with that cute little flower from the “Flower Shop” stamp set and you can’t go wrong. Really … “You can never have too much happy”! Isn’t that a cute saying? It comes from the stamp set Yippee-Skippee on page 37 of the 2013-14 catalog! It’s one of the FREE stamp sets I got when I went to convention this year. I love convention, it’s also a great place to be inspired, see old friend, making new ones and just have fun.
When using your designer scraps (and yes, you can use regular cardstock too) all you need to do is weave the scrap pieces together. I lay them out to see what colors I like next to each other. You need to be a bit careful when flipping it over to adhere it to your card so it doesn’t come apart. Mine is a bit crooked … Did you notice?
To help you with the products I used on this card, here is a list of ingredients:
|
ITEM |
PRICE |
DESCRIPTION |
|
$10.95 |
Gingham Garden Designer Series Paper |
|
|
$23.95 |
Flower Shop Stamp Set – WOOD |
|
|
$17.95 |
Flower Shop Stamp Set – CLEAR |
|
|
$16.95 |
Pansy Punch |
|
|
$18.95 |
Yippee Skippee Stamp Set – WOOD |
|
|
$14.95 |
Yippee Skippee Stamp Set – CLEAR |
|
|
$4.95 |
Rhinestone Basic Jewel |
|
|
$9.95 |
Stripes Embossing Folder |
So, next time you are looking for inspiration, you can always go back into your stash of cards, come back here and click onto one of the categories that describe the type of card you need, or find me on pinterest!
ONLY 2 MORE DAYS …
Offer Dates: July 1-31, 2013
Offer Details: Buy three packs of select Designer Series Paper and get one for free!
The Fine Print:
- These items do not qualify for the offer:
- Designer Series Paper Stacks
- Specialty Designer Series Paper
- Designer Series Paper ordered through hostess benefits
- Orders may be placed on any type of order (workshop, customer, or online).
- No limits. Order six? You’ll get two for free. Nine? You’ll get three for free.
- Check out our Designer Series Papers in the annual catalog pages 151, 153, and 154.
Choose from the Designer Series Paper packs below for super savings in July!: ENDS JULY 31st
- 130140 Soho Subway
- 131390 Afternoon Picnic
- 130138 I Am Me
- 129310 Gingham Garden
- 130129 Etcetera
- 130145 Birthday Basics
- 130144 Venetian Romance
- 130131 Eastern Elegance
- 126926 Modern Medley
- 126902 Polka Dot Parade
- 130814 Epic Day This and That
Did yo know, that if you click onto one of the words highlighted in pink, it will take you to a link to show you that item of viewing place. Check it out and let me know how you like it.
Have a great week!
Gettin’ ready … Halloween is just around the corner!
Hello Stampin’ Friends ~
A bit of a chill in the air this morning in Wisconsin … almost feels like fall. Which brings me to our card today – Halloween.
For those of you who have been stampin’ with me awhile, you know that Halloween is one of my favorite holidays! I think it’s just fun, and I love seeing kids dressed up… makes for so many wonderful memories!
Today’s card is wishing you a Halloween Hello from the stamp set “Halloween Hello” found in the Holiday Catalog on page 21. There a so many cute stamps included in this set, but I chose the bats for this one. I’m OK with bats as long as they are on my cards and NOT in my house! Ewwww… the stories I could tell.
This card as quite easy to make, begin with the Masking Technique, then sponge on the color. I used Daffodil Delight, Pumpkin Pie, Elegant Eggplant and Basic Black. I did stamp the bats with the Black StazOn (my favorite black ink).
Hope you can see the “glitter” on the bats… Oh my, Stampin’ Up! has glitter for us Halloween fanatics! You get both the Black and Orange Ultrafine Glitters! I think my bats may have turned out better (glitter wise) if I had used the Heat & Stick powder … but, I actually stamped my bats first and then masked and sponged.
I stamped the Halloween Hello greeting from my mask… love the clear stamps for that! Then put the mask in the 1″ circle punch and punched it smaller. I used the 1-1/4 circle punch again (original mask size – for moon) and punched a Pumpkin Pie mat for the greeting.
Couldn’t make a card without some noticeable texture, so a added a touch of pumpkin pie under the stamped piece and embossed it with the Woodgrain folder.
Here is a list of ingredients that I used to create today’s card: If you click on the item number, it will take you right to my store page, and you can get a better look at the product.
|
ITEM |
PRICE |
DESCRIPTION |
|
$18.95 |
Halloween Hello – WOOD |
|
|
$14.95 |
Halloween Hello – CLEAR |
|
|
$7.95 |
Black / Orange Stampin’ Glitter |
|
|
$4.50 |
2-Way Glue Pen |
|
|
$12.95 |
1” Circle Punch |
|
|
$15.95 |
1-1/4” Circle Punch |
|
|
$99.95 |
BigShot |
|
|
$7.95 |
Woodgrain Embossing Folder |
You may shop anytime, night or day (even in your jammies) with my on-line store. Don’t forget the Designer Series Paper promotion … Buy 3 – Get 1 FREE!
Do you love Halloween as much as I do? Then keep your eye out for an upcoming “Halloween Party”. We’ll be stampin’ cards & more!
Enjoy the rest of your weekend and I will see you tomorrow!
Layered Brayer Technique
Hello …
Oh my, weekends seem to pass so quickly! I have been busy preparing for my Hostess / Customer Appreciation and Kick-Off Party. I invite all my hostesses from the past Stampin’ Up! year to join me for dinner and a little bit of “spoiling”. Hostesses qualify for this exclusive event by having a stampin’ party or they are in one of my clubs.
I have all types of clubs: scrapbooking (2 – 12 x 12 pages), techniques (most popular / 2 cards and a 6 x 6 technique sheet) and stamp-n-scrap (they make a card and 1 – 12 x 12 page). I am currently filling my clubs for the upcoming 2013-14 stampin’ year. We begin in September and go through June… we meet only 1 night a month. I have weeknight, and Saturday clubs.
Membership includes your Make-n-Takes, all main and seasonal catalogs, club only specials / discounts, and an invitation to my hostess only appreciation dinner.
Here is one of the techniques my members have done in the past:
Layered Brayer
Directions:
1) Heat emboss your chosen images on Glossy White card stock using VersaMark ink and Clear Stampin’ Emboss powder. Bold images work best for this technique.
2) Ink your brayer with a light color of ink, and bray your card stock.
3) Use a sticky note or scrap paper cut to desired shapes and sizes to cover portions of your card stock.

4) Ink your brayer with a darker color of ink, and bray your card stock again.
5) Repeat process if extra layers desired.
6) Remove paper scraps and wipe embossed images to remove excess ink.
Let me know if you are interested in joining one of my clubs, or get your friends together (min. 8 – max.12) and I’ll do which type of club you and your friends are interested in.
New Stamp Set Parade … Day 4
Hello Stampers ~
It’s finally Friday … and my last day at Frabill. For those of you who have not heard yet, the company was sold and moved to Illinois. I chose to build my Stampin’ Up! business.
Today is our fourth installment of our new card parade, and it has a bit of a twist! A fun and easy technique for you too … White Washing!
Begin with the “Natural Composition Specialty” paper and the Craft White Ink Pad … and a sponge or sponge dauber. Ink up the sponge with the white craft ink and rub it all over the “Naturals Composition” paper. Let set for a bit, then with a paper towel, whip the excess ink off the pre-embossed paper… it really makes the pattern on the paper “pop”.
On that note … our card today has a “masculine” look!
Today’s featured stamp set is: CHALK TALK
It’s this technique cool?! It’s quick and easy, and a bit “manly”. I saw them doing this technique to antiqued furniture on all those home design shows. I also saw them do this to update the look of a fireplace!
I thought the “White Wash” technique would go good with a stamp set called “Chalk Talk!” I also wanted to give it a different flare by using a softer color . I “aged” the tag a bit by sponging the edges and crumpling (is that a word?) up the cardstock.
I finished the card off by adding the additional hearts … because when your thanking your man, you want to add a little heart ♥
Here is a complete list of supplies:
Stamp Set: CHALK TALK (W-130631 / C-130634)
Chalk Talk Frame Lits (129983) Coordinates with 3 stamp sets!
SAVE 15% WHEN YOU BUNDLE… the stamp set & punch (W-132731 / C-132730)
PUNCHES: Full Heart (119883) and Small Heart (117193)
Cardstocks: Basic Black (121045) Crumb Cake (120953) / Real Red (102482)
“Natural Composition” Specialty Paper (126917)
Ink Pads: Real Read (126949)
BigShot (113439) / NEW … Magnetic Platform (130658) and Framelits listed above
Stampin’ Dimensionals (104430)
If you need any of the supplies listed, you may shop 24-7 by clicking the link below.
Enjoy your weekend!
Thanks for stopping by.
Birthday Postage…
Hello Stampers ~
Yikes … I’m getting behind in my blogging duties! lol
I’m a little excited about today’s post – I’ve been wanting to use the “Postage Due” stamp set for a long time. Last night I finally sat down and began stamping. Wow, how easy it was to make this card, all the collage work is done for you!
I decided to do a simple “Sponging” Technique using a of couple of colors and see what happened … I used “Pool Party” and “Wisteria Wonder”. I was pleased with how nice they look together, and fit well with this design.
I just stamped the “Postage Due” image onto Whisper White with the Black StazOn and the began to sponge. I started with the Pool Party, leaving the center white, and then added the Wisteria. I also added some color to my punched additions using the sponges.
It’s hard to see from the photo, but I stamped the background using VersaMark.
Here is a list of supplies I used to create this card:
STAMP SETS:
Postage Due (W-128562 / C-126397)
Label Love (W-130619 / C-130622) Happy Birthday
En Francais (W-128562 / C-127790) Background stamp with VersaMark … hard to see on photo
PUNCHES:
Decorative Label (120907)
Artisan Label (130920) Coordinates with Label Love Stamp Set
Postage Stamp (122344)
CARDSTOCK: Whisper White / Pool Party / Basic Black / Perfect Plum
MISCELLANEOUS: Stampin’ Sponges (101610)
If you need any of the supplies used to create this card, just click the link below.
Feel free to leave a comment… I’d love to hear your thoughts.
Enjoy the remainder of your weekend!
Dream … The Open Sea
Hello Stampers!
Just a quick post today … I know your busy!
I wanted to share a card (I cased from a fellow demonstrator) that we did at one of my all day stampin’ events. It’s a great “MAN” card and we used the “Triple Time” Technique. It’s just perfect for the “Open Sea” stamp set (page 101)
The colors just make this card! We used Crumb Cake, Very Vanilla, and “my new black” …. Early Espresso!
I also want to show you a close up of the beautiful “Antique Brads” (117273) – they go with so many styles of stamping. This little one worked perfect for our nautical theme.
Have an awesome Saturday!
Simply Scored Spring Flowers …
Hello Stampers ~
I hope you’re enjoying the beautiful weather we have finally received! I see many facebook posts about getting your gardens in, so I thought I would share this pretty bouquet of flowers with you!
I took this picture at the 2011 Stampin’ Up! National Convention who’s theme that year was “GROW”… so what better way to convey the “grow” message than with flowers! They are so pretty and they spread cheer to anyone receiving them, and my guess, to the givers too.
They are quite simple to make… just get out your Simply Score Tool (122334) and your favorite Designer Series Papers or cardstock!
Accordion-folded Flower
Directions:
1) Cut card stock or Designer Series paper to 12″ x 3/4″.
2) Score strip every 1/4″ the entire length of the card stock and accordion fold the score lines.
3) Adhere ends of card stock together (Sticky Strip works best).
4) Holding the card stock with two hands, twist one edge of the strip into the center as shown to create a flower shape.
5) To hold the flower together, I use a hot glue gun and my Silicon Craft Sheet (127853) to hold shape in place. Just add a dot of hot glue directly onto your Silicon sheet and press the center of your flower into it. It’s soo cool … it just lifts right off and holds your flower firm.
6) Adhere a punched circle to the flower center on one or both sides.
Tip:Experiment with different sizes and score intervals to create the desired shape of your flower.
Have fun … and feel free to send me photos of your creations! I would love to see them.
SIMPLY SKETCHED …
Welcome stampin’ friends!
I am stoked about sharing my card with you today! WHY… you say?
Because it is one of my favorite new Hostess stamp sets …
“Simply Sketched”
This stamp set is a beautifully designed “sketch” style that just calls your name. Oh, and the greetings are so pretty! The card below is the “Make & Take” that I designed from my 2013 Spring Demonstrator Retreat! We used aqua painters to do the “Watercolor” technique on the flower.
The base is “Crumb Cake” cardstock. The pretty green “Pear Pizzazz” paper comes from the “Gingham Garden” Designer Series Paper pack. The “pop” of color is the NEW “Strawberry Slush” from the 2013-15 In-Colors.
I used the 2-1/2 inch circle punch (120906) on the flower and the “Window Frames Collection” Framelits (129021) for the mat. The pretty button came from the new “Very Vintage Designer Buttons” (129327).
OK… I can’t help it. I must share my swap card with you too! The Island Indigo color makes the card “pop” and was chosen to coordinate with the “Soho Subway” Designer Series Paper. And don’t you just love that little bird!?
Let me just say … “the picture in the catalog does not do this paper justice”. I simply fell in love with the Soho Subway Designer Series Paper (130140), it’s great for scrapbooking… and any type of card!
And FYI … the “Sympathy” is included in the Simply Sketched stamp set. Just click on the “Shop Now” button to purchase any of the items you saw here today.
A little reminder that the “Simply Sketched” is an exclusive Hostess set, which you can get FREE when you host a stampin’ party, join one of my clubs, or place an order of $150 (order with a friend or two!)
Have an awesome week!
My favorite new product …
Hello Stampin’ friends!
When I got my hands on the New 2013-14 Idea Book & Catalog, I knew right away what I had to have! For those of you who come to my annual Kick-Off party, you know I have a “My Favorite Stamp Set Contest” … and I still will, but I couldn’t wait to share this product with you!
The BIGSHOT … just like the Lone Ranger, now has a side kick you can’t be without! Meet Tonto!
The new Stampin’ Up! Magnetic Platform for Framelits & Edgelits (130658)
No more post-it notes since the magnet easily holds them in place! I can’t wait to get my hands on it, because you all know… I love my framelits!
Watch the video from Stampin’ Up! to see how easy it really works!
Now, you’ll need a cute idea to use with the new magnetic platform, here is a beautiful card that I received from one of my Star’s members Brenda Morateck! I just love the neutral color pallet on this card, it works well with the “COLLAGE” Technique she used.
The “Secret Garden” stamp set (page 94) and coordinating framelits (page 187) were used to create this card. Some of you will recognize the greeting as coming from the awesome stamp set “Lacy & Lovely” on page 117.
Hope you enjoyed today’s post, and my “Lone Ranger” reference … You know I’ll be going to see Johnny Depp as Tonto!Best Wishes …. for savings!
Hello Stampers ~
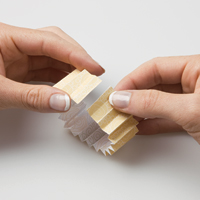
Today I am sharing two cards… Stampin’ Up! is having a sale on some of our most popular stamp sets. Two of mine, the “Petite Pairs” and “Sweet Essentials” are featured today!
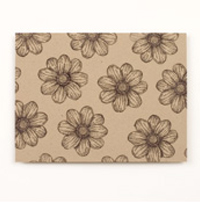
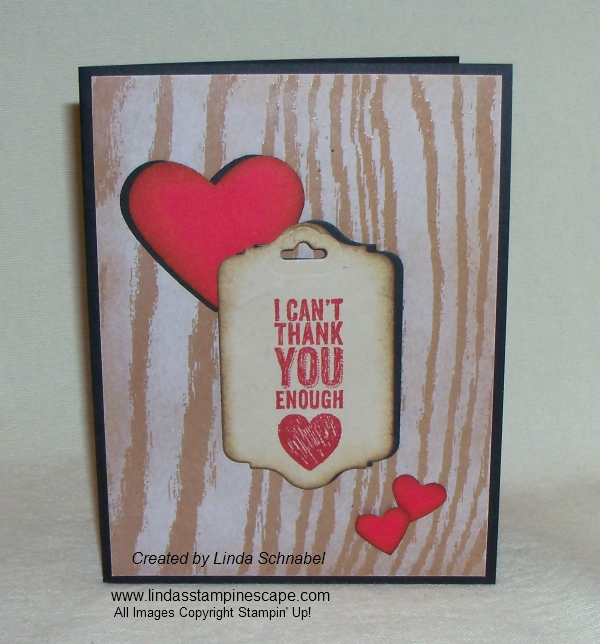
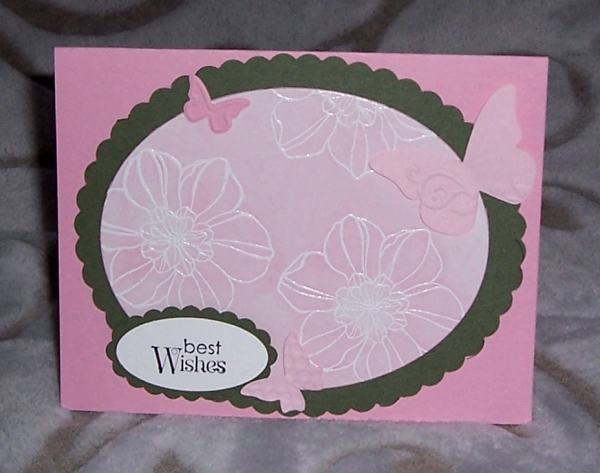
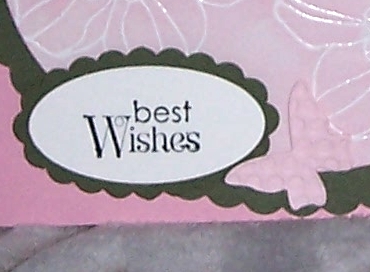
First, is a card that I received as a “swap” from my Star’s team member, Cindy Schneider. Our Star’s group meets once a month to stamp, swap, share ideas and business tips! Not to mention … we have fun too.
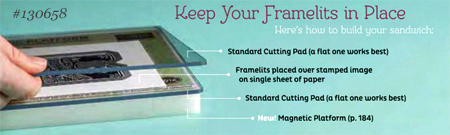
To create this card, we embossed in white, the flower from ” Secret Garden” (pg. 94) and then sponged with “Pretty in Pink” ink. Although that is one of the discontinued colors … there are plenty of pretty pinks you can use. The “Oval Collection” framelits (129381 / pg. 186) was used to cut the flower pattern out and frame it with the scallop mat.
Oh yes, I need to mention the contrasting cardstock is “Early Espresso”… I love the way espresso looks with the pastel colors (try it with Pool Party!)
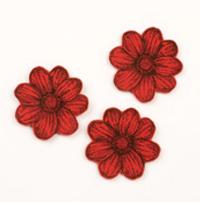
The card was embellished with the butterflies from the “Beautiful Wings” Embosslit die… these dies emboss onto the butterfly and cut them out for us! We also have buttons and heart embosslit dies, all are found on page 188 of the NEW Catalog.
I’m thrilled to tell you that the fabulous “Petite Pairs” stamp set, one of three that is currently ON SALE!
You can save 25% when you purchase one, two or all three of the stamp sets!
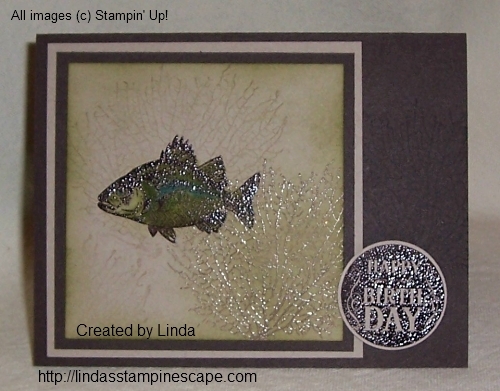
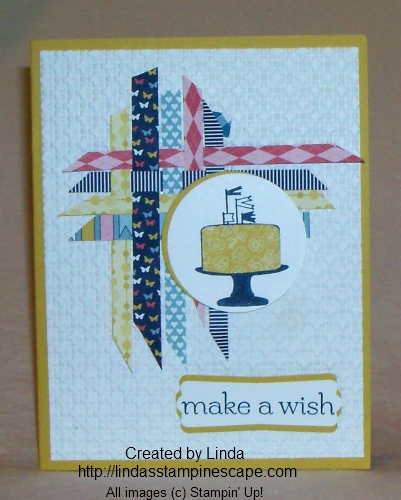
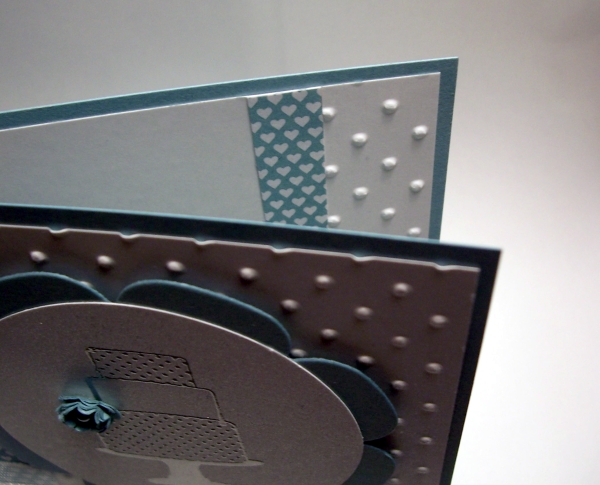
Now I’d like to share a card that I made a while back that features the “Sweet Essentials” (pg. 41) stamp set! ON SALE. And y0u’ll recognize the cake from yesterdays post … Make a Cake stamp set.
Little stampin’ tip …
If your making a special card for a wedding or special friend, embellish the inside of the card too!
It’s doesn’t take much, but it will leave a lasting impression.
Feel free to leave a comment about today’s post, I’d love to hear from you.
Have a great weekend and Happy Stampin’
Linda
Sale: 25 percent off three of our greeting sets!
No limits and get them on any order type (workshop, customer, demonstrator, or online).
Dates: May 31-June 30, 2013
| Sale Price | Retail Price | Description | Item |
| $17.96 | $23.95 | Sassy Salutations Wood-Mount Stamp Set | 132070 |
| $13.46 | $17.95 | Sassy Salutations Clear-Mount Stamp Set | 126707 |
| $14.96 | $19.95 | Sweet Essentials Wood-Mount Stamp Set | 132085 |
| $11.21 | $14.95 | Sweet Essentials Clear-Mount Stamp Set | 126457 |
| $21.71 | $28.95 | Petite Pairs Wood-Mount Stamp Set | 128706 |
| $15.71 | $20.95 | Petite Pairs Clear-Mount Stamp Set | 122497 |


